Mistral GC2030, GC2025, GC2020, GC,2016, GC2015, GC2011, GC2010, GC2006, GC2005
ENGLISH 4 ESPAÑOL 12 PORTUGUÊS 20 GC2005,2006,2010,2015,2020,2025,2030 TÜRKÇE 28
ENGLISH Important For optimal safety, read these instructions carefully and look at the illustrations before you start using the appliance. - Never leave the iron unattended when it is connected to the mains. - Young children should not be allowed to use the appliance without supervision. Keep an eye on children to make sure that they do not play with the appliance. - The soleplate of the iron can become extremely hot and may cause burns if touched.
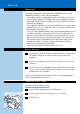
ENGLISH C 5 4 Pour tap water into the water tank by means of the filling jug and fill the tank to maximum level. Do not fill the water tank beyond the MAX indication. If the tap water in your area is very hard, we advise you to use distilled water. Do not use vinegar, starch or chemically descaled water. Setting the temperature 1 C N NYLO N NYLO IN LA OO W LINLIN EN S O IE S IL K L E N C OTOO N C OT T 2 3 4 B Put the iron on its heel.
ENGLISH C 2 Set the steam control to the appropriate steam position. - q for moderate steam (temperature settings 2 to 3) - w for maximum steam (temperature settings 3 to MAX) B Steaming will start as soon as the set temperature has been reached. ◗ Types GC2005, 2006, 2010, 2011, 2015, 2016:Water may leak from the soleplate if the set temperature is too low (MIN to 2). Ironing without steam 1 Set the steam control to position O ( = no steam). 2 Set the temperature dial to the recommended position.
ENGLISH 7 Shot of Steam (types GC2030, 2025, 2016, 2015, 2011, 2010 only) A powerful shot of steam helps to remove stubborn creases. The Shot-of-Steam function only works at temperature settings between 2 and MAX. C 1 Press and release the Shot-of-Steam button. Vertical Shot of Steam (types GC2030, 2025, 2016, 2015 only) C 1 The Shot of Steam function can also be used when you hold the iron in vertical position. Never direct the steam towards people.
ENGLISH 3 If the amber pilot light comes on after the iron has been moved, wait for it to go out before you start ironing. 4 If the amber light does not come on after the iron has been moved, the iron is ready for use. Cleaning and maintenance Calc-Clean The Calc-Clean function removes scale and impurities. Use the Calc-Clean function once every two weeks. If the water in your area is very hard (i.e.
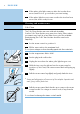
ENGLISH C 9 9 Put the steam control needle back by inserting the point of the needle exactly in the centre of the hole and by fitting the small projection on the side of the needle into the slot. Set the steam control knob to position O. Repeat the Calc-Clean process if the iron still contains a lot of impurities. After the Calc-Clean process - Plug in the iron to let the soleplate dry up. - Unplug the iron when the amber pilot light has gone out.
ENGLISH Information & service If you need information or if you have a problem, please visit the Philips Web site at www.philips.com or contact the Philips Customer Care Centre in your country (you will find its phone number in the worldwide guarantee leaflet). If there is no Customer Care Centre in your country, turn to your local Philips dealer or contact the Service Department of Philips Domestic Appliances and Personal Care BV.
ENGLISH 11 Troubleshooting This chapter summarises the most common problems you could encounter with your iron. Please read the different sections for more details. If you are unable to solve the problem, please contact the Philips Customer Care Centre in your country. See the worldwide guarantee leaflet for telephone numbers of the or visit our website at www.philipsonline.com. Problem Possible cause(s) The iron is plugged in but the soleplate Connection problem. is cold.
ESPAÑOL Importante Para una seguridad óptima, antes de empezar a usar el aparato lean cuidadosamente estas instrucciones y miren las ilustraciones. - Cuando esté enchufado a lared, no dejen nunca este aparato sin vigilacia. - Este aparato no está destinado a ser usado por chiquillos sin vigilancia. Los niños deben ser vigilados para asegurarse de que no juegan con este aparato. - La suela de la Plancha puede calentarse extremadamente y puede causar quemaduras si se toca.
ESPAÑOL C 13 4 Utilizando la jarrita para llenar, viertan agua del grifo en el depósito del agua y llénenlo hasta el nivel máximo. No llenen el depósito por encima de la indicación "MAX". Si el agua del grifo es muy dura en su zona, le aconsejamos usar agua destillada. No usen vinagre, almidón o agua químicamente descalcificada. Cómo ajustar la temperatura 1 C 2 N NYLO N NYLO IN LA OO W L LINLIN EN S O IE S IL K E N C OTOO N C OT T - 3 4 B Pongan la Plancha sobre su talonera.
ESPAÑOL Cómo planchar con vapor Asegúrense de que haya suficiente agua en el depósito del agua. 1 Ajusten el dial de la temperatura a la temperatura recomendada. Consulten la sección "Cómo ajustar la temperatura". C 2 Ajusten el control del vapor a la apropiada posición de vapor. - q para vapor moderado (Posiciones de temperatura de 2 a 3). - w para vapor máximo (Posiciones de temperatura de 3 a MAX). B El vaporizado empezará tan pronto como se haya alcanzado la temperatura seleccionada.
ESPAÑOL C 15 2 Presionen y mantengan apretado el botón del Vapor Extra durante un máximo de 5 segundos. 3 Para evitar que haya pérdidas de agua por la suela esperen, como mínimo, 1 minuto antes de volver a usar la función Vapor Extra. Chorro de Vapor (Solo en modelos GC 2030, 2025, 2016, 2015, 2011, 2010) Un poderoso chorro de vapor que les ayudará a eliminar las arrugas rebeldes La función Chorro de Vapor solo funciona a posiciones de temperatura entre 2 y MAX.
ESPAÑOL Para volver a calentar la Plancha : 1 Cojan la Plancha o muévanla ligeramente. 2 La lámpara piloto roja se apagará. Dependiendo de la temperatura de la suela, la lámpara piloto ambar de la temperatura se encenderá. 3 Si la lámpara piloto ambar se enciende después de haber movido la Plancha, esperen a que se apague antes de empezar a planchar. 4 Si la lámpara piloto ambar no se enciende después de mover la Plancha, esta está lista para el uso.
ESPAÑOL C 8 17 Estiren más del botón del control del vapor para sacar la aguja de control del vapor. Usen vinagre para eliminar las incrustaciones (Si las hay) de la aguja. No tuerzan o deterioren la aguja de control del vapor. C 9 Vuelvan a poner la aguja de control del vapor, insertándola exactamente en el centro del agujero y fijando el pequeño saliente del lado de la aguja en su ranura. Lleven el botón de control del vapor a la posición "O".
ESPAÑOL Cómo guardar la Plancha C 1 Desenchufen la Plancha de la red y lleven el control del vapor a la posición "O". 2 Vacíen el depósito del agua. 3 Dejen que la Plancha se enfríe. Enrrollen el cable de red alrededor del siltio para guardarlo y fíjenlo con la brida del cable. 4 Guarden siempre la Plancha sobre su talonera y en un lugar seco y seguro. Información y Servicio Si necesitan información o si tienen algún problema, visiten la página Web de Philips en www.philips.
ESPAÑOL 19 Guía de problemas Este capítulo reune los más comunes problemas con los que pueden encontrase con su Plancha. Para más detalles, lean las diferentes secciones. Si no pueden resolver el problema, contacten con el más cercano Servicio de Asistencia Técnica de Philips.Vean el folleto de la Garantía Mundial para hallar el número de teléfono del Servicio Philips de Atención al Cliente o visiten nuestra página Web en www.philipsonline.com.
PORTUGUÊS Importante Para sua segurança, antes de começar a usar o aparelho leia atentamente as instruções e consulte as ilustrações fornecidas. - Nunca deixe o ferro ligado à corrente sem vigilância. - Este aparelho não deve ser utilizado por crianças sem a supervisão de um adulto.Também as crianças devem ser mantidas à distância para não brincarem com o aparelho. - A base do ferro pode ficar extremamente quente e provocar queimaduras.
PORTUGUÊS C 21 4 Deite água da torneira para dentro do reservatório servindose da medida. Encha o reservatório até ao nível máximo. Não ultrapasse a indicação MAX. Se a água da torneira da sua área de residência for muito dura, é aconselhável usar água destilada. Não use vinagre, lixívia ou água descalcificada quimicamente. Selecção da temperatura 1 C N NYLO N NYLO IN LA OO W LINLIN EN S O IE S IL K L E N C OTOO N C OT T 2 3 4 B Coloque o ferro em posição de descanso.
PORTUGUÊS C 2 Coloque o controlo do vapor na posição adequada. - q para vapor moderado (temperaturas entre 2 e 3) - w para vapor máximo (temperaturas entre 3 e MAX) B O vapor começa a sair logo que a água atinge a temperatura seleccionada. ◗ Modelos GC2005, 2006, 2010, 2011, 2015, 2016: Pode pingar água da base do ferro se a temperatura for muito baixa (MIN a 2). Passar sem vapor 1 Regule o controlo do vapor para a posição O (=sem vapor).
PORTUGUÊS 23 Jacto de Vapor (apenas nos mod. GC2030, 2025, 2016, 2015, 2011, 2010) Um potente jacto de vapor que ajuda a remover vincos mais renitentes. A função de Jacto de Vapor só funciona com temperaturas entre 2 e MAX. C 1 Prima e solte o botão do Jacto de Vapor. Jacto de Vapor Vertical (apenas nos mod. GC2030, 2025, 2016, 2015) C 1 O Jacto de Vapor também pode ser usado quando se mantém o ferro na posição vertical. Nunca vire o jacto de vapor na direcção de ninguém.
PORTUGUÊS 3 Se a luz âmbar se acender depois do ferro ter sido movimentado, aguarde que ela se apague antes de recomeçar o trabalho. 4 Se a luz âmbar não se acender depois de o ferro ser movimentado, o ferro está pronto para ser usado. Limpeza e manutenção Limpeza do Calcário A função 'Calc-Clean' remove o calcário e as impurezas. Use a função 'Calc-Clean' todos os quinze dias.
PORTUGUÊS C 9 25 Volte a colocar a agulha no seu lugar, introduzindo a ponta da agulha exactamente no centro do orifício e encaixando a pequena saliência lateral da agulha na ranhura. Regule o controlo do vapor para a posição O. Repita o procedimento de limpeza (Calc-Clean) se ainda houver muitas impurezas no ferro. Depois de proceder à limpeza do calcário (Calc-Clean) - Ligue o ferro e deixe a base secar. - Desligue o ferro quando a luz âmbar se apagar.
PORTUGUÊS Informações e assistência Se necessitar de informações ou se tiver qualquer problema, por favor visite a página Philips na Internet em www.philips.com ou contacte o Centro de Informação ao Consumidor Philips do seu país (o número de telefone encontra-se no folheto da garantia mundial). Se não existir um Centro de Informação ao Consumidor no seu país, dirija-se a um agente Philips local ou ao Departamento de Service da Philips Domestic Appliances and Personal Care BV.
PORTUGUÊS 27 Resolução de problemas Este capítulo resume alguns dos problemas mais comuns que poderá encontrar no seu ferro. Por favor, leia atentamente os vários capítulos para obter mais informações. Se não conseguir resolver o problema, queira contactar o Centro de Assistência Philips mais próximo ou um dos seus representantes. Consulte o folheto da garantia mundial para saber os números de telefone das Linhas de Ajuda Philips ou visite o nosso endereço na web em www.philipsonline.com.
TÜRKÇE Önemli Güvenliğiniz açısından, lütfen cihazınızı kullanmaya başlamadan önce kullanma kılavuzunu dikkatlice okuyunuz. - Ütüyü kesinlikle fişi elektrik prizine bağlı ve sıcak halde yalnız bırakmayınız. - Küçük yaştaki kişilerin, cihazı yalnız başlarına kullanmalarına kesinlikle izin verilmemelidir. - Ütünün tabanı sıcak olduğundan, yanmamanız için dikkat ediniz. Elektrik kordonunu sıcak ütü tabanından uzak tutunuz.
TÜRKÇE C 29 4 Su tankını doldurma deliğinden su kabı yardımı ile maksimum seviyeye kadar doldurunuz. Doldurduğunuz suyun maksimum seviyesini geçmemesi için özen gösteriniz. Kullandığınız suyun cinsi çok sert ise, ütü suyu kullanınız. Kesinlikle sirke, çamaşır kolası gibi kimyasal birleşimli sıvılar kullanmayınız. Sıcaklık ayarı 1 C N NYLO N NYLO IN LA OO W LINLIN EN S O IE S IL K L E N C OTOO N C OT T Ütünüzü arka kısmı üzerine oturtunuz. 2 Sıcaklık ayar düğmesini istenilen sıcaklığa getiriniz.
TÜRKÇE C 2 Buhar ayarını istenilen pozisyona getiriniz. - q az buhar (sıcaklık ayarları 2 den 3 'e) - w kuvvetli buhar (sıcaklık ayarları 3 den MAKSİMUM 'a kadar) B Ütü istenilen sıcaklığa erişince istenilen buharı verebilirsiniz. ◗ GC2005, 2006, 2010, 2011, 2015, 2016 model ütülerde: Eğer sıcaklık çok düşmüşse (en az 2) tabandan su damlatabilir. Buharsız Ütüleme 1 Buhar ayar düğmesini "0" pozisyonuna getiriniz.(=Buharsız ütüleme) 2 Sıcaklık ayar düğmesini istenilen pozisyona getiriniz.
TÜRKÇE 31 Şok Buhar (Sadece GC2030, 2025, 2016, 2015, 2011, 2010 modelleri içindir) Şok buhar özelliği çok fazla kırışmış kumaşlar için idealdir. Şok buhar özelliği sadece (2ve Maksimum) yüksek sıcaklık derecesinde kullanılır. C 1 Şok buhar düğmesine basınız ve serbest bırakınız. Dikey buharlama ( Sadece model GC2030, 2025, 2016, 2015 için geçerlidir.) C 1 Cihazın şok buhar fonksiyonu , ütüyü dik olarak kullandığınız zaman da kullanılabilir. Buharı direk olarak insanlara doğru tutmayınız.
TÜRKÇE 3 Eğer ütü hareket ettikten sonra turuncu pilot ışık yanarsa, ütülemeye başlamadan önce sönmesini bekleyiniz. 4 Eğer ütü hareket ettikten sonra turuncu pilot ışık yanmıyorsa, ütü kullanıma hazırdır. Temizlik ve Bakım "Calc clean" Kireç temizleme Kireç temizleme- Calc Clean özelliği sayesinde buhar ünitesinde oluşan kum, kir gibi küçük zerrecikler temizlenir. İki haftada bir "Calc clean"kireç temizleme uygulanmalıdır.
TÜRKÇE C 9 33 Buhar kontrol düğmesinin çubuğunu deliğin tam ortasından sokarak "Calc Clean" - Kireç temizleme işlemini, ütünün içerisinde hala kireç ve tortular varsa tekrarlayınız. "Calc Clean"- Kireç Temizleme işleminden sonra - Ütüyü prize takarak tabanının kurumasını sağlayınız. - Pilot ışık sönünce ütüyü prizden çekiniz. - Ütünüzü yavaşça eski bir bez üzerinde gezdiriniz. Kalan su lekeleri tabandan çıkacaktır. - Ütüyü saklamadan önce soğumasını bekleyiniz.
Türkçe Bilgi ve Servis Ek bilgilere ihtiyacınız veya bir probleminiz olduğunda Tüketici danışma hattını arayabilirsiniz. Numaralarını garanti belgelerinde bulabilirsiniz. Veya web Sitemizi ziyaret edebilirsiniz. www.philips.com.tr Sorunlar ve Çözümler Bu bölümde ütüyü kullanırken karşınıza çıkabilecek en muhtemel sorunları özetleyecektir. Daha fazla ayrıntı için değişik bölümleri okuyunuz.
Türkçe 35 Sorunlar ve Çözümler Bu bölümde ütüyü kullanırken karşınıza çıkabilecek en muhtemel sorunları özetleyecektir. Daha fazla ayrıntı için değişik bölümleri okuyunuz. Eğer karşılaştığınız sorunları çözemeyecek durumdaysanız size en yakın yetkili Philips servislerinden yardım isteyebilirsiniz. Philips tüketici Danışma Hattının telefonlarını garanti belgelerinin içinden bulabilirsiniz. 0800 261 33 02 Problem Nedenleri Yapılması gereken Ütünün fişi prize bağlı olduğu halde, tabanının ısınmaması.