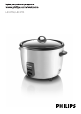
HD4718, HD4715
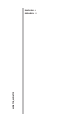
A 1 B C D E F L M G N H I O J K P
English 6 HD4718, HD4715 Español 11
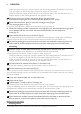
English Introduction Congratulations on your purchase and welcome to Philips! To fully benefit from the support that Philips offers, register your product at www.philips.com/welcome. General description (Fig.
English - This appliance is intended for household use only. If the appliance is used improperly or for professional or semiprofessional purposes or if it is not used according to the instructions in this user manual, the guarantee becomes invalid and Philips refuses liability for any damage caused. Place the rice cooker on a stable, horizontal and level surface. The accessible surfaces may become hot when the appliance is operating.
- English Make sure the inner pot is in proper contact with the heating element. To achieve this, turn the inner pot slightly to the left and right a few times inside the rice cooker. Make sure that the outside of the inner pot is dry and clean. Also make sure that there is no foreign residue on the heating element or the magnetic switch. 5 Put the lid on the rice cooker and put the plug in the wall socket. , The keep-warm light goes on to indicate that the appliance is on. (Fig.
English When the cooking process is finished, the rice cooker automatically switches to the keepwarm mode. The cook light goes out and the keep-warm light goes on. We advise you not to keep rice warm for more than 5 hours, to preserve its taste. The keep-warm mode does not switch off automatically. To end the keep-warm mode, remove the mains plug from the wall socket. , Cleaning Unplug the rice cooker before you clean it. Wait until the rice cooker has cooled down sufficiently before you clean it.
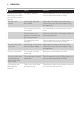
English Problem Cause Solution The keep-warm light The light is defective. does not go on when the cooking process is finished. Take the appliance to your Philips dealer or a service centre authorised by Philips. The rice is not cooked. Not enough water has been added. Add water according to the scale on the inside of the inner pot (see chapter ‘Using the appliance’). The cooking process has not started. You have failed to press down the control lever.
Español 11 Introducción Felicitaciones por su compra y bienvenido a Philips. Para aprovechar la ayuda que ofrece Philips, registre su producto en www.philips.com/welcome. Descripción general (fig.
- - Español Este artefacto fue diseñado exclusivamente para uso doméstico. Si se utiliza de forma incorrecta, con fines profesionales o semiprofesionales o de un modo contrario a lo que indican las instrucciones de uso, la garantía quedará anulada y Philips no asumirá responsabilidad alguna por los daños ocasionados. Coloque la arrocera sobre una superficie estable, horizontal y plana. Las superficies accesibles pueden calentarse cuando el artefacto está en funcionamiento.
Español 13 4 Coloque el recipiente interior en la arrocera. (fig. 4) - Para asegurarse de que el recipiente está en contacto con la placa de calentamiento, gírelo algunas veces hacia la izquierda y la derecha. - Asegúrese de que la parte externa del recipiente interior esté seca y limpia, y de que no queden restos en la placa de calentamiento ni en el interruptor magnético. 5 Cierre la tapa de la arrocera y enchufe el artefacto en la toma de corriente.
Español Al finalizar la cocción, la arrocera pasará automáticamente al modo de conservación de calor. La luz de cocción se apagará, y se encenderá la luz de conservación de calor. Le aconsejamos que no deje el arroz en el modo de conservación de calor por más de 5 horas para que no pierda sabor. El modo de conservación de calor no se apaga de forma automática. Para finalizar el modo de conservación de calor, deberá desenchufar la arrocera. , Limpieza Desenchufe la arrocera antes de limpiarla.
Español 15 Problema Causa Solución La luz de conservación de calor no se enciende cuando el proceso de cocción ha terminado. La luz está fallada. Lleve el aparato a su distribuidor Philips o a un centro de servicio autorizado por Philips. El arroz no está cocido. No ha añadido suficiente agua. Añada la cantidad de agua necesaria según la escala del recipiente interior (consulte el capítulo “Uso del artefacto”). El proceso de cocción no comienza.
2 3 4 5 6 7 8 9 10
4222.002.6725.