Always here to help you Register your product and get support at www.philips.
1
HD8651 ENGLISH 6 DEUTSCH 29 ITALIANO 53
ENGLISH Table of contents Introduction General description Important Danger Warning Caution Electromagnetic fields (EMF) Before first use Installing the machine Preparing for use Filling the water tank Filling the coffee bean container Heating up the machine Manual rinsing cycle Installing the Intenza+ water filter Using the machine Brewing 1 or 2 cups of espresso or regular coffee Frothing milk Hot water Adjusting the machine Adjusting the grinding degree Adjusting the coffee volume Cleaning and mainten
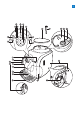
ENGLISH 7 General description (Fig.
ENGLISH -- Children shall not play with the machine. -- This machine is designed to grind beans and brew coffee. Use it correctly and with care to avoid scalding by hot water and steam. -- Do not pour liquids on the mains cord connector. -- Do not use the machine if the plug, the mains cord or the machine itself is damaged. -- If the mains cord is damaged, you must have it replaced by Philips, a service centre authorised by Philips or similarly qualified persons in order to avoid a hazard.
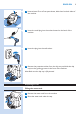
ENGLISH 9 3 Leave at least 15cm of free space above, behind and on both sides of the machine. 4 Insert the small plug into the socket located on the back of the machine. 5 Insert the plug into the wall socket. 6 Remove the protective sticker from the drip tray and slide the drip tray into the guiding grooves in the front of the machine. Note: Make sure the drip tray is fully inserted. Preparing for use Filling the water tank 1 Remove the water tank from the machine.
ENGLISH 3 Fill the water tank with cold tap water up to the MAX indication. Never fill the water tank with warm, hot or sparkling water, as this may cause damage to the water tank and the machine. 4 Slide the water tank back into the machine. Filling the coffee bean container 1 Fill the coffee bean container with espresso beans. Only use espresso beans. Never use ground coffee, unroasted coffee beans or caramelised coffee beans, as this may cause damage to the machine.
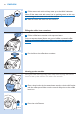
ENGLISH 11 3 When the warning light flashes quickly, turn the control dial to the hot water icon and wait a few seconds. ,, The warning light goes out and some water comes out of the hot water/steam wand or classic milk frother. 4 After a few seconds, when hot water stops coming out of the hot water/steam wand and the warning light flashes slowly, turn the control dial back to the coffee bean icon. ,, The machine is heating up and the on/off button flashes slowly.
ENGLISH 5 Place a bowl under the hot water/steam wand or classic milk frother. 6 Turn the control dial to the hot water icon. 7 Let the water flow until the water tank is empty. ,, The ‘water tank empty’ light lights up continuously. 8 Turn the control dial back to the coffee bean icon. 9 Fill the water tank with fresh water up to the MAX indication. ,, The machine is ready for use. Note:The first cups of coffee may be a bit watery, this is normal.
ENGLISH 13 2 Remove the filter from its packaging and immerse it in cold water with the opening pointing upwards. Press the sides of the filter gently to let out the air bubbles. 3 Turn the knob of the filter to the setting that corresponds to the water hardness of the area you live in. A Soft water B Hard water (default) C Very hard water Note:You can test the water hardness with a water hardness test strip. 4 Place the filter in the empty water tank. Press it down until it cannot move any further.
ENGLISH 3 Press the espresso button or regular coffee button. Note:You can interrupt the brewing cycle at any time.To do this, press the same button (for espresso or regular coffee) that you pressed to start brewing coffee. -- Press the espresso button or regular coffee button once to brew 1 cup of coffee. ,, The machine grinds the required amount of coffee beans for one cup and then brews one cup of coffee. -- Press the espresso button or regular coffee button twice to brew 2 cups of coffee.
ENGLISH 15 4 Fill a jug up to 1/3 with cold milk. Note: Use cold milk (at a temperature of approximately 5°C/41°F) with a protein content of at least 3% to ensure an optimal frothing result.You can use whole milk or semi-skimmed milk, depending on your preference. 5 Immerse the hot water/steam wand or classic milk frother in the milk and turn the control dial to the steam icon. Froth the milk by gently swirling the jug and moving it up and down.
ENGLISH 4 Turn the control dial back to the coffee bean icon when the cup contains the preferred amount of hot water. Adjusting the machine You can adjust the grinding degree and coffee volume to obtain coffee that is perfectly customised to your taste. Adjusting the grinding degree You can adjust the grinding degree of the machine. At each grinding degree selected, the ceramic coffee grinder guarantees a perfectly even grind for every cup of coffee you brew.
ENGLISH 17 Cleaning and maintenance Regular cleaning and descaling prolongs the lifetime of your machine and ensures optimum quality and taste of your coffee. Do not immerse the machine in water or any other liquid. Never use scouring pads, abrasive cleaning agents or aggressive liquids to clean the machine. Always unplug the machine and let it cool down before you clean it. Note: None of the detachable parts are dishwasher-proof. Rinse them under the tap.
ENGLISH 3 Open the maintenance door. 4 Press the PUSH button (1) and pull at the grip of the brewing unit (2) to remove it from the machine. 5 Clean the coffee exit duct thoroughly with a spoon handle or another round-tipped kitchen utensil. 6 Rinse the outside of the brewing unit under a lukewarm tap. Never use any washing-up liquid or other cleaning agent to clean the brewing unit. Do not dry the brewing unit with a cloth to prevent fibres from collecting inside the brewing unit.
ENGLISH 19 -- Make sure the lever is in contact with the base of the brewing unit. 8 Make sure the locking hook of the brewing unit is in the correct position. -- To position the hook correctly, push it upwards until it is in uppermost position. Note:The hook is not correctly positioned if it is still in bottommost position. 9 Slide the brewing unit back into the machine along the guiding rails on the sides until it clicks into position. Do not press the PUSH button. 10 Close the maintenance door.
ENGLISH Lubrication For optimal performance of the machine, lubricate the brewing unit after it has brewed 500 cups of coffee or once every 3 months. Contact the Philips Saeco hotline to buy lubricant. 1 Switch off the machine and unplug it. 2 Follow steps 2 to 4 in section ‘Cleaning the brewing unit’ to remove the brewing unit from the machine. 3 Apply some lubricant around the shaft in the bottom of the brewing unit. 4 Apply some lubricant to both sides of the part shown in the illustration.
ENGLISH 21 Descaling procedure The descaling procedure lasts 30 minutes and consists of a descaling cycle and a rinsing cycle. Preparation 1 Switch off the machine. If you do not switch off the machine, you cannot enter the descaling cycle. 2 Empty the drip tray and place it back. Remove the classic milk frother (if present). 3 Empty the water tank and remove the Intenza+ water filter (if present). Pour the entire bottle of descaling solution into the water tank.
ENGLISH 3 Turn the control dial back to the coffee bean icon. Wait approximately 1 minute to let the descaling solution act. 4 Press the espresso button to brew a cup of espresso. Wait approximately 1 minute to let the descaling solution act. Note: During the descaling process, the coffee grinding function does not work. If you press the espresso button, only water will flow out of the machine. 5 Repeat steps 2 to 4 until the ‘water tank empty’ light lights up continuously.
ENGLISH 23 7 Remove the drip tray, rinse it and place it back. 8 Reattach the classic milk frother. 9 Remove the water tank and rinse it. 10 Reinstall the Intenza+ water filter (if present). 11 Fill the water tank with fresh tap water up to the MAX indication and slide the water tank back into the machine. 12 Press the on/off button to switch off the machine. ,, When you switch the machine back on, it is ready for use again.
ENGLISH -- The on/off button flashes slowly. The machine is warming up or performing a procedure. -- The on/off button flashes quickly. The machine is overheated. Brew a cup of hot water to cool down the machine. -- The descaling light and the on/off button light up continuously. You have to descale the machine. Follow the instructions in chapter ‘Descaling the machine’. -- The descaling light flashes slowly. The machine is descaling. -- The 2-cup light and the on/off button flash slowly.
ENGLISH 25 -- The ‘water tank empty’ light lights up continuously. The water level is low. Fill the water tank with fresh water up to the MAX indication. -- The warning light lights up continuously and the on/off button goes out. The coffee grounds container is full. Empty the coffee grounds container while the machine is on. Make sure that the warning light flashes before you reinsert the coffee grounds container. -- The warning light and the on/off button light up continuously.
ENGLISH -- The lights flash slowly and simultaneously. The machine is out of order. Switch off the machine for 30 seconds, then switch it back on. Try this two or three times. If the machine does not reset, contact the Philips Consumer Care Centre in your country. Recycling -- This symbol on a product means that the product is covered by European Directive 2012/19/EU. Inform yourself about the local separate collection system for electrical and electronic products.
ENGLISH 27 Problem Solution The machine does not work. Make sure the small plug is inserted into the socket. Plug in and switch on the machine. Make sure that the voltage indicated on the machine corresponds to the local mains voltage. The machine is stuck in the descaling procedure. Press the on/off button. You can restart the descaling procedure or follow the instructions in chapter ‘Descaling the machine’, section ‘If you are unable to finish the descaling procedure’.
ENGLISH Problem Solution Brew a few cups of coffee to let the machine adjust itself to the new grinding settings. Use a different type of coffee beans. Water ends up in the drip tray. This is normal. To guarantee the perfect cup of coffee, the machine uses water to rinse the internal circuit and brewing unit. Some of the water flows through the internal system directly into the drip tray. Empty the drip tray regularly. The machine seems to be leaking.
DEUTSCH 29 Inhaltsangabe Einführung Allgemeine Beschreibung Wichtig Gefahr Warnung Achtung Elektromagnetische Felder Vor dem ersten Gebrauch Aufbau der Maschine Für den Gebrauch vorbereiten Den Wassertank füllen Füllen des Kaffeebohnenbehälters Aufheizen der Maschine Manueller Spülzyklus Einsetzen des Intenza+ Wasserfilters Verwenden der Maschine Brühen von 1 oder 2 Tassen Espresso oder normalem Kaffee Aufschäumen von Milch Heißes Wasser Anpassen der Maschine Anpassen des Mahlgrads Einstellen der Kaffeeme
DEUTSCH Allgemeine Beschreibung (Abb.
DEUTSCH --- ---- 31 sicheren Gebrauch des Geräts erhalten und die Gefahren verstanden haben. Die Reinigung und Pflege der Maschine darf von Kindern unter 8 Jahren nicht ohne Aufsicht durchgeführt werden. Bewahren Sie die Maschine und das Kabel außerhalb der Reichweite von Kindern unter 8 Jahren auf. Kinder dürfen nicht mit der Maschine spielen. Die Maschine ist für das Mahlen von Kaffeebohnen und die Zubereitung von Kaffee bestimmt.
DEUTSCH Vor dem ersten Gebrauch Aufbau der Maschine 1 Entfernen Sie das Verpackungsmaterial von der Maschine. 2 Stellen Sie die Maschine auf einem Tisch oder einer Arbeitsfläche auf. Achten Sie darauf, dass sich weder Wasserhahn und Spülbecken noch Wärmequellen in der Nähe des Geräts befinden. 3 Über, hinter und auf beiden Seiten der Maschine muss ein Abstand von mindestens 15 cm gewahrt werden. 4 Stecken Sie den kleinen Stecker in die Buchse auf der Rückseite der Maschine.
DEUTSCH 33 Für den Gebrauch vorbereiten Den Wassertank füllen 1 Nehmen Sie den Wasserbehälter von der Maschine. 2 Spülen Sie den Wasserbehälter unter fließendem Wasser ab. 3 Füllen Sie den Wasserbehälter bis zur Markierung MAX mit kaltem Wasser. Füllen Sie den Wasserbehälter nie mit warmem, heißem oder Mineralwasser, da dies zu Beschädigungen im Wasserbehälter und an der Maschine führen kann. 4 Setzen Sie den Wasserbehälter wieder in die Maschine ein.
DEUTSCH Aufheizen der Maschine Während des ersten Aufheizens fließt frisches Wasser durch den internen Kreislauf und heizt die Maschine so auf. Dies dauert einige Sekunden. 1 Stellen Sie eine Schüssel unter die Heißwasser-/Dampfdüse oder den klassischen Milchaufschäumer und den Kaffeeauslauf. Achten Sie darauf, dass der Drehschalter auf das Symbol für Kaffeebohnen zeigt. 2 Drücken Sie den Ein-/Ausschalter.
DEUTSCH 35 Manueller Spülzyklus Während des manuellen Spülzyklus bereitet die Maschine eine Tasse Kaffee zur Vorbereitung des internen Kreislaufs für den Gebrauch zu. 1 Stellen Sie eine Schüssel unter den Kaffeeauslauf. 2 Stellen Sie sicher, dass der Ein-/Ausschalter konstant leuchtet. 3 Drücken Sie die Taste für normalen Kaffee. ,, Die Maschine beginnt mit der Zubereitung einer Tasse Kaffee zur Vorbereitung des internen Kreislaufs für den Gebrauch. Dieser Kaffee ist nicht genießbar.
DEUTSCH 9 Füllen Sie den Wassertank bis zur Markierung MAX mit frischem Wasser. ,, Die Maschine ist einsatzbereit. Hinweis: Die ersten Tassen Kaffee sind möglicherweise etwas wässrig. Dies ist normal. Die Maschine muss einige Brühzyklen vollständig durchlaufen, um ihre Einstellungen zu optimieren. Einsetzen des Intenza+ Wasserfilters Wir empfehlen Ihnen, den Intenza+ Wasserfilter einzusetzen, da dieser Kalkablagerungen in Ihrer Maschine verhindert.
DEUTSCH 37 7 Füllen Sie den Wasserbehälter erneut bis zur Markierung MAX mit frischem Wasser, und setzen Sie ihn in die Maschine ein. ,, Der Ein-/Ausschalter leuchtet konstant. Die Maschine ist einsatzbereit. Verwenden der Maschine Für garantiert perfekten Espresso spült die Maschine regelmäßig ihren internen Kreislauf mit Wasser. Dieser automatische Spülvorgang erfolgt 15 Minuten nachdem die Maschine in den Standby-Modus gewechselt ist oder sich vollständig ausgeschaltet hat.
DEUTSCH 4 Zum Einschalten der Maschine drücken Sie den Ein-/Ausschalter. ,, Wenn Sie nur eine Tasse Kaffee gebrüht haben, spült die Maschine kurz den internen Kreislauf und schaltet sich dann aus. Hinweis:Wenn die Maschine sich im Standby-Modus befindet, schaltet sie sich nach 30 Minuten automatisch aus. Aufschäumen von Milch Wenn Sie nach dem Einschalten der Maschine oder nach dem Brühen einer Tasse Kaffee Milch aufschäumen möchten, ist möglicherweise immer noch etwas Wasser im internen Kreislauf.
DEUTSCH 39 1 Drücken Sie die Taste für Espresso oder normalen Kaffee. ,, Der Ein-/Ausschalter blinkt schnell, um anzuzeigen, dass die Maschine überhitzt ist und keinen Kaffee zubereiten kann. 2 Stellen Sie eine Schüssel unter die Heißwasser-/Dampfdüse oder den klassischen Milchaufschäumer, und drehen Sie den Drehschalter auf das Heißwassersymbol. 3 Heißes Wasser fließt aus der Heißwasser-/Dampfdüse oder dem klassischen Milchaufschäumer.
DEUTSCH Anpassen der Maschine Sie können den Mahlgrad des Kaffees und die Kaffeemenge einstellen, um Ihren ganz persönlichen, perfekten Kaffee zu kochen. Anpassen des Mahlgrads Sie können den Mahlgrad der Maschine anpassen. Das Mahlwerk aus Keramik garantiert gleichmäßiges und perfektes Mahlen für jede Tasse Kaffee. Das ganze Aroma wird bewahrt, sodass jede Tasse perfekt schmeckt. 1 Drücken Sie den Mahlgradregler fest (1), und drehen Sie ihn dann schrittweise (2).
DEUTSCH 41 Reinigen der Heißwasser-/Dampfdüse oder des klassischen Milchaufschäumers Reinigen Sie die Heißwasser-/Dampfdüse oder den klassischen Milchaufschäumer nach jeder Verwendung mit einem feuchten Tuch. Reinigen Sie die Heißwasser-/Dampfdüse oder den klassischen Milchaufschäumer ein Mal pro Woche gründlich. 1 Entfernen Sie den Schutzgriff von der Heißwasser-/Dampfdüse, indem Sie ihn nach unten abziehen. Die Heißwasser-/Dampfdüse oder der klassische Milchaufschäumer können sehr heiß sein.
DEUTSCH 4 Drücken Sie die Taste PUSH (1), ziehen Sie am Griff der Brühgruppe (2), und entfernen Sie sie aus der Maschine. 5 Reinigen Sie den Kaffeeauswurfschacht gründlich mit einem Löffelgriff oder einem anderen runden Küchenutensil. 6 Spülen Sie die Außenseite der Brühgruppe unter lauwarmem fließendem Wasser ab. Verwenden Sie zum Reinigen der Brühgruppe keine Geschirrspülmittel oder andere Reinigungsmittel.
DEUTSCH 43 -- Um den Haken in die richtige Position zu bringen, schieben Sie ihn so weit wie möglich nach oben. Hinweis: Der Haken ist nicht richtig positioniert, wenn er noch in der untersten Position ist. 9 Schieben Sie die Brühgruppe entlang der Führungsschienen an den Seiten wieder in die Maschine, bis sie hörbar einrastet. Drücken Sie die Taste PUSH nicht. 10 Schließen Sie die Servicetür. 11 Schieben Sie den Satzbehälter wieder in die Maschine.
DEUTSCH 4 Tragen Sie wie in der Abbildung dargestellt etwas Schmiermittel auf beiden Seiten des Teils auf. 5 Befolgen Sie die Schritte 7 bis 11 im Abschnitt “Reinigen der Brühgruppe”, um die Brühgruppe und den Satzbehälter wieder in die Maschine einzusetzen. Entkalken der Maschine Im Laufe der Zeit lagert sich Kalk in der Maschine ab. Es ist wichtig, die Maschine zu entkalken, wenn die orangefarbene Entkalkungsanzeige kontinuierlich leuchtet.
DEUTSCH 45 5 Achten Sie darauf, dass der Drehschalter sich auf dem Symbol für Kaffeebohnen befindet. 6 Stellen Sie eine Schüssel unter die Heißwasser-/Dampfdüse. Entkalkungsvorgang 1 Halten Sie die Tasten für Espresso und normalen Kaffee gleichzeitig etwa 5 Sekunden lang gedrückt. ,, Die orangefarbene Entkalkungsanzeige blinkt während des gesamten Entkalkungsvorgangs langsam. 2 Drehen Sie den Drehschalter auf das Heißwassersymbol, und bereiten Sie heißes Wasser zu.
DEUTSCH 2 Füllen Sie den Wasserbehälter bis zur Markierung MAX mit frischem Leitungswasser, und schieben Sie den Wasserbehälter wieder in die Maschine. 3 Leeren Sie die Schüssel, und stellen Sie sie wieder auf die Auffangschale unter der Heißwasser-/Dampfdüse. 4 Drücken Sie die Espresso-Taste, und bereiten Sie eine Tasse Espresso zu. Wiederholen Sie dies zwei Mal. 5 Drehen Sie den Drehschalter auf das Heißwassersymbol.
DEUTSCH 47 2 Entfernen Sie die Auffangschale, spülen Sie sie aus, und setzen Sie sie wieder ein. 3 Entfernen Sie den Wasserbehälter, und spülen Sie ihn aus. 4 Füllen Sie den Wasserbehälter bis zur Markierung MAX mit frischem Leitungswasser, und schieben Sie den Wasserbehälter wieder in die Maschine. 5 Drücken Sie die Espresso-Taste, und bereiten Sie eine Tasse Espresso zu. Wiederholen Sie dies zwei Mal. 6 Drehen Sie den Drehschalter auf das Heißwassersymbol.
DEUTSCH -- Der Ein-/Ausschalter blinkt schnell. Die Maschine ist überhitzt. Bereiten Sie eine Tasse heißes Wasser zu, um die Maschine abzukühlen. -- Die Entkalkungsanzeige und der Ein-/Ausschalter leuchten kontinuierlich. Die Maschine muss entkalkt werden. Befolgen Sie die Anweisungen im Kapitel “Entkalken der Maschine”. -- Die Entkalkungsanzeige blinkt langsam. Die Maschine wird entkalkt. -- Die 2-Tassen-Anzeige und der Ein-/Ausschalter blinken langsam.
DEUTSCH 49 -- Die Warnanzeige leuchtet ununterbrochen, und der Ein-/ Ausschalter erlischt. Der Kaffeepulverbehälter ist voll. Leeren Sie den Kaffeepulverbehälter, während die Maschine eingeschaltet ist. Stellen Sie sicher, dass die Warnanzeige blinkt, bevor Sie den Kaffeepulverbehälter wieder einführen. -- Die Warnanzeige und der Ein-/Ausschalter leuchten ununterbrochen. Der Kaffeebohnenbehälter leer ist. Füllen Sie den Kaffeebohnenbehälter. -- Die Warnanzeige blinkt schnell.
DEUTSCH Recycling -- Befindet sich dieses Symbol auf der Maschine, gilt für diese Maschine die Europäische Richtlinie 2012/19/EU. Informieren Sie sich über die örtlichen Bestimmungen zur getrennten Entsorgung von elektrischen und elektronischen Produkten. Befolgen Sie die örtlichen Bestimmungen, und entsorgen Sie Ihre Maschine niemals über den normalen Hausmüll. Durch die korrekte Entsorgung von Altgeräten werden Umwelt und Menschen vor negativen Folgen geschützt.
DEUTSCH Problem Lösung Die Heißwasser/Dampfdüse produziert kein heißes Wasser/ keinen Dampf mehr. Überprüfen Sie, ob die Öffnung der Heißwasser-/Dampfdüse verstopft ist. Wenn dies der Fall ist, reinigen Sie das Loch. 51 Der klassische Milchaufschäumer ist möglicherweise verschmutzt. Reinigen Sie den klassischen Milchaufschäumer. Der Espresso hat nicht ausreichend Crema.
DEUTSCH Problem Lösung Die Maschine scheint undicht zu sein. Die Auffangschale ist voll und ist während des Brüh- oder Entkalkungsvorgang übergelaufen. Prüfen Sie, ob der Wasserbehälter undicht ist. Die Brühgruppe oder die Leitungen hinter oder unter der Brühgruppe sind möglicherweise verstopft. Spülen Sie die Brühgruppe mit lauwarmem Wasser ab, und reinigen Sie den oberen Filter sorgfältig. Reinigen Sie auch das Innere der Maschine mit einem weichen, feuchten Tuch.
ITALIANO 53 Sommario Introduzione Descrizione generale Importante Pericolo Avviso Attenzione Campi elettromagnetici (EMF) Primo utilizzo Installazione della macchina Predisposizione dell’apparecchio Riempimento del serbatoio dell’acqua Riempimento del contenitore caffè in grani Riscaldamento della macchina Ciclo di risciacquo manuale Installazione del filtro dell’acqua Intenza+ Modalità d’uso della macchina Preparate 1 o 2 tazze di caffè espresso o caffè normale Come montare il latte Acqua calda Regolazio
ITALIANO Descrizione generale (fig.
ITALIANO ------ 55 La manutenzione e la pulizia non devono essere eseguite da bambini se non di età superiore a 8 anni e in presenza di un adulto. Tenete l’apparecchio e il relativo cavo fuori dalla portata di bambini di età inferiore a 8 anni. Evitate che i bambini giochino con la macchina. Questa macchina è progettata per macinare ed erogare caffè. Utilizzatela correttamente e con cautela per evitare ustioni dovute al vapore e all’acqua calda.
ITALIANO Primo utilizzo Installazione della macchina 1 Rimuovete tutto il materiale da imballaggio dalla macchina. 2 Posizionate la macchina su un tavolo o un piano di lavoro lontano dal rubinetto, dal lavello e da fonti di calore. 3 Lasciate almeno 15 cm di spazio libero in alto, dietro e ai lati della macchina. 4 Inserite lo spinotto nella presa situata sulla parte posteriore della macchina. 5 Inserite la spina nella presa di corrente.
ITALIANO 57 Predisposizione dell’apparecchio Riempimento del serbatoio dell’acqua 1 Estraete il serbatoio dell’acqua dalla macchina. 2 Sciacquare il serbatoio sotto l’acqua corrente. 3 Riempite il serbatoio con acqua fredda del rubinetto fino al livello massimo (MAX). Non riempite mai il serbatoio dell’acqua con acqua calda, bollente o frizzante, per evitare di danneggiare il serbatoio stesso e la macchina. 4 Fate scorrere il serbatoio dell’acqua nella macchina.
ITALIANO Riscaldamento della macchina Durante l’iniziale processo di riscaldamento, l’acqua dolce scorre attraverso il circuito interno per riscaldare la macchina. Questa operazione richiede alcuni secondi. 1 Posizionate un recipiente sotto l’erogatore di acqua calda/vapore, al pannarello classico e al beccuccio del caffè. Accertatevi che il selettore sia impostato sull’icona del caffè in grani. 2 Premete il pulsante on/off.
ITALIANO 59 Ciclo di risciacquo manuale Durante il ciclo di risciacquo manuale, la macchina eroga una tazza di caffè per preparare il circuito interno per l’uso. 1 Posizionate un recipiente sotto il beccuccio del caffè. 2 Verificate che il pulsante on/off si accenda a luce fissa. 3 Premete il pulsante del caffè normale. ,, La macchina eroga una tazza di caffè per preparare il circuito interno all’uso. Questo caffè non è potabile. 4 Svuotate il recipiente una volta terminato il ciclo di preparazione.
ITALIANO 9 Riempite il serbatoio con acqua dolce fino al livello massimo (MAX). ,, La macchina è pronta all’uso. Nota: le prime tazze di caffè potrebbero essere un po’ acquose, si tratta di un fenomeno del tutto normale. La macchina ha bisogno di alcuni cicli di preparazione per ottimizzare le impostazioni. Installazione del filtro dell’acqua Intenza+ Vi consigliamo di installare il filtro dell’acqua Intenza+ per prevenire la formazione di calcare all’interno della macchina.
ITALIANO 61 Modalità d’uso della macchina Per garantire l’espresso perfetto, la macchina risciacqua il circuito interno con acqua a intervalli regolari. Questo ciclo di risciacquo automatico viene effettuato 15 minuti dopo che l’apparecchio è entrato in modalità standby o si spegne. Durante il ciclo di risciacquo automatico, una parte dell’acqua scorre dal circuito interno direttamente nel vassoio antigoccia. Svuotate il vassoio antigoccia regolarmente.
ITALIANO Come montare il latte Se desiderate montare il latte dopo aver acceso la macchina, o dopo aver erogato una tazza di caffè, dovreste prima eliminare l’acqua residua presente all’interno del circuito interno. 1 Posizionate una grande tazza sotto l’erogatore di acqua calda/vapore o pannarello classico. 2 Ruotate il selettore sull’icona del vapore. ,, Mentre l’acqua si riscalda, il pulsante on/off lampeggia. ,, L’acqua calda fuoriesce dall’erogatore di acqua calda/vapore o pannarello classico.
ITALIANO 63 Acqua calda 1 Assicuratevi che il pulsante on/off sia acceso a luce fissa. Se il pulsante on/off lampeggia lentamente, la macchina è in fase di riscaldamento. 2 Posizionate una tazza sotto l’erogatore di acqua calda/vapore o pannarello classico. 3 Ruotate il selettore sull’icona dell’acqua calda. ,, L’acqua fuoriesce dall’erogatore di acqua calda/vapore o pannarello classico.
ITALIANO Regolazione della quantità di caffè Potete regolare la quantità di caffè secondo il vostro gusto e le dimensioni delle tazze. Sia il pulsante del caffè normale sia quello del caffè espresso possono essere programmati. 1 Posizionate una tazza sul coperchio del vassoio antigoccia. 2 Tenete premuto il pulsante del tipo di caffè che desiderate regolare. Rilasciate il pulsante non appena la macchina inizia a macinare il caffè in grani.
ITALIANO 65 -- Se la macchina dispone di un pannarello classico, rimuovete il tubo e la parte superiore. 2 Sciacquate il tubo e la parte superiore con abbondante acqua dolce e asciugateli con un panno asciutto. 3 Pulire l’erogatore di acqua calda/vapore con un panno bagnato per rimuovere eventuali residui di latte. 4 Posizionate l’impugnatura protettiva e pannarello classico (se presente) nuovamente sull’erogatore di acqua calda/vapore. Quando saranno posizionati correttamente sentirete uno scatto.
ITALIANO 4 Premete il pulsante PUSH (1) e tirate l’impugnatura del gruppo infusore (2) per rimuoverla dalla macchina. 5 Pulite il condotto di uscita del caffè a fondo con il manico di un cucchiaio o un altro utensile da cucina dalla punta arrotondata. 6 Risciacquate la parte esterna del gruppo infusore sotto un getto di acqua tiepida. Non utilizzate mai detersivi per piatti o detergenti per pulire il gruppo infusore.
ITALIANO 67 -- Per posizionare il gancio correttamente, spingetelo verso l’alto fino alla posizione più alta raggiungibile. Nota: se il gancio è ancora in posizione inferiore significa che non è posizionato correttamente. 9 Fate scorrere nuovamente il gruppo infusore nella macchina tramite le guide sui lati fino a che non scatta in posizione. Non premete il pulsante PUSH. 10 Chiudete lo sportello di manutenzione. 11 Fate scorrere il recipiente dei fondi di caffè nella macchina.
ITALIANO 4 Applicate del lubrificante su entrambi i lati della parte mostrata nell’illustrazione. 5 Seguite i passaggi da 7 a 11 della sezione “Pulizia del gruppo infusore” per rimettere in posizione il gruppo infusore e il recipiente dei fondi di caffè. Procedura di rimozione del calcare: Durante l’uso, il calcare si accumula all’interno della macchina. È fondamentale eseguire la pulizia della macchina quando la spia arancione per la pulizia dal calcare si accende a luce fissa.
ITALIANO 69 4 Aggiungete l’acqua alla soluzione anticalcare nel serbatoio dell’acqua fino al livello MAX. 5 Accertatevi che il selettore sia impostato sull’icona del caffè in grani. 6 Posizionate un recipiente sotto l’erogatore di acqua calda/vapore. Ciclo di decalcificazione 1 Premete il pulsante del caffè espresso e quello del caffè normale contemporaneamente per circa 5 secondi. ,, La spia arancione per la pulizia dal calcare lampeggia lentamente durante l’intero ciclo di pulizia anticalcare.
ITALIANO 2 Riempite il serbatoio dell’acqua con acqua dolce di rubinetto fino al segno MAX e reinserite il serbatoio dell’acqua sulla macchina. 3 Svuotate il recipiente e riposizionatelo sul vassoio antigoccia sotto l’erogatore di acqua calda/vapore. 4 Premete il pulsante espresso e preparate una tazza di caffè espresso. Ripetete l’operazione due volte. 5 Ruotate il selettore sull’icona dell’acqua calda.
ITALIANO 71 2 Rimuovete il vassoio antigoccia, sciacquatelo e riposizionatelo. 3 Rimuovete il serbatoio dell’acqua e sciacquatelo. 4 Riempite il serbatoio dell’acqua con acqua dolce di rubinetto fino al segno MAX e reinserite il serbatoio dell’acqua sulla macchina. 5 Premete il pulsante espresso e preparate una tazza di caffè espresso. Ripetete l’operazione due volte. 6 Ruotate il selettore sull’icona dell’acqua calda.
ITALIANO -- La spia per la pulizia dal calcare e il pulsante on/off si accendono a luce fissa. È necessario eseguire la pulizia. Seguite le istruzioni contenute nel capitolo “Procedura di rimozione del calcare”. -- La spia per la pulizia dal calcare lampeggia lentamente. La macchina sta rimuovendo il calcare. -- La spia delle 2 tazze e il pulsante on/off lampeggiano lentamente. La macchina programma la quantità di caffè da erogare.
ITALIANO 73 -- La spia e il pulsante on/off si accendono fisse. Il contenitore del caffè in grani è vuoto. Riempite il contenitore del caffè in grani. -- La spia lampeggia rapidamente. Non c’è acqua nel circuito interno. Ruotate il selettore sull’icona dell’acqua calda e lasciate che l’acqua esca dalla macchina fino a un flusso continuo. Consultare il capitolo “Predisposizione dell’apparecchio”, sezione “Riscaldamento della macchina”. Seguite i passaggi 3 e 4. -- La spia lampeggia lentamente.
ITALIANO Garanzia e assistenza Per assistenza o informazioni, visitate il sito Web all’indirizzo www.philips.com/ support oppure leggete l’opuscolo della garanzia internazionale. Per acquistare le parti di ricambio, visitate il sito www.shop.philips.com/ service oppure recatevi presso il vostro rivenditore Philips. Inoltre, potete contattare il centro assistenza Philips del vostro paese.
ITALIANO 75 Problema Soluzione Il gruppo infusore non può essere rimosso. Rimuovete il recipiente con i fondi di caffè prima di aprire lo sportello di manutenzione. Se dopo questa operazione non riuscite ancora a rimuovere il gruppo infusore, seguite i passaggi indicati di seguito. Reinserite il recipiente dei fondi di caffè, chiudete lo sportello di manutenzione, accendete la macchina. La macchina è pronta all’uso. Spegnete la macchina e provate a rimuovere nuovamente il gruppo infusore.
ITALIANO Specifiche tecniche Funzionalità Valore / posizione Tensione nominale All’interno dello sportello di manutenzione Potenza nominale All’interno dello sportello di manutenzione Dimensioni (L x A x P) 295 mm x 325 mm x 420 mm Peso 6,9 kg Materiale Plastica Lunghezza cavo 0,8 m -1,2 m Capacità serbatoio acqua estraibile 1000 ml Dimensioni tazza Fino a 95 mm Capacità contenitore caffè in grani 170 g Capacità recipiente fondi di caffè 8 dischi Pressione pompa 15 bar Caldaia
4219.460.2023.