HD8652 HD8652 2100 FRONT COVER A5 BW.
English 5 Français 32 Nederlands 60
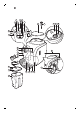
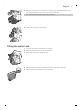
1 2 1 4 6 5 3 7 32 10 30 29 28 31 8 Milk clean 11 Memo 9 Memo 12 13 27 14 15 16 17 18 19 26 20 22 21 23 24 25
English 5 Contents Introduction Important 6 6 Warning Caution Electromagnetic fields (EMF) 6 7 7 Machine overview (Fig.
English Introduction Dear customer, we thank you for buying this Philips 2100 series automatic espresso machine! To fully benefit from the support that Philips offers, please register your product at www.philips.com/welcome. The machine is suitable for preparing espresso coffee using whole coffee beans. It can also dispense steam and hot water. In this user manual you find all the information you need to install, use, maintain and get the best out of your machine.
English 7 - Keep the machine and its cord out of the reach of children aged less than 8 years. - Children should be supervised to ensure that they do not play with the machine. - Never insert fingers or other objects in the coffee grinder. Caution - This machine is intended for normal household use only. It is not intended for use in environments such as staff kitchens of shops, offices, farms or other work environments. - Always put the machine on a flat and stable surface.
English 8 12 On/off button with light 13 Hot water/steam wand with protective handle 14 Water tank 15 Coffee dispensing spout 16 Automatic milk frother 17 Milk tube connector 18 Suction tube 19 Top of the milk carafe 20 Pin on top of the milk carafe 21 Milk carafe 22 Drip tray full indicator 23 Drip tray cover 24 Drip tray 25 Coffee grounds container 26 Brew group 27 Service door 28 Grinder adjustment knob 29 Ceramic coffee grinder 30 Coffee bean container 31 Grinding degree adjustment tool 32 Lid of coff
English 5 Remove the protective sticker from the drip tray and slide the drip tray into the guiding grooves in the front of the machine. Note: Make sure the drip tray is fully inserted. 6 Insert the automatic milk frother. Filling the water tank 1 Turn the automatic milk frother to the left. 2 Remove the water tank from the machine. 3 Rinse the water tank under the tap. 4 Fill the water tank with cold tap water up to the MAX indication. 5 Slide the water tank back into the machine.
English Filling the coffee bean container 1 Fill the coffee bean container with espresso beans. Note: Only use espresso beans. Never use ground coffee, unroasted coffee beans or caramelised coffee beans, as this may cause damage to the machine. 2 Put the lid on the coffee bean container. Heating up the machine During the initial heat-up process, fresh water flows through the internal circuit to heat up the machine. This takes a few seconds.
English 11 Installing the Intenza+ water filter We advise you to install the Intenza+ water filter as this prevents scale build-up in your machine. You can buy the Intenza+ water filter separately. For more details, see chapter ‘Guarantee and support’, section ‘Ordering maintenance products’. 1 Remove the small white filter from the water tank and store it in a dry place. Note: Please keep the small white filter for future use. You will need it for the descaling process.
English rinsing cycle, some of the water flows through the inner circuit directly into the drip tray. Empty the drip tray regularly. Brewing 1 or 2 cups of espresso 1 Make sure the on/off button light lights up continuously and the control dial points to the desired coffee strength bean icon. 2 Place 1 or 2 cups under the coffee spout. 3 Select the coffee strength by turning the dial to one or two beans. Select 2 beans for a stronger taste. 4 Press the espresso button.
English 13 2 Turn the hot water/steam wand with the automatic milk frother towards the machine until the automatic milk frother touches the machine and is in horizontal position. 3 Remove the lid of the milk carafe and pour the milk in the milk carafe. Close the lid of the milk carafe. 4 Insert the other end of the suction tube into the milk carafe till the bottom of the milk carafe. 5 Place a large cup under the automatic milk frother and the coffee spout.
English 2 Turn the control dial to one or two coffee beans icon to stop frothing milk. Hot water Warning: Danger of scalding! Dispensing may be preceded by small jets of hot water. Use the appropriate protective handle only. 1 Make sure the on/off button lights up continuously. If the on/off button flashes slowly, the machine is heating up. 2 Remove the automatic milk frother. Keep the protective handle on the hot water/steam wand. 3 Place a cup under the hot water/steam wand.
English 2 1 15 cup of coffee. It ensures full aroma preservation, delivering the perfect taste in every cup. - Press the grinding degree adjustment knob firmly and then turn it one notch at a time. - There are 5 different grinding degree settings you can choose from.The smaller the dot, the stronger the coffee. - The difference becomes noticeable after you have brewed 2-3 cups f coffee at the new setting.
English Quick clean of the milk system Note: After brewing a cappuccino perform a quick clean of the milk system. 1 2 3 4 Place a cup under the automatic milk frother. Turn the control dial to the hot water icon. Dispense HOT WATER for 5 seconds Turn the control dial to one of the coffee bean icons to stop hot water dispensing. Cleaning the automatic milk frother (daily) 1 2 3 4 5 Place a cup under the automatic milk frother. Insert the suction tube into a cup filled with fresh water.
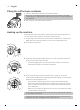
English 1 2 3 1 2 3 4 5 17 Suction tube Milk frother lid Rubber ring Milk frother Rubber cover How to clean the automatic milk frother 4 1 5 Remove the automatic milk frother from the steam tube. Caution: If the machine has been recently used, the steam tube and the automatic milk frother could be hot. 2 Remove the suction tube from the milk frother lid. 3 Remove the rubber ring from the automatic milk frother.
English 7 To reassemble, press in the middle to attach the rubber lid to the milk frother and make sure it is in place. 8 Attach the automatic milk frother to the milk frother lid. When the two parts lock into place, you hear a click. 9 Insert the suction tube into the automatic milk frother. 10 Place the rubber ring back onto the automatic milk frother. 11 Attach the automatic milk frother back to the hot water/steam wand.
English 19 Cleaning the brew group Warning: Do not clean the brew group in the dishwasher and do not use washing-up liquid or a cleaning agent to clean it. Clean the brew group once a week. 1 Switch off the machine and unplug it. 2 Remove the coffee grounds container from the machine. 3 Open the service door. 4 Press the PUSH button and pull at the grip of the brew group to remove it from the machine.
English 7 Rinse the outside of the brew group under a lukewarm tap. Warning: Never use any washing-up liquid or other cleaning agent to clean the brewing unit. Warning: Do not dry the brew group with a cloth to prevent fibers from collecting inside the brewing unit.After rinsing, just shake excess water off the brewing unit or let it air-dry. 8 Before you slide the brew group back into the machine, make sure the two reference signs on the side match.
English 21 10 Slide the brew group back into the machine along the guiding rails on the sides until it clicks into position. Warning: Do not press the PUSH button. 11 Close the service door. 12 Slide the coffee grounds container back into the machine. Lubrication For optimal performance of the machine you have to lubricate the brew group. See table below for the lubrication frequency. For support visit our website: www.philips.com/support.
English 4 Apply a thin layer of grease to the rails on both sides (see figure). 5 Insert the brew group as described in section 'Weekly cleaning of the brew group'. You can use the grease tube multiple times. Descaling the machine Scale builds up inside the machine during use. It is essential to descale the machine when the orange descaling light lights up continuously. Only use the special Philips Saeco descaling solution to descale the machine.
English 23 Descaling cycle 1 Press the espresso button and cappuccino button simultaneously for approximately 5 seconds. - The orange descaling light flashes slowly during the entire descaling cycle. 5 sec 2 Turn the control dial to the hot water icon and brew hot water. Let hot water flow out of the hot water/steam wand for 10 seconds. 3 Turn the control dial back to the single bean icon.Wait approximately 1 minute to let the descaling solution act. 4 Press the espresso button to brew a cup of espresso.
English 5 Turn the control dial to the hot water icon. 6 Let hot water flow out of the hot water/steam wand until the ‘water tank empty’ light lights up continuously. Note: If you want to interrupt the water flow, turn the control dial back to the coffee bean icon.To restart the water flow, turn it back to the hot water icon. 7 8 9 10 11 Remove the drip tray, rinse it and place it back. Reattach the automatic milk frother. Remove the water tank and rinse it.
English 25 Meaning of light signals - The on/off button light lights up continuously. The machine is ready for use. - The on/off button flashes slowly. The machine is warming up or performing a procedure. - The on/off button flashes quickly. The machine is overheated. Brew a cup of hot water to cool down the machine. - The descaling and on/off button lights light up continuously. You have to descale the machine. Follow the instructions in chapter ‘Descaling the machine’.
English - The 2-cup and on/off button lights flash slowly. The machine is programming the amount of coffee to brew. Follow the instructions in chapter ‘Using the machine’, section ‘Adjusting the coffee volume’. - The 2-cup light lights up continuously and the on/off button flashes slowly. The machine is brewing two cups of coffee. - The water tank empty light lights up continuously.The water level is low. Fill the water tank with fresh water up to the MAX level.
English 27 - The warning light flashes quickly. There is no water in the internal circuit. Turn the control dial to the hot water icon and let hot water come out of the machine until the water flows continuously. See chapter ‘Preparing for use’ section ‘Heating up the machine’. Follow steps 3 and 4. - The warning light flashes slowly. The brewing unit is not correctly inserted, the coffee grounds container is not inserted, the service door is open or the control dial is not in the correct position.
English The machine is stuck in the descaling procedure. The descaling process has been interrupted or proceeded in an incorrect order. Press the on/off button. You can restart the descaling procedure or follow the instructions in chapter ‘Descaling the machine’, section ‘Interruption of the descaling process'. The coffee is not hot enough. The cups you use are cold. Preheat the cups by rinsing them with hot water. You added milk.
English 29 Place the drip tray and the coffee grounds container back. Leave the brew group out. Close the maintenance door and switch the machine on and off. Then try to reinsert the brew group. The machine grinds the coffee beans but no coffee comes out. The coffee is too weak. The drip tray is quickly filled. The grind is set too fine. Adjust the grinder to a coarser setting. The brew group is dirty. Clean the brew group. The coffee dispensing spout is dirty.
English The milk does not froth. The automatic milk frother is dirty or not assembled or installed correctly. Clean the automatic milk frother and make sure it is correctly assembled or installed. The type of milk used is not suitable for frothing. Different types of milk result in different amounts of froth and different froth qualities. Semi-skimmed or full-fat cow's milk give good results.
English Cup size Up to 95mm Coffee bean container capacity 170g Coffee grounds container capacity 8 cakes Pump pressure 15 bar Boiler Stainless steel Safety devices Thermal fuse 31
Français Table des matières Introduction Important 33 33 Avertissement Attention Champs électromagnétiques (CEM) 33 34 35 Présentation de la machine (Fig.
Français 33 Introduction Cher client, vous venez d'acheter une machine à espresso automatique de la série Philips 2100 et nous vous en remercions. Pour bénéficier pleinement de l'assistance Philips, veuillez enregistrer votre produit sur le site www.philips.com/welcome. Cette machine convient à la préparation de café espresso à partir de grains de café entiers. Elle distribue également de la vapeur et de l’eau chaude.
Français - Cette machine peut être utilisée par des enfants âgés de 8 ans ou plus, des personnes dont les capacités physiques, sensorielles ou intellectuelles sont réduites ou des personnes manquant d'expérience et de connaissances, à condition que ces enfants ou personnes soient sous surveillance ou qu'ils aient reçu des instructions quant à l'utilisation sécurisée de la machine et qu'ils aient pris connaissance des dangers encourus.
Français 35 Champs électromagnétiques (CEM) Cet appareil Philips est conforme à toutes les normes et à tous les règlements applicables relatifs à l’exposition aux champs électromagnétiques. Présentation de la machine (Fig.
Français 36 Remarque : Laissez un espace libre d'au moins 15 cm au-dessus, à l'arrière et sur les côtés de la machine. 15cm 15cm 15cm 15cm 15cm 3 Insérez la petite fiche dans la prise située à l’arrière de l’appareil. 4 Connectez la prise au secteur. 5 Retirez l'autocollant de protection du plateau égouttoir et faites glisser le plateau égouttoir dans les rainures à l'avant de la machine. Remarque : Assurez-vous que le plateau égouttoir est entièrement inséré.
Français 37 4 Remplissez le réservoir avec de l'eau froide du robinet, jusqu'au niveau maximal (MAX). 5 Glissez le réservoir d’eau dans l’appareil. Remplissage du bac à grains de café 1 Remplissez le réservoir de grains de café spécial espresso. Remarque : Utilisez uniquement des grains de café espresso. N'utilisez jamais du café moulu, des grains de café non torréfiés ou caramélisés car cela risque d'endommager la machine. 2 Placez le couvercle sur le bac à grains de café.
Français 4 Au bout de quelques secondes, lorsque l'eau chaude cesse de s'écouler de la buse à eau chaude/vapeur et que le voyant d'avertissement clignote lentement, réglez le bouton de commande à nouveau sur l'icône de grain unique. - La machine chauffe et le bouton marche/arrêt clignote lentement. - Lorsque la machine a fini de chauffer, elle effectue un cycle de rinçage automatique pour nettoyer le circuit interne avec de l'eau fraîche. L'eau s'écoule de l'unité d'écoulement du café.
Français 39 4 Placez le filtre à eau dans le réservoir d’eau vide. Appuyez dessus jusqu'à ce qu'il ne puisse plus bouger. 5 Remplissez le réservoir d'eau avec de l'eau fraîche jusqu'à l'indication MAX et glissez-le dans la machine. 6 Laissez la machine faire passer l'eau chaude jusqu'à ce que le réservoir d'eau soit vide (voir le chapitre « Utilisation de la machine », section « Eau chaude »).
Français optimale. Vous pouvez utiliser du lait entier, du lait écrémé, du lait de soja et du lait sans lactose. Préparer un cappuccino Avertissement : Risque de brûlures ! De petits jets d’eau chaude peuvent précéder l'écoulement de l'eau. Lorsque vous utilisez de la vapeur, la buse à eau chaude/vapeur et le mousseur à lait automatique risquent d'être chauds. Prenez la buse à vapeur uniquement par son manche protecteur. 1 Fixez le mousseur à lait automatique à la buse à eau chaude/vapeur.
Français 41 7 Appuyez sur le bouton du cappuccino. La machine verse d'abord le lait, puis le café. - La machine prend quelques secondes avant d'arrêter l'écoulement. Remarque : Si vous voulez interrompre le cycle de préparation, appuyez à nouveau sur le bouton cappuccino. 8 La quantité de café et de lait peut être personnalisée. Veuillez vous reporter au chapitre « Réglage de la machine », section « Réglage de la longueur du café et du lait ». 9 Placez une tasse sous le mousseur à lait automatique.
Français 3 Placez une tasse sous la buse à eau chaude/vapeur. 4 Réglez le bouton de commande sur l'icône d'eau chaude. - De l'eau s'écoule de la buse à eau chaude/vapeur. 5 Réglez le bouton de commande à nouveau sur une des icônes de grain de café lorsque la tasse contient la quantité souhaitée d'eau chaude. Réglage de la machine Vous pouvez régler le niveau de mouture et le volume de café pour obtenir un café parfaitement adapté à vos goûts.
Français 43 Régler le volume du café avec la fonction MEMO Vous pouvez régler le volume du café selon vos goûts et la taille des tasses. Le bouton espresso peut être programmé. 1 Placez une tasse sous la buse de distribution du café. 2 Maintenez le bouton espresso enfoncé. Relâchez le bouton lorsque la machine commence à moudre des grains de café. - Le voyant 2 tasses et le bouton marche/arrêt clignotent lentement. 3 Appuyez sur le bouton espresso lorsque la tasse contient la quantité de café souhaitée.
Français Nettoyage (quotidien) du mousseur à lait automatique 1 Placez une tasse sous le mousseur à lait automatique. 2 Insérez le tube d'aspiration dans une tasse remplie d'eau douce. 3 Réglez le bouton de commande sur l'icône de nettoyage de la vapeur/du lait. 4 Versez de l'eau chaude pendant 5 secondes. 5 Tournez le bouton de commande sur une des icônes de grains de café pour arrêter de verser l'eau chaude.
Français 45 1 2 3 1 2 3 4 5 Tube d'aspiration Couvercle du mousseur à lait Joint Mousseur à lait Couvercle en caoutchouc Comment nettoyer le mousseur à lait automatique 4 1 5 Retirez le mousseur à lait automatique du tube à vapeur. Attention : Si la machine a récemment été utilisée, le tube à vapeur et le mousseur à lait peuvent être chauds. 2 Retirez le tube d'aspiration du couvercle du mousseur à lait. 3 Retirez le joint du mousseur à lait automatique.
Français 7 Pour remonter la machine, appuyez au milieu pour fixer le couvercle en caoutchouc sur le mousseur à lait et s'assurer qu'il est en place. 8 Fixez le mousseur à lait automatique au couvercle du mousseur à lait. Vous devez entendre un clic quand les deux parties s'enclenchent. 9 Insérez le tube d'aspiration dans le mousseur à lait automatique. 10 Replacez le joint sur le mousseur à lait automatique. 11 Fixez le mousseur à lait automatique à nouveau à la buse à eau chaude/vapeur.
Français 47 Nettoyage du groupe café Avertissement : Ne nettoyez pas le groupe café dans le lavevaisselle et n’utilisez pas de liquide vaisselle ou de détergent pour le nettoyer. Nettoyez le groupe café une fois par semaine. 1 Mettez la machine hors tension et débranchez-la. 2 Enlevez le bac à marc de café de la machine. 3 Ouvrez le portillon de l'appareil. 4 Appuyez sur le bouton PUSH et tirez le groupe café pour l'enlever de la machine.
Français 7 Rincez l'extérieur du groupe café sous l'eau tiède du robinet. Avertissement : N'utilisez jamais de liquide vaisselle ou tout autre produit de nettoyage pour nettoyer le groupe café. Avertissement : Ne séchez pas le groupe café avec un chiffon pour ne pas que des fibres ne tombent dans le groupe café. Après rinçage, retirez l'excès d'eau en secouant le groupe café ou en le laissant sécher à l'air libre.
Français 49 10 Replacez le groupe café dans la machine en le faisant glisser le long des rainures latérales de guidage jusqu'à ce qu'il soit enclenché. Avertissement : N'appuyez pas sur le bouton PUSH. 11 Fermez le portillon de l’appareil. 12 Insérez le bac à marcs de café dans la machine. Lubrification Pour des performances optimales, vous devez lubrifier le groupe café. Reportez-vous au tableau ci-dessous pour connaître la fréquence de lubrification.
Français 4 Appliquez une fine couche de graisse sur les rails des deux côtés (se reporter à l'image). 5 Insérez le groupe café tel que décrit dans la section « Nettoyage hebdomadaire du groupe café ». Vous pouvez utiliser le tube de graisse plusieurs fois. Détartrage de l'appareil Des résidus de calcaire se forment lors de l'utilisation de la machine. Il est essentiel de détartrer la machine lorsque le voyant de détartrage orange reste allumé.
Français 51 Cycle de détartrage 1 Appuyez simultanément sur le bouton pour espresso et le bouton pour cappuccino pendant environ 5 secondes. - Le voyant de détartrage orange clignote lentement pendant tout le cycle de détartrage. 5 sec 2 Réglez le bouton de commande sur l'icône d'eau chaude et préparez de l'eau chaude. Laissez l'eau s'écouler de la buse à eau chaude/vapeur pendant 10 secondes. 3 Réglez à nouveau le bouton de commande sur l'icône du grain de café unique.
Français 5 Réglez le bouton de commande sur l'icône d'eau chaude. 6 Laissez l'eau chaude s'écouler de la buse à eau chaude/vapeur jusqu'à ce que le voyant « Réservoir d'eau vide » reste allumé. Remarque : Si vous voulez interrompre l'écoulement de l'eau, réglez à nouveau le bouton de commande sur l'icône de grain de café. Pour redémarrer l'écoulement de l'eau, réglez-le sur l'icône d'eau chaude. 7 8 9 10 11 Retirez le plateau égouttoir, rincez-le et remettez-le en place.
Français 53 Signification des voyants - Le voyant du bouton marche/arrêt reste allumé. La machine est prête à l’emploi. - Le bouton marche/arrêt clignote lentement. La machine chauffe ou effectue une procédure. - Le bouton marche/arrêt clignote rapidement. La machine surchauffe. Préparez une tasse d'eau chaude pour faire refroidir la machine. - Les voyants du bouton marche/arrêt et de détartrage restent allumés. Vous devez détartrer la machine.
Français - Les voyants des boutons 2 tasses et marche/arrêt clignotent lentement. La machine programme la quantité de café à préparer. Suivez les instructions du chapitre « Utilisation de la machine », section « Réglage du volume de café ». - Le voyant 2 tasses reste allumé et le bouton marche/arrêt clignote lentement. La machine prépare deux tasses de café. - Le voyant « Réservoir d'eau vide » reste allumé. Le niveau d'eau est bas.
Français 55 - Le voyant d'avertissement clignote rapidement. Il n'y a pas d'eau dans le circuit interne. Réglez le bouton de commande sur l'icône d'eau chaude et laissez l'eau chaude sortir de la machine jusqu'à ce que l'eau s'écoule en continu. Veuillez vous reporter au chapitre « Avant utilisation », section « Processus de chauffe de la machine ». Suivez les étapes 3 et 4. - Le voyant d'avertissement clignote lentement.
Français La machine ne s'allume pas. L’appareil est débranché. Assurez-vous que la petite fiche est correctement insérée dans la prise secteur. Branchez la machine et mettezla en marche. La machine se bloque pendant la procédure de détartrage. Le processus de détartrage a été interrompu ou effectué dans le mauvais ordre. Appuyez sur le bouton marche/arrêt.
Français Impossible d’insérer le groupe café. 57 Le groupe café n’est pas Le groupe café n’a pas été placé en positionné correctement. pause avant d’être remis en place. Assurez-vous que le levier est en contact avec la base du groupe café et que le crochet du groupe café est dans la bonne position. Remettez en place le plateau égouttoir et le bac à marc de café. Laissez le groupe café à l’extérieur. Fermez la porte destinée à l’entretien puis allumez et éteignez l’appareil.
Français Il n'y a pas assez de café dans ma tasse. Le lait ne mousse pas. Il n'y a pas d'eau dans le circuit interne. Il y a peut-être de l'air dans le circuit interne. Rincez le circuit interne de la machine en réglant le bouton de commande sur l'icône d'eau chaude et en laissant un peu d'eau s'écouler de la machine. Le volume de la tasse a été modifié. Réglez le volume de la tasse à l'aide de la fonction memo. Le groupe café est sale.
Français 59 Puissance nominale Intérieur de la porte d'accès au groupe café Dimensions (l x H x P) 295 mm x 325 mm x 420 mm Poids 6,9 kg Matériau Plastique Longueur du cordon 0,8 m - 1,2 m Capacité du réservoir d’eau 1 000 ml Taille de tasse Jusqu'à 95 mm Capacité du bac à marcs de café 170 g Capacité du bac à marcs de café 8 galettes Pression de la pompe 15 bars Chaudière Acier inoxydable Dispositifs de sécurité Fusible thermique
Nederlands Inhoudsopgave Introductie Belangrijk 61 61 Waarschuwing Let op Elektromagnetische velden (EMV) 61 62 62 Apparaatoverzicht (fig.
Nederlands 61 Introductie Geachte klant, hartelijk dank voor de aanschaf van dit automatische Philipsespressoapparaat uit de 2100-serie. Registreer uw product op www.philips.com/welcome om optimaal gebruik te kunnen maken van de door Philips geboden ondersteuning. Het apparaat is geschikt voor de bereiding van espressokoffie met koffiebonen. Daarnaast levert het apparaat stoom en heet water.
Nederlands - Deze machine kan worden gebruikt door kinderen vanaf 8 jaar en door personen met verminderde lichamelijke, zintuiglijke of geestelijke capaciteiten of weinig ervaring en kennis, mits zij onder toezicht staan of instructies hebben ontvangen over veilig gebruik van de machine en zij de gevaren van het gebruik begrijpen. - Reiniging en onderhoud mogen alleen door kinderen worden uitgevoerd die ouder zijn dan 8 en alleen onder toezicht.
Nederlands 63 Apparaatoverzicht (fig.
Nederlands 3 Steek de kleine stekker in de aansluitopening aan de achterkant van het apparaat. 4 Steek de stekker in het stopcontact. 5 Verwijder de beschermende sticker van de lekbak en schuif de lekbak in de geleidegroeven aan de voorzijde van het apparaat. Opmerking: Zorg ervoor dat de lekbak volledig is geplaatst. 6 Bevestig de automatische melkopschuimer op het pijpje. Het waterreservoir vullen 1 Draai de automatische melkopschuimer naar links. 2 Verwijder het waterreservoir uit het apparaat.
Nederlands 65 Het bonenreservoir vullen 1 Vul het bonenreservoir met espressobonen. Opmerking: Gebruik alleen espressobonen. Gebruik nooit gemalen koffie, ongebrande koffiebonen of gekarameliseerde koffiebonen. Dit kan schade aan het apparaat kan veroorzaken. 2 Plaats het deksel op het bonenreservoir. Het apparaat opwarmen Wanneer het apparaat voor het eerst wordt opgewarmd, stroomt er vers water door het interne doorloopsysteem om het apparaat op te warmen. Dit duurt een paar seconden.
Nederlands 4 Als er na een paar seconden geen heet water meer uit het heetwater/stoompijpje komt en het waarschuwingslampje langzaam knippert, draait u de bedieningsknop terug naar het pictogram van één koffieboon. - Het apparaat is aan het opwarmen en de aan-uitknop knippert langzaam. - Wanneer het apparaat is opgewarmd, voert het een automatische spoelcyclus met schoon water uit om het interne doorloopsysteem te reinigen. Er stroomt water uit de koffie-uitloop.
Nederlands 67 3 Draai de knop van het filter naar de instelling die overeenkomt met de waterhardheid van het gebied waarin u woont. a Zeer zacht water/zacht water b Hard water (standaard) c Zeer hard water Opmerking: U kunt de waterhardheid meten met een teststrip voor waterhardheid. 4 Plaats het filter in het lege waterreservoir. Druk het filter naar beneden totdat het niet verder kan. 5 Vul het waterreservoir tot aan de MAX-aanduiding met vers water en schuif het reservoir in het apparaat.
Nederlands 4 Druk op de espressoknop. Opmerking: U kunt het koffiezetten op elk gewenst moment onderbreken. Druk op dezelfde knop waarop u hebt gedrukt om het koffiezetten te starten. - Druk eenmaal op de espressoknop om 1 kopje koffie te zetten. - Druk tweemaal op de espressoknop om 2 kopjes koffie te zetten. - Wanneer u twee kopjes koffie zet, gaat het lampje voor 2 kopjes branden. Het apparaat maalt de benodigde hoeveelheid koffiebonen voor één kopje en vult dan beide kopjes voor de helft.
Nederlands 69 5 Plaats een grote kop onder de automatische melkopschuimer en de koffie-uitloop. 6 Selecteer de koffiesterkte door de bedieningsknop naar één of twee bonen te draaien. Selecteer twee bonen voor een sterkere smaak. 7 Druk op de cappuccinoknop. Het apparaat geeft eerst de melk af en vervolgens koffie. - Het duurt enkele seconden voordat het apparaat stopt met de afgifte. Opmerking: Als u het koffiezetten wilt onderbreken, drukt u nogmaals op de cappuccinoknop.
Nederlands Heet water Waarschuwing: verbrandingsgevaar. Voordat de afgifte van water begint, kunnen er een paar straaltjes heet water uit het stoompijpje komen. Raak alleen het beschermende handvat aan. 1 Controleer of de aan-uitknop onafgebroken brandt. Als de aan-uitknop langzaam knippert, is het apparaat aan het opwarmen. 2 Verwijder de automatische melkopschuimer. Laat het beschermende handvat op het heetwater-/stoompijpje zitten. 3 Plaats een kop onder het heetwater-/stoompijpje.
Nederlands 2 1 71 - Druk de instelknop voor de maalgraad stevig in en draai de knop één stapje per keer. - Er zijn 5 verschillende maalgraadinstellingen waaruit u kunt kiezen. Hoe kleiner de stip, hoe sterker de koffie. - Het verschil wordt merkbaar nadat u 2 of 3 koppen koffie hebt gezet met de nieuwe instelling. Waarschuwing: Draai de instelknop voor de maalgraad niet meer dan één stapje per keer, om schade aan de molen te voorkomen.
Nederlands Snelle reiniging van het melksysteem Opmerking: Voer nadat u een cappuccino hebt gezet een snelle reiniging van het melksysteem uit. 1 2 3 4 Plaats een kop onder de automatische melkopschuimer. Draai de bedieningsknop naar het heetwaterpictogram. Tap heet water gedurende 5 seconden. Draai de bedieningsknop naar een van de koffieboonpictogrammen om de afgifte van heet water te stoppen.
Nederlands 1 2 3 4 5 6 7 73 Giet de inhoud van het zakje Saeco-melksysteemreiniger in de melkkan en vul de melkkan tot de MAX-aanduiding met water. Sluit het deksel van de melkkan. Dompel het andere uiteinde van het melkslangetje in de melk tot aan de bodem van de melkkan. Plaats een grote kom onder de melkschuimuitloop. Draai de bedieningsknop naar het ‘stoom/melk reinigen’-pictogram. - Het apparaat spoelt de reinigingsoplossing door de melkschuimuitloop.
Nederlands 1 1 2 4 Druk op de zijkanten (1) om de automatische melkopschuimer ontgrendelen en verwijder de opschuimer door deze uit het deksel te trekken terwijl u de opschuimer een klein beetje heen en weer beweegt (2). 5 Verwijder het rubberen deksel van de melkopschuimer. 6 Spoel de onderdelen af met lauw water. Opmerking: U kunt deze onderdelen ook in de afwasmachine schoonmaken.
Nederlands 10 Plaats de rubberen ring terug op de automatische melkopschuimer. 11 Bevestig de automatische melkopschuimer weer op het heetwater/stoompijpje. De zetgroep schoonmaken Waarschuwing: Maak de zetgroep niet schoon in de vaatwasmachine en gebruik geen afwasmiddel of schoonmaakmiddelen om deze schoon te maken. Maak de zetgroep één keer per week schoon. 1 Schakel het apparaat uit en haal de stekker uit het stopcontact. 2 Verwijder de koffiedikbak uit het apparaat. 3 Open de servicedeur.
Nederlands 4 Druk op de PUSH-knop en trek aan de handgreep van de zetgroep om deze uit het apparaat te verwijderen. 1 2 5 Maak de uitgang van het koffiekanaal grondig schoon met de steel van een lepel of ander keukengerei met een rond uiteinde. 6 Maak de binnenkant van het apparaat schoon met een vochtige doek. 7 Spoel de buitenkant van de zetgroep af onder een lauwe kraan. Waarschuwing: Gebruik nooit afwasmiddel of een ander schoonmaakmiddel om de zetgroep schoon te maken.
Nederlands 77 - Duw de haak omhoog tot in de bovenste stand om de haak in de juiste positie te zetten. Opmerking: De haak bevindt zich niet in de juiste positie als deze nog in de onderste stand staat. 10 Schuif de zetgroep over de geleiderails aan de zijkant terug in het apparaat tot deze vastklikt. Waarschuwing: Druk niet op de PUSH-knop. 11 Sluit de servicedeur. 12 Schuif de koffiedikbak terug in het apparaat.
Nederlands 1 Schakel het apparaat uit en haal de stekker uit het stopcontact. 2 Verwijder de zetgroep en spoel deze onder de kraan af met lauwwarm water, zoals beschreven in het gedeelte 'Wekelijkse reiniging van de zetgroep'. 3 Breng een dunne laag smeermiddel aan op de as onder in de zetgroep. 4 Breng een dunne laag smeermiddel aan op de geleiders aan beide zijden (zie afbeelding). 5 Plaats de zetgroep zoals beschreven in het gedeelte 'Wekelijkse reiniging van de zetgroep'.
Nederlands 79 Waarschuwing: Als u het apparaat niet uitschakelt, kunt u de ontkalkingscyclus niet starten. 2 Leeg de lekbak en plaats deze weer terug. Verwijder de automatische melkopschuimer (indien aanwezig). 3 Leeg het waterreservoir en verwijder het Intenza+-filter (indien aanwezig). Giet de volledige fles Philips/Saeco-ontkalkingsoplossing in het waterreservoir. 4 Vul de ontkalkingsoplossing in het waterreservoir aan met water, tot de MAX-aanduiding.
Nederlands 5 Draai de bedieningsknop naar het heetwaterpictogram. 6 Laat heet water uit het heetwater-/stoompijpje stromen totdat het 'waterreservoir leeg'-lampje onafgebroken brandt. Opmerking: Als u de waterstroom wilt onderbreken, draait u de bedieningsknop terug naar het koffieboonpictogram. Als u weer heet water wilt tappen, draait u de bedieningsknop terug naar het heetwaterpictogram. 7 8 9 10 11 Verwijder de lekbak, spoel de bak schoon en plaats deze weer terug.
Nederlands 81 Betekenis van lampjes - Het lampje van de aan-uitknop brandt onafgebroken. Het apparaat is klaar voor gebruik. - De aan-uitknop knippert langzaam. Het apparaat is aan het opwarmen of voert een procedure uit. - De aan-uitknop knippert snel. Het apparaat is oververhit. Tap een kop heet water om het apparaat af te koelen. - Het ontkalkingslampje en het lampje van de aan-uitknop branden onafgebroken. U moet het apparaat ontkalken. Volg de instructies in het hoofdstuk 'Het apparaat ontkalken'.
Nederlands - Het lampje voor 2 kopjes en het lampje van de aan-uitknop knipperen langzaam. Het apparaat programmeert de te zetten hoeveelheid koffie. Volg de instructies in het gedeelte ‘De koffiehoeveelheid aanpassen’ van het hoofdstuk 'Het apparaat gebruiken'. - Het lampje voor 2 kopjes brandt onafgebroken en de aan-uitknop knippert langzaam. Het apparaat is twee koppen koffie aan het zetten. - Het 'waterreservoir leeg'-lampje brandt onafgebroken. Het waterniveau is laag.
Nederlands 83 - Het waarschuwingslampje knippert snel. Er zit geen water in het interne doorloopsysteem. Draai de bedieningsknop naar het heetwaterpictogram en laat heet water uit het apparaat komen totdat het water onafgebroken stroomt. Zie het gedeelte ‘Het apparaat opwarmen’ in het hoofdstuk 'Eerste installatie'. Volg stap 3 en 4. - Het waarschuwingslampje knippert langzaam.
Nederlands Het apparaat is vastgelopen tijdens het ontkalkingsproces. Het ontkalkingsproces is onderbroken of in de verkeerde volgorde uitgevoerd. Druk op de aan-uitknop. U kunt het ontkalkingsproces opnieuw starten of de instructies volgen in het gedeelte ‘Onderbreking van het ontkalkingsproces' in het hoofdstuk 'Het apparaat ontkalken'. De koffie is niet heet genoeg. De koppen die u gebruikt Verwarm de koppen voor door ze af te zijn koud. spoelen met heet water. U hebt melk toegevoegd.
Nederlands 85 Plaats de lekbak en de koffiedikbak terug. Laat de zetgroep buiten het apparaat. Sluit de onderhoudsdeur en schakel het apparaat in en uit. Probeer vervolgens de zetgroep weer te plaatsen. Het apparaat maalt de koffiebonen maar er komt geen koffie uit. De koffie is te slap. De lekbak is snel vol. De maling is te fijn ingesteld. Stel de molen in op een grovere maling. De zetgroep is vuil. Maak de zetgroep schoon. De koffie-uitloop is vuil.
Nederlands De zetgroep is vuil. De melk schuimt niet op. Maak de zetgroep schoon (zie het gedeelte 'De zetgroep schoonmaken' in het hoofdstuk 'Schoonmaken en onderhoud'). De automatische Maak de automatische melkopschuimer melkopschuimer is vuil of schoon en zorg dat deze goed in elkaar niet goed in elkaar gezet wordt gezet of geplaatst. of geplaatst. Het type melk dat u gebruikt, is niet geschikt voor opschuimen.
Nederlands 87 Snoerlengte 0,8 -1,2 m Capaciteit waterreservoir 1000 ml Hoogte van koppen Maximaal 95 mm Inhoud van bonenreservoir 170 g Inhoud van koffiedikbak 8 koeken Pompdruk 15 bar Boiler Roestvrij staal Veiligheidsvoorzieningen Thermische zekering
4219.460.3288.1 REV00 29-01-2016 4219.460.3288.1 REV00 HD8652 2100 BACK COVER A5 BW.