HD9640, HD9641 HD9642, HD9643 HD9645, HD9646 HD9647 Always here to help you Register your product and get support at www.philips.
ENGLISH TABLE OF CONTENTS HD9640, HD9641, HD9642, HD9643, HD9645, HD9646, HD9647 2 Important Electromagnetic fields (EMF) Introduction 3 5 6 General description 6 Airfryer and accessories 8 Before first use 9 Preparing for use 9 Placing the removable mesh bottom 9 Placing the EasyClick handle 10 Food table 11 Cooking table for presets 12 Using the appliance 13 Airfrying 13 Changing the cooking temperature during cooking 17 Changing the cooking time durin
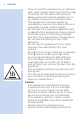
ENGLISH 3 Important Read this important information carefully before you use the appliance and save it for future reference. Danger -- Always put the ingredients to be fried in the basket, to prevent them from coming into contact with the heating elements. -- Do not cover the air inlet and the air outlet openings while the appliance is operating. -- Do not fill the pan with oil as this may cause a fire hazard. -- Never immerse the appliance in water or any other liquid, nor rinse it under the tap.
ENGLISH -- Only connect the appliance to an earthed wall outlet. Always make sure that the plug is inserted into the wall outlet properly. -- Always place and use the appliance on a dry, stable, level and horizontal surface. -- This appliance is not intended to be operated by means of an external timer or a separate remote-control system. -- Do not place the appliance against a wall or against other appliances. Leave at least 10cm free space on the back and sides and 10cm free space above the appliance.
ENGLISH ------- -- --- 5 examination or repair. Do not attempt to repair the appliance yourself, otherwise the guarantee becomes invalid. Let the basket and non-stick grill pan cool down before you exchange or remove the EasyClick handle. This appliance is designed to be used at ambient temperatures between 5°C and 40°C. Always unplug the appliance after use. Let the appliance cool down for approx. 30 minutes before you handle or clean it. Do not overfill the basket.
ENGLISH Introduction Congratulations on your purchase and welcome to Philips! To fully benefit from the support that Philips offers, register your product at www.philips.com/welcome. Your new Airfryer allows you to prepare your favorite ingredients and snacks in a healthier way. The Airfryer uses hot air in combination with high-speed air circulation (TurboStar rapid air technology) and a top grill to prepare a variety of tasty dishes in a healthy, fast and easy way.
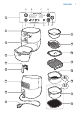
ENGLISH A B C D 1 I H G F E 2 17 3 16 1 15 4 14 5 6 13 MAX 12 7 MAX 8 9 11 10 7
ENGLISH Airfryer and accessories Refer to below table and see the by-packed accessories for your Airfryer. The type number of your Airfryer starts with “HD96XX”. You can find the type number on the packaging or on the bottom of the device. HD9640 HD9641/45 HD9641/56 HD9641/66 HD9642 HD9643 HD9645 HD9646 HD9647 Please keep in mind that some Airfryers may not be available in your country. Also some accessories may not be available in your country. To purchase, see the Philips Airfryer app or visit www.
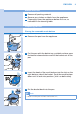
ENGLISH Before first use 1 Remove all packing material. 2 Remove any stickers or labels from the appliance. 3 Thoroughly clean the appliance before first use, as indicated in the cleaning table. Preparing for use Placing the removable mesh bottom 1 Remove the pan from the appliance. 2 Put the pan with the basket on a suitable surface, press the basket release button and lift the basket out of the pan. 1 2 2 3 Insert the hook of the mesh bottom into the slot on the right bottom side of the basket.
ENGLISH 5 Slide the pan back into the appliance. Placing the EasyClick handle Warning •• Always make sure the basket and the handle have cooled down before you attach or detach the EasyClick handle. Note •• The EasyClick handle also fits to the non-stick grill pan. It helps you clean and store the appliance in an easy way. To attach the EasyClick handle: 1 Hold the basket with one hand and hold the handle with the other hand.
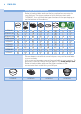
ENGLISH 11 Food table The table below helps you select the basic settings for the types of food you want to prepare. Note •• Keep in mind that these settings are suggestions. As ingredients differ in origin, size, shape as well as brand, we cannot guarantee the best setting for your ingredients. Ingredients Min.- max.
ENGLISH Ingredients Min.- max. amount (grams) Time (minutes) Temperature (°C) Fish 150-400 10-18 200 Shellfish 100-400 7-15 180 Chicken bread crumbed 100-300 8-15 180 Shake/ Turn Additional information Add oil to the breadcrumbs. Cooking table for presets The grams in bold represent the amount of food for which the preset is designed for. If you cook with a different amount, adapt the cooking time accordingly.
ENGLISH 13 Using the appliance Airfrying Caution •• This is an Airfryer that works on hot air. Do not fill the pan with oil or frying fat. •• Do not touch hot surfaces. Use handles or knobs. Only hold the pan by the basket handle. •• This product is for household use only. •• The appliance may produce some smoke when you use it for the first time. This is normal. •• Preheating of the appliance is not necessary. 1 Place the appliance on a stable, horizontal, level and heat-resistant surface.
ENGLISH Note •• The Airfryer can prepare a large range of ingredients. Consult the ‘Food table’ for the right quantities and approximate cooking times. •• Do not exceed the amount indicated in the ‘Food table’ section or overfill the basket beyond the ‘MAX’ indication as this could affect the quality of the end result.
ENGLISH 15 8 After the temperature is confirmed, the time indication “- -“starts blinking. »» To change the cooking time, turn the QuickControl dial. »» To confirm the cooking time, push the QuickControl dial. 9 The appliance starts cooking after the cooking time has been confirmed. Tip •• To pause the cooking process, push the QuickControl dial. To resume the cooking process, push the QuickControl dial again.
ENGLISH Note •• Excess oil from the ingredients is collected on the bottom of the pan. •• If you prepare several batches of fatty ingredients (e.g. drumsticks, sausages or hamburgers), carefully pour off any excess oil or rendered fat from pan after each batch or before shaking or replacing basket in pan. 11 Remove the pan from the appliance and place it on a heat-resistant surface. 12 Check if the ingredients are ready.
ENGLISH 17 Changing the cooking temperature during cooking 1 During cooking, press the temperature button. »» To change the cooking temperature, turn the QuickControl dial. »» To confirm the cooking temperature or time, push the QuickControl dial. Changing the cooking time during cooking 1 During cooking, press the timer button. »» To change the cooking time, turn the QuickControl dial.
ENGLISH »» To confirm the cooking time, push the QuickControl dial. Choosing the preset modes 1 After the appliance is switched on, press the preset button. »» The preset indication for frozen French fries starts blinking. 2 Turn the QuickControl dial to select the preset you need. 3 Push the QuickControl dial to confirm the preset. »» The cooking temperature displays on the screen and the recommended cooking time blinks. »» To change the cooking time, turn the QuickControl dial.
ENGLISH 19 4 Push the QuickControl dial again to confirm the cooking time, and the appliance starts cooking. Tip •• Refer to the “Cooking table for presets” to find the suitable cooking time and more information. Choosing the keep warm mode 1 Press the keep warm button (you can activate the keep warm mode at each time). »» The keep warm indication goes on. »» The keep warm timer is set to 30 minutes. You cannot adjust the keep warm time. To cease the keep warm mode, simply switch off the appliance.
ENGLISH 3 Empty the bowl and dry the potato sticks with a dish towel or paper towel. 4 Pour a half tablespoon of cooking oil in the bowl, put the sticks in the bowl and mix until the sticks are coated with oil. 5 Remove the sticks from the bowl with your fingers or a slotted kitchen utensil so excess oil remains in the bowl. Note •• Do not tilt the bowl to pour all the sticks in the basket at once to prevent excess oil from going into the pan. 6 Put the sticks in the basket.
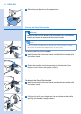
ENGLISH 21 4 Put the second half of the ingredients onto the doublelayer rack. 5 Follow steps 6 to 14 of section ‘Airfrying’. Warning •• The double-layer rack becomes very hot during use. Wear oven gloves when you remove the double-layer rack from the basket. Using the non-stick grill pan 1 Follow steps 1 to 3 of section ‘Airfrying’. 2 Press the basket release button and lift the basket out of the pan. 1 3 Attach the EasyClick handle to the non-stick grill pan (see ‘Placing the EasyClick handle’).
ENGLISH 4 Carefully remove the splatter-proof lid. Warning 2 1 •• The splatter-proof lid is very hot. Wear oven gloves when you remove it. 5 Proceed with step 12 to 14 of section ‘Airfrying’. Using the baking pan 1 Put the ingredients into the baking pan. 2 Follow steps 1 to 3 of section ‘Airfrying’. 3 Remove the pan from the appliance and place it on a suitable surface. Place the baking pan into the pan. 4 Follow steps 6 to 14 of section ‘Airfrying’.
ENGLISH 23 Cleaning Warning •• Let the basket, pan, accessories and the inside of the appliance cool down completely before you start cleaning. •• The pan, basket and inside of appliance have a non-stick coating. Do not use metal kitchen utensils or abrasive cleaning materials as this may damage the non-stick coating. Clean the appliance after every use. Remove oil and fat from the bottom of the pan after every use to prevent smoke.
ENGLISH 6 Clean the inside of the appliance with a moist cloth. Cleaning table Storage 1 Unplug the appliance and let it cool down. 2 Make sure all parts are clean and dry before storing. 3 Wrap the power cord onto the cord storage wrap.
ENGLISH 25 Note •• Always hold the Airfryer horizontally when you carry it. Make sure that you also hold the drawer on the front part of the appliance as it can slide out of the appliance if accidentally tilted downwards. This can lead to damaging of the drawer. •• Always make sure that the removable parts of the Airfryer e.g. EasyClick handle, removable mesh bottom, etc. are fixed before you carry and/or store it.
ENGLISH Problem Possible cause Solution If you leave the appliance switched on for a longer time, some areas get too hot to touch. These areas are marked on the appliance with the following icon: As long as you are aware of the hot areas and avoid touching them, the appliance is completely safe to use. My home-made fries do not turn out as I expected. You did not use the right To get the best results, use fresh, slightly potato type. floury potatoes.
ENGLISH 27 Problem Possible cause Solution White smoke comes out of the appliance. You are preparing fatty ingredients. The oil or rendered fat in the pan may cause white smoke and the pan may get hotter than usual. You can carefully pour off any excess oil or fat from pan and then continue cooking. You can also place the splatter-proof lid on the basket. The pan still contains greasy residues from previous use. White smoke is caused by greasy residues heating up in the pan.
Specifications are subject to change without notice © 2016 Koninklijke Philips N.V.