HD965X, HD976X User manual 2 Bedienungsanleitung 23 Mode d’emploi 45 Gebruiksaanwijzing 66
ENGLISH TABLE OF CONTENTS Important Electromagnetic fields (EMF) Automatic shut-off Introduction 3 4 4 5 General description 5 Before first use 7 Preparing for use Placing the removable mesh bottom and fat reducer Food table Using the appliance Airfrying Changing to another preset during cooking Using the manual mode Changing the cooking temperature or time at any time Choosing the keep warm mode Making home-made fries Cleaning 7 7 8 10 10 14 15
ENGLISH 3 Important Read this important information carefully before you use the appliance and save it for future reference. Danger - Never immerse the appliance in water nor rinse it under the tap. - Do not let any water or other liquid enter the appliance to prevent electric shock. - Always put the ingredients to be fried in the basket, to prevent them from coming into contact with the heating elements. - Do not cover the air inlet and the air outlet openings while the appliance is operating.
ENGLISH - Do not place the appliance on or near a hot gas stove or all kinds of electric stove and electric cooking plates, or in a heated oven. Never fill the pan with oil. This appliance is designed to be used at ambient temperatures between 5°C and 40°C. Check if the voltage indicated on the appliance corresponds to the local mains voltage before you connect the appliance. Keep the mains cord away from hot surfaces.
ENGLISH 5 Introduction Congratulations on your purchase and welcome to Philips! To fully benefit from the support that Philips offers, register your product at www.philips.com/welcome. Philips Airfryer XXL uses hot air to fry your favorite food with little or no added oil. It is built to fry as crispy as deep fried with minimum amount of fat.
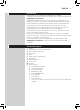
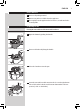
ENGLISH A B I H 11 G C F D E 10 1 2 9 8 3 4 7 5 6
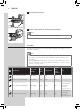
ENGLISH Before first use 1 Remove all packing material. 2 Remove any stickers or labels from the appliance. 3 Thoroughly clean the appliance before first use, as indicated in the cleaning table. Preparing for use Placing the removable mesh bottom and fat reducer 1 Open the drawer by pulling the handle. 2 Remove the basket by lifting the handle. 3 Place the fat reducer into the pan. 2 1 4 Insert the removable mesh bottom into the slot on the right bottom side of the basket.
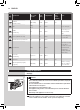
ENGLISH 5 Put the basket in the pan. 6 Slide the drawer back into the Airfryer by the handle. Note • Never use the pan without the fat reducer or the basket in it. Food table The table below helps you select the basic settings for the types of food you want to prepare. Note • Keep in mind that these settings are suggestions. As ingredients differ in origin, size, shape as well as brand, we cannot guarantee the best setting for your ingredients. • When preparing larger amount of food (e.g.
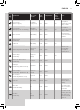
ENGLISH 9 Temperature Shake, turn, or stir halfway Note 7-18 180°C Yes Ready when golden yellow and crispy outside. 100-600 g (5-30 pieces) 14-16 180°C Yes Ready when golden yellow and crispy outside.
ENGLISH Ingredients Min.- max. amount Time (min) Temperature Shake, turn, or stir halfway Shellfish Around 25-30 g 200-1500 g 10-25 200°C Yes Cake 500g 18 oz 28 180°C Use a cake pan. Muffins Around 50 g 1-9 12-14 180°C Use heat-proof silicone muffin cups. Quiche (diameter 21 cm) 1 15 180°C Use a baking tray or oven dish.
ENGLISH Note • Do not put anything on top or on the sides of the appliance. This could disrupt the airflow and affect the frying result. 2 Pull the power cord out of the cord storage compartment at the back of the appliance. 3 Put the plug in the wall outlet. 4 Open the drawer by pulling the handle. 5 Put the ingredients in the basket. Note • The Airfryer can prepare a large range of ingredients. Consult the ‘Food table’ for the right quantities and approximate cooking times.
ENGLISH 6 Slide the drawer back into the Airfryer by the handle. Caution • Never use the pan without the fat reducer or basket in it. If you heat up the appliance without basket, use oven gloves to open the drawer. The edges and inside of the drawer become very hot. • Do not touch the pan, fat reducer or basket during and for some time after use, as they get very hot. 7 Press the Power On/Off ( ) button to switch on the appliance.
ENGLISH 13 Note • If you do not set the required cooking time within 30 minutes, the appliance automatically shuts off for safety reasons. • If “- -” is selected as the time indication, the appliance goes into preheating mode. • Some ingredients require shaking or turning halfway through the cooking time (see ‘Food table’). To shake the ingredients, press the QuickControl dial to pause cooking, open the drawer and lift the basket out of the pan and shake it over the sink.
ENGLISH Note • To remove large or fragile ingredients, use a pair of tongs to lift out ingredients. • Excess oil or rendered fat from the ingredients is collected on the bottom of the pan below the fat reducer. • Depending on the type of ingredients cooking, you may want to carefully pour off any excess oil or rendered fat from the pan after each batch or before shaking or replacing the basket in the pan. Place the basket on a heat-resistant surface.
ENGLISH 15 4 To change the cooking time, turn the QuickControl dial. 1 » To confirm the selected cooking time, push the QuickControl dial. 1 Using the manual mode 1 Press the preset ( ) button. 2 Turn the QuickControl dial to select the manual mode ( 3 Push the QuickControl dial to enter the manual mode. » The default temperature is 180°C. ).
ENGLISH 4 To change the temperature, turn the QuickControl dial. » To confirm the temperature, push the QuickControl dial. 1 2 5 After the temperature is confirmed, the time indication “- -” starts blinking. 6 To change the cooking time, turn the QuickControl dial. » To confirm the cooking time, push the QuickControl dial. 1 2 Changing the cooking temperature or time at any time 1 Press the temperature ( ) or timer ( ) button.
ENGLISH 17 2 To change the cooking temperature or time, turn the QuickControl dial. » To confirm the cooking temperature or time, push the QuickControl dial or the temperature/timer button again. 1 Note • If you do not press the QuickControl dial or the temperaure/timer button to 2 confirm the changes, they will be automatically confirmed after 10 seconds. 1 2 Choosing the keep warm mode 1 Press the keep warm ( ) button (you can activate the keep warm mode at any time).
ENGLISH Note • If you activate the keep warm mode during cooking (the keep warm button lights up with pulsing effect), the appliance will keep your food warm for 30 minutes after the cooking time has elapsed. • During the keep warm mode, the fan and heater inside of the appliance turn on from time to time. • The keep warm mode is designed to keep your dish warm immediately after it is cooked in the Airfryer. It is not meant for reheating.
ENGLISH 19 Cleaning Warning • Let the basket, pan, fat reducer and the inside of the appliance cool down completely before you start cleaning. • Remove the fat reducer from the pan using rubber tipped tongs. Do not remove using your fingers as hot fat or oil collects under the fat reducer. • The pan, basket, fat reducer and inside of the appliance have a non-stick coating. Do not use metal kitchen utensils or abrasive cleaning materials as this may damage the non-stick coating.
ENGLISH 5 Clean the heating element with a cleaning brush to remove any food residues. 6 Clean the inside of the appliance with hot water and a non-abrasive sponge. Storage 1 Unplug the appliance and let it cool down. 2 Make sure all parts are clean and dry before storing. 3 Insert the cord into the cord storage compartment. Note • Always hold the Airfryer horizontally when you carry it.
ENGLISH 21 Guarantee and support If you need information or support, please visit www.philips.com/support or read the separate worldwide guarantee leaflet. Troubleshooting This chapter summarizes the most common problems you could encounter with the appliance. If you are unable to solve the problem with the information below, visit www.philips.com/support for a list of frequently asked questions or contact the Consumer Care Center in your country.
ENGLISH Problem Possible cause Solution I see some peeling off spots inside my Airfryer. Some small spots can appear inside the pan of the Airfryer due to the incidental touching or scratching of the coating (e.g. during cleaning with harsh cleaning tools and/or while inserting the basket). You can prevent damage by lowering the basket into the pan properly. If you insert the basket at an angle, its side may knock against the wall of the pan, causing small pieces of coating to chip off.
DEUTSCH 23 INHALTSVERZEICHNIS Wichtig! Elektromagnetische Felder Automatische Abschaltung Einführung 24 25 26 26 Allgemeine Beschreibung 26 Vor dem ersten Gebrauch 28 Für den Gebrauch vorbereiten Einsetzen des abnehmbaren Siebbodens und des Fettabscheiders Grillzeiten-Tabelle Das Gerät benutzen Garen mit dem Airfryer Wechseln zu einer anderen Voreinstellung während des Garens Verwenden des manuellen Modus Ändern der Gartemperatur oder -zeit Auswählen des War
DEUTSCH Wichtig! Lesen Sie diese wichtigen Informationen vor dem Gebrauch des Geräts aufmerksam durch, und bewahren Sie sie für eine spätere Verwendung auf. Achtung! - Tauchen Sie das Gerät niemals in Wasser; spülen Sie es auch nicht unter fließendem Wasser ab. - Achten Sie darauf, dass kein Wasser oder andere Flüssigkeiten in das Gerät eindringen, um Stromschläge zu vermeiden. - Geben Sie die zu bratenden Zutaten in den Korb, damit sie nicht mit den Heizelementen in Kontakt kommen.
DEUTSCH - 25 Stellen Sie das Gerät nicht auf einen heißen Gas- oder Elektroherd jeglicher Art, elektrische Kochplatten oder in den beheizten Ofen. Füllen Sie die Pfanne niemals mit Öl. Dieses Gerät wurde speziell für die Verwendung bei Umgebungstemperaturen zwischen 5°C und 40°C entworfen. Prüfen Sie, bevor Sie das Gerät in Betrieb nehmen, ob die Spannungsangabe auf dem Gerät mit der örtlichen Netzspannung übereinstimmt. Achten Sie darauf, dass das Netzkabel nicht in der Nähe heißer Flächen verläuft.
DEUTSCH Automatische Abschaltung Dieses Gerät ist mit einer automatischen Abschaltungsfunktion ausgestattet. Wenn die Zeit am Timer abgelaufen ist, schaltet sich das Gerät automatisch aus. Um das Gerät manuell auszuschalten, drehen Sie den Timer auf die Position "0". Einführung Herzlichen Glückwunsch zu Ihrem Kauf und willkommen bei Philips! Um das Kundendienstangebot von Philips vollständig nutzen zu können, sollten Sie Ihr Produkt unter www.philips.com/welcome registrieren.
DEUTSCH A B I H 11 G C F D E 10 1 2 9 8 3 4 7 5 6 27
DEUTSCH Vor dem ersten Gebrauch 1 Entfernen Sie sämtliches Verpackungsmaterial. 2 Entfernen Sie sämtliche evtl. vorhandenen Aufkleber oder Etiketten vom Gerät. 3 Reinigen Sie das Gerät vor der ersten Verwendung gründlich, wie in der Reinigungstabelle angegeben. Für den Gebrauch vorbereiten Einsetzen des abnehmbaren Siebbodens und des Fettabscheiders 1 Ziehen Sie am Griff zum Öffnen der Schublade. 2 Nehmen Sie den Korb durch Anheben des Griffs heraus. 3 Setzen Sie den Fettabscheider in die Pfanne.
DEUTSCH 29 5 Setzen Sie den Korb in die Pfanne. 6 Schieben Sie die Schublade am Griff zurück in den Airfryer. Hinweis • Verwenden Sie die Pfanne nie ohne den Fettabscheider oder den Korb. Grillzeiten-Tabelle Die folgende Tabelle hilft Ihnen dabei, die grundlegenden Einstellungen für die Lebensmittel auszuwählen, die Sie zubereiten möchten. Hinweis • Beachten Sie, dass es sich bei diesen Einstellungen nur um Empfehlungen handelt.
DEUTSCH Inhaltsstoffe Min./Max. Menge Zeit (Min.) Temperatur Schütteln, wenden oder Hinweis rühren nach der Hälfte der Zeit Hausgemachte Kartoffelecken 200–1400 g 20–42 180 °C Ja Weichen Sie sie 30 Minuten in Wasser ein, trocknen Sie sie, und fügen Sie dann 1/4 bis 1 EL Öl hinzu. Gefrorene Snacks (Chicken Nuggets) 80–1300 g (6–50 Stück) 7–18 180 °C Ja Fertig, wenn außen goldgelb und knusprig.
DEUTSCH Inhaltsstoffe Ganzer Fisch ca. 300–400 g Min./Max. Menge 1-2 Zeit (Min.) 18 – 22 Temperatur 31 Schütteln, wenden oder Hinweis rühren nach der Hälfte der Zeit 200 °C Schneiden Sie den Schwanz ab, wenn er nicht in den Korb passt. Um ein Ankleben zu vermeiden, legen Sie die Seite mit der Haut nach unten, und geben Sie etwas Öl hinzu. Fischfilets ca. 120 g 1-3 (1 Schicht) 9–12 200 °C Schalentiere ca.
DEUTSCH Das Gerät benutzen Garen mit dem Airfryer Vorsicht • Dieser Airfryer funktioniert mit Heißluft. Füllen Sie die Pfanne nicht mit Öl, Frittierfett oder anderen Flüssigkeiten. • Berühren Sie die heißen Oberflächen nicht. Verwenden Sie immer die Griffe. Berühren Sie die heiße Pfanne und den Fettabscheider nur mit Ofenhandschuhen. • Dieses Gerät ist nur für den Gebrauch im Haushalt bestimmt. • Beim ersten Gebrauch kann das Gerät etwas Rauch entwickeln. Das ist normal.
DEUTSCH 33 5 Geben Sie die Zutaten in den Korb. Hinweis • Der Airfryer kann viele verschiedene Zutaten zubereiten. Die richtigen Mengen und entsprechenden Garzeiten finden Sie in der Lebensmitteltabelle. • Überschreiten Sie niemals die in der Lebensmitteltabelle angegebene Menge, und füllen Sie den Korb nie über die MAX-Markierung hinaus, da dies die Qualität des Endergebnisses beeinträchtigen kann.
DEUTSCH 10 Der Garvorgang beginnt, sobald die Garzeiteinstellung bestätigt wurde. Tipp • Drücken Sie den QuickControl-Regler, um den Garvorgang zu unterbrechen. Drücken Sie erneut den QuickControl-Regler, um den Garvorgang fortzusetzen. Hinweis • Wenn Sie die erforderliche Garzeit nicht innerhalb von 30 Minuten einstellen, schaltet sich das Gerät aus Sicherheitsgründen automatisch aus. • Wenn "- -" als Zeitanzeige ausgewählt ist, wechselt das Gerät in den Vorheizmodus.
DEUTSCH 35 14 Leeren Sie den Inhalt des Korbs in eine Schüssel oder auf einen Teller. Nehmen Sie den Korb zum Entleeren immer aus der Pfanne, da sich heißes Öl unten in der Pfanne ansammeln kann. Hinweis • Um große oder zerbrechliche Zutaten herauszunehmen, verwenden Sie eine Zange, um die Zutaten aus dem Korb zu heben. • Überschüssiges Öl oder ausgeschmolzenes Fett von den Speisen sammelt sich am Boden der Pfanne unter dem Fettabscheider.
DEUTSCH 3 Drücken Sie den QuickControl-Regler, um die ausgewählte Voreinstellung zu bestätigen. Die Anzeige für die Garzeit blinkt auf dem Bildschirm. 1 4 Drehen Sie den QuickControl-Regler, um die Garzeit zu ändern. 1 » Drücken Sie den QuickControl-Regler, um die ausgewählte Garzeit zu bestätigen. 1 Verwenden des manuellen Modus 1 Drücken Sie die Voreinstellungstaste ( ). 2 Drehen Sie den QuickControl-Regler, um den manuellen Modus auszuwählen ( ).
DEUTSCH 37 3 Drücken Sie den QuickControl-Regler, um den manuellen Modus zu bestätigen. » Die Standardtemperatur beträgt 180SDgrC. 4 Drehen Sie den QuickControl-Regler, um die Temperatur einzustellen. » Drücken Sie den QuickControl-Regler, um die Temperatureinstellung zu bestätigen. 1 2 5 Nachdem Sie die Temperatureinstellung bestätigt haben, blinkt die Zeitanzeige "- -". 6 Drehen Sie den QuickControl-Regler, um die Garzeit einzustellen.
DEUTSCH 2 Drehen Sie den QuickControl-Regler, um die Gartemperatur oder -zeit einzustellen. » Zum Bestätigen der Gartemperatur oder -zeit drücken Sie den QuickControl-Regler oder die Temperatur-/Timer-Taste erneut. 1 Hinweis • Wenn Sie den QuickControl-Regler oder die Temperatur-/Timer-Taste zur 2 Bestätigung der Änderungen nicht drücken, werden diese nach 10 Sekunden automatisch bestätigt.
DEUTSCH 39 Hinweis • Wenn Sie den Warmhaltemodus während des Garvorgangs aktivieren (die Warmhaltetaste blinkt), hält das Gerät Ihre Speisen nach Ablauf der Garzeit 30 Minuten lang warm. • Im Warmhaltemodus werden der Lüfter und das Heizelement im Inneren des Geräts gelegentlich eingeschaltet. • Der Warmhaltemodus ist dazu gedacht, Ihr Gericht direkt nach der Zubereitung im Airfryer warm zu halten. Er ist nicht zum Aufwärmen geeignet.
DEUTSCH Pflege Achtung • Lassen Sie den Korb, die Pfanne, den Fettabscheider und die Innenseite des Geräts vollständig abkühlen, bevor Sie mit dem Reinigungsvorgang beginnen. • Entfernen Sie mithilfe einer Zange mit gummierten Spitzen den Fettabscheider aus der Pfanne. Entfernen Sie den Einsatz nicht mit den Fingern, da sich heißes Fett oder Öl unter dem Fettabscheider ansammelt. • Die Pfanne, der Korb, der Fettabscheider und die Innenseite des Geräts sind antihaftbeschichtet.
DEUTSCH 41 Hinweis • Vergewissern Sie sich, dass keine Feuchtigkeit auf dem Bedienfeld zurückbleibt. Trocknen Sie das Bedienfeld mit einem Tuch, nachdem Sie es gereinigt haben. 5 Reinigen Sie das Heizelement mit einer Reinigungsbürste, um etwaige Lebensmittelrückstände zu entfernen. 6 Reinigen Sie die Innenseite des Geräts mit heißem Wasser und einem nicht kratzenden Schwamm. Aufbewahrung 1 Ziehen Sie den Netzstecker aus der Steckdose, und lassen Sie das Gerät abkühlen.
DEUTSCH Recycling - Dieses Symbol bedeutet, dass das Produkt nicht mit dem normalen Hausmüll entsorgt werden kann (2012/19/EU). 1 Altgeräte können kostenlos an geeigneten Rücknahmestellen abgegeben werden. 2 Diese werden dort fachgerecht gesammelt oder zur Wiederverwendung vorbereitet. Altgeräte können Schadstoffe enthalten, die der Umwelt und der menschlichen Gesundheit schaden können. Enthaltene Rohstoffe können durch ihre Wiederverwertung einen Beitrag zum Umweltschutz leisten.
DEUTSCH 43 Problem Mögliche Ursache Lösung Meine hausgemachten Pommes Frites gelingen nicht wie erwartet. Sie haben die falsche Kartoffelsorte verwendet. Verwenden Sie für ein optimales Ergebnis frische, (leicht) mehlig kochende Kartoffeln. Wenn Sie die Kartoffeln lagern müssen, lagern Sie sie nicht in einer kalten Umgebung wie z. B. einem Kühlschrank. Wählen Sie Kartoffeln aus, auf deren Verpackung steht, dass sie sich zum Frittieren eignen. Die Zutatenmenge im Korb ist zu groß.
DEUTSCH Problem Mögliche Ursache Lösung Marinade, Flüssigkeiten oder Tupfen Sie die Lebensmittel trocken, bevor Sie Fleischsaft gelangen in das sie in den Korb geben. ausgetretene Fett. Mein Display zeigt 5 Bindestriche an, wie im Bild unten abgebildet. Dies ist ein Fehlercode. 1. Ziehen Sie den Netzstecker aus der Steckdose, und lassen Sie das Gerät 5 Minuten lang ruhen, bevor Sie es wieder anschließen. 2.
FRANÇAIS 45 TABLE DES MATIÈRES Important Champs électromagnétiques (CEM) Arrêt automatique Introduction 46 48 48 48 Description générale 48 Avant la première utilisation 50 Avant utilisation Installation du fond alvéolé amovible et du réducteur de graisse Tableau de cuisson des aliments Utilisation de l'appareil Cuisson à l'air chaud Changer la présélection pendant la cuisson Utilisation du mode manuel Changer la température ou le temps de cuisson à tout moment
FRANÇAIS Important Lisez attentivement ces informations importantes avant d'utiliser l'appareil et conservez-les pour un usage ultérieur. Danger - Ne plongez jamais l’appareil dans l’eau et ne le rincez pas sous le robinet. - Veillez à ne pas faire pénétrer d’eau ou d’autres liquides dans l’appareil afin d’éviter tout risque d’électrocution. - Mettez toujours les aliments à frire dans le panier afin d’éviter qu’ils entrent en contact avec les résistances.
FRANÇAIS - - 47 Les surfaces accessibles peuvent chauffer lorsque l’appareil fonctionne. Conservation des pommes de terre : la température doit être adaptée à la variété des pommes de terre entreposées et doit être supérieure à 6°C pour minimiser le risque d’exposition à l’acrylamide dans les aliments préparés. Ne placez pas l’appareil sur ou à proximité d’une cuisinière chaude à gaz ou de tout type de cuisinière électrique ou de plaques de cuisson électriques, ou dans un four chaud.
FRANÇAIS Champs électromagnétiques (CEM) Cet appareil Philips est conforme à toutes les normes et à tous les règlements applicables relatifs aux champs électromagnétiques. Arrêt automatique Cet appareil est doté d'une fonction d'arrêt automatique. Au terme de la durée programmée, l'appareil s'éteint automatiquement. Pour éteindre l'appareil manuellement, réglez le minuteur sur la position « 0 ».
FRANÇAIS 49 A B I H 11 G C F D E 10 1 2 9 8 3 4 7 5 6
FRANÇAIS Avant la première utilisation 1 Retirez tout l'emballage. 2 Retirez tous les autocollants et étiquettes de l'appareil. 3 Nettoyez soigneusement l'appareil avant la première utilisation, comme indiqué dans le tableau de nettoyage. Avant utilisation Installation du fond alvéolé amovible et du réducteur de graisse 1 Ouvrez le tiroir en tirant sur la poignée. 2 Enlevez le panier en soulevant la poignée. 3 Placez le réducteur de graisse dans la cuve.
FRANÇAIS 51 5 Placez le panier dans la cuve. 6 Replacez le tiroir dans la friteuse Airfryer grâce à la poignée. Note • N'utilisez jamais la cuve sans y avoir préalablement installé le réducteur de graisse ou le panier. Tableau de cuisson des aliments Le tableau ci-dessous vous aide à choisir les réglages de base pour certains types d'aliments. Note • N'oubliez pas que ces réglages sont donnés à titre d'indication.
FRANÇAIS Ingrédients Min.- max. quantité Temps (min) Secouez, tournez, Tempéra- ou méture langez à mi-cuisson Note 180 °C Oui Faites tremper 30 minutes dans l'eau, séchez et ajoutez 1/4 à 1 cuillère à soupe d'huile. Quartiers de pommes de terre maison 200-1 400 g En-cas surgelés (nuggets de poulet) 80-1 300 g 7-18 (6-50 pièces) 180 °C Oui Vos nuggets sont prêts lorsqu'ils sont dorés et croustillants à l'extérieur.
FRANÇAIS Ingrédients Min.- max. quantité Temps (min) Secouez, tournez, Tempéra- ou méture langez à mi-cuisson Poisson entier Entre 300 et 400 g 1-2 18-22 200 °C Découpez la queue si elle ne tient pas dans le panier. Filets de poisson Environ 120 g 1-3 (1 couche) 9-12 200 °C Afin d'éviter qu'ils ne collent, placez la peau vers le bas et ajoutez un peu d'huile. Fruits de mer De 25 à 30 g 200-1 500 g 10-25 200 °C Gâteau 500 g 18 oz 28 180 °C Utilisez un moule à gâteau.
FRANÇAIS Utilisation de l'appareil Cuisson à l'air chaud Attention • Cette friteuse Airfryer fonctionne avec de l'air chaud. Ne remplissez pas la cuve d'huile, de graisse de friture, ni d'aucun autre liquide. • Ne touchez pas les surfaces chaudes. Utilisez les poignées ou les boutons. Manipulez la cuve chaude et le réducteur de graisse avec des gants de cuisine. • Cet appareil est destiné à un usage domestique uniquement. • Lors de la première utilisation, de la fumée peut se dégager de cet appareil.
FRANÇAIS 55 5 Mettez les aliments dans le panier. Note • La friteuse Airfryer permet de préparer une grande variété d'aliments. Consultez le tableau de cuisson des aliments pour connaître les bonnes quantités et les temps de cuisson approximatifs. • Ne dépassez pas la quantité indiquée dans le tableau de cuisson des aliments et ne remplissez pas le panier au-delà de l'indication MAX car cela pourrait affecter la qualité du résultat final.
FRANÇAIS 10 L'appareil démarre la cuisson une fois que le temps de cuisson a été confirmé. Conseil • Pour suspendre le processus de cuisson, appuyez sur le bouton QuickControl. Pour reprendre le processus de cuisson, appuyez à nouveau sur le bouton QuickControl. Note • Si vous ne réglez pas le temps de cuisson requis dans les 30 minutes, l'appareil s'éteint automatiquement pour des raisons de sécurité. • Si vous sélectionnez l'indication de temps « - - », l'appareil passe en mode préchauffage.
FRANÇAIS 57 Attention • Une fois la cuisson terminée, la cuve, le réducteur de graisse, l'intérieur de l'appareil et les ingrédients sont chauds. En fonction du type d'aliments placés dans l'Airfryer, de la vapeur peut s'échapper de la cuve. 14 Videz le contenu du panier dans un saladier ou un plat. Retirez toujours le panier de la cuve pour vider son contenu, car de l'huile chaude peut se trouver au fond de la cuve. Note • Pour sortir les aliments épais ou fragiles, utilisez des pinces.
FRANÇAIS 3 Pour confirmer la présélection choisie, appuyez sur le bouton QuickControl. Le temps de cuisson clignote à l'écran. 1 4 Pour changer le temps de cuisson, tournez le bouton QuickControl. 1 » Pour confirmer le temps de cuisson, appuyez sur le bouton QuickControl. 1 Utilisation du mode manuel 1 Appuyez sur le bouton de présélection ( ). 2 Tournez le bouton QuickControl pour sélectionner le mode manuel ( ).
FRANÇAIS 59 3 Appuyez sur le bouton QuickControl pour basculer en mode manuel. » La température par défaut est de 180°C. 4 Pour changer la température, tournez le bouton QuickControl. » Pour confirmer la température, appuyez sur le bouton QuickControl. 1 2 5 Une fois la température confirmée, l'indicateur de temps « - - » commence à clignoter. 6 Pour changer le temps de cuisson, tournez le bouton QuickControl. » Pour confirmer le temps de cuisson, appuyez sur le bouton QuickControl.
FRANÇAIS 2 Pour changer le temps de cuisson, tournez le bouton QuickControl. » Pour confirmer la température ou le temps de cuisson, appuyez sur le bouton QuickControl, ou de nouveau sur le bouton de température/minuteur. 1 Note • Si vous n'appuyez pas sur le bouton QuickControl ou sur le bouton de 2 température/minuteur pour confirmer vos changements, ceux-ci seront automatiquement confirmés au bout de 10 secondes.
FRANÇAIS 61 Note • Si vous activez le mode de maintien au chaud durant la cuisson (le bouton de maintien au chaud s'allume avec l'effet d'impulsion), l'appareil gardera les aliments chauds pendant 30 minutes une fois le temps de cuisson écoulé. • En mode de maintien au chaud, le ventilateur et l'élément chauffant à l'intérieur de l'appareil s'activent de temps en temps. • Le mode de maintien au chaud est conçu pour garder les aliments chauds immédiatement après leur cuisson dans la friteuse Airfryer.
FRANÇAIS Nettoyage Avertissement • Laissez refroidir entièrement le panier, la cuve, le réducteur de graisse et l'intérieur de l'appareil avant de commencer le nettoyage. • Retirez le réducteur de graisse de la cuve à l'aide de pinces. Ne le retirez pas avec les doigts, car le réducteur de graisse récupère l'huile et la graisse chaude. • La cuve, le panier, le réducteur de graisse et l'intérieur de l'appareil sont équipés d'un revêtement antiadhésif.
FRANÇAIS 63 Note • Assurez-vous qu'aucune trace d'humidité ne subsiste sur le panneau de commande. Séchez le panneau de commande avec un chiffon après l'avoir nettoyé. 5 Nettoyez l'élément chauffant avec une brosse de nettoyage pour éliminer les résidus de nourriture. 6 Nettoyez l'intérieur de l'appareil avec de l'eau chaude et une éponge non abrasive. Rangement 1 Débranchez l'appareil et laissez-le refroidir. 2 Veillez à nettoyer et sécher tous les éléments avant de ranger l'appareil.
FRANÇAIS Garantie et assistance Si vous avez besoin d'une assistance ou d'informations supplémentaires, consultez le site Web www.philips.com/support ou lisez le dépliant séparé sur la garantie internationale. Dépannage Cette rubrique présente les problèmes les plus courants que vous pouvez rencontrer avec votre appareil. Si vous ne parvenez pas à résoudre le problème à l'aide des informations ci-dessous, rendez-vous sur www.philips.
FRANÇAIS Problème 65 Cause possible Solution Certains types d'aliments doivent être mélangés à micuisson. Suivez les instructions de ce mode d'emploi pour préparer des frites maison (voir le tableau de cuisson des aliments ou télécharger l'application gratuite Airfryer). L'appareil n'est pas branché. Lorsque vous allumez l'appareil, vous entendez le ventilateur fonctionner. Si vous n'entendez pas ce son, vérifiez si la fiche est correctement branchée sur la prise murale.
NEDERLANDS INHOUDSOPGAVE Belangrijk Elektromagnetische velden (EMV) Automatische uitschakeling Introductie 67 68 69 69 Algemene beschrijving 69 Voor het eerste gebruik 71 Klaarmaken voor gebruik 71 De mand met uitneembare gaasbodem plaatsen en vetverminderaar 71 Tabel voor etenswaren 72 Het apparaat gebruiken 75 Heteluchtfrituren 75 Tijdens de bereiding een andere voorgeprogrammeerde instelling kiezen 78 De handmatige modus gebruiken 79 De bereidingstemperatu
NEDERLANDS 67 Belangrijk Lees deze belangrijke informatie zorgvuldig door voordat u het apparaat gaat gebruiken. Bewaar het boekje om het indien nodig later te kunnen raadplegen. Gevaar - Dompel het apparaat nooit in water en spoel het nooit af onder de kraan. - Zorg dat er geen water of een andere vloeistof in het apparaat terechtkomt om een elektrische schok te voorkomen. - Doe de etenswaren die u wilt bakken altijd in de mand om te voorkomen dat ze met de verwarmingselementen in contact komen.
NEDERLANDS - Plaats het apparaat niet op of in de buurt van een heet gasfornuis of elektrisch fornuis, hete elektrische kookplaat of in een warme oven. Vul de pan nooit met olie. Dit apparaat is ontworpen voor gebruik bij een omgevingstemperatuur tussen 5°C en 40°C. Controleer of het voltage dat wordt aangegeven op het apparaat, overeenkomt met de plaatselijke netspanning voordat u het apparaat aansluit. Houd het netsnoer uit de buurt van hete oppervlakken.
NEDERLANDS 69 Automatische uitschakeling Dit apparaat heeft een functie voor automatische uitschakeling. Als de timer is afgelopen, wordt het apparaat automatisch uitgeschakeld. Draai de timer naar '0' om het apparaat handmatig uit te schakelen. Introductie Gefeliciteerd met uw aankoop en welkom bij Philips! Registreer uw product op www.philips.com/welcome om optimaal gebruik te kunnen maken van de door Philips geboden ondersteuning.
NEDERLANDS A B I H 11 G C F D E 10 1 2 9 8 3 4 7 5 6
NEDERLANDS 71 Voor het eerste gebruik 1 Verwijder al het verpakkingsmateriaal. 2 Verwijder eventuele stickers of labels van het apparaat. 3 Reinig het apparaat grondig vóór het eerste gebruik, zoals aangegeven in de schoonmaaktabel. Klaarmaken voor gebruik De mand met uitneembare gaasbodem plaatsen en vetverminderaar 1 Open de lade door aan het handvat te trekken. 2 Haal de mand eruit door deze op te tillen aan het handvat. 3 Plaats de vetverminderaar in de pan.
NEDERLANDS 5 Plaats de mand in de pan. 6 Schuif de lade aan het handvat terug in de Airfryer. Opmerking • Gebruik de pan nooit zonder de vetverminderaar of mand. Tabel voor etenswaren De onderstaande tabel vermeldt de basisstanden voor veelvoorkomende etenswaren die u wilt bereiden. Opmerking • Houd er rekening mee dat deze standen slechts indicaties zijn. Aangezien etenswaren verschillen in herkomst, grootte, vorm en merk, kunnen we niet de beste stand voor uw etenswaren garanderen.
NEDERLANDS 73 Ingrediënten Min.- — max.hoeveelheid Tijd (min.) Halverwege schudden, Temperatuur draaien of roeren Opmerking Bevroren snacks (kipnuggets) 80-1300 g (6-50 stuks) 7-18 180°C Ja Klaar als ze goudbruin en krokant zijn aan de buitenkant. Bevroren snacks (kleine loempia's van ongeveer 20 g) 100-600 g (5-30 stuks) 14-16 180°C Ja Klaar als ze goudbruin en krokant zijn aan de buitenkant.
NEDERLANDS Ingrediënten Min.- — max.hoeveelheid Tijd (min.) Halverwege schudden, Temperatuur draaien of roeren Opmerking Leg de vis met de huidkant op de bodem en voeg wat olie toe om aanbakken te voorkomen. Visfilet Ongeveer 120 g 1-3 (1 laag) 9-12 200°C Schelp-/schaaldieren Ongeveer 25-30 g 200-1500 g 10-25 200°C Cake 500 g 18 oz 28 180°C Cakevorm gebruiken. Ja Muffins Ongeveer 50 g 1-9 12-14 180°C Gebruik hittebestendige siliconen muffinvormpjes.
NEDERLANDS Het apparaat gebruiken Heteluchtfrituren Let op • Dit is een Airfryer en dit apparaat werkt met hete lucht. Vul de pan niet met olie, frituurvet of een andere vloeistof. • Raak hete oppervlakken niet aan. Gebruik handgrepen of knoppen. Draag ovenwanten wanneer u met de hete pan en vetverminderaar werkt. • Dit apparaat is uitsluitend bedoeld voor huishoudelijk gebruik. • Er kan wat rook uit het apparaat komen wanneer u dit voor het eerst gebruikt. Dit is normaal.
NEDERLANDS 5 Doe de etenswaren in de mand. Opmerking • Met de Airfryer kunt u een grote verscheidenheid aan etenswaren bereiden. Raadpleeg de ‘Tabel voor etenswaren’ voor de juiste hoeveelheden en de kooktijden bij benadering. • De hoeveelheden uit de ‘Tabel voor etenswaren’ mogen niet worden overschreden en de mand mag niet tot boven de 'MAX'-aanduiding worden gevuld omdat dit een negatief effect op de kwaliteit van het eindresultaat kan hebben.
NEDERLANDS 77 10 Nadat de bereidingstijd bevestigd is, begint het apparaat met de bereiding. Tip • Om het bereidingsproces te pauzeren, drukt u op de QuickControl-knop. Om het bereidingsproces te hervatten, drukt u nogmaals op de QuickControl-knop. Opmerking • Als u de noodzakelijke bereidingstijd niet binnen 30 minuten instelt, wordt het apparaat om veiligheidsredenen uitgeschakeld. • Als '- -' als tijdsaanduiding is geselecteerd, wordt de modus voor voorverwarmen ingeschakeld.
NEDERLANDS 14 Leeg de mand in een schaal of op een bord. Haal altijd de mand uit de pan om de inhoud eruit te halen aangezien onder in de pan nog hete olie kan zitten. Opmerking • Om grote of kwetsbare etenswaren uit de mand te verwijderen, kunt u het beste een tang gebruiken. • Overtollige olie of gesmolten vet van de etenswaren wordt opgevangen op de bodem van de pan onder de vetverminderaar.
NEDERLANDS 79 3 Als u de geselecteerde voorgeprogrammeerde instelling wilt bevestigen, drukt u op de QuickControl-knop. De aanduiding voor de bereidingstijd knippert op het scherm. 1 4 Om de bereidingstijd te wijzigen, draait u aan de QuickControl-knop. 1 » Druk op de QuickControl-knop om de geselecteerde bereidingstijd te bevestigen. 1 De handmatige modus gebruiken 1 Druk op de snelkeuzeknop ( ). 2 Draai aan de QuickControl-knop om de handmatige modus ( selecteren.
NEDERLANDS 3 Druk op de QuickControl-knop om de handmatige modus te starten. » De standaardtemperatuur is 180 °C. 4 Om de temperatuur te wijzigen, draait u aan de QuickControl-knop. » Om de temperatuur te bevestigen, drukt u op de QuickControlknop. 1 2 5 Zodra de temperatuur is bevestigd, begint de tijdsaanduiding “- -” te knipperen. 6 Om de bereidingstijd te wijzigen, draait u aan de QuickControl-knop. » Om de bereidingstijd te bevestigen, drukt u op de QuickControlknop.
NEDERLANDS 81 2 Om de bereidingstemperatuur of -tijd te wijzigen, draait u aan de QuickControl-knop. » Om de bereidingstemperatuur of bereidingstijd te bevestigen, drukt u op de QuickControl-knop of opnieuw op de temperatuurknop of timerknop. 1 Opmerking 2 • Als u niet op de QuickControl-knop of op de temperatuurknop of timerknop drukt om de wijzigingen te bevestigen, worden deze na 10 seconden automatisch bevestigd.
NEDERLANDS Opmerking • Als u de warmhoudmodus tijdens het bereiden activeert (de warmhoudknop knippert), houdt het apparaat uw etenswaren gedurende 30 minuten na het aflopen van de bereidingstijd warm. • Tijdens de warmhoudmodus gaan de ventilator en het verwarmingselement in het apparaat zo nu en dan aan. • De warmhoudmodus is ontworpen om uw maaltijd onmiddellijk na de bereiding in de Airfryer warm te houden. Deze modus is niet bedoeld voor opwarmen.
NEDERLANDS 83 Reiniging Waarschuwing • Laat de mand, de pan, de vetverminderaar en de binnenkant van het apparaat volledig afkoelen voordat u begint met reinigen. • Haal de vetverminderaar uit de pan met behulp van een tang met rubberen uiteinden. Doe dit niet met uw vingers, aangezien de hete olie of het hete vet zich onder de vetverminderaar verzamelt. • De pan, de mand, de vetverminderaar en de binnenkant van het apparaat hebben een antiaanbaklaag.
NEDERLANDS 5 Maak het verwarmingselement schoon met een schoonmaakborsteltje om etensresten te verwijderen. 6 Maak de binnenkant van het apparaat schoon met warm water en een niet-schurend sponsje. Opbergen 1 Haal de stekker uit het stopcontact en laat het apparaat afkoelen. 2 Controleer of alle onderdelen schoon en droog zijn voordat u het apparaat opbergt. 3 Duw het snoer in de snoeropbergruimte. Opmerking • Houd de Airfryer altijd horizontaal wanneer u deze draagt.
NEDERLANDS 85 Garantie en ondersteuning Als u informatie of ondersteuning nodig hebt, bezoek dan www.philips.com/support of lees het 'worldwide guarantee'-vouwblad. Problemen oplossen Dit hoofdstuk behandelt in het kort de problemen die u kunt tegenkomen tijdens het gebruik van uw apparaat. Als u het probleem niet met de onderstaande informatie kunt oplossen, ga dan naar www.philips.com/support voor een lijst met veelgestelde vragen of neem contact op met het Consumer Care Center in uw land.
NEDERLANDS Probleem Mogelijke oorzaak Oplossing Ik zie wat afbladderingen in mijn Airfryer. In de pan van de Airfryer kunnen kleine plekjes ontstaan wanneer u de coating per ongeluk hebt aangeraakt of bekrast, bijvoorbeeld tijdens het reinigen met agressieve schoonmaakmiddelen en/of bij het plaatsen van de mand). U kunt beschadigingen voorkomen door de mand correct in de pan te plaatsen.
Specifications are subject to change without notice © 2021 Philips Domestic Appliances Holding B.V.