HD986X, HD987X User manual 3 用户手册 24
ENGLISH 3 TABLE OF CONTENTS Important 4 Introduction 6 General description 6 Before first use 8 Preparing for use 8 Placing the removable mesh bottom and fat reducer Food table for manual time/temperature settings Using the appliance Airfrying Food table for Smart Chef programs Cooking with Smart Chef programs Making home-made fries Choosing the keep warm mode Save your favorite setting Cleaning Cleaning table 8 9 11 11 15 16 17 17 18 21 22 S
ENGLISH Important Read this important information carefully before you use the appliance and save it for future reference. Danger - Do not place the appliance on or near a hot gas stove or all kinds of electric stove and electric cooking plates, or in a heated oven. Never immerse the appliance in water nor rinse it under the tap. Do not let any water or other liquid enter the appliance to prevent electric shock.
ENGLISH - Storage of potatoes: The temperature shall be appropriate to the potato variety stored and it shall be above 6°C to minimize the risk of acrylamide exposure in the prepared foodstuff. Never fill the pan with oil. This appliance is designed to be used at ambient temperatures between 5°C and 40°C. Check if the voltage indicated on the appliance corresponds to the local mains voltage before you connect the appliance. Keep the mains cord away from hot surfaces.
ENGLISH Electromagnetic fields (EMF) This Philips appliance complies with all applicable standards and regulations regarding electromagnetic fields. Automatic shut-off This appliance is equipped with an automatic shut-off function. When the time of the timer has elapsed, the device will shut off automatically. If you do not press a button within 30 minutes, the appliance switches off automatically. To switch off the appliance manually, press the power On/ off button.
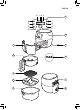
ENGLISH A LK J 11 B I C H D G F E 10 1 2 9 8 3 4 7 5 6 7
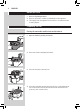
ENGLISH Before first use 1 Remove all packing material. 2 Remove any stickers or labels (if available) from the appliance. 3 Thoroughly clean the appliance before first use, as indicated in the cleaning chapter. Preparing for use Placing the removable mesh bottom and fat reducer 2 1 1 Open the drawer by pulling the handle. 2 Remove the basket by lifting the handle. 3 Place the fat reducer into the pan.
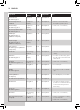
ENGLISH 5 Put the basket in the pan. 6 Slide the drawer back into the Airfryer by the handle. 9 Note • Never use the pan without the fat reducer or the basket in it. Food table for manual time/temperature settings The table below helps you select the basic settings for the types of food you want to prepare. Note • Keep in mind that these settings are suggestions. As ingredients differ in origin, size, shape as well as brand, we cannot guarantee the best setting for your ingredients.
ENGLISH Min.– max. amount Time (min) Temperature Chicken breast Around 160 g/6 oz 1–5 pieces 18–22 180°C/350°F Chicken fingers bread crumbed 3–12 pieces (1 layer) 10–15 180°C/350°F • Add oil to the breadcrumbs. Chicken wings Around 100 g/3.5 oz 2–8 pieces (1 layer) 14–18 180°C/350°F • Shake, turn, or stir halfway Meat chops without bone Around 150 g/5.3 oz 1–5 chops 10–13 200°C/400°F Hamburger Around 150 g/5.
ENGLISH Using the appliance Airfrying Caution • This is an Airfryer that works on hot air. Do not fill the pan with oil, frying fat or any other liquid. • Do not touch hot surfaces. Use handles or knobs. Handle the hot pan and fat reducer with oven-safe gloves. • This appliance is for household use only. • This appliance may produce some smoke when you use it for the first time. This is normal. • Preheating of the appliance is not necessary.
ENGLISH 5 Put the ingredients in the basket. Note • The Airfryer can prepare a large range of ingredients. Consult the ‘Food table’ for the right quantities and approximate cooking times. • Do not exceed the amount indicated in the ‘Food table’ section or overfill the basket beyond the ‘MAX’ indication as this could affect the quality of the end result.
ENGLISH 13 10 Push the QuickControl dial to confirm the selected temperature. » After the temperature is confirmed, the time indication starts blinking on the screen. 11 Turn the QuickControl dial to choose your desired cooking time. Note • If you press the favorite button 2 you will save this cooking temperature and time as your favorite cooking settings. Any previously saved settings will be overwritten. For more details, refer to chapter "Save your favorite setting".
ENGLISH 15 Open the drawer by pulling the handle and check if the ingredients are ready. Note • If the ingredients are not ready yet, simply slide the drawer back into the Airfryer by the handle and add a few extra minutes to the set time. 16 To remove small ingredients (e.g. fries), lift the basket out of the pan by the handle. Caution • After the cooking process, the pan, the fat reducer, the basket, interior housing and the ingredients are hot.
ENGLISH 15 Food table for Smart Chef programs Note • This appliance is for indoor use only. Start the automatic cooking programs with the appliance at room temperature—do not pre-heat. • Always distribute the food evenly in the basket. • Turn/shake the food only if indicated by the appliance. Keep the drawer open as short as possible. • Do not use any accessories. Make sure that the fat reducer is properly placed in the appliance.
ENGLISH Cooking with Smart Chef programs Season your ingredients as desired. Put the food inside the basket and slide the basket inside the appliance. Note • Do not use honey, syrups or any other sugary ingredients to season your food, since the browning will get very dark. 1 Press the On/Off button 2 To change the Smart Chef program, turn the QuickControl dial until the desired icon is blinking. 3 To confirm the Smart Chef program, press the QuickControl dial.
ENGLISH 5 17 When you hear the bell and the timer has elapsed to 0, the food is ready. Note • If your food is underdone or the food does not reach your prefered browning level, proceed cooking for several more minutes by pressing the timer button (see steps 11–12 in chapter “Using the appliance”). Making home-made fries To make great home-made fries in the Airfryer: 1 Peel the potatoes and cut into sticks (10 x 10 mm/0.4 x 0.4 in thick).
ENGLISH 2 » The keep warm timer is set to 30 minutes. To change the keep warm time (1–30 min), press the timer button , turn the QuickControl dial and then push it to confirm. You cannot adjust the keep warm temperature. 1 3 2 To pause the keep warm mode, push the QuickControl dial. To resume the keep warm mode, push the QuickControl dial again. 3 To exit the keep warm mode, press the return button button .
ENGLISH 2 Press the temperature button 3 Turn the QuickControl dial to select the temperature. 4 Press the QuickControl dial to confirm the chosen temperature. 5 Turn the QuickControl dial to select the time. 6 Press the favorite button after the setting is saved. 19 . 2 2 to save your setting.
ENGLISH 7 Press the QuickControl dial to start the cooking process. Cooking with a favorite setting 1 Press the On/Off button to switch on the appliance. 2 Press the favorite button . 3 Press the QuickControl dial to start the cooking process. Note • You can overwrite your favorite setting by applying the same procedure as mentioned above. • Pressing the favorite button in the manual mode will overwrite your favorite setting.
ENGLISH 21 Cleaning Warning • Let the basket, pan, fat reducer and the inside of the appliance cool down completely before you start cleaning. • Remove the fat reducer from the pan using rubber tipped tongs. Do not remove using your fingers as hot fat or oil collects under the fat reducer. • The pan, basket, fat reducer and inside of the appliance have a non-stick coating. Do not use metal kitchen utensils or abrasive cleaning materials as this may damage the non-stick coating.
ENGLISH 5 Clean the heating element with a cleaning brush to remove any food residues. 6 Clean the inside of the appliance with hot water and a non-abrasive sponge.
ENGLISH 23 Storage 1 Unplug the appliance and let it cool down. 2 Make sure all parts are clean and dry before storing. 3 Insert the cord into the cord storage compartment. Note • Always hold the Airfryer horizontally when you carry it. Make sure that you also hold the drawer on the front part of the appliance as it can slide out of the appliance if accidentally tilted downwards. This can lead to damaging of the drawer. • Always make sure that the removable parts of the Airfryer e.g.
简体中文 目录 重要信息 25 产品简介 27 基本说明 27 首次使用之前 29 使用准备 29 放置可拆卸滤网底部和减脂器 手动时间/温度设置食物表 使用本产品 空气煎炸 智能大厨程序食物表 使用智能大厨程序烹饪 自制炸薯条 选择保温模式 保存您喜爱的设置 清洁 清洁表 29 30 32 32 36 37 38 38 39 41 43 存储 43 回收 43 保修和支持 43
简体中文 25 重要信息 使用产品之前,请仔细阅读本重要信息,并妥善保管以供日后参考。 危险 - 切勿将产品置于加热的煤气炉或各种类型的电炉和电烤盘上方或 附近,或者加热的炉具内。 切勿将产品浸入水中,也不要在自来水龙头下冲洗。 切勿让水或其它液体进入该产品,以免发生触电。 始终将食材放置在炸篮中煎炸,以免接触到加热元件。 产品正在工作时,不要盖住其进风口和出风口。 切勿在煎锅中倒油,因为这可能导致火灾危险。 如果插头、电源线或产品本身受损,请勿使用本产品。 切勿在产品工作时触碰到它的内部。 切勿放入超出炸篮规定上限的食物量。 始终确保加热器上没有杂物,并且没有食物卡在其中。 警告 - 如果电源线损坏,为避免危险,必须由飞利浦、其服务代理商或 类似的专职人员进行更换。 产品只能使用带接地线的插座。务必确保插头已正确插入电源 插座。 本产品不能利用外部定时器或独立的遥控器系统操作。 产品的可接触表面在使用过程中可能会变得很热。(图1) 应照看好儿童,确保他们不玩耍本产品。 本产品不适合由肢体不健全、感觉或精神上有障碍或缺乏相关经 验和知识的人(包括儿童)使用,除非有负责其安全的人对他们 使用本产品进行
简体中文 - 在初次使用产品之前,请彻底清洗与食品接触的部件。请参阅手 册中的说明。 警告 - 本产品仅限于普通家用。不得用于商店、办公场所、农场或其他 工作环境的员工食堂。也不得由酒店、汽车旅馆、提供住宿和早 餐的场所及其他住宿环境中的客人使用。 产品无人看管时和拆装、存储或清洁之前,务必断开产品电源。 将产品放在一个水平、平滑、稳固的表面上。 对本产品使用不当,或者将其用于专业、半专业用途,或者没有 根据本用户手册中的说明进行使用,此类情况下保修将失效,飞 利浦对此类损坏概不负责。 本产品应送往由飞利浦授权的服务中心检查或修理。请不要尝试 自己修理产品,否则产品维修保证书将会无效。 使用后务必拔下产品的插头。 在处理或清洁产品之前,请先让产品冷却大约 30 分钟。 确保在本产品中烹调的食材最终呈金黄色,而不是黑色或棕色。 烧焦的部分应该丢弃。请勿在高于 180°C 的温度下煎炸新鲜土 豆(以尽可能减少丙烯酰胺的产生)。 电磁场 (EMF) 本飞利浦产品符合所有有关电磁场的适用标准和法规。 自动断电 本产品配备了自动关熄功能。定时器的时间结束后,设备将自动关 闭。如果您在 30 分钟内不按按
简体中文 27 产品简介 欢迎购买并使用飞利浦产品! 为了您能充分享受飞利浦提供的支持,请在 www.philips.com/welcome 上注册您的产品。 有了飞利浦 Airfryer 空气炸锅,您现在可以享用理想烹制的油炸食 物 — 外酥里嫩 — 煎炸、烧烤、烘焙和烘烤,以健康、快速且简便 的方式烹调各种美食佳品。 有关更多灵感、食谱以及 Airfryer 空气炸锅的相关信息,请访问 www.philips.
简体中文 A LK J 11 B I C H D G F E 10 1 2 9 8 3 4 7 5 6
简体中文 29 首次使用之前 1 拆掉所有包装材料。 2 去除产品上的不干胶或标签(如果有)。 3 首次使用之前,请根据清洁章节中的说明彻底清洁本产品。 使用准备 放置可拆卸滤网底部和减脂器 2 1 1 拉动手柄,打开抽屉。 2 提起手柄,取出炸篮。 3 将减脂器放入煎锅。 4 将可拆卸滤网底部插入炸篮右下侧的插槽内。向下推滤网底部, 直至其锁定到位(两侧发出“咔哒”声)。
简体中文 5 将炸篮放入煎锅中。 6 用手柄将抽屉滑回 Airfryer 空气炸锅。 注意 • 切勿在未放入减脂器或炸篮的情况下使用煎锅。 手动时间/温度设置食物表 下表可帮助您为要烹饪的各种食物选择基本设置。 注意 • 请记住这些设置仅供参考。由于食材的来源、大小、形状和品牌各有不 同,我们无法保证为您的食材提供最佳设置。 • 制作大量食物时(例如,炸薯条、对虾、鸡腿、冷冻点心)时,为获得 最佳效果,请将炸篮中的原料摇晃、翻动或搅拌 2 至 3 次。 最小 - 最大 份量 时间 温度 (分钟) 自制炸薯条 (12 x 12 毫米/ 0.5 x 0.
简体中文 原料 最小 - 最大 份量 时间 温度 (分钟) 冷冻点心 (小春卷,约 20 克/ 0.7 盎司) 100-600 克/ 4-21 盎司 (5-30 块) 14-16 鸡胸 约 160 克/6 盎司 1-5 片 18-22 180°C/350°F 鸡条面包屑 3-12 块 (1 层) 10-15 180°C/350°F • 向面包屑加油。外表呈金黄 鸡翅 约 100 克/3.5 盎司 2-8 块 (1 层) 14-18 180°C/350°F • 炸制中途需摇晃、翻动或搅 无骨肉排 约 150 克/ 5.3 盎司 1-5 块肉排 10-13 200°C/400°F 汉堡包 约 150 克/ 5.3 盎司 (直径 10 厘米/4 英寸) 1-4 块肉饼 10-15 200°C/400°F 厚香肠 约 100 克/3.5 盎司 (直径 4 厘米/1.6 英寸) 1-6 片 (1 层) 12-15 200°C/400°F 薄香肠 约 70 克/2.5 盎司 (直径 2 厘米/0.
简体中文 原料 什锦蔬菜(大致切碎) 最小 - 最大 份量 时间 温度 (分钟) 300-800 克/ 11-28 盎司 10-20 200°C/400°F 注意 • 根据自己的口味设置烹饪时 间。 • 炸制中途需摇晃、翻动或搅 拌原料 使用本产品 空气煎炸 警告 • 该款Airfryer 空气炸锅采用热空气加热。请勿在煎锅中倒入油、油脂或 任何其他液体。 • 请勿触摸高温表面。使用手柄或旋钮。用隔热手套握持热煎锅和减脂 器。 • 本产品仅限于家用。 • 第一次使用本产品时可能会出现一些烟雾。这是正常的。 • 无需预热本产品。 1 将本产品置于稳固、水平、平整且隔热的表面上。确保抽屉可完 全打开。 注意 • 请勿在产品上方或两侧放置物品。这会阻隔气流并影响空气加热的效 果。 2 将电源线从产品背面的电线储藏格中拉出。 3 将插头插入墙上插座。
简体中文 33 4 拉动手柄,打开抽屉。 5 将原料放入炸篮。 注意 • Airfryer 空气炸锅可用于烹饪许多食材。请参阅“食物表”以了解适当的 份量和大致烹饪时间。 • 放入的食材量不得超过“食物表”部分指明的份量,也不要让炸篮中的 食材量超过 MAX 指示线,因为这可能影响最终的煎炸效果。 • 如果要同时烹饪不同的食材,在同时烹饪食材之前,请确保查看不同食 材的建议烹饪时间。 6 用手柄将抽屉滑回 Airfryer 空气炸锅。 警告 • 切勿在未放入减脂器或炸篮的情况下使用煎锅。如果在没有炸篮的情 况下加热产品,请使用隔热手套打开抽屉。抽屉的边缘和内侧会变得 非常烫。 • 在使用过程中和使用后的一段时间内,请勿触碰煎锅、减脂器或炸篮, 因其非常烫。 7 按下电源开/关按钮 可启动产品。 注意 • 要开始使用智能大厨程序,请参阅“使用智能大厨程序烹饪”一章。 8 按下温度按钮 。 » 温度指示会在屏幕上闪烁。 注意 • 如果您先按下定时器按钮 饪。 ,产品将在确认烹饪时间后立即开始烹
简体中文 9 转动 QuickControl 旋钮,选择您所需的烹饪温度。 2 10 按下 QuickControl 旋钮可确认选定温度。 » 确认温度后,屏幕上的时间指示将开始闪烁。 11 转动 QuickControl 旋钮,选择您所需的烹饪时间。 注意 • 如果您按下收藏按钮 2 ,您可以将此烹饪温度和时间保存为您的收藏 烹饪设置。任何以前保存的设置都将被覆盖。有关更多详细信息,请参 阅“保存您的收藏设置”一章。 • 请参阅提供了不同类型食物手动时间/温度设置的食物表。 12 按下 QuickControl 旋钮可确认选定时间。 13 确认烹饪时间后,产品将开始烹饪。 提示 • 要暂停烹饪过程,请推动 QuickControl 旋钮。要恢复烹饪过程,请再次 推动 QuickControl 旋钮。 • 要在烹饪过程中更改烹饪温度或时间,请重复步骤 8-10。 • 要取消任何正在进行的过程并返回主菜单,请按返回按钮 。
简体中文 35 注意 • 如果在 30 分钟内未设置所需的烹饪时间,出于安全考虑,产品会自动 关闭。 • 如果选择“- -”作为时间指示,则设备会进入预热模式。 • 某些食材在烹调过程中需要中途摇晃或翻动(请参阅“食物表”)。 要摇晃原料,请按 QuickControl 旋钮暂停烹饪,打开抽屉并从煎锅中提 起炸篮,在水池上方摇晃。然后,将带有炸篮的煎锅滑回产品中,按 QuickControl 旋钮继续烹饪。 • 如果将定时器设为烹饪时间的一半,当您听到定时器响铃时,表明应该 摇晃或翻动食材。请确保将定时器重置为剩余烹饪时间。 14 当您听到定时器响铃时,表明烹饪时间已结束。 15 拉动手柄,打开抽屉,检查原料是否已熟透。 注意 • 如果原料还未熟透,只需用把手将抽屉滑回 Airfryer 空气炸锅中,再将 设置的时间增加几分钟。 16 要取出体积较小的原料(例如炸薯条),请用手柄将炸篮提出 煎锅。 警告 • 烹饪过程结束后,煎锅、减脂器、炸篮、内壳和原料都会很烫。煎锅中 可能会有蒸汽逸出,这取决于 Airfryer 空气炸锅中烹饪的原料类型。 17 将炸篮中的食材全部倒入碗或碟中。务必将炸篮从
简体中文 在一批原料烹饪完毕后,Airfryer 空气炸锅可随时开始烹饪下一批原 料。 注意 • 如果想烹饪下一批原料,请重复执行步骤 4 至 17。 智能大厨程序食物表 注意 • 本产品仅限于室内使用。在产品处于室温的情况下启动自动烹饪程序 — 不要预热。 • 始终将食品均匀地分布在炸篮中。 • 仅在产品指示时转动/摇晃食品。抽屉打开时间应尽可能短。 • 切勿使用任何附件。确保将减脂器正确放置在产品上。 • 由于食物的原产地、尺寸和品牌不同,请确保在食用前已经充分烹制 好。 智能大厨程序 冷冻薯条 操作方法 细型(7x7 毫 米) 中号(10x10毫 米) 冷冻薯条零食 • 请使用直接从冰箱中取出的冷冻薯 条。烹饪前请勿解冻。 200 至 1400 克 • 此程序适用于细型(7 x 7 毫米)和中 号(10 x 10 毫米)冷冻薯条。 • 如果您购买了为空气炸锅特制的薯 条,请按照包装上的指示操作。 • 请仅使用新鲜粉质土豆,请勿使用预 自制切割 (10x10 毫米) 煮过的土豆。 500 至 1400 克 自制炸薯条 鱼 佳效果。 整条鱼 大而扁的鱼 鱼排 鸡腿 鸡
简体中文 37 使用智能大厨程序烹饪 按需要给原料调味。将食物放入炸篮内,然后将炸篮滑入产品内。 注意 • 请勿使用蜂蜜、糖浆或任何其他含糖成分调配您的食物,因为烘烤会导 致食物变黑。 1 按开/关按钮 2 要更改智能大厨程序,请转动 QuickControl 旋钮,直至所需图标 不断闪烁。 3 要确认智能大厨程序,请按 QuickControl 旋钮。 » 产品会自动计算出理想的烹饪温度和时间。几分钟后,屏幕 将显示第一次预估的烹饪温度和时间。在此期间,产品已开 始烹饪。只要屏幕交替显示闪烁的指示条和温度/时间,则 表示产品仍在计算烹饪时间,且产品将在烹饪过程中自动调 整时间。 启动产品。 2 注意 • 要准备一只整鸡,需先称好整鸡的重量,然后再放入炸篮中。转动 QuickControl 旋钮并按下以确认以选择重量。 • 在产品正在计算烹饪时间即显示屏上显示闪烁的指示条时,请勿拉出抽 屉。否则智能大厨程序将停止,产品将重置为主菜单。使用手动模式继 续烹饪,因为在食物半熟时重新启动智能大厨程序会导致烹制时间预 估错误。 • 完成计算阶段后,您将看到温度和时间交替显示(无闪烁条),您
简体中文 自制炸薯条 使用Airfryer 空气炸锅自制美味炸薯条: 1 将土豆削皮并切成小条(10 x 10 毫米/0.4 x 0.
简体中文 39 2 要暂停保温模式,请推动 QuickControl 旋钮。要恢复保温模式, 请再次推动 QuickControl 旋钮。 3 要退出保温模式,请按返回按钮 或开/关按钮 。 提示 • 如果在保温模式期间炸薯条等食物的松脆度变差,请提前关闭产品以缩 短保温时间或以 180°C 的温度烹饪 2-3 分钟,增加其松脆度。 注意 • 如果在烹饪期间启用保温模式(保温指示会亮起),产品会在烹饪时间 结束后将食物保温 30 分钟。 • 在保温模式期间,产品中的风扇和加热器会不时地启动。 • 保温模式旨在为 Airfryer 空气炸锅烹饪好的菜肴立即提供保温。这并非 进行再加热。 保存您喜爱的设置 2 1 按开/关按钮 启动产品。 2 按下温度按钮 。 3 转动 QuickControl 旋钮以选择温度。
简体中文 4 按下 QuickControl 旋钮以确认选定温度。 5 转动 QuickControl 旋钮以选择时间。 6 按收藏按钮 7 按下 QuickControl 旋钮,开始烹饪过程。 2 以保存设置。保存设置后,您将听到一声哔声。
简体中文 41 使用收藏设置烹饪 1 按开/关按钮 2 按收藏按钮 3 按 QuickControl 旋钮,开始烹饪过程。 启动产品。 。 注意 • 您可以通过应用上述相同的过程覆盖收藏设置。 • 在手动模式下按收藏按钮将覆盖您的收藏设置。要应用您的收藏设置, 请先按返回按钮退出手动模式。 • 要退出收藏模式,请按返回按钮 。 • 在使用收藏模式进行烹饪时,您可以通过按温度或定时器按钮来更改温 度或时间。这种更改不会覆盖已存储的收藏设置。 清洁 警告 • 在开始清洁之前,请完全冷却炸篮、煎锅、减脂器以及产品内部。 • 用橡胶头夹子从煎锅中取出减脂器。请勿用手指取出,因为减脂器下方 收集的油脂或油会很烫。 • 煎锅、炸篮、减脂器以及产品内部均覆有不黏涂层。不要使用金属厨具 或研磨性清洁材料,因为这样可能损坏不粘涂层。 每次使用后都应立即清洁产品。每次使用后都要清除煎锅底部的油 和油脂。 1 按电源开/关按钮 关闭产品,从电源插座上拔下插头,让产 品冷却。
简体中文 提示 • 取出煎锅和炸篮,让 Airfryer 空气炸锅更快冷却。 2 用橡胶头夹子从煎锅中取出减脂器。将煎锅底部的油脂或油处 理掉。 3 用洗碗机清洗煎锅、炸篮和减脂器。您也可以用热水、清洁剂和 非研磨性海绵进行清洁(请参阅“清洁表”)。 提示 • 如果食物残渣粘在煎锅、减脂器或炸篮上,可以将其在加入清洁剂的热 水中浸泡 10 至 15 分钟。浸泡会使食物残渣变松,更易清除。确保使用 能溶解油脂的清洁剂。如果煎锅、减脂器或炸篮上出现油脂染色,并且 使用热水和清洁剂无法将其清除,则可使用液体脱脂剂。 • 如有必要,可使用软到中硬度的毛刷清理粘在加热元件上的食物残渣。 不要使用钢丝刷或硬毛刷,因为这可能损坏加热元件的涂层。 4 用湿布擦拭产品的外部。 注意 • 确保控制面板上未留有湿气。清洁后用布擦干控制面板。 5 用清洁刷清洁加热元件,以去除任何食品残渣。 6 用热水和非磨蚀性海绵清洗产品内部。
简体中文 43 清洁表 存储 1 拔掉产品的插头,并使其完全冷却。 2 在存放前,确保所有部件清洁且干燥。 3 将电源线插入电线储藏格。 注意 • 如需搬运Airfryer 空气炸锅,请务必保持其水平。此外,请确保握住产品 前部的抽屉,如果不小心向下倾斜,抽屉可能会从产品滑出。这有可能 造成抽屉损坏。 • 在进行搬运和/或存放之前,请务必确保 Airfryer 空气炸锅的可拆卸部件 (例如,可拆卸滤网底部等)已固定到位。 回收 - 弃置产品时,请不要将它与一般生活垃圾一同丢弃,应将其交给 官方指定的回收中心。这样做有利于环保。 请遵循您所在国家/地区的电器及电子产品分类回收规定。正确 弃置产品有助于避免对环境和人类健康造成负面影响。 保修和支持 如果您需要信息或支持,请访问 www.philips.
© 2022 Philips Domestic Appliances Holding B.V.