Return your Product Registration Card today to get the very most from your purchase. Registering your model with PHILIPS makes you eligible for all of the valuable benefits listed below, so don't miss out. Complete and return your Product Registration Card at once to ensure: *Proof of Purchase Returning the enclosed card guarantees that your date of purchase will be on file, so no additional paperwork will be required from you to obtain warranty service.
Acknowledgments The 'HDRW 720/17' is based in part on the Entropy Gathering Daemon, which is copyright (C) 1999-2000 Brian Warner. All Rights Reserved.
Safety Information Safety Precautions Warning: To prevent fire or shock hazard, do not expose this equipment to rain or moisture. Federal Communications Commission (FCC) Warning: Any unauthorized changes or modifications to this equipment void the user’s authority to operate it. Laser Safety This unit employs a laser. Only a qualified service person should remove the cover or attempt to service this device, due to possible eye injury.
IMPORTANT SAFETY INSTRUCTIONS 1. Read these instructions. 12. 2. Keep these instructions. 3. Heed all warnings. 4. Follow all instructions. 5. Do not use this apparatus near water. 6. Clean only with dry cloth. 7. Do not block any of the ventilation openings. Install in accordance with the manufacturer’s instructions. 8. Do not install near any heat sources such as radiators, heat registers, stoves, or other apparatus (including amplifiers) that produce heat. 9.
Table of contents Overview of functions ......................... 1 The TV Guide On Screen ™ System 24 Functioning of the device ................................................................................ The remote control ......................................................................................... Additional TV functions .................................................................................. Front of the device ................................................................
Table of contents Playing a DVD video disc .............................................................................. Playing a DVD+RW/ +R disc ....................................................................... Playing an audio CD ....................................................................................... Playing an MP3 CD ......................................................................................... Playing a (Super) Video CD .................................................
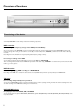
Overview of functions Functioning of the device Your Philips DVD/HDD recorder mainly consists of the following components: HDD recorder For recording in a temporary storage on the HDD (Time shift Buffer) As soon as you turn on the DVD/HDD recorder, it automatically records the current TV channel selected on the DVD/HDD recorder in this temporary storage. As a result, you can 'rewind' to a scene ( D ) or watch a still picture ( PAUSE 9 ), while the current TV show is still being recorded.
Overview of functions REC/OTR n Record the current TV show on the HDD, mark recordings in the time shift buffer to be stored on HDD. Hold button down to start the recording from now. (Mark the recording from the beginning of the actual position in the Time Shift Buffer). STANDBY m To switch set on or off, interrupt menu function. A programmed recording (TIMER) or an archiving process will be continued until the end, and the device will then be switched off.
Overview of functions A B Cursor buttons up, down in the menus. Previous or next position in the time shift buffer during playback from HDD. D C Cursor buttons left, right in the menus. Previous or next position during playback of a title from the HDD (media browser or time shift buffer). If you hold down this button you can faster browse trough the recordings. The speed will increase automatically. OK Confirming of functions Starting the playback from the begining in the 'Media Browser'.
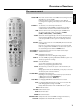
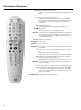
Overview of functions Additional TV functions ENGLISH With the enclosed multicode remote control you can control the main functions of your TV set. To do this, you must first enter a code number that corresponds to the make of your TV set. You will find a summary of all available remote control commands on the last page of this manual. How to enter this code number you will read in the chapter ' Using your DVD-Recorder remote control with your TV set'.
Overview of functions Front of the device STANDBY-ON m : To switch device off / on, interrupt a function. G : Play button Play back a recorded disc or a title on the HDD In the TV Guide On Screen ™System: OK-button. N : select previous title/search backwards TRAY LED : Red light around the disc tray indicates recording on a DVD+RW/+R. O : select next title/search forwards OPEN/CLOSE J : Open/close disc tray.
ENGLISH Overview of functions Back of the device AUDIO L/R (OUT 2) White/red cinch jack for the connection of a TV set with audio input jacks or an additional device. 4MAINS Connection to the household AC-outlet (110V/60Hz) ANTENNA IN Connection of the antenna TV OUT Connection of the antenna cable to the TV set Input jacks (IN
Introduction Welcome to the growing family of owners of PHILIPS equipment. Thank you for buying a HDRW 720/17 . Discs you can use The following discs can be used in your DVD recorder for playback and recording: Recording and playback DVD+RW (Digital Versatile Disc + rewriteable) uses phase change media, the same technology on which rewritable CDs are based. A high-performance laser is used to change the reflective properties of the recording layer; this process can be repeated more than a thousand times.
Introduction Component Video cable (Cinch cable with red/blue/green connectors) Audio cable (Cinch cable with red/white connectors) IR blaster ENGLISH Super Video CD CD-R (CD-Recordable) with Audio/MP3 content Important CD-RW (CD-Rewritable) with Audio/MP3 content Regional code DVDs must be marked 'ALL' for all regions or '1' for region 1 to work in this machine. If the DVD is marked with a different region, it cannot be played in this DVD recorder.
Introduction C This electronic equipment contains several materials that can be recycled. If you are disposing of an old device, please take it to a recycling centre. BDo not switch on the device immediately after transport from a cold to a warm room or vice versa, or under conditions of extreme humidity. Wait at least three hours after transporting the device. The DVD recorder needs this time to acclimate to its new environment (temperature, relative humidity, etc.).
Introduction Your PhilipsDVD recorder has a number of special functions to make it easier to use and to enhance your enjoyment. You can operate the main functions on your television using your DVD-Recorder recorder remote control, even if your television is not a Philips. You can upgrade the software of your DVD-Recorder with a CD-ROM. On the web site http://www.p4c.philips.com under the model number 'HDRW 720/17' you will find the data and the upgrade information.
Introduction The TV Guide On Screen™Systemgives you an on-screen listing of what's on TV. It also lets you program your DVD recorder by selecting the show you want to record from the list on your screen. You simply enter your local post code during set up and you can see the next 48 hours or what's on right now or even what's on in a favorite category such as sports or movies. Click with your remote on the show you'd like to see or schedule.
Preparing the remote control for operation The remote control and its batteries are packed separately in the original DVD recorder packaging. You must install the batteries in the remote control before use - described in the following section. 1 Take the remote control and the enclosed batteries (2 batteries). For the following functions you need to hold down the • TV button (on the left side) and then select the function you need with the appropriate button.
Connecting the DVD recorder Connecting to the TV Choose from the following connections: Connection with Component
Connecting the DVD recorder This cable, usually featuring yellow cinch plugs, is used for transmitting the Composite Video Baseband Signal (CVBS). In this method of transmission the color signal and the brightness signal are transmitted on the same cable. Under certain circumstances, this may lead to problems with the picture, such as 'Moiré' patterns.
Connecting additional devices Connecting a video recorder, DVD player. You can also connect a video recorder or a DVD player to the input jacks. Connecting a cable box only via antenna cable If you want to connect a cable box only via antenna cable, please observe the following: O Connect the DVD-Recorder directly with your TV-set (Cable from the output jacks directly to the TV set).
Connecting a camcorder to the front jacks Connecting audio devices to the digital audio jacks To copy camcorder recordings, you can use the front jacks. These jacks are behind the door in the lower right corner of the front panel. The back of the DVD Recorder features two digital audio output jacks OPTICAL OUT for an optical cable and COAX OUT for a coaxial cable (cinch cable). Recordings from the front jacks were stored on the HDD to make editing easy.
Installation 2 Select the desired language for the on-screen menu by pressing B or A . Initial installation After you have successfully connected the DVD Recorder and other devices to your TV (as described in the previous chapter), this chapter will help you start the initial installation. The DVD Recorder automatically seeks and stores all available TV channels.
Installation 7 Confirm with OK . 8 Select the desired screen format position using B or A . Initial Setup TV Shape 4:3 letterbox 4:3 panscan 16:9 Press OK to continue a No TV-Stations found yet? b Select a different TV channel on your TV set. Are you getting a picture for this channel? If not, check the cable connection from the antenna (antenna jack) to the DVD recorder and to the TV set. b Please have patience.
Installation Tuner mode Your DVD-Recorder is equipped with a so called Tuner Mode. With the button TUNER you can switch between playback from the HDD/disc or the Picture from the internal Tuner (TV Channels). If a cable box is connected to the VIDEO (CVBS)-EXT2 or S-VIDEO (Y/C)-EXT2 jacks and installed as described in the chapter 'Setting up the TV Guide On Screen™system' you can switch only between the playback and the TV Channels from the cable box. The internal Tuner is switched off.
Automatic TV channel search If the channel assignments of your cable or satellite TV provider change or if you are reinstalling the DVD recorder, e.g. after moving house, you can start this procedure again. This will replace the stored TV channels with the new ones. 7 Press C . P The automatic TV channel search starts. This allows the DVD recorder to save all available TV channels. This procedure may take several minutes. Installation Auto Ch.
Additional installation features Adding and clearing TV channels manually With this function you can block TV channels on which reception is not possible. They will be skipped when the CHANNEL q and CHANNEL r buttons are selected. ATTENTION ! The allocation (TV channel name to the TV channel) will be done from the TV Guide On Screen ™System automatically. Therefor you cannot select this function.
Additional installation features O Playback audio The DVD will play back in the language you have chosen. O 'Subtitle' Subtitle language O 'Menu' You have the option of setting one of the displayed languages for the on-screen menu (OSD). However, the DVD recorder display will only display English text regardless of this setting. 5 Select the appropriate setting using B or A and confirm with OK . 6 Select 'Time/Date' using B or A and confirm with C . 7 Select 'Automatic' with B or A and confirm with C .
Additional installation features Setting the time and date If the time is still incorrect, this may be due to a weak or faulty TV signal. In this case, switch off the automatic setting. A In the line 'Daylight Saving', select one of the following: 'On': The time set corresponds to summer time (summer time activated) 'Off': The time set corresponds to winter time (summer time deactivated) 1 Press the BROWSER HDD button and then the SYSTEM MENU button on the remote control. P The 'SYSTEM MENU' appears.
The TV Guide On Screen ™ System Your DVD Recorder is equipped with the TV Guide On Screen™System. The TV Guide On Screen™System offers a free interactive electronic program guide that lists all the TV programs available in your area. You can also use the TV Guide On Screen™System to program your DVD recorder to record your favorite shows. Press TV GUIDE to see a summary of all the TV programs currently being shown on the various TV channels.
The TV Guide On Screen ™ System Connecting the IR
The TV Guide On Screen™System General The TV Guide On Screen™System is a free on-screen listing for all the TV channels in your area. You can also use it to control a cable box. Function buttons If TV Guide On Screen™information has been loaded you can perform various actions in the TV Guide On Screen™screen. There are two color buttons (blue and green). The actions these buttons perform depends on the menu at the time. Always check before pressing a button.
The TV Guide On Screen ™ System The 'LISTINGS' screen This list appears when you press the TV GUIDE button. You can view the listing for all the TV channels from today to the same day next week. 1 Press TV GUIDE . The 'LISTINGS' screen will appear. P In the top left corner the picture of the TV channel appears which was selected before you call up the TV Guide On Screen™system.
The TV Guide On Screen ™ System The 'MESSAGES' screen Messages to the user are stored here. If a message has been received but has not yet been read, a closed yellow envelope appears in the 'video window'. Messages are automatically deleted when the message's "lifetime" expires (60 days) unless they have already been deleted with the green action button. Moreover, the TV Guide On Screen™system ID number is displayed at the end of the list. This number is always visible and cannot be deleted.
The TV Guide On Screen ™ System The 'SETUP' screen 'Change channel display' Here you can change the order of the TV channels for the 'LISTINGS' screen. Moreover, you can assign the channel numbers to the TV stations and switch them on or off. 1 Press OK . A TV station is displayed in two columns. 2 Use the B and A buttons to select the TV station you want to modify. Use the D and C buttons to switch between tiles. Left tile The TV station logos and call letters are shown here.
Recording on the HDD General The Time shift Buffer ENGLISH As soon as you turn on the DVD recorder, the currently selected TV channel on the DVD-Recorder is recorded in a temporary storage (Time shift Buffer). Recordings in the time shift buffer will be automatically deleted e.g. after 3 hours if the period of the time shift buffer is set to 3 hours (factory setting).
Recording on the HDD Symbols in the 'Time Shift Buffer' Navigation in the time shift buffer Following symbols can appear in the info bar at the top of the screen in the 'Time Shift Buffer'. With the INFO button on the remote control you can also call up this infobar. Preparation: •) Switch on the TV set, and if necessary, select the channel for the DVD recorder (channel 3 or 4). •) Switch on the DVD recorder. Left area 1 Press INFO to display the bar of the time shift buffer on the screen.
Mark TV shows for recording Mark part of a title As a rule, recordings in the time shift butter are automatically deleted after a certain time (1 to 6 hours). In order to store recordings on the HDD permanently, you can mark sections of the time shift buffer that will not be deleted and will be available as titles for later playback. You can also mark only parts of a title. If you mark several parts of a title, each part will be stored as a separate title on the HDD.
Recording on the HDD Manual recordings Recordings from the actual on the DVD-Recroder selected TV channel are always started and recorded in the time shift buffer as soon as you switch on the device. To store recordings on the HDD, choose from the following: Start of the recording: Recording from a video recorder/DVD player Please observe: Most pre-recorded video cassettes or DVDs are copy-protected. If you try to copy these, the message 'COPYPROTECT' will appear in the display of the DVD recorder.
Recording on the HDD Using this function, you can store recordings via the front jacks directly on the HDD. These titles will be automatically protected to prevent them from being automatically deleted in case the HDD is full. The symbol 'F' indicates such a protection. O STOP h The recording will be interrupted. You can start a new recording by pressing REC/OTR n . A new title is created. 6 Press the red function button to terminate the camera operating mode.
Programming a recording (TIMER) General Use 'Programming a recording (TIMER)', to automatically start and stop a recording at a later date. The DVD recorder will switch to the right channel and begin recording at the correct time. With this DVD recorder, you can pre-programme at least 15 recordings within a period of one year.
Programming a recording (TIMER) a The following message appears on the screen: 'PlusCode number wrong' b The entered PlusCode number is incorrect. Repeat your entry or cancel using the green function button. ENGLISH Programming recordings with the VCR Plus+® System P The decoded data appears after confirmation. Thanks to this programming system, you no longer need to tediously enter the date, TV channel, start and finish time.
Programming a recording (TIMER) Programming recordings without the VCR Plus+® System How to change or delete a programmed recording (TIMER) Preparation: •) Switch on the TV set, and if necessary, select the channel for the DVD recorder (channel 3 or 4). •) Switch on the DVD recorder. Preparation: •) Switch on the TV set, and if necessary, select the channel for the DVD recorder (channel 3 or 4). •) Switch on the DVD recorder. 1 Press TIMER s on the remote control.
Programming a recording (TIMER) ENGLISH Cancel a programmed recording in progress A programmed recording will run as long as the end of the TV show is reached (end time of the schedule or end time out of the TV Guide On Screen™System) If you switch off the DVD-Recorder with STANDBY m the DVD-Recorder will be switched off after the recording is completed. If you want to cancel the programmed recording proceed as follows: 1 Press the red function button 2 Select 'Yes' using D and confirm with OK .
Playback from the HDD General Each recording stored on the HDD is displayed in the media browser with a corresponding index picture. 5 Press STOP h to end playback. P You will return to the media browser. The position where playback was interrupted will be automatically stored. By pressing PLAY G , playback resumes at this position. 1 Press BROWSER HDD on the remote control or HDD on the DVD recorder. P The Media Browser appears.
Playback from the HDD Zoom feature The media browser ENGLISH The Zoom feature allows you to enlarge the video image and pan through the enlarged image during play back from the HDD or from the time shift buffer. 1 During playback, press PAUSE 9 at the position where you want to enlarge the picture. P You will see a still picture. 2 Press SYSTEM MENU . P The 'System Menu' appears. 3 Press C in line 'Toolbar' to select 'Options'. 4 Press B to select 'Zoom' and confirm with C .
Playback from the HDD Change order for the media browser Change title settings Your may choose only titles that meet certain criteria for the overview. This order will remain until you exit the media browser. Use this function to change the title settings. 1 Press BROWSER HDD on the remote control. P The Media Browser appears. 2 Press D . P The 'Order Menu' appears. 3 Select one of the following options using B or A and confirm with OK .
Playback from the HDD Use this function to adapt the title (recording) to your personal preferences. 'Video edit' Here you can insert/clear chapter markers, hide chapters, merge chapters, or divide the title. ENGLISH Edit title 1 Press BROWSER HDD on the remote control. P The Media Browser appears. 2 Select the title whose settings you want to change with B , A . Press EDIT . 3 Select one of the displayed functions with B , A and confirm with C to proceed with the changes.
Playback from the HDD Editing recorded titles (name) Divide title From the TV Guide On Screen™data the title (name) of a TV show will be taken automatically (e.g. 'ROCKY'). Otherwise, only the program number (program name) and the time will be stored as the name of the recording. The name of the recording can only be changed after the recording has finished. You can divide a title in several parts (titles) as large as you like. Each of these parts (titles) is designated by a separate index picture.
Playback from the HDD Insert/remove chapter markers You can remove titles/recordings from the HDD to use the capacity from the HDD for new recordings. To find you special scenes in one title faster, you can insert chapter markers. These markers can also be deleted. 1 Press BROWSER HDD on the remote control. P The Media Browser appears. 1 Press BROWSER HDD on the remote control. P The 'Media Browser' appears on the screen.
Playback from the HDD Hide chapters (sections) By default, all chapters are visible. You can hide or unhide certain chapters during playback (e.g. unwanted scenes). 8 Press PAUSE 9 at the corresponding position. 9 Set the end marker with the blue function button. P The 'hidden' area is greyed out. P The description of the blue function key changes to 'HIDE' . End with EDIT .
Archiving (storing) titles on a DVD+RW/+R You can choose the title of the HDD that you want to transfer on a DVD+RW/+R. The copying process is done at a higher speed than the recording. Therefore, you can transfer an 8-hour recording in 'M8' recording mode on a DVD+RW/+R in just 30 minutes. This time depends on the recording mode used. Please observe the following information: • • • • • • You cannot change the recording quality.
Playback from a disc General notes on playback With this DVD recorder you can play back the following systems: •) DVD Video •) (Super)Video CD Disc •) DVD+RW Disc •) DVD+R Disc •) DVD-RW (video mode, finalized) •) DVD-R •) CD-R •) CD-RW •) Audio CD •) MP3-CD You can operate the video recorder using the remote control or the buttons on the front of the DVD recorder. a The display will read 'PIN' b The child lock has been activated for the inserted disc.
Playback from a disc A menu may appear when a DVD is played back. If the titles and chapters are numbered, press a number button on the remote control. Playing a DVD+RW/ +R disc 1 If the disc is write-protected or a finalized DVD+R disc, playback starts automatically. O You can also use the D , C , A , B buttons or number buttons 0..9 to select a menu item and confirm with OK . O You can also access the menu using DISC MENU on the C01 ANNA P01 remote control.
Playback from a disc Playing an MP3 CD MP3 (MPEG1 Audio Layer-3) files are highly compressed music files. Using this technology the data volume can be compressed by a factor of 10. This means it is possible to record 10 hours of music in CD quality on a single CD-ROM. When creating MP3 CDs please note the following: File system: ISO9660 Directory structure: maximum of 8 levels Formats: *.mp3 Filenames: maximum of 12 characters (8+3) Maximum of 32 albums, 999 titles Supported sampling frequencies: 32, 44.
Additonal playback features DVD's are divided in titles and chapters. O During playback, press O to go to the next title. If there are several chapters within a title, the next chapter. Still picture 1 During playback, press PAUSE 9 to stop playback and display a still picture. C01 2:04 O Press N to return to the start of the current title/chapter. O Press N twice to return to the start of the previous title/chapter.
Additonal playback features Camera angle Repeat/Shuffle play You can mark entire sections or the whole disc for endless playback. Depending on the type of disc (DVD video, DVD+RW, video CD) you can select a chapter, title or the entire disc. 1 Select the desired chapter, title or the entire disc and start playback. 2 During playback, press SELECT .
Additonal playback features Select the audio language ENGLISH Many pre-recorded DVD discs have more than one audio language. The language initially selected for playback will be the one you selected when you first set up the DVD recorder. However you can change the audio language of the inserted disc at any time. You can change the audio language either using the menu of the inserted disc ( DISC MENU button) or the DVD recorder's menu bar ( SYSTEM MENU button).
Managing the disc contents General Favorite Scene Selection Charly 1 00:29:59 • M1 Fr15/02/2004 Empty title 01:30:01 In this menu you can adapt a title to suit your particular needs. You can insert/delete chapter markers, hide chapters, select a new index, or split up a title. In this menu you can adapt a title on a DVD+RW/+R to suit your particular needs. You can insert/delete chapter markers, delete all chapter markers, or split up the title.
Managing the disc contents a The number of chapters ('C') has increased by two or more Hiding chapters numbers 1 Search the beginning of the scene you want to hide. Press PAUSE 9 .
Managing the disc contents Deleting chapter markers Changing the index picture Within a title you can delete either all markers or individual markers. Normally the picture from the beginning of a recording is used as the index picture. You can however choose any picture from the recording as the index picture.
Managing the disc contents You can divide a title into several sections (titles) of any size. Each of these sections (titles) is identified by its own index. Note: This division cannot be undone. 4 Using C or D select the position where the letter/number/icon is to be changed/re-entered. 5 Change the icon using A or B .
Managing the disc contents Disc settings Erasing recordings/titles You can erase specific recordings from a disc. Please note: If there is an 'Empty title' between titles, this space can not be used from this DVD-Recorder. Each recording from the HDD to a DVD+RW/+R (archiving) will be added at the end of existing recordings Philips1 00:35:59 used Fr15/02/2004 NTSC 1 Press the STOP h button or during playback press DISC MENU .
Changing the disc name Finalizing DVD+R discs 1 In the 'Disc info display' press C . P The 'Settings for' menu appears on the TV screen. This feature is required to play back a DVD+R disc in a DVD player. Once the disc has been finalized no further recordings or changes can be made. 1 In the 'Disc info display' press C . P The 'Settings for' menu appears on the TV screen.
Disc Manager (DM) a When I insert a disc I see a number on the screen in the General information index picture screen in the top left-hand corner b You have inserted a disc that has already been registered by the Disc The 'Disc Manager' is an integrated database in the DVD recorder that remembers all recordings on DVD+RW/+R discs made by this DVD recorder. This gives you a complete overview of your entire video collection at the touch of a button.
Disc Manager (DM) This function can be used to quickly and easily find and play back a recording saved in the Disc Manager. 1 Press DISC MANAGER on the remote control. 2 Select 'Find title' using B or A and confirm with C . P A list of the titles of all recordings stored in the Disc Manager (DM) will appear on the TV screen. Find title Title Charly 1 Searching discs You can easily search for the title of a recording stored in the Disc Manager.
User preferences for the HDD General 5 Confirm the new setting with OK . This section describes how you can adjust the functions of the HDD to your personal preferences. When you press SYSTEM MENU , a so-called puck 'Z' appears on a line. If there are further selection options within a line, an arrow e.g.: 'S'. will appear in the respective segments e.g.: 'W'. Using the corresponding buttons on the remote control (e.g. C ) you can call up further features or selection options.
User preferences for the HDD O 'M2x' Using this feature, you can search a position by time. You can use this feature both for titles in the media browser and for playback from the time shift buffer. Standard Play plus (better than S-VHS quality) offers standard picture quality and a recording time of: DVD+RW/+R: 2,5 hours. HDD: approx. 60 hours ENGLISH 'Time search' O 'M3' 'Subpictures' This function is only required if recordings were made through a video camera connected to the DV IN (CAM2) jack.
User preferences for the HDD 'Filter' 'Jump back' Here you can choose between: Set the time you want to jump backward when you press JUMP BACK in the time shift buffer. I can not select this function Check the actual record mode selected. This function is available in the record modes 'M4' to 'M8' only. Use the setting 5 minutes for Jump forwardand 1 minute for 'Jump back', to make it easy to skip unwanted scenes.
Additional user preferences This section describes how you can make additional personal settings. The symbols have the following meaning: Picture settings You can select the following functions in this menu: Picture settings Sound settings Language settings Additional settings Disc settings Preparation: •) Switch on the TV set, and if necessary, select the channel for the DVD recorder (channel 3 or 4). •) Switch on the DVD recorder.
Additional user preferences - Disconnect the recorder's power cord. - Hold down N on the DVD Recorder while reconnecting the power cord. 'PRO' (progressive scan) appears on the display. - If you want to switch back, hold down N until 'PRO' disappears from the display. The DVD Recorder is switched to 'Interlaced.
Additional user preferences O 'Dimmed': Additional settings You can select the following functions in this menu: ENGLISH The display appears less bright. The disc tray light is switched off. O 'Off': The display and the disc tray light are switched off.
Access control (Child Lock) Child lock (DVD and VCD) This feature enables discs to be locked for children. When Child Lock is on, a 4-digit code (PIN) needs to be entered before a disc can be played. You can also decide whether the inserted disc should always be played or should be played only once, despite the child lock •)'Play always': This disc is stored in a memory with space for 50 child-safe discs. If more than 50 discs are stored, the last disc in the list is removed and the new disc is added.
Parental level control (DVD video only) Films on pre-recorded DVD discs may contain scenes not suitable for children. Therefore, some discs may contain 'Parental Control' rating information that applies to the entire disc or to certain scenes on the disc. The appropriate scenes have filter values that reach from 1-8. If such a scene is detected during playback, the filter value set on the DVD recorder is compared to the scene.
Access control (Child Lock) Changing the PIN code Preparation: •) Switch on the TV set, and if necessary, select the channel for the DVD recorder (channel 3 or 4). •) Switch on the DVD recorder. 1 Press the TUNER and then the SYSTEM MENU button on the remote control. P The menubar appears. 2 Select the 'A' icon using D or C . 3 Select ' (Disc features)' using B or A and confirm with C . Access control Auto resume Disc features Enter code On 4 Confirm 'Access control' using C .
Information on the screen of your TV Symbols in the menu bar Press DISC MENU and then SYSTEM MENU to open the menu bar. If a disc is played back, you can open the menubar with SYSTEM MENU . Use D and C to select the relevant function. Use B to confirm the function and go either to another menu or execute the function directly. Some functions may not be available, depending on the disc inserted.
Information on the screen of your TV The symbols on your DVD recorder display Messages in the DVD recorder display READING These symbols can light up on your DVD recorder display: The following messages may appear in your DVD recorder display Multi-function display/text line •) Clock •) Disc/title playing time •) Title name •) Display of the channel number of the TV channel/playing time/function. •) Display of information and alerts •) Display of the title from the actual recording.
Information on the screen of your TV HDD: within a title 500, on the HDD 1000 (spreaded over the whole HDD) ENGLISH DISC FULL The disc/HDD is full. There is no space for new recordings PAL DISC A disc with PAL recordings has been inserted. The machine is trying to record an NTSC signal. Insert a new disc or one that contains NTSC recordings. NTSC DISC A disc with NTSC recordings has been inserted. The machine is trying to record a PAL signal. Insert a new disc or one that contains PAL recordings.
Before you call an engineer If you have any problems using this DVD recorder, the reason may be one of the following. You can also call the customer service centre in your country. You can also visit our web page 'http://www.p4c.philips.com' . Have the model number (MODEL NO) and the production number (PROD.NO) of your recorder ready. The production number (PROD. NO.
Before you call an engineer PROBLEM SOLUTION bThere is no recording on the HDD/disc: Check the titles from the HDD in the media browser (button ENGLISH BROWSER HDD ), change disc.
Before you call an engineer PROBLEM SOLUTION Missing or wrong TV channels bWrong cable connection selected The cable box do not always react to the IR Blaster In the TV Guide On Screen™'LISTINGS' screen, I see too many or too less TV Channels My cable box does not react on the remote control from the cable box or automatically switches through the channels There is picture or sound interference on TV reception: Distorted sound coming from a connected hi
PROBLEM SOLUTION A DVD+RW disc cannot be played on certain DVD players 'Minimum recording times': Recording mode 'M1': 5 minutes, 'M2': 10 minutes, 'M2x': 13 minutes, 'M3': 15 minutes, 'M4': 20 minutes, 'M6': 30 minutes, 'M8': 30minutes, bSome DVD players cannot play back DVD+RW recordings. You can solve this problem by using a special function: 1 Open the disc tray with OPEN/CLOSE J . Insert the disc but do not close the tray. 2 Hold down the number button 2 on the remote control until the tray closes.
DVD Recorder One year Free Labor / One year Parts Exchange This product must be carried in for repair. WHO IS COVERED? MAKE SURE YOU KEEP... You must have proof of purchase to receive warranty service. A sales receipt or other document showing that you purchased the product is considered proof of purchase. Please keep your sales receipt or other document showing proof of purchase. Attach it to the owner's manual and keep both nearby.
ENGLISH Chapters Also known as 'scenes', a DVD movie can be broken up into sections much like the chapters of a book, that can be accessed quickly and easily via the DVD menu or remote control. NICAM NICAM is a digital sound transmission system. Using NICAM, you can transmit either 1 stereo channel or 2 separate mono channels. However, if reception is poor and the sound distorted you can turn off NICAM. NTSC National Television Systems Committee.
Code numbers of the remote control A Mark ........................................ 146 Action ........................................... 116 Admiral .... 093, 134, 209, 262, 306, 332 Aiko .. 013, 246, 248, 250, 255, 266 Akai .. 002, 113, 114, 140, 216, 246, 248, 250, 255, 266, 285, 292, 305, 324, 332 Akura ......... 217, 222, 246, 250, 266 Alba . 201, 217, 219, 232, 246, 249, 250, 266, 272, 281 Amstrad ... 201, 228, 232, 234, 246, 250, 261, 266, 280, 332 Amtron ...........................................
LXI ... 001, 006, 033, 037, 043, 044, 097, 111, 113, 134, 148 M Electronic . 201, 211, 212, 233, 236, 246, 250, 258, 272, 279, 283, 285, 287 Magnadyne 209, 257, 272, 306, 332 Magnafon ............................. 256, 257 Magnasonic 113, 114, 136, 154, 262 Magnavox 004, 006, 008, 015, 037, 041, 042, 045, 046, 070, 113, 114, 120, 128, 131, 133, 134, 136, 137, 142, 144, 262 Marantz ....
Vestel .......................................... Video Concepts .......................... VideoSystem ................................ Vidikron ........................................ Vision ............................................ 3103 605 21401 4375/000 (Wwn N Nw n wWNnwNwnNwnNnWNnw N) HDRW 720/17 ENGLISH 279, 283, 285, 287, 292, 309, 313, 324, 330, 332 Univox .......................................... 250 81 250 115 250 134 250 Vortec ........................................... 250 Voxson .
Technical data Storage media Hard Disc recording: Audio Format 120 GB HDD Compressed digital Dolby Digital (AC3) NTSC NTSC NTSC DTS, MPEG2 DVD/CD playback Playback 5.
HDRW 720/17 3103 605 21401 4375/000 (Wwn N Nw n wWNnwNwnNwnNnWNnw N)