HDT 8520 www.philips.
1 1.1 1.2 Important Safety information Reducing power consumption 7 7.1 7.2 Accessories and connections Connecting your audio equipment Connecting your standard-definition TV 34 34 2 2.1 2.2 2.3 2.4 2.5 Your HD recorder What’s in the box? What you also need (not supplied)? Overview How to read this manual? How to use the menus? 8 8 9 9 10 10 8 Guarantee and service 35 9 Technical data 35 10 Frequently asked questions 37 3 3.1 3.2 3.3 3.
1 Important Thank you for purchasing a Philips product. Take time to read this user manual before using your HD recorder. It provides important information on the installation, operation and safety of your HD recorder. Keep this manual next to your HD recorder for future reference. Disposal of your old product Your product is designed and manufactured with high quality materials and components, which can be recycled and reused.
ENGLISH 1.1 Safety information Your HD recorder is powered using a 12 V power supply unit.Your HD recorder has been manufactured to meet the appropriate safety standards, but you must follow the below instructions to operate it safely. Keep these instructions for future reference. Danger • Your HD recorder does not contain any user-serviceable parts. Do not attempt to open it. All maintenance work must be carried out by qualified service centres. • The supplied mains plug is a non-rewireable type.
Warnings • Before connecting the 12 V power supply unit to the mains, check that the mains supply voltage corresponds to the voltage printed on it. If the mains voltage is different, consult your local dealer. • The 12 V power supply unit has been designed for indoor use only. • Use only the original 12 V power supply unit. • Unplug the 12 V power supply unit from the wall socket before lightning storms.
Reducing power consumption ENGLISH 1.2 Your HD recorder is designed to reduce its impact on the environment and complies with the European Directive 2009/125/EC. This is part of Philips’ ongoing commitment to lead the way in environmental responsibility. It has a standby mode of operation that needs very little power.
2 Your HD recorder Congratulations on your purchase and welcome to Philips! To fully benefit from the support that Philips offers, register your product at www.philips.com/welcome. With your HD recorder, you will never need to schedule your life around your favourite TV programmes. Thanks to the built in hard-disk drive (HDD) that records programmes as you watch them, you can pause live TV, or repeat a scene you missed. 2.
What you also need (not supplied)? ENGLISH 2.2 SCART cable (required only if you have a standard-definition TV) TV 2.3 Overview Front panel 1 4 6 7 2 3 5 1 2 5 3 4 Remote control 1 TEXT RADIO GUIDE MENU 10 9 8 Rear panel EXIT 2 OPTIONS 3 INFO BACK LIB 4 HDD 5 6 AD DIGITAL RECORDER Your HD recorder Front Panel 1 Standby indicator 2 Standby button 3 Programme +/- buttons 4 Resolution button 5 V-Out button 6 Display 7 HD indicator 8 Record indicator 9 USB 2.
2.4 How to read this manual? Danger Describes situations of injury or loss of life. 3 Getting started 3.1 Preparing your remote control Warning Describes actions that may cause damage to the product. Note Additional information. Tip Information that is useful to know but not essential to the task. For example, information about alternative use. 2.
Connecting your HDTV Danger Risk of electric shock! Before making any connections, ensure that your equipment is disconnected from the mains. 1 HD recorder Aerial wall socket 3.3 Installing your HD recorder Before you start installation, make sure you have made all the required connections. Insert the two-way connector on the supplied mains lead into the 12 V power supply unit. Connect the 12 V power supply unit to the 12 V power connector on the rear panel of your HD recorder.
Press the green button to confirm. The TV shape menu appears. Use / to highlight the network that you want to install and press the green button. A progress screen displays to confirm that the search is taking place. When the search is complete, a screen displays the number of TV and radio channels that your HD recorder has found.Your HD recorder automatically saves these channels. Press the green button to go to the next step.
Note Entering your postal code is mandatory. You will not be able to complete the first installation setup without entering your postal code. To change the default PIN code (0000), press and use the number buttons to enter you new PIN code.You will then be prompted to re-enter your PIN code to confirm. Note Your new PIN code can be any 4-digit number other than the default PIN code (0000). Press the green button to confirm your choice and complete the installation.
4 Using your HD recorder 4.1 Standby/wake up To put your HD recorder into standby, press on your HD recorder’s front panel or remote control. To take your HD recorder out of standby, press again.You can also press BACK , P+/P- or any number button on your remote control to wake up your HD recorder. See page 7 for more information. 4.2 Changing channels To change channels, use the P+/P- on your remote control or your HD recorder’s front panel.You can also use the number buttons on your remote control.
More about the channel banner content Channel number Channel name ENGLISH 4.4.
4.5 Using channel lists You use the channel list menu to switch to any TV or radio channel from the All TV or All Radio channel list, or your favourite lists. Changing channel Press OK to display the current channel list. Use / to select the channel you want to watch. Press OK to preview the channel; press OK again to watch it. 4.
Press or OK and then press / to select an option from the list that appears on the right.You can change these settings using the Tools menu: Settings Options Subtitles language On Off (default) Audio language Available languages depend on the broadcast programme. Audio desc. level Set the audio description volume. (Available if ‘Audio description’ is turned on and broadcast.) Lip sync Set the DIGITAL audio output delay to synchronise audio with video.
In the menu that pops up, use / to highlight your choice and press OK to confirm. To pause playback at any moment, press pause K. To restart playback, press play . Note Until you return to live TV viewing, you will not be able to use any other function of your HD recorder. 4.8.1 Instant replay You can instantly replay what you have seen (or missed) during the last few seconds. Press while watching live TV. The time-shift bar appears and you are taken back 15 seconds, by default.
4.9.2 Scheduling recordings Press GUIDE to display the TV guide. Use / / / to highlight the programme you want to record, and press the red button. In the menu that pops up, use / to highlight Record the selected programme or Record the selected series and press OK to confirm. If the programme is on now, your HD recorder starts recording instantly. If it is on at a later time, your HD recorder will record the programme when it starts.
Note When you select a programme to record, your HD recorder checks whether there is enough disk space to record it. If the disk is nearly full, your HD recorder will automatically delete some of your old and unprotected programmes to make space for the new programme. 4.9.3 Time-shift bar for a paused programme Your HD recorder automatically records the program you are watching. This recording may fill in a buffer for a maximum of 3 hours.
Controlling playback and recording Instant Replay Commercial skip Play Pause In play mode: Fast Forward (x2, x4, x32, x128) In Pause mode Slow forward (x1/2, x1/4) In play mode: Fast Rewind (x2, x4, x32, x128) In Pause mode Slow backward (x1/2, x1/4) In Play mode One Touch Recording In EPG Schedule a recording on selected program Stop playback or stop recording or return to live TV 4.9.5 Viewing scheduled recordings Press to display the Scheduled recordings menu.
4.9.6 Watching recorded programmes To view all the recorded programmes, press HDD (LIB). The Recordings menu appears. All recorded programmes are protected by default to prevent you from deleting them accidentally. To delete a protected recording, use / to highlight it, press the blue button to unprotect it, and then press the red button to delete it. A message appears asking you to confirm. If you are sure, press the green button; if not, press the red button.
Using more of your HD recorder 5.
5.
Front-panel display messages ENGLISH 5.
Software update is starting Software is being loaded Software is being saved Successful update Automatic resolution adjustment (recommended) Resolution is set to 576i Resolution is set to 576p Resolution is set to 720p Resolution is set to 1080i Resolution is set to 1080p Recording library is open Play Rewind Pause Fast forward Fast rewind Your HD recorder is in the first installation setup 26 Using more of your HD recorder
Using the Main menu Press MENU to display the Main menu. Use / to highlight a setting. Press or OK to confirm your choice. Press BACK to return to the Main menu. Press BACK again, MENU or EXIT to remove the Main menu. Note Use the colour buttons to perform contextual actions, which are described at the bottom of the screen. 5.4.1 Managing favourite lists Your HD recorder allows you to create favourite lists that include the channels you watch the most.
Renaming favourite lists From the Favourites menu, use / to highlight either TV channels or Radio channels and press or OK. The menu now displays the default channel list (All TV or All Radio) and any existing favourite lists. Use / to highlight the favourite list that you want to rename, and press the blue button. In the Rename list menu that pops up, use / or the number buttons to rename your favourite list.
Use / / / / OK to navigate through the settings and options, and make changes. Press or BACK to save your changes and return to the previous menu. You use the Preferences menu to change these settings: Display • Banner duration - Use this to set the length of time (3 to 10 seconds) that the channel banner remains on-screen when you change channel. By default, it is set to 5 seconds. • Front panel brightness - Use this to set the brightness of the front-panel display.
Digital output • HDMI output resolution - Use this to set the HDMI video resolution to 576i, 576p, 720p, 1080i, 1080p, Auto (default) or Original. Note that you can also change this setting using the RES button on the front panel of your HD recorder. • Audio capabilities on HDMI - Use this to set the HDMI audio format to PCM (default) or Auto*. • Audio capabilities on S/PDIF - Use this to set the S/PDIF audio format to PCM (default) or Dolby Digital*.You can also set this to Not connected.
Note When Parental control limits is set to ON, menu items like Parental control and Set-up will be protected by the PIN code. To create a new child timer, use / to highlight Child timers, and press or OK. Make sure that Define child timer is highlighted and press or OK. Use / / / to set the time period during which you will be able to watch any unlocked channel without having to enter your PIN code. Press the green button to confirm.
Updating your HD recorder’s software manually You can manually update your HD recorder software using a USB memory stick. Download the latest software file from the Philips website (www.philips.com/support), unzip it and transfer it to a USB memory stick. Be sure to place the downloaded file in the top-level folder of your USB memory stick. Connect your USB memory stick to the USB connector on the rear panel (or on the side) of your HD recorder.
Note Set Portable antenna powering to On only if you need to power an active-indoor antenna that requires a 5 V power supply not exceeding 50 mA current consumption. Be sure to read your indoor antenna’s user manual before turning this setting on. To control antenna output, press to highlight Antenna output and press or OK. Use / to highlight Inactive in eco mode or Always active. Press to save your changes and return to the previous menu.
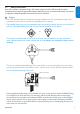
7 Accessories and connections 7.1 Connecting your audio equipment HD recorder TV A D C B HDMI Audio Equipment S/PDIF Digital L R Analogue HDMI OUT HDMI IN Digital C Option A – Optical S/PDIF connection (Digital) Connect the SPDIF audio output of your HD recorder to the relevant audio input of your audio equipment using an optical S/PDIF cable (not supplied). Consult the user manual of your audio equipment to choose the proper digital audio inputs.
Note Optionally, you can also use the supplied RF cable to connect the RF output connector (labelled To TV/VCR) of your HD recorder to the RF input connector of your TV. 8 Guarantee and service For the Philips warranty applicable to your HD recorder, please visit the Philips website: www.philips.com/guarantee. In case you do not have an Internet connection, please contact your local Philips Consumer Care Centre (see page 42).
• • • • • • • • • • • • • • • • Programme list editing: Add, Move, Delete Parental control – Child lock 8 days Electronic Programme Guide Event timer 8 Event programming via EPG DVB subtitling Digital TXT / MHEG with Interaction channel Video scaling on HDMI output: Auto, Original, 576i, 576p, 720p, 1080i, 1080p50 Dolby Digital 5.
Miscellaneous • Temperature range (°C) Operating +5 °C to +45 °C Storage -25 °C to +70 °C • Mains: AC 230 V +/- 10%, 50 Hz • Power consumption: < 15 W Standby: < 0.4 W • Weight: Product: 1.75 Kg Including packaging: 2.7 Kg • Dimensions: Product (mm) 240 x 210 x 65 Packaging (mm) 360 x 290 x 100 Due to continued improvements, this information is subject to change without notice. 10 Frequently asked questions Connection Your HD recorder does not display any digital TV channels on your TV.
Your HD recorder seems to be switching off automatically after some time. If your HD recorder automatically goes into standby mode (standby indicator on the front panel lights up), this is due to the Eco mode. The Eco mode is set to 3hours, by default (environmentally friendly product). To modify it, go to Menu > Settings > Preferences > Automatic Eco mode, and choose a different value. See page 30. Your remote control is not working.
Your HD recorder found all the expected channels after you retuned it. However, when you turned on your HD recorder the next day, the picture was breaking up and some channels were missing. Your HD recorder has an automatic retuning feature; this allows it to keep up to date with minor service changes. However, when the signal level of nearby relay transmitters are high or if the antenna signal is being amplified, these problems can occur.
You get a picture or a freezed picture, a program number on the front display and your receiver seems blocked while not responding to the remote control commands. Your HD recorder has hung up.You have to reset your HD recorder. Press the standby button on the front panel until PHILIPS is shown on the front-panel display. If you have tried all of the actions suggested above and still are not able to resolve the problem, contact your local Philips Consumer Care Centre (see page 42).
EasyLink The Philips EasyLink™ technology enables you to control multiple devices, which are connected through standard HDMI cables, using a single remote. MPEG Motion Picture Experts Group. A collection of compression systems for digital audio and video. PIN Code A 4-digit code used to prevent access to inappropriate programmes (parental control). HDCP High-bandwidth Digital Content Protection (HDCP) is a type of digital copy protection system.
12 Index Contact information Change channel, 14 -16 Channel banner, 14, 15 Connect HDMI, 11 SCART, 35 Control volume, 14 Favourite lists Create, 27 Delete, 28 Modify, 28 Rename, 28 First installation, 11 Front panel, 23 Indoor antenna Powering, 11, 33 HDT 8520/05 Serial number: UNITED KINGDOM Phone: 0800 331 60 15 Rear panel, 23 Record Instantly, 18 Scheduled, 19, 21 Remote control, 24 Restore factory settings, 32 Retune, 31 Return channel, 30 Scheduled recordings, 19, 21 Software update, 31 System se
ENGLISH Trademarks and partner logos The Philips wordmark and the Philips shield are registered trademarks of Koninklijke Philips Electronics N.V. and are used by Pace plc under license from Koninklijke Philips Electronics N.V. Manufactured under license from Dolby Laboratories. “Dolby” and the double-D symbol are trademarks of Dolby Laboratories.
© 2010 Koninklijke Philips Electronics N.V. All rights reserved.