HowTo_Ext_RW_Nero7_and_LS.qxd 17-08-2006 13:42 Pagina 1 How to...
HowTo_Ext_RW_Nero7_and_LS.
HowTo_Ext_RW_Nero7_and_LS.
HowTo_Ext_RW_Nero7_and_LS.
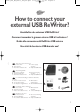
HowTo_Ext_RW_Nero7_and_LS.qxd 17-08-2006 13:42 Pagina 5 How to connect your external USB ReWriter? Anschließen des externen USB ReWriter? Comment raccorder le graveur externe USB à l’ordinateur ? Guida alla connessione del ReWriter USB esterno Hoe sluit ik de externe USB-brander aan? 1 UK This can be found in the box: A: Your new drive. D: Power supply B: This manual. (2 parts). C: The Nero software disc. E: HiSpeed USB Cable. D Verpackungsinhalt: A: Ein neues Laufwerk. B: Dieses Handbuch.
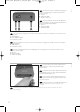
HowTo_Ext_RW_Nero7_and_LS.qxd 17-08-2006 13:42 Pagina 6 UK At the back side, you will find the plugs you need for connecting your external rewriter to your computer. A: Power. B: HiSpeed USB. C: Audio connector. 2 Auf der Rückseite finden Sie die Buchsen, D die Sie benötigen, um den externen ReWriter an Ihren Computer anzuschließen. A: Strom. B: HiSpeed-USB. C: Audioanschluss. Les connecteurs requis pour brancher votre graveur externe à l’ordinateur se trouvent au dos F de l’appareil.
HowTo_Ext_RW_Nero7_and_LS.qxd 4 17-08-2006 13:42 Pagina 7 UK Plug the USB cable in the external rewriter. Do not connect the cable to the computer at this moment. D Stecken Sie das USB-Kabel in den externen ReWriter. Schließen Sie das Kabel jetzt noch nicht an Ihren Computer an. F Branchez le câble USB au graveur externe. Ne branchez pas encore le câble à l’ordinateur. I Inserire il cavo USB nel rewriter esterno. Non collegare il cavo al computer in quel momento.
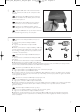
HowTo_Ext_RW_Nero7_and_LS.qxd 17-08-2006 13:42 Pagina 8 UK When you are using Windows 98 Second Edition, please go to the end of this chapter. Otherwise, continue with step 7. ➤ Identify your Operating System by right clicking on “My Computer” and choosing “Properties”. 6 D Wenn Sie Windows 98 Second Edition verwenden, gehen Sie bitte zum Ende dieses Kapitels. Ansonsten fahren Sie mit Schritt 7 fort.
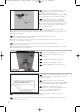
HowTo_Ext_RW_Nero7_and_LS.qxd 9 17-08-2006 13:42 Pagina 9 UK The drivers will be installed automatically. This may take some seconds. ➤ The popups shown are operating system dependent. D Die Treiber werden automatisch installiert. Dieser Vorgang kann einige Sekunden dauern. ➤ Die angezeigten Popups sind je nach Betriebssystem unterschiedlich. F Les pilotes sont installés automatiquement. Cette opération peut prendre quelques secondes.
HowTo_Ext_RW_Nero7_and_LS.qxd 17-08-2006 13:42 Pagina 10 UK For Windows 98 Second Edition only: 1. Insert the Nero disc in a CD or DVD device of your computer. If you do not have a CD-ROM on your computer, please refer to the Frequently Asked Questions on www.philips.com/storageupdates. 2. When the Nero screen (as in step 11) is shown, connect your external rewriter to the computer (as in step 7). 3. The “Add New Hardware Wizard” will pop up. 4. Click “Next” in “The wizard searches for new drivers…:”.
HowTo_Ext_RW_Nero7_and_LS.qxd 17-08-2006 13:42 Pagina 11 How to disconnect your external USB ReWriter? Trennen des externen USB ReWriter? Comment débrancher le graveur externe USB ? Guida alla disconnessione del ReWriter USB esterno Hoe koppel ik de externe USB-brander los? 1 UK To disconnect, click the “Safely Remove Hardware” icon. D Um den ReWriter zu trennen, klicken Sie vorher auf das Symbol „Hardware sicher entfernen".
HowTo_Ext_RW_Nero7_and_LS.qxd 17-08-2006 13:42 Pagina 12 UK Disconnect your external rewriter when this shows up. D Trennen Sie Ihren externen ReWriter, sobald Sie auf dem Bildschirm dazu aufgefordert werden. F Lorsque ce message s’affiche, vous pouvez débrancher le graveur externe. I Scollegare il rewriter esterno quando appare. Koppel uw externe brander los wanneer dit bericht wordt weergegeven.
HowTo_Ext_RW_Nero7_and_LS.qxd 17-08-2006 13:42 Pagina 13 Up to date? Sind Sie auf dem neuesten Stand? Vos logiciels sont-ils à jour ? Aggiornamento Up to date? 1 UK Start the Philips Intelligent Agent. ➤ If not available, choose “Start”,“(All) Programs”, “Philips Intelligent Agent”,“Philips Intelligent Agent”. D Starten Sie den Philips Intelligent Agent. ➤ Wenn er auf dem Desktop nicht zur Verfügung steht, wählen Sie “Start“, „Programme“,“Philips Intelligent Agent“,“Philips Intelligent Agent“.
HowTo_Ext_RW_Nero7_and_LS.qxd 17-08-2006 13:42 UK Pagina 14 Download the updates and install them. Laden Sie die Updates herunter und installieren Sie sie. 3 D F Téléchargez les mises à jour et installez-les. Effettuare il Download degli aggiornamenti e installarli. I NL Download de updates en installeer ze. UK Choose "Start", "(All) Programs", "Nero 7 Essentials", "Nero ProductSetup". 4 D Wählen Sie "Start", "(Alle) Programme", "Nero 7 Essentials", "Nero ProductSetup".
HowTo_Ext_RW_Nero7_and_LS.qxd 6 7 UK 8 13:42 Pagina 15 Click "OK". D Klicken Sie auf "OK". F Cliquez sur "OK". I Fare clic su "OK". NL Klik op "OK". UK Click "OK". D Klicken Sie auf "OK". F Cliquez sur "OK". I Fare clic su "OK". NL 17-08-2006 Klik op "OK". UK The Windows Firewall may warn you. Click "Unblock" to allow your Nero to be updated. D Sie erhalten evtl. eine Warnung von der Windows Firewall. Klicken Sie auf "Sperre deaktivieren", damit sich Nero aktualisieren kann.
HowTo_Ext_RW_Nero7_and_LS.qxd 17-08-2006 UK 13:42 Pagina 16 Nero downloads and updates itself. Nero führt den Download und die Aktualisierung selbstständig durch. D F Nero télécharge et se met à jour automatiquement. I L'aggiornamento di Nero viene scaricato ed eseguito. NL Nero gaat automatisch downloaden en bijwerken.
HowTo_Ext_RW_Nero7_and_LS.qxd 17-08-2006 13:42 Pagina 17 How to print a label using LightScribe? So beschriften Sie Ihre CD/DVD mit LightScribe Comment imprimer une étiquette avec LightScribe ? Guida alla stampa di un'etichetta utilizzando LightScribe Hoe druk ik een label af met LightScribe? 1 UK Start “Nero StartSmart Essentials”. D Starten Sie „Nero StartSmart Essentials“. F Lancez 'Nero StartSmart Essentials'. I Avviare “Nero StartSmart Essentials”. NL Start “Nero StartSmart Essentials”.
HowTo_Ext_RW_Nero7_and_LS.qxd 17-08-2006 UK 13:42 Pagina 18 Choose “Extra” and ‘Print LightScribe label” Klicken Sie auf „Extras“ und „LightScribe Label drucken” 2 D F Choisissez 'Extras' et 'Imprimer une étiquette LightScribe'. I Selezionare “Extra” e “Stampare etichette LightScribe” NL Kies “Extra” en ‘LightScribe-label afdrukken” UK To insert a full image, doubleclick on the empty CD area. 3 D Doppelklicken Sie auf den leeren CD/DVDBereich, um ein komplettes Bild einzufügen.
HowTo_Ext_RW_Nero7_and_LS.qxd 5 UK 17-08-2006 13:42 Pagina 19 Your image will be aligned to the printable area. D Ihr Bild wird auf den bedruckbaren Bereich ausgerichtet. F L'image sera adaptée à la zone imprimable. L’immagine d’interesse verrà allineata all’area stampabile. I NL Uw afbeelding wordt uitgelijnd in het afdrukgebied. 6 UK To insert an image on a part of the disc, start the “image tool” D Um nur auf eine Teilfläche der Disc ein Bild zu drucken, führen Sie das „Bild-Werkzeug“ aus.
HowTo_Ext_RW_Nero7_and_LS.qxd 17-08-2006 UK 13:42 Pagina 20 To enter text, choose the “Text Box Tool”. Um Text einzugeben, wählen Sie das „Textbox-Werkzeug“. 8 D F Pour entrer un texte, choisissez 'Outil Boîte de texte'. I Per inserire un testo, selezionare lo “Strumento riquadro testo”. NL Kies “Tekstvak” om tekst in te voegen. UK Draw the area where to put the text. A smaller area will print faster. 9 D Zeichnen Sie die Fläche, in die Sie Text schreiben möchten.
HowTo_Ext_RW_Nero7_and_LS.qxd 11 17-08-2006 13:42 Pagina 21 UK Click on the “Print LightScribe Label” icon when your label is ready to print. D Klicken Sie auf das Symbol „LightScribe Label drucken“, sobald Ihr Label druckbereit ist. F Cliquez sur l'icône 'Imprimer label LightScribe' lorsque l'étiquette est prête à être imprimée. I Fare clic sull’icona “Stampa etichetta LightScribe” quando l’etichetta è pronta per la stampa.
HowTo_Ext_RW_Nero7_and_LS.qxd 17-08-2006 13:42 Pagina 22 UK Congratulations, your disc has been printed successfully. You may exit the application now D Glückwunsch, Ihre Disc wurde erfolgreich bedruckt. Sie können jetzt die Anwendung verlassen. F Félicitations, le disque a été imprimé avec succès. Vous pouvez maintenant quitter l'application. I Congratulazioni, è stata completata la stampa del disco. Ora è possibile uscire dall’applicazione. NL Gefeliciteerd, uw cd is met succes bedrukt.
HowTo_Ext_RW_Nero7_and_LS.qxd 17-08-2006 13:42 Pagina 23 How to make a video disc? Erstellen einer Video-Disc Comment créer un disque vidéo ? Guida alla creazione di un video disc Hoe maak ik een video-cd? 1 UK Start “Nero StartSmart Essentials”. D Starten Sie “Nero StartSmart Essentials“. F Lancez 'Nero StartSmart Essentials'. I Avviare “Nero StartSmart Essentials”. NL Start “Nero StartSmart Essentials”.
HowTo_Ext_RW_Nero7_and_LS.qxd 17-08-2006 13:42 Pagina 24 UK Choose “Photo and Video” and “Make your own DVD-Video”. 2 D Wählen Sie “Foto und Video“ und “Eigenes DVD-Video erstellen“. F Choisissez 'Photo et Vidéo' et 'Créer votre propre DVD-Vidéo'. I Selezionare “Foto e video” e “Creare il proprio DVD-Video”. NL Kies “Foto en video” en “Maak uw eigen DVD-Video”. UK If you want to capture video from a camera, connect it to your PC. Otherwise go to step 8.
HowTo_Ext_RW_Nero7_and_LS.qxd 5 17-08-2006 13:42 Pagina 25 UK Select the capture device and press the record button. D Wählen Sie das Aufnahmegerät und drücken Sie die Aufnahmetaste. F Sélectionnez le périphérique de capture et appuyez sur le bouton d'enregistrement. I Selezionare il dispositivo di cattura e premere il pulsante Registra. NL Selecteer het apparaat waar u video vanaf wilt laden en druk op de opnameknop. 6 UK During capturing, you will see the progress here.
HowTo_Ext_RW_Nero7_and_LS.qxd 17-08-2006 13:42 Pagina 26 UK If you want to add files from the hard disk, choose “Add Video Files”. Otherwise go to step 10. 8 D Wenn Sie Dateien von der Festplatte hinzufügen möchten, wählen Sie „Videodaten hinzufügen“. Ansonsten fahren Sie mit Schritt 10 fort. F Si vous voulez ajouter des fichiers à partir du disque dur, choisissez 'Ajouter des fichiers vidéo'. Sinon, allez à l'étape 10.
HowTo_Ext_RW_Nero7_and_LS.qxd 11 17-08-2006 13:42 Pagina 27 UK You can here add video effects, text effects and transitions. D Sie können Videoeffekte, Texteffekte und Übergänge hinzufügen. F Vous pouvez ajouter ici des effets vidéo, des effets de texte et des transitions. I Qui è possibile aggiungere effetti video, testo e transizioni. NL Hier kunt u video-effecten, teksteffecten en overgangen toevoegen. 12 UK You can also trim the recorded video by sliding the markers. When done, choose “Next”.
HowTo_Ext_RW_Nero7_and_LS.qxd 17-08-2006 13:42 Pagina 28 UK Enter the title in the “Header” field and click “Edit menu”. 14 D Geben Sie den Titel im Feld „Kopfzeile“ ein und klicken Sie auf “Menü bearbeiten“. F Entrez le titre dans la zone 'En-tête' et cliquez sur 'Editez le Menu'. I Inserire il titolo nel campo “Intestazion” e fare clic su “Modif. menu”. NL Voer de titel in het veld “Koptekst” in en klik op “Bewerken menu”. UK You can change the layout, the background, add titles,… here.
HowTo_Ext_RW_Nero7_and_LS.qxd 17 17-08-2006 13:42 Pagina 29 UK Choose “Burn to”, choose your recorder and choose “Burn”. D Klicken Sie auf “Brennen auf“, wählen Sie Ihren Rekorder und klicken Sie auf “Brennen“. F Choisissez 'Graver vers', sélectionnez le graveur et choisissez 'Graver'. I Selezionare “Masterizza su”, selezionare il masterizzatore e quindi “Scrivi”. NL Kies “Branden naar”, kies uw recorder en kies “Branden”. 18 UK NeroVision Express is transcoding and burning your disc.
HowTo_Ext_RW_Nero7_and_LS.
HowTo_Ext_RW_Nero7_and_LS.qxd 17-08-2006 13:42 Pagina 31 How to make an audio or data disc? Erstellen einer Audio- oder Daten-Disc Comment créer un disque audio ou de données ? Guida alla creazione di un disco audio o di un disco dati Hoe maak ik een audio- of data-cd? 1 UK Start “Nero StartSmart”. D Starten Sie “Nero StartSmart“. F Lancez 'Nero StartSmart'. I Avviare “Nero StartSmart”. NL Start “Nero StartSmart”.
HowTo_Ext_RW_Nero7_and_LS.qxd 17-08-2006 13:42 UK Pagina 32 Choose „Data” or “Audio”. D Wählen Sie “Daten“ oder “Audio“. F Choisissez 'Données' ou 'Audio'. I Selezionare “Dati” o “Audio”. NL 2 Kies „Data” of “Audio”. UK For data, choose „Make Data CD” or „Make Data DVD”. 3 D Für Daten wählen Sie “Daten CD erstellen“ oder “Daten DVD erstellen“. F Pour créer un disque de données, choisissez 'Créer un CD de données' ou 'Créer un DVD de données'.
HowTo_Ext_RW_Nero7_and_LS.qxd 5 UK 6 13:42 Pagina 33 Click “Add” D Klicken Sie auf “Hinzufügen“. F Cliquez 'Ajouter'. I Fare clic su “Aggiungi” NL 17-08-2006 Klik op „Toevoegen” UK Select all the files to burn and click “Add”. Click “Close” when finished. D Wählen Sie alle Dateien, die Sie brennen möchten, und klicken Sie auf “Hinzufügen“. Klicken Sie, wenn Sie fertig sind, auf “Schließen“. F Sélectionnez tous les fichiers à graver et cliquez sur 'Ajouter'.
HowTo_Ext_RW_Nero7_and_LS.qxd 17-08-2006 13:42 UK Pagina 34 Choose your recorder and click „Burn”. Wählen Sie ihren Rekorder und klicken Sie auf “Brennen“. 8 D F Choisissez votre graveur et cliquez sur 'Graver'. I Selezionare il Masterizzatore e fare clic su “Scrivi”. NL Kies uw Recorder en klik op „Branden”. UK Nero is burning your disc. D Nero brennt Ihre Disc. F Nero commence la gravure du disque. I Nero sta masterizzando il disco. NL Nero is bezig uw cd te branden.
HowTo_Ext_RW_Nero7_and_LS.qxd 17-08-2006 13:42 Pagina 35 How to copy a disc? Kopieren einer Disc Comment copier un disque ? Guida alla copia di un disco Hoe kopieer ik een cd? 1 UK Start “Nero StartSmart Essentials”. D Starten Sie “Nero StartSmart Essentials“. F Lancez 'Nero StartSmart Essentials'. I Avviare “Nero StartSmart Essentials”. NL Start “Nero StartSmart Essentials”.
HowTo_Ext_RW_Nero7_and_LS.qxd 17-08-2006 13:42 Pagina 36 UK Choose „Favorites” and “Copy CD” or “Copy DVD”. 2 D Wählen Sie “Favoriten“ und “CD kopieren“ oder “DVD kopieren“. F Choisissez 'Favoris' et 'Copier CD' ou 'Copier DVD'. I Selezionare “Preferiti” e “Copia CD” o “Copia DVD”. NL Kies „Favorieten” en “CD Kopiëren” of “DVD Kopiëren”. UK Select the source drive. D Wählen Sie das Quelllaufwerk. F Sélectionnez le lecteur source. I Selezionare l’Unità di origine.
HowTo_Ext_RW_Nero7_and_LS.qxd 5 UK 13:42 Pagina 37 Nero will now copy your disc. D Nero brennt jetzt Ihre Disc. F Nero commence la copie du disque. I Ora Nero eseguirà la copia del disco. NL 6 17-08-2006 Nero zal uw cd nu kopiëren. UK Congratulations, your disc has been written successfully. You may exit the application now. D Glückwunsch, Ihre Disc wurde erfolgreich beschrieben. Sie können jetzt die Anwendung verlassen. F Félicitations, le disque a été gravé avec succès.
HowTo_Ext_RW_Nero7_and_LS.qxd 17-08-2006 13:42 Pagina 38 More info or help needed? Visit www.philips.com/storageupdates UK Troubleshooting Philips optical disc drives are manufactured with utmost care. In case of problems, it often appears that the drive itself is not defective. You can simply solve most of these problems by using the support tools offered by Philips. When you’re experiencing problems: 1 2 3 Please check the information in the “How to…” manual Check the Philips support websites www.
HowTo_Ext_RW_Nero7_and_LS.qxd 17-08-2006 13:42 Pagina 39 Weitere Informationen oder Hilfe erforderlich? Besuchen Sie www.philips.com/storageupdates D Fehlersuche Optische Laufwerke werden von Philips mit größter Sorgfalt hergestellt. Bei Problemen stellt sich oft heraus, dass das Laufwerk selbst nicht defekt ist. Sie können die meisten dieser Probleme einfach unter Verwendung der Support-Werkzeuge von Philips lösen.
HowTo_Ext_RW_Nero7_and_LS.qxd 17-08-2006 13:42 Pagina 40 Vous avez besoin d'aide ou de plus d'informations ? Surfez sur www.philips.com/storageupdates F Dépannage Les lecteurs de disques optiques Philips sont fabriqués avec le plus grand soin. Lorsqu’un problème survient, il apparaît souvent que le lecteur lui-même n’est pas défectueux. La plupart des problèmes peuvent simplement être résolus à l’aide des outils d'assistance proposés par Philips.
HowTo_Ext_RW_Nero7_and_LS.qxd 17-08-2006 13:42 Pagina 41 Per ulteriori informazioni o assistenza Consultare il sito Web all'indirizzo www.philips.com/storageupdates I Risoluzione dei problemi Le unità disco ottiche della Philips sono prodotte con la massima cura. In caso di problemi, spesso risulta che non è l’unità in quanto tale ad avere dei problemi. Potete risolvere semplicemente la maggior parte di questi problemi utilizzando gli strumenti di supporto offerti da Philips.
HowTo_Ext_RW_Nero7_and_LS.qxd 17-08-2006 13:42 Pagina 42 Meer informatie of hulp nodig? Ga naar www.philips.com/storageupdates NL Probleemoplossing De optische schijfstations van Philips zijn met de grootst mogelijke zorg gemaakt. Als zich problemen voordoen, blijkt vaak dat het station zelf geen defecten heeft. U kunt de meeste van deze problemen eenvoudig oplossen door de hulpprogramma's van Philips te gebruiken. Wat te doen bij problemen: 1 2 3 Controleer de informatie in de handleiding.
HowTo_Ext_RW_Nero7_and_LS.qxd 17-08-2006 13:42 Pagina 43 ¿Cómo conectar el re-grabador USB externo? Como conectar seu regravador USB externo? Harici USB ReWriter cihazınız nasıl bağlanır? Podłączanie zewnętrznej nagrywarki USB Hur ansluts den externa USB-brännaren? 1 E Contenido de la caja: A: Su nueva unidad. D: B: Este manual. C: Disco con software E: Nero. Fuente de alimentación (2 partes). Cable USB de alta velocidad. PT Os seguintes itens estão contidos na caixa: A: Sua nova unidade.
HowTo_Ext_RW_Nero7_and_LS.qxd 17-08-2006 13:42 Pagina 44 E En la parte posterior encontrará los conectores que necesita para conectar el re-grabador externo al ordenador. A: Alimentación. B: USB de alta velocidad. C: Conector de audio. 2 PT Na parte traseira, você encontrará os plugues necessários para conectar seu regravador externo ao seu computador. A: Power (Alimentação). B: HiSpeed USB (USB de alta velocidade). C: Audio connector (Conector de áudio).
HowTo_Ext_RW_Nero7_and_LS.qxd 4 17-08-2006 13:42 Pagina 45 E Conecte el cable USB en el re-grabador externo. No conecte el cable al ordenador en este momento. PT Conecte o cabo USB no regravador externo. Não conecte o cabo ao computador neste momento. TR USB kablosunu harici yeniden yazıcıya takın. Bilgisayara giden kabloyu bu aşamada bağlamayın. PL Podłącz kabel USB do zewnętrznej nagrywarki. Nie podłączaj jeszcze kabla do komputera. SV Anslut USB-kabeln till den externa brännaren.
HowTo_Ext_RW_Nero7_and_LS.qxd 17-08-2006 13:42 Pagina 46 E Si se utiliza Windows 98 Segunda Edición, por favor vaya al final de este capítulo. De lo contrario siga en el paso 7. ➤ Identifique su sistema operativo haciendo clic con el botón derecho del ratón en “Mi PC” y elija “Propiedades”. 6 PT Ao usar o Windows 98 Second Edition, vá para o final deste capítulo. Caso contrário, continue com a etapa 7.
HowTo_Ext_RW_Nero7_and_LS.qxd 9 17-08-2006 13:42 Pagina 47 E Los controladores se instalarán automáticamente. Esto puede tardar unos segundos. ➤ Las pantallas emergentes mostradas dependen del sistema operativo. PT Os drivers serão instalados automaticamente. Isso pode levar alguns segundos. ➤ Os pop-ups mostrados dependem do sistema operacional. TR Sürücüler otomatik olarak yüklenir. Bu işlem birkaç saniye sürebilir. ➤ Gösterilen açılan pencereler işletim sistemine bağlıdır.
HowTo_Ext_RW_Nero7_and_LS.qxd 17-08-2006 13:42 Pagina 48 E Sólo en el caso de Windows 98 Segunda Edición: 1. Ponga el disco de Nero en un lector de CD o DVD del ordenador. Si no tiene lector de CD-ROM en el ordenador, por favor consulte la sección de Preguntas Frecuentes en www.philips.com/storageupdates. 2. Si se muestra la pantalla de Nero (como en el paso 11), conecte el re-grabador externo al ordenador (como en el paso 7). 3.
HowTo_Ext_RW_Nero7_and_LS.qxd 17-08-2006 13:42 Pagina 49 ¿Cómo desconectar el re-grabador USB externo? Como desconectar seu regravador USB externo? Harici USB ReWriter cihazı nasıl ayrılır? Odłączanie zewnętrznej nagrywarki USB Hur kopplas den externa USB-brännaren bort? 1 E Para desconectarlo, haga clic en el icono “Quitar hardware con seguridad”. PT Para desconectar, clique no ícone “Remover hardware com segurança”. TR Ayırmak için, “Donanımı Güvenle Kaldır” simgesini tıklayın.
HowTo_Ext_RW_Nero7_and_LS.qxd 17-08-2006 13:42 Pagina 50 E Desconecte el re-grabador externo cuando aparezca este mensaje. PT Desconecte seu regravador externo quando aparecer o seguinte. TR Bu göründüğünde harici yeniden yazıcıyı ayırın. PL Następnie odłącz zewnętrzną nagrywarkę. Koppla bort den externa brännaren när detta visas.
HowTo_Ext_RW_Nero7_and_LS.qxd 17-08-2006 13:42 Pagina 51 ¿Actualizar? Atualizado? Güncel mi? Aktualizacja Uppdaterad? 1 E UK Inicie Philips Intelligent Agent. ➤ Si no está disponible, elija “Inicio”, “Programas”, “Philips Intelligent Agent”, “Philips Intelligent Agent”. PT Iniciar o Philips Intelligent Agent. ➤ Se não estiver disponível, selecione “Iniciar”, “(Todos) os programas”, “Philips Intelligent Agent”, “Philips Intelligent Agent”. TR Philips Intelligent Agent’ı başlat.
HowTo_Ext_RW_Nero7_and_LS.qxd 17-08-2006 13:42 Pagina 52 E Descargando las actualizaciones e instalándolas. 3 PT Faça o download das atualizações e instale-as. TR Güncellemeleri indir ve kur. PL Pobierz i zainstaluj aktualizacje. SV Ladda ner uppdateringarna och installera dem. E Elija "Inicio", "(Todos) Programas", "Nero 7 Essentials", "Nero ProductSetup". 4 PT Seleccione "Iniciar", "(Todos os) Programas", "Nero 7 Essentials", "Nero ProductSetup".
HowTo_Ext_RW_Nero7_and_LS.qxd 6 7 8 E 13:42 Pagina 53 Haga clic en "OK". PT Clique em "OK". TR "Tamam"ı tıklatın. PL Kliknij "OK". SV Klicka på "OK". E 17-08-2006 Haga clic en "OK". PT Clique em "OK". TR "Tamam"ı tıklatın. PL Kliknij "OK". SV Klicka på "OK". E Es posible que el Firewall de Windows le dé un mensaje. Haga clic en "Unblock" (Desbloquear) para permitir que Nero se actualice. PT A Firewall do Windows pode avisá-lo.
HowTo_Ext_RW_Nero7_and_LS.qxd 17-08-2006 13:42 Pagina 54 E Nero se descarga y actualiza automáticamente. PT O Nero transfere e actualiza o software. TR Nero yüklenir ve güncellenir. PL Program Nero pobierze i zainstaluje aktualizację. SV Nero laddas ner och uppdateras automatiskt.
HowTo_Ext_RW_Nero7_and_LS.qxd 17-08-2006 13:42 Pagina 55 ¿Cómo imprimir una etiqueta utilizando LightScribe? Como imprimir uma etiqueta usando o LightScribe? LightScribe kullanarak etiket nbasıl yazdırılır Drukowanie etykiet za pomocą funkcji LightScribe Hur skriver man ut en etikett med hjälp av LightScribe? 1 E UK Inicie “Nero StartSmart Essentials”. PT Inicie o “Nero StartSmart Essentials”. TR “Nero StartSmart Essentials”’ı başlat. Uruchom program „Nero StartSmart Essentials”.
HowTo_Ext_RW_Nero7_and_LS.qxd 17-08-2006 13:42 Pagina 56 E Elija “Herramientas” e ‘‘Imprimir etiqueta LightScribe” 2 PT Selecione “Extras” e “Imprimir etiqueta do LightScribe” TR “Ekstra”yı seçin ve ‘LightScribe etiketini yazdırın” PL Kliknij „Dodatki” i „Wypal etykietę LightScribe” SV Välj "Extra" och "Skriv ut LightScribe-etikett" E Para introducir una imagen completa, haga doble clic en la zona vacía del CD. 3 PT Para inserir uma imagem completa, clique duas vezes na área vazia do CD.
HowTo_Ext_RW_Nero7_and_LS.qxd 5 E 17-08-2006 13:42 Pagina 57 La imagen se ajustará a la zona de impresión. Sua imagem estará alinhada com a área imprimível. PT TR Görüntünüz yazdırılabilir alanda hizalanacaktır. Obraz zostanie dopasowany do obszaru drukowania. PL SV 6 Din bild riktas in i utskriftsområdet.
HowTo_Ext_RW_Nero7_and_LS.qxd 17-08-2006 13:42 Pagina 58 E Para introducir texto, elija “Herramienta Cuadro de texto”. 8 PT Para inserir texto, selecione a “Ferramenta caixa de texto”. TR Metin girmek için “Yazı Kutusu Aleti”ni seçin. Aby wpisać tekst, kliknij „Narzędzie wstawiania pola tekstowego”. PL SV Om du vill skriva in text väljer du "Textboxverktyg". E Marque la zona donde colocará el texto. Una zona pequeña se imprimirá más rápido. 9 PT Desenhe a área na qual o texto será colocado.
HowTo_Ext_RW_Nero7_and_LS.qxd 11 17-08-2006 13:42 Pagina 59 E Haga clic en el icono “Imprima etiqueta LightScribe” cuando la etiqueta lista para imprimir. PT Clique no ícone “Imprimir etiqueta do LightScribe” quando sua etiqueta estiver pronta para ser impressa. TR Etiketiniz yazdırmak için hazır olduğunda “LightScribe Etiketini Yazdır” simgesine tıklayın. PL Kliknij ikonę „Drukuj etykietę LightScribe”, kiedy etykieta będzie gotowa do druku.
HowTo_Ext_RW_Nero7_and_LS.qxd 17-08-2006 13:42 Pagina 60 E Felicitaciones, su disco se ha imprimido correctamente. Ahora puede salir de la aplicación PT Parabéns, seu disco foi impresso com sucesso. Você pode sair do aplicativo agora. TR Tebrikler, diskiniz başarıyla yazdırıldı. Şimdi uygulamadan çıkabilirsiniz PL Gratulacje! Drukowanie płyty zakończyło się pomyślnie. Możesz zakończyć pracę programu SV Grattis, du har bränt en skiva. Du kan stänga programmet nu.
HowTo_Ext_RW_Nero7_and_LS.qxd 17-08-2006 13:42 Pagina 61 ¿Cómo crear DVD de vídeo? Como criar um disco de vídeo? Video diski nasıl oluşturulur? Tworzenie płyty wideo Hur går det till att göra en videoskiva? 1 E UK Inicie “Nero StartSmart Essentials”. PT Inicie o “Nero StartSmart Essentials”. TR “Nero StartSmart Essentials”ı başlat. Uruchom program “Nero StartSmart Essentials”. PL SV Starta "Nero StartSmart Essentials".
HowTo_Ext_RW_Nero7_and_LS.qxd 17-08-2006 13:42 Pagina 62 E Elija “Foto y vídeo” y “Crear DV de vídeo propio” 2 PT Selecione “Foto e vídeo” e “Crie seu próprio DVD de vídeo” TR “ Fotograf ve Video” ve “Keni DVDVideo’nu Yarat”yu seç PL Kliknij “Foto i wideo” i “Twórz własne DVDVideo” SV Välj "Foto och video" och "Gör din egen DVD-video" E Si quiere capturar vídeo desde una cámara, conéctela a su PC. De lo contrario, vaya al paso 8 3 PT Se desejar capturar vídeo de uma câmera, conecte-a ao seu PC.
HowTo_Ext_RW_Nero7_and_LS.qxd 5 17-08-2006 13:42 Pagina 63 E Seleccione el dispositivo de captura y pulse el botón Record. PT Selecione o dispositivo de captura e aperte o botão de gravação. TR Yakalanan aygıtı seçin ve kayıt düğmesine basın. PL Wybierz urządzenie do przechwytywania i naciśnij przycisk nagrywania. SV Välj den enhet som du vill hämta video från och tryck på inspelningsknappen. 6 E PT Durante la captura, aquí verá el proceso. Durante a captura, você verá o progresso aqui.
HowTo_Ext_RW_Nero7_and_LS.qxd 17-08-2006 13:42 Pagina 64 E Si quiere añadir archivos desde el disco duro, elija “Añadir archivos de vídeo”. De lo contrario, vaya al paso 10 8 PT Se quiser adicionar arquivos do disco rígido, selecione “Adicionar arquivos de vídeo”. Caso contrário, vá para a etapa 10. TR TSabit diskten dosya eklemek istiyorsanız, “Vidyo Dosyasi Ekle”ı seçin. Aksi halde 10. adıma gidin. PL Jeśli chcesz dodać pliki z dysku twardego, kliknij “Dodaj pliki wideo”.
HowTo_Ext_RW_Nero7_and_LS.qxd 11 17-08-2006 13:42 Pagina 65 E Aquí, puede añadir efectos de vídeo, efecto de texto y transiciones. PT Aqui você pode adicionar efeitos de vídeo, efeitos de texto e transições. TR Video efektlerini, metin efektlerini ve geçişleri buraya ekleyebilirsiniz. PL Tutaj możesz dodać efekty wideo, efekty tekstowe i przejścia. SV Här kan du lägga till videoeffekter, texteffekter och övergångar. 12 E Puede recortar el vídeo grabado desplazando los marcadores.
HowTo_Ext_RW_Nero7_and_LS.qxd 17-08-2006 13:42 Pagina 66 E Ponga el título en el campo “Cabecera” y haga clic en “Editar menú”. 14 PT Digite o título no campo “Cabeçalho” e clique em “Editar menu”. TR “Başlık” alanına başlığı girin ve “Menü Düzenle”ye tıklayın. PL Wpisz tytuł w polu „Nagłówek” i kliknij „Edycja menu”. SV Ange titeln i fältet "Rubrik" och klicka på "Redigera Meny". E Puede cambiar el diseño, fondo, añadir títulos,… aquí. Cuando haya terminado, elija “Siguiente” dos veces.
HowTo_Ext_RW_Nero7_and_LS.qxd 17 17-08-2006 13:42 Pagina 67 E Elija “Grabar en”, elija su grabador y elija “Grabar”. PT Selecione “Gravar em”, selecione seu gravador e selecione “Gravar”. TR “Farklı Yazdır”yu seçin, kaydedicinizi seçin ve “Yaz” seçeneğini seçin. PL Kliknij „Nagraj na”, wybierz nagrywarkę i kliknij „Nagraj”. SV Välj "Bränn med", markera din brännare och välj "Bränn".
HowTo_Ext_RW_Nero7_and_LS.
HowTo_Ext_RW_Nero7_and_LS.qxd 17-08-2006 13:42 Pagina 69 ¿Cómo crear un disco de datos o audio? Como criar um disco de áudio ou dados? Bzir ses veya veri diski nasıl oluşturulur? Nagrywanie płyt audio lub danych. Hur går det till att göra en ljud- eller dataskiva? 1 E UK Inicie “Nero StartSmart”. PT Inicie o “Nero StartSmart”. TR “Nero StartSmart”ı başlatın. PL Uruchom program „Nero StartSmart”. SV Starta "Nero StartSmart".
HowTo_Ext_RW_Nero7_and_LS.qxd 17-08-2006 E 13:43 Pagina 70 Elija “Datos” o “Audio”. PT Selecione “Dados” ou “Áudio”. TR „Veri” veya “Ses”yu seçin. PL Kliknij „Dane” lub „Audio”. SV Välj "Data" eller "Audio". E Para datos, elija “Crear CD de datos” o “Crear DVD de datos” 2 3 PT Para dados, selecione ”Criar CD de dados” ou ”Criar DVD de dados”.
HowTo_Ext_RW_Nero7_and_LS.qxd 5 6 E 17-08-2006 13:43 Pagina 71 Haga clic en “Añadir” PT Clique em “Adicionar”. TR „Ekle”yi seçin PL Kliknij „Dodaj” SV Klicka på "Lägg till" E Seleccione todos los archivos a grabar y haga clic en “Añadir”. Haga clic en “Cerrar” cuando termine. PT Selecione todos os arquivos a serem gravados e clique em “Adicionar”. Clique em “Fechar” quando tiver terminado. TR Yakacağınız tüm dosyaları seçin ve “Ekle”ye tıklayın. Bittiğinde “Kapat”a tıklayın.
HowTo_Ext_RW_Nero7_and_LS.qxd 17-08-2006 E 13:43 Pagina 72 Elija su grabador y haga clic en "Grabar”. Selecione seu gravador e clique em ”Gravar”. 8 PT TR Kaydediciyi seçin ve „Yak”a tıklayın. PL Wybierz nagrywarkę i kliknij „Nagraj”. SV Välj din brännare och klicka på "Bränn". E Nero está grabando su disco. PT O Nero está gravando seu disco. TR Nero diskinizi yakıyor. PL Program Nero rozpocznie nagrywanie płyty. SV Nero bränner skivan.
HowTo_Ext_RW_Nero7_and_LS.qxd 17-08-2006 13:43 Pagina 73 ¿Cómo copiar un disco? Como copiar um disco? Bir disk nasıl kopyalanır? Kopiowanie płyt Hur går det till att kopiera en skiva? 1 E UK Inicie “Nero StartSmart Essentials”. PT Inicie o “Nero StartSmart Essentials”. TR “Nero StartSmart Essentials”ı başlatın. Uruchom program „Nero StartSmart Essentials”. PL SV Starta "Nero StartSmart Essentials".
HowTo_Ext_RW_Nero7_and_LS.qxd 17-08-2006 13:43 Pagina 74 E Elija “Favoritos” y “Copiar CD” o “Copiar DVD”. 2 PT Selecione ”Favoritos” e ”Copiar CD” ou ”Copiar DVD”. TR „Sık Kullanılanlar” ve “CD Kopyala” veya “DVD Kopyala”yı seçin. PL Kliknij „Ulubione” i „Kopiuj CD” lub „Kopiuj DVD”. SV Välj "Favoriter" och "Kopiera CD" eller "Kopiera DVD". E Seleccione la unidad de origen. PT Selecione a unidade de origem. TR Kaynak sürücüyü seçin. PL Wybierz napęd źródłowy. SV Välj källenhet.
HowTo_Ext_RW_Nero7_and_LS.qxd 5 6 E 17-08-2006 13:43 Pagina 75 Nero está ahora copiando su disco. PT Agora o Nero copiará seu disco. TR Nero artık diskinizi kopyalayacaktır. PL Program Nero rozpocznie kopiowanie płyty. SV Nero kopierar din skiva. E Felicitaciones, su disco se ha grabado con éxito. Ahora puede salir de la aplicación. PT Parabéns, seu disco foi gravado com sucesso. Você pode sair do aplicativo agora. TR Tebrikler, diskiniz başarıyla yazıldı. Uygulamadan şimdi çıkabilirsiniz.
HowTo_Ext_RW_Nero7_and_LS.qxd 17-08-2006 13:43 Pagina 76 ¿Si necesita más información o ayuda? Visite www.philips.com/storageupdates E Solución de problemas Las unidades de discos ópticos de Philips están fabricadas con el máximo cuidado. En caso de problemas, con mucha frecuencia ocurre que la unidad no está defectuosa realmente. Puede solucionar la mayoría de problemas utilizando las herramientas de soporte que ofrece Philips.
HowTo_Ext_RW_Nero7_and_LS.qxd 17-08-2006 13:43 Pagina 77 São necessárias mais informações ou ajuda? Visite o site www.philips.com/storageupdates PT Solução de problemas As unidades de disco óticas da Philips são fabricadas com o máximo cuidado. No caso de problemas, é comum que a própria unidade não pareça ter defeitos. É possível solucionar a maioria desses problemas simplesmente utilizando as ferramentas de suporte oferecidas pela Philips.
HowTo_Ext_RW_Nero7_and_LS.qxd 17-08-2006 13:43 Pagina 78 Daha fazla bilgi veya yardım gereklidir? www.philips.com/storageupdates adresini ziyaret edin TR Sorun Giderme Philips optik diskleri çok büyük bir dikkatle üretilmiştir. Çoğu sorun durumunda sürücünün arızalı olmadığı görülmektedir. Sorunlarınızın çoğunu Philips tarafından sağlanan destek araçları ile çözümleyebilirsiniz. Bir sorunla karşılaştığınızda: 1 2 3 Lütfen “Nasıl yapılır…” kılavuzundaki bilgileri okuyun.
HowTo_Ext_RW_Nero7_and_LS.qxd 17-08-2006 13:43 Pagina 79 Potrzebna pomoc lub dodatkowe informacje Odwiedź witrynę www.philips.com/storageupdates PL Rozwiązywanie problemów Napędy optyczne firmy Philips są produkowane z maksymalną starannością. W razie problemów często okazuje się, że sam napęd nie jest wadliwy. Większość problemów można rozwiązać samodzielnie, korzystając z narzędzi pomocy, oferowanych przez firmę Philips. W razie napotkania problemów: 1 2 3 Sprawdź informacje w podręczniku „Jak…”.
HowTo_Ext_RW_Nero7_and_LS.qxd 17-08-2006 13:43 Pagina 80 Mer information eller hjälp behövs? Besök www.philips.com/storageupdates SV Felsökning Philips optiska diskenheter tillverkas med yttersta noggrannhet. Om problem skulle inträffa visar det sig ofta att själva enheten inte är defekt. Du kan helt enkelt lösa de flesta problem genom att använda de supportverktyg som Philips erbjuder. Om du stöter på problem: 1 2 3 Läs informationen i användarhandboken. På Philips supportwebbplatser www.philips.
HowTo_Ext_RW_Nero7_and_LS.
HowTo_Ext_RW_Nero7_and_LS.
HowTo_Ext_RW_Nero7_and_LS.qxd 17-08-2006 13:43 Pagina 83 Safety Precautions USA/Canada: This player is for use only with IBM compatible UL listed Personal Computers or Macintosh UL listed workstations, weighing less than 18 kg. LASER SAFETY This unit employs a laser. Do not remove the cover or attempt to service this device when connected due to the possibility of eye damage. LASER-SICHERHEIT In das Gerät ist ein Laser eingebaut.
HowTo_Ext_RW_Nero7_and_LS.qxd 17-08-2006 13:43 Pagina 84 Additional information available on our website www.philips.com/storageupdates www.philips.com/storage Specifications subject to change without notice. All dimensions shown are approximate. © 2006 Koninklijke Philips Electronics N.V. All rights reserved. Reproduction, copying, usage, modifying, hiring, renting, public performance, transmission and/or broadcasting in whole or part is prohibited without the written consent of Philips Electronics N.