
User manual


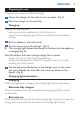


Preparing for use
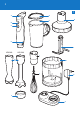
There are two ways to install the charger:
1 Mount the charger on the wall, close to a socket. (Fig. 2)
2 Place the charger on the worktop.
Charging
Charge the hand blender:
before you use the appliance for the rst time, or
when the blue charging light ashes to indicate that the batteries
are low.
1 Put the adapter in the wall socket.
2 Put the motor unit in the charger. (Fig. 3)
Thecharginglightashesblueslowlytoindicatethattheappliance
is charging (Fig. 4).
Note: The adapter feels warm during charging. This is normal.
It takes 4 hours to fully charge the appliance.
Charge the appliance for at least 15 minutes to use it for a light
blending job (soup, puree).
3 Youcanplacetheblenderbarinthechargernexttothemotor
unit(yourblenderbarmaydifferfromtheoneshowninthe
gure).(Fig.5)
Charging light indications
Charging
When the appliance is charging, the charging light ashes blue slowly.
Batteries fully charged
When the batteries are fully charged, the charging light lights up blue
continuously.
Batteries low
When the batteries are low, the blue charging light ashes. The lower the
energy level in the batteries, the faster the charging light ashes.
-
-
,
-
-
ENGLISH 9