Always there to help you Register your product and get support at www.philips.
Contents 1 Help and support 3 3 3 2 Important 4 4 5 5 5 3 Your home theater 7 7 8 9 4 Connect and set up 11 11 11 13 Use onscreen help (user manual) Navigate onscreen help Safety Care for your product Care of the environment 3D health warning Remote control Main unit Connectors Placement Connect to TV Connect digital devices through HDMI Connect audio from TV and other devices Set up EasyLink (HDMI-CEC control) Connect and set up a home networ
1 Help and support Philips provides extensive online support. Visit our website at www.philips.com/support to: • download the complete user manual • print the quick start guide • watch video tutorials (available only for selected models) • find answers to frequently answered questions (FAQs) • email us a question • chat with our support representative. Follow the instructions on the website to select your language, and then enter your product model number.
2 Important Read and understand all instructions before you use your product. If damage is caused by failure to follow instructions, the warranty does not apply. Safety Risk of electric shock or fire! • Never expose the product and accessories to rain or water. Never place liquid containers, such as vases, near the product. If liquids are spilt on or into the product, disconnect it from the power outlet immediately. Contact Philips Consumer Care to have the product checked before use.
• • • of children at all times! If swallowed, the battery can cause serious injury or death. Severe internal burns can occur within two hours of ingestion. If you suspect that a battery has been swallowed or placed inside any part of the body, seek immediate medical attention. When you change the batteries, always keep all new and used batteries out of reach of children. Ensure that the battery compartment is completely secure after you replace the battery.
Parents should monitor their children during 3D viewing and ensure they do not experience any discomfort as mentioned above. Watching 3D is not recommended for children under six years of age as their visual system is not fully developed yet.
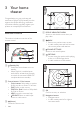
3 Your home theater Congratulations on your purchase, and welcome to Philips! To fully benefit from the support that Philips offers(e.g. notification of product software upgrade), register your product at www.philips.com/welcome. Remote control This section includes an overview of the remote control. a POP-UP MENU/DISC MENU Access or exit the disc menu when you play a disc. b c d a • • BACK Return to a previous menu screen. In radio mode, press and hold to erase the current preset radio stations.
• • c In radio mode, press up or down to tune the radio frequency. During network and password setup, press left to delete a character. (Mute) Mute or restore volume. d +/- (Volume) Increase or decrease volume. a Alphanumeric buttons • Enter values or letters (using SMS style entry). • In radio mode, select a preset radio station. b TOP MENU Access the main menu of a video disc. a • • (Stop) / (Open/Close) Stop play. Press and hold for three seconds to open or close the disc compartment.
• • Stop play. In radio mode, press and hold to erase the current preset radio stations. d SOURCE Select an audio or video source for the home theater. e +/Increase or decrease volume. f (Open/Close) Open or close the disc compartment. Connect to a coaxial audio output on the TV or a digital device. e VIDEO Connect to the composite video input on the TV. f AUX Connect to an analog audio output on the TV or an analog device.
c Voltage selector (For Asia Pacific only) Switch the voltage selector to the local power line voltage. d AC MAINS~ Connect to the power supply. a b a (USB) Audio, video or picture input from a USB storage device. b MUSIC iLINK / MIC (MIC is available only in selected models) • Audio input from an MP3 player or a microphone. • Audio input from a microphone. (Available only in selected models) Subwoofer connectors a b c d a LED • When the power is on, the LED turns on.
4 Connect and set up This section helps you connect your home theater to a TV and other devices, and then set it up. For information about the basic connections of your home theater and accessories, see the quick start guide. Note •• For identification and supply ratings, see the type plate at the back or bottom of the product. •• Before you make or change any connections, make sure that all devices are disconnected from the power outlet.
3 connected through HDMI to be controlled by a single remote control, such as volume control for both the TV and the home theater. (see 'Set up EasyLink (HDMI-CEC control)' on page 14) If you cannot hear the TV audio through your home theater, set up the audio manually. (see 'Set up the audio' on page 15) 4 TV If you cannot hear the TV audio through your home theater, set up the audio manually.
4 When you watch videos, switch your TV to the correct video input. For details, see the TV user manual. Use the best quality connection available on your TV, home theater, and other devices. Note Connect digital devices through HDMI Connect a digital device such as a set-top box, games console, or camcorder to your home theater through a single HDMI connection.
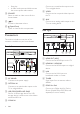
theater to the COAXIAL/DIGITAL OUT connector on the TV or other device. • The digital coaxial connector might be labeled DIGITAL AUDIO OUT. • • Option 3: Connect audio through analog audio cables Enable EasyLink Basic quality audio AUDIO IN- AUX VCR 1 Using an analog cable, connect the AUX connectors on your home theater to the AUDIO OUT connectors on the TV or other device.
• Note •• To change the EasyLink control settings, press (Home), select [Setup] > [EasyLink]. • • Set up the audio If you cannot hear the audio output of a connected device through your home theater speakers, do the following: • Check that you have enabled EasyLink on all the devices, (see 'Set up EasyLink (HDMI-CEC control)' on page 14) and • on your TV, set the audio output to "Amplifier" (instead of TV speakers). For details, see the TV user manual, and • setup the EasyLink audio control.
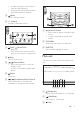
LAN www 1 2 3 4 5 6 Using a network cable, connect the LAN connector on your home theater to the network router. Press (Home). Select [Setup], and then press OK. Select [Network] > [Network installation] > [Wired (Ethernet)]. Follow the onscreen instructions to complete the setup. • If connection fails, select [Retry], and then press OK. Select [Finish], and then press OK to exit. • To view the network settings, select [Setup] > [Network] > [View network settings].
5 Use your home theater This section helps you use the home theater to play media from a wide range of sources. Before you start • Make the necessary connections described in the quick start guide and the user manual. • Complete the first-time setup. First-time setup appears when you turn on your home theater for the first time or if you do not complete the setup. • Switch the TV to the correct source for your home theater (for example, HDMI, AV IN).
Button Action SUBTITLE DISC/ POP-UP MENU Select subtitle language for video. Access or exit the disc menu. OPTIONS Access the advanced options when you play your audio, video, or media files (see 'Audio, video, and picture options' on page 20). Synchronize picture and sound If the audio and video are not synchronized, delay the audio to match the video. 1 2 3 4 Press SOUND SETTINGS. Select AUD SYNC, and then press OK. Press the Navigation buttons (up/down) to synchronize the audio with the video.
2 3 4 5 6 7 8 Connect a USB storage device to your home theater. Press (Home) and select [Setup]. Select [Advanced] > [Local storage]. Select [Advanced] > [BD-Live security] > [Off] to enable BD-Live. • To disable BD-Live, select [On]. Select the BD-Live icon in the disc menu, and then press OK. »» BD-Live starts to load. The loading time depends on the disc and your internet connection. Press the Navigation buttons to navigate BD-Live, and then press OK to select an option.
Character Set Language [Standard] Albanian, Danish, Dutch, English, Finnish, French, Gaelic, German, Italian, Kurdish (Latin), Norwegian, Portuguese, Spanish, Swedish, Turkish Simplified Chinese Traditional Chinese [Chinese] [ChineseTraditional] [Korean] English and Korean VOD code for DivX Before you purchase DivX videos and play them on your home theater, register the home theater on www.divx.com using the DivX VOD code. 1 2 3 Press (Home). Select [Setup], and then press OK.
• • • • • • • • • • • • • • • • • • • [Subtitle Language]: Select subtitle language for video. [Subtitle shift]: Change the subtitle position on the screen. [Info]: Display information about what is playing. [Character set]: Select a character set that supports the DivX subtitle. [Time search]: Skip to a specific part of the video by entering the time of the scene. [2nd audio language]: Select the second audio language for Blu-ray video.
OPTIONS Radio Listen to FM radio on your home theater, and store up to 40 radio stations. Note •• AM and digital radio are not supported. •• If no stereo signal is detected, or if fewer than five stations are found, you are prompted to install the radio stations again. 1 2 3 Connect the FM antenna to the TUNER at the back of your home theater. • For the best reception, place the antenna away from your TV or other sources of radiation. Press SOURCE repeatedly until RADIO appears on the display panel.
iPod or iPhone Connect a Philips dock to play music, photos, and videos from your iPod or iPhone. What you need • A Philips dock (model: Philips DCK306x, sold separately for some models): to purchase it, visit www.philips.com/welcome • A yellow composite video cable. 1 2 3 Connect the Philips dock to the DOCK for iPod connector on your home theater. To view slideshow from your iPod or iPhone on your TV, connect the dock to the TV by using the yellow composite cable.
• • For iPhone or iPad, search for the app in App Store (App Store). For Android based phone or tablet, search for the app in Market (Market). Control your home theater 1 2 On the mobile device, access MyRemote application. Select your home theater (by its network name) from the home screen. »» A browsing bar is displayed at the bottom of the screen. • 3 If your home theater is not found, check the network connection or tap the Devices tab on your mobile device to search again.
Browse Smart TV Use Smart TV to access variety of internet applications and specially adapted internet websites. For interactive discussions on Smart TV services, visit the Smart TV forum at www.supportforum. philips.com Note •• Koninklijke Philips Electronics N.V. bears no responsibility for content provided by Smart TV service providers.
4 Press OK to confirm. • Rent online video Rent videos from online stores, through your home theater. You can watch them right away or later. Many online video stores offer a huge choice of video, with different rental prices, periods, and conditions. For some stores, you must create an account before you can rent.
Button Navigation buttons OK BACK OPTIONS 7 Press Action Navigate and select an option Confirm a selection. Return to a previous page. Access options related to a current activity. • • (Home) to exit Skype. Note •• For more information on Skype, visit www.skype.com. •• Use of a wireless network connection may lead to the loss of audio and image quality. You may also experience internet related disruptions, delays and loss of data during communication.
2 3 4 5 6 Click the Library tab, and then select Media Sharing. The first time you select Media Sharing on your PC,a pop-up screen appears. Check the Share my media box and click OK. »» The Media Sharing screen is displayed. In the Media Sharing screen, make sure that you see a device marked as Unknown Device. »» If you don't see an unknown device after a minute or so, check that your PC firewall is not blocking the connection. Select the unknown device and click Allow.
Play files from your PC 2 Note •• Before you play multimedia content from the computer, make sure that the home theater is connected to the home network, and the media server software is properly set up. 1 2 3 Press 4 5 (Home). Select [browse PC], and then press OK. »» A content browser is displayed. Select a device on the network. »» The folders in the selected device are displayed. Depending on the media server, the folder names may vary.
4 Press BACK to exit. • If you do not press a button within a minute, the menu exits automatically. • 5 PERSONAL: Personalize the sound based on your preferences. Press OK to confirm. Surround sound mode Equalizer Experience an immersive audio experience with surround sound modes. Change the high frequency (treble), mid frequency (mid), and low frequency (bass) settings of the home theater. 1 2 3 4 Press SOUND SETTINGS. Select SURROUND, and then press OK.
6 Change settings Picture and video settings The home theater settings are already configured for optimal performance. Unless you have a reason to change a setting, we recommend that you keep the default setting. 1 2 3 4 Note •• You cannot change a setting that is grayed out. •• To return to the previous menu, press BACK. To exit the menu, press (Home). Language settings 1 2 3 4 Press (Home). Select [Setup], and then press OK. Select [Preference], and then press OK.
• • on your home theater. Night mode is only available in DVDs and Blu-ray discs with Dolby Digital, Dolby Digital Plus, and Dolby True HD soundtracks. [HDMI Audio]: Set the HDMI audio output from your TV, or disable HDMI audio output from the TV. [Audio sync]: Set audio delay if audio and video cannot be matched. Parental control settings 1 2 3 4 Press Energy saving settings 1 2 3 4 (Home). Select [Setup], and then press OK. Select [Preference], and then press OK.
Restore default settings 1 2 3 4 33 Press (Home). Select [Setup], and then press OK. Select [Advanced] > [Restore default settings], and then press OK. Select [OK], and then press OK to confirm. »» Your home theater is reset to its default settings except for some settings such as parental control and DivX VOD registration code.
7 Update software Philips continually tries to improve its products. To get the best features and support, update your home theater with the latest software. Compare the version of your current software with the latest version on www.philips.com/ support. If the current version is lower than the latest version available on the Philips support website, upgrade your home theater with the latest software. Caution •• Do not install a lower version of software than the current version installed on your product.
2 3 4 5 Press (Home). Select [Setup], and then press OK. Select [Advanced] > [Software update] > [USB]. Follow the onscreen instructions to confirm the update. »» Update process takes about 5 minutes to complete. Update the onscreen help If the current version of the onscreen help is lower than the latest version available on www. philips.com/support, download and install the latest onscreen help (see 'Check software version' on page 34).
Step 2: Update onscreen help Caution •• Do not switch off the home theater or remove the USB flash drive during the update. 1 2 3 4 5 Connect the USB flash drive containing the downloaded file to your home theater. • Make sure that the disc compartment is closed and there is no disc inside. Press (Home). Enter 338 on the remote control. Follow the onscreen instructions to confirm the update. Disconnect the USB flash drive from the home theater.
8 Product specifications File formats • • Note •• Specifications and design are subject to change without notice. • Region codes The type plate on the back or bottom of the home theater shows which regions it supports. Country Europe, United Kingdom Asia Pacific, Taiwan, Korea Latin America DVD BD A A Australia, New Zealand Russia, India C China C Audio: • .aac, .mka, .mp3, .wma, .wav, .mp4, .m4a, .flac, .ogg • .ra (Available only in Asia Pacific and China) Video: • .avi, .divx, .mp4, .m4v, .
Extension Con- Audio tainer codec Bit rate MPEG 4 ASP FLAC Upto 24 bps OGGPCM No limit MP3 Upto 320 kbps Video formats If you have a high definition TV, your home theater allows you to play your: • video files with a resolution of 1920 x 1080 pixels (except DivX, which has a resolution of 77220 x 576) and frame rate of 6 ~ 30 frames per second. • photo files with a resolution of 18 M pixels. .avi files in AVI container Audio codec Video codec Bit rate PCM, Dolby Digital, DTS core, MP3, WMA DivX 3.
Audio codec Video codec Bit rate PCM, DTS core, MPEG, MP3 MPEG 1, MPEG 2 40 Mbps Audio • • .flv files in FLV container Audio codec Video codec Bit rate MP3, AAC H.264/AVC upto HiP@5.1 H.263 On2 VP6 25 Mbps 38.4 Mbps 40 Mbps • Radio • .3gp files in 3GP container Audio codec Video codec Bit rate AAC, HEAAC MPEG 4 ASP 38.4 Mbps H.264/AVC upto HiP@5.1 25 Mbps max S/PDIF Digital audio input: • Optical: TOSLINK Sampling frequency: • MP3: 32 kHz, 44.1 kHz, 48 kHz • WMA: 44.
• Storage temperature and humidity: -40 °C to 70 °C, 5% to 95% Subwoofer • • • • • • • Power supply: • Europe/China: 220-240 V~, 50 Hz • Latin America/Asia Pacific: 110-127 V/220-240 V~, 50-60 Hz • Russia/India: 220-240 V~, 50 Hz Impedance: 3 ohm Speaker drivers: 1 x 6.5" woofer Power consumption: 50 W Standby power consumption: 0.5 W Dimensions (WxHxD): 195 x 298 x 410 mm Weight: 7.2 KG Remote control batteries • 2 x AAA-R03-1.
9 Troubleshooting Warning •• Risk of electric shock. Never remove the casing of the product. To keep the warranty valid, never try to repair the product yourself. If you have problems using this product, check the following points before you request service. If you still have a problem, get support at www. philips.com/support. Main unit The buttons on the home theater do not work. • Disconnect the home theater from the power supply for a few minutes, then reconnect. Picture No picture.
Distorted sound or echo. • If you play audio from the TV through the home theater, make sure that the TV is muted. • If the sound from the wireless subwoofer is interrupted or distorted, make that the subwoofer is far away from microwave ovens, DECT phones, or other Wi-Fi devices. Audio and video are not synchronized. • 1) Press SOUND SETTINGS. 2) Press the Navigation buttons (left/right) to select AUD SYNC, and then press OK.
• Make sure that the iPod or iPhone software has not been tampered with or illegally modified. Cannot view pictures from an iPod or iPhone on the TV. • Connect a yellow composite cable to the iPod dock and the TV. • Switch the TV to the AV/VIDEO source (corresponding to the yellow composite cable). • Press the play button on the iPod or iPhone to start a slideshow. • Make sure that the iPod or iPhone software has not been tampered with or illegally modified. My 3D video played in 2D mode.
10 Notice This section contains the legal and trademark notices. Copyright This item incorporates copy protection technology that is protected by U.S. patents and other intellectual property rights of Rovi Corporation. Reverse engineering and disassembly are prohibited. This product incorporates proprietary technology under license from Verance Corporation and is protected by U.S. Patent 7,369,677 and other U.S.
in this Agreement which are in lieu of all other warranties, whether express and implied, including but not limited to any implied warranties or conditions of merchantability and fitness for a particular purpose; and effectively exclude all liability for indirect, special, incidental and consequential damages, such as but not limited to lost profits. Compliance This product complies with the radio interference requirements of the European Community.
Certified device that plays DivX video. Visit divx.com for more information and software tools to convert your files into DivX videos. ABOUT DIVX VIDEO-ON-DEMAND: This DivX Certified device must be registered in order to play purchased DivX Video-onDemand (VOD) movies. To obtain your registration code, locate the DivX VOD section in your device setup menu. Go to vod.divx.com for more information on how to complete your registration.
11 Language code Abkhazian 6566 Afar 6565 Afrikaans 6570 Amharic 6577 Arabic 6582 Armenian 7289 Assamese 6583 Avestan 6569 Aymara 6589 Azerhaijani 6590 Bahasa Melayu 7783 Bashkir 6665 Belarusian 6669 Bengali 6678 Bihari 6672 Bislama 6673 Bokmål, Norwegian 7866 Bosanski 6683 Brezhoneg 6682 Bulgarian 6671 Burmese 7789 Castellano, Español 6983 Catalán 6765 Chamorro 6772 Chechen 6769 Chewa; Chichewa; Nyanja 7889 9072 Ё᭛ Chuang; Zhuang 9065 Church Slavic; Slavonic 6785 Chuvash 6786 Corsican 6779 Česky 6783 Dansk
12 Index 2 2nd audio language 2nd subtitle language 3 3D disc in 2D mode 3D safety 3D video A advanced settings amplifier audio connection (HDMI ARC) audio formats audio from other devices audio language audio options audio post processing audio settings auto standby auto subtitle shift auto volume B batteries BD-Live Blu-ray Bonus View brightness C change password character set clear BD-Live memory connect a digital device (HDMI) connect to TV connectors control buttons (disc) control buttons (rad
L language code M main unit media formats media sharing menu language musical slideshows N network night mode O one-touch play one-touch standby options P parental control PBC (play back control) picture options picture resolution picture settings picture-in-picture play disc play from iPod play from PC play radio play USB storage device play video and slideshow from iPod power settings predefined sound mode preference program radio stations R radio recycling region codes remote control repeat 49
Philips Consumer Lifestyle HK-1237- HTB5150D/12 Year 2012 ........................................................ (Report No. / Numéro du Rapport) .............................................................................................. (Year in which the CE mark is affixed / Année au cours de laquelle le marquage CE a été apposé) EC DECLARATION OF CONFORMITY (DECLARATION DE CONFORMITE CE) We / Nous, PHILIPS CONSUMER LIFESTYLE B.V.
Specifications are subject to change without notice © 2012 Koninklijke Philips Electronics N.V. All rights reserved.