Always there to help you Register your product and get support at www.philips.
Contents 1 Important Safety Care for your product Care of the environment 2 Your home theater Main unit Remote control 3 Connect and setup Speakers Connectors Connect to TV Connect audio from TV and other devices 3 3 4 4 5 5 5 8 8 9 10 13 13 13 14 15 16 17 17 18 18 5 Change settings 20 20 20 21 21 22 23 Picture Sound Language Parental control Energy saving Apply factory settings 27 9 Notice Copyright Compliance Trademarks 29 2
1 Important Read and understand all instructions before you use your home theater. If damage is caused by failure to follow instructions, the warranty does not apply. Safety Risk of electric shock or fire! • Never expose the product and accessories to rain or water. Never place liquid containers, such as vases, near the product. If liquids are spilt on or into the product, disconnect it from the power outlet immediately. Contact Philips Consumer Care to have the product checked before use.
• • • of children at all times! If swallowed, the battery can cause serious injury or death. Severe internal burns can occur within two hours of ingestion. If you suspect that a battery has been swallowed or placed inside any part of the body, seek immediate medical attention. When you change the batteries, always keep all new and used batteries out of reach of children. Ensure that the battery compartment is completely secure after you replace the battery.
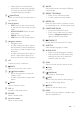
2 Your home theater Remote control This section includes an overview of the remote control. Congratulations on your purchase, and welcome to Philips! To fully benefit from the support that Philips offers, register your home theater at www.philips.com/welcome. 1 Main unit 3 2 24 23 4 5 6 a Disc compartment 7 b Display panel c d (Open/Close) Open or close the disc compartment, or eject the disc. 8 9 (Play/Pause) Start, pause or resume play.
• b When EasyLink is enabled, press and hold for at least three seconds to switch all connected HDMI CEC compliant devices to standby. (Open/Close) Open or close the disc compartment, or eject the disc. c Source buttons • DISC: Switch to disc source.Access or exit the disc menu when you play a disc. • AUDIO SOURCE: Select an audio input source. • RADIO: Switch to FM radio. • USB: Switch to USB storage device. d Navigation buttons • Navigate menus.
EasyLink controls With Easylink, you can control your home theater and the TV with the following buttons on your home theater remote control (see 'EasyLink' on page 18). • (Standby-On): Press and hold to switch your home theater, TV and the connected devices to standby. • (Play/Pause): When a video disc is in the disc compartment, wake up the TV from standby, and then play a disc.
3 Connect and setup This section helps you connect your home theater to a TV and other devices, and then set it up. For information about the basic connections of your home theater and accessories, see the quick start guide. Note •• For identification and supply ratings, refer to the type plate at the back or bottom of the product. •• Before you make or change any connections, make sure Note that all devices are disconnected from the power outlet.
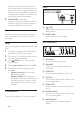
5 Place the rear surround speakers to the left and right side of your seating position, either in line with it or slightly behind it. For best effect, point the speakers towards the seating position and place the speakers just above the ear level (when seated). SUBWOOFER (subwoofer): Place the subwoofer at least one meter to the left or right of the TV. Leave about ten centimeter clearance from the wall.
3 Connect to TV Connect your home theater to a TV to watch videos. You can listen to audio from TV programs through your home theater speakers. Use the best quality connection available on your home theater and TV. Option 1: Connect to TV through HDMI (ARC) Best quality video Your home theater supports HDMI version with Audio Return Channel (ARC). If your TV is HDMI ARC compliant, connect your home theater to the TV through the HDMI ARC connection for easy and quick setup.
the audio manually (see 'Set up audio for connected devices' on page 12). Note •• If your TV has a DVI connector, you can use an HDMI/ DVI adapter to connect to TV. Option 3: Connect to the TV through composite video Basic quality video If your TV does not have HDMI connectors, connect your home theater to the TV through a composite connection. A composite connection does not support high-definition video.
VCR Set up audio for connected devices When you connect a device to your home theater, check the audio settings. 1 2 3 On your TV and other devices, turn on HDMI-CEC. For details, see the user manual of the TV and the other device. Select 'Amplifier' from the TV speakers menu. For details, see the TV user manual. On your home theater, turn on System Audio Control, and then map the audio of the connected device to the correct connectors on your home theater (see 'Play audio from home theater' on page 19).
4 Use your home theater 1 Press SURR repeatedly to select a surround mode. • MULTI-CH: Traditional 5.1 channel for a more relaxing cinematic experience. • STEREO: Two-channel stereo sound. Ideal for listening to music. This section helps you use the home theater to play media from a wide range of sources. Before you start • Make the necessary connections described in the Quick start guide and the user manual. • Switch the TV to the correct source for the home theater.
Button / Navigation buttons (left/right) Navigation buttons (up/down) SUBTITLE DISC AUDIO SYNC SCREEN FIT ZOOM REPEAT REPEAT A-B ANGLE INFO Action Fast backwards or fast forwards. Press repeatedly to change the search speed. Rotate the picture clockwise or counter-clockwise. Flip the picture vertically or horizontally. Select subtitle language for video. Access or exit the disc menu. Select an audio language or channel. Fit the picture format to the TV screen. Zoom into a video scene or picture.
1 Note •• You can use digital cameras connected by USB if they can play the files without using a special computer program. While playing video, press SUBTITLE to select a language. Note •• Make sure that the subtitle file has the same name as Play files 1 2 3 4 Connect the USB storage device to the home theater. Press USB. »» A content browser is displayed. Select a file, and then press OK. Press the playback buttons to control play (see 'Play buttons' on page 13).
• Audio, video, and picture options • Use advanced features when you play audio, video, or media files from a disc or a USB storage device. Audio options 1 Press INFO repeatedly to cycle through the following options: • Show the current track information and time. • [Disc Go To:%c%2d:%2d%C]: Skip to a specific part of the disc by entering the disc time. • [Track Go To:%c%2d:%2d%C]: Skip to a specific part of the track by entering the track time. • [Select Track:%c%2d%C/%2d]: Select a specific track.
PROGRAM Radio Listen to FM radio on your home theater, and store up to 40 radio stations. What you need • FM antenna. Note Manual: 1) Press PROGRAM. 2) Press Numeric buttons to select a preset number. 3) Press OK to store the radio station. 4) Repeat the steps above to store other radio stations. Automatic: Press and hold for three seconds to reinstall the radio stations •• AM and digital radio are not supported. •• If no stereo signal is detected, you are prompted to install the radio stations again.
Create MP3 files EasyLink Use your home theater to convert audio CDs into MP3 files. The home theater supports Philips EasyLink, which uses the HDMI-CEC (Consumer Electronics Control) protocol. EasyLinkcompliant devices that are connected through HDMI can be controlled by a single remote control. Philips does not guarantee 100% interoperability with all HDMI-CEC devices. What you need • An audio disc. • A USB storage device 1 2 3 4 5 6 Connect a USB storage device to the home theater.
One-touch standby When you press and hold (Standby) on the remote control, the home theater and all the connected HDMI-CEC devices (that support one-touch standby) switch to the standby mode. If one-touch standby is enabled on your home theater, you can switch to standby with the remote control of the TV or other HDMICEC devices. System Audio Control When you play a device that has its audio output routed to the home theater, the home theater switches to the corresponding audio source automatically.
5 Change settings This section helps you to change the settings of your home theater. Caution •• Most of the settings are already configured with the best value for your home theater. Unless you have a reason to change a setting, it is best to leave it at the default value. Picture resolution To enjoy high definition HDMI video output, set the HDMI video settings that best match up with your TV capability. 1 2 3 4 Note •• You cannot change a setting that is grayed out.
Night mode Disc subtitle For quiet listening, decrease the volume of loud sounds when you play discs. Night mode is only available for Dolby-encoded DVD and Blu-ray discs. 1 2 1 2 3 Press SETUP. Select [Audio Setup], and then press OK. Select [Night Mode] > [On], and then press OK. Language Select a language for the home menu, audio, and subtitles. 3 4 3 4 Press 1 2 3 4 SETUP. Select [General Setup], and then press OK. Select [OSD Language], and then press OK.
• 5 If you do not have a password or you have forgotten, enter 0000. Press OK. Ratings Some discs are recorded with ratings according to age. You can set up your home theater to play only discs with an age rating lower than your child’s age. 1 2 3 4 5 Press SETUP. Select [Preference Setup], and then press OK. Select [Parental], and then press OK. Select an age rating, and then press OK. • To play all discs irrespective of the rating, select level 8. Use the Numeric buttons to enter the password.
Display panel Change the brightness of the home theater display panel. 1 2 3 4 Press SETUP. Select [General Setup], and then press OK. Select [Display Dim], and then press OK. Select the brightness, and then press OK. Apply factory settings Reset your home theater to the default settings. You cannot reset the parental control settings. 1 2 3 4 23 Press SETUP. Select [Preference Setup], and then press OK. Select [Default], and then press OK. Select [Reset], and then press OK.
6 Update software To continue to get the best features and support for your home theater, update the software regularly. Compare the version of your current software with the latest version on www.philips.com/support. Check software version 1 2 3 Press 4 5 6 Select [Version Info.], and then press OK. »» The software version is displayed. Update software through USB or CD-R What you need • A CD-R or a USB flash drive with at least 75MB of memory. The USB flash drive must be FAT formatted.
7 Product specifications • • Amplifier • • Note •• Specifications and design are subject to change without notice. • • Region codes The type plate on the back or bottom of the home theater shows which regions it supports. Country DVD Europe, United Kingdom Asia Pacific, Taiwan, Korea • • • • Russia, India Media formats DVD-Video, DVD+R/+RW, DVD-R/-RW, DVD+R/-R DL, CD-R/CD-RW, Audio CD, Video CD/SVCD, Picture files, MP3 media, WMA media, DivX media, USB storage device File formats • Audio: .
• • • Class support: USB Mass Storage Class (MSC) File system: FAT16, FAT32 Maximum memory support: < 160 GB Main unit • • • • • Power supply: • Europe/China/Russia/India: 220-240V~, 50 Hz • Latin America/Asia Pacific: 110-240V~, 50-60 Hz Power consumption: 55 W Standby power consumption: ≤ 0.5 W Dimensions (WxHxD): 360 x 58 x 325 mm Weight: 2.3 kg • Cable length (rear): 7 m Remote control batteries • 2 x AAA-R03-1.
8 Troubleshooting Warning •• Risk of electric shock. Never remove the casing of the product. To keep the warranty valid, never try to repair the product yourself. If you have problems using this product, check the following points before you request service. If you still have a problem, get support at www. philips.com/support. Main unit The buttons on the home theater do not work. • Disconnect the home theater from the power supply for a few minutes, then reconnect. Picture No picture.
DivX subtitles do not display correctly. • Make sure that the subtitle file name is the same as the movie file name (see 'Subtitles' on page 15). • Select the correct character set: 1) Press SETUP. 2) Select [Preference Setup] > [DivX Subtitle]. 3) Select the supported character set. 4) Press OK. Cannot read the contents of a USB storage device. • Make sure that the format of the USB storage device is compatible with the home theater.
9 Notice This section contains the legal and trademark notices. Copyright This item incorporates copy protection technology that is protected by U.S. patents and other intellectual property rights of Rovi Corporation. Reverse engineering and disassembly are prohibited. Compliance This product complies with the radio interference requirements of the European Community. Trademarks Manufactured under license from Dolby Laboratories. Dolby and the double-D symbol are trademarks of Dolby Laboratories.
10 Language code Abkhazian 6566 Afar 6565 Afrikaans 6570 Amharic 6577 Arabic 6582 Armenian 7289 Assamese 6583 Avestan 6569 Aymara 6589 Azerhaijani 6590 Bahasa Melayu 7783 Bashkir 6665 Belarusian 6669 Bengali 6678 Bihari 6672 Bislama 6673 Bokmål, Norwegian 7866 Bosanski 6683 Brezhoneg 6682 Bulgarian 6671 Burmese 7789 Castellano, Español 6983 Catalán 6765 Chamorro 6772 Chechen 6769 Chewa; Chichewa; Nyanja 7889 9072 Ё᭛ Chuang; Zhuang 9065 Church Slavic; Slavonic 6785 Chuvash 6786 Corsican 6779 Česky 6783 Dansk
11 Index A amplifier audio HDMI audio predefined modes quality settings speaker setup specifications audio input mapping audio language audio options auto standby B brightness 25 20 13 11 20 9 25 19 21 16 22 23 C care environment product connect speakers TV (Composite) TV (HDMI) connectors front connectors control disc play Easylink (HDMI-CEC) main unit parental control radio create MP3 4 4 9 11 10 9 13 7 5 21 17 18 31 EN 18 21 16 13 15 22 21 16 16 13 21 14 16 16 14 14 5 15 15 15 E EasyLink (H
video settings HDMI-CEC 20 18 L language audio disc menu language code onscreen menu subtitle 21 21 30 21 21 M main unit overview specifications troubleshooting manually setup speakers media formats MP3 connector create MP3 display contents play O one-touch play one-touch standby overview connectors HDMI-CEC main unit remote control settings speaker setup 5 26 27 9 25 9 18 14 17 18 18 9 18 5 5 20 9 P parental control lock disc password ratings password Philips Easylink picture high resolution JP
settings audio auto standby default disc language HDMI audio HDMI video HDMI-CEC menu language parental rating password picture power restore screen saver sleep timer subtitle language video setup speakers manually sleep timer slideshows musical picture software check current version update sound predefined sound mode surround sound synchronize picture and sound troubleshooting sound mode speakers connect manual setup position setup specifications surround sound subtitle character set language subwoofer spe
Specifications are subject to change without notice © 2012 Koninklijke Philips Electronics N.V. All rights reserved. HTD3500_12_UM_V1.