Register your product and get support at www.philips.
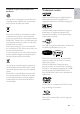
1 Important Safety and important notice Trademark notice Care 2 Your product Feature highlights Product overview 3 Connect Place the product Connect video cables Connect speaker cables to speakers Connect speakers and subwoofer Connect radio antenna Connect audio cables/other devices Connect LAN Connect power cord 4 Get started Insert the remote control batteries Find the correct viewing channel Use the Home menu Select menu display language Set up network Use Philips EasyLink 5 Play Play a disc Play vi
1 Important Copyright Safety and important notice Warning • Risk of overheating! Never install the product • • • • • • in a confined space. Always leave a space of at least 4 inches around the product for ventilation. Ensure curtains or other objects never cover the ventilation slots on the product. Never place the product, remote control or batteries near naked flames or other heat sources, including direct sunlight. Only use this product indoors.
Your product is designed and manufactured with high quality materials and components, which can be recycled and reused. When this crossed-out wheeled bin symbol is attached to a product it means that the product is covered by the European Directive 2002/96/EC. Please inform yourself about the local separate collection system for electrical and electronic products. Please act according to your local rules and do not dispose of your old products with your normal household waste.
Manufactured under licence from Dolby Laboratories. Dolby and the double-D symbol are trademarks of Dolby Laboratories. Manufactured under licence under U.S. Patent #s: 5,451,942; 5,956,674; 5,974,380; 5,978,762; 6,487,535; & other U.S. and worldwide patents issued & pending. DTS is a registered trademark and the DTS logos, Symbol, DTSHD and DTS-HD Advanced Digital Out are trademarks of DTS, Inc. © 1996-2008 DTS, Inc. All Rights Reserved. ENERGY STAR and the ENERGY STAR mark are registered U.S.
Congratulations on your purchase, and welcome to Philips! To fully benefit from the support that Philips offers; register your product at www.philips.com/welcome. Feature highlights Philips EasyLink Your product supports Philips EasyLink, which uses the HDMI CEC (Consumer Electronics Control) protocol. EasyLink-compliant devices that are connected through HDMI connectors can be controlled by a single remote control.
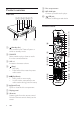
i Disc compartment Product overview j MP3 LINK jack Connect a portable audio player. Main unit k abcdefg USB jack Connect a USB supported device. Remote control a b kj i h | a (Standby-On) Turn on the Home Theatre System or switch to standby mode. { b SOURCE Select media to play or listen to audio from the connected device. z y c VOL +/Increase or decrease volume. d (Stop) • Stop play. • Press and hold to erase the preset radio station. e • • f (Play/Pause) Start, pause or resume play.
b (Standby-On) • Turn on the home theatre or switch it to standby mode. • When EasyLink is enabled, press and hold for at least three seconds to turn all connected HDMI CECcompliant devices to standby. OPEN/CLOSE Open or close the disc compartment. c Source buttons • DISC / POP-UP MENU: Switch to disc source.Access to disc menu during play. • RADIO: Switch to FM radio. • USB: Switch to the connected USB device. • AUDIO SOURCE: Select an audio input.
x SURR. SOUND • Switch audio output to multi-channel surround or stereo mode. • For HTS7200 only: Switch audio output to DOLBY Virtual speaker or Stereo mode. y / • • (Previous/Next) In video mode, skip to previous or next title, chapter or track. In radio mode, select a preset radio station. z / (Fast Backward / Fast Forward) Fast reverse or fast forward. Press repeatedly to change the search speed. { BACK Return to a previous menu screen. | TOP MENU Access the main menu of a video disc.
3 Connect FRON T RIGH T Make the following connections to use your Home Theatre System. For a comprehensive interactive guide, see www.connectivityguide. philips.com.
Option 1: Connect to the HDMI jack Option 2: Connect to the component video jack HDMI OUT Pr HDMI IN 1 Pb Y Connect the HDMI cable to the HDMI OUT jack on this Home Theatre System and the HDMI input jack on the TV. Tip Pr Pb Y • If the TV has a DVI connector only, connect via a HDMI/DVI adapter. Connect an audio cable for sound output. • You can optimise the video output. Press HDMI repeatedly to select the best resolution the TV can support.
VIDEO OUT Connect speakers and subwoofer English Option 3: Connect to the Video (CVBS) jack VIDEO VIDEO IN 1 Connect a composite video cable (not supplied) to the VIDEO jack on this Home Theatre System and the VIDEO input jack on the TV. Note • The video input jack on the TV might be labelled as A/V IN, VIDEO IN, COMPOSITE or BASEBAND. • This type of connection provides standard picture quality. 1 Connect the speakers and subwoofer to the matching jacks on this Home Theatre System.
1 2 Connect the FM antenna to the FM75 jack on this Home Theatre System (for some models, this cable is already connected). Note • To listen to the audio output from this connection, press AUDIO SOURCE repeatedly until ‘AUX1’ is displayed on the display panel. Extend the FM antenna and fix its ends to the wall. Tip • For better FM stereo reception, connect to an external FM antenna.
English Connect to optical jack Note • To listen to the audio output from this connection, press AUDIO SOURCE repeatedly until ‘AUX2’ is displayed on the display panel. OPTICAL Connect to coaxial jack DIGITAL IN OPTICAL DIGITAL OUT COAXIAL 1 DIGITAL IN COAXIAL DIGITAL OUT Connect an optical cable (not supplied) to the DIGITAL-IN-OPTICAL jack on this Home Theatre System and the OPTICAL/SPDIF output jack on the device.
1 Connect a 3.5 mm stereo audio cable (not supplied) to the MP3 LINK jack on this Home Theatre System and the phone jack on the portable media player (such as MP3 player). Note LAN • To listen to the audio output from this connection, press AUDIO SOURCE repeatedly until ‘MP3 LINK’ is displayed on the display panel. Connect USB device BROADBAND 1 Connect the network cable (not supplied) to the LAN jack on this Home Theatre System and the LAN jack on the broadband modem or router.
Insert the remote control batteries Navigate through the menu 1 Point the remote control directly at the remote sensor on the product and select the desired function. 2 Press the following buttons on the remote control to navigate through the on-screen menus. Button Action Move up or down Move left or right Confirm a selection Enter numbers OK Access to the Home menu. 1 On the back of the remote control, slide the battery cover to remove it. 2 Insert the 2 supplied batteries (AAA).
Tip Use the Home menu • You can set the default language for DVD disc, see (‘Adjust settings’ > ‘Video Setup’ > [Disc Menu]). Play Disc USB Settings Press (Home menu). • Select [Play Disc] to start disc play. • Select [USB] to view the USB contents. • Select [Settings] to access the setup menu. Select menu display language Note • Skip this setting if this product is connected to a HDMI CEC compliant TV. It switches automatically to the same OSD menu language as per your TV setting.
Your product supports Philips EasyLink, which uses the HDMI CEC (Consumer Electronics Control) protocol. EasyLink-compliant devices that are connected through HDMI connectors can be controlled by a single remote control. Note Audio Input Mapping When you map the connection between other devices and the audio input jacks of this Home Theatre System, you can enjoy the System Audio Control (one-touch audio) feature.
Philips TV Aux1 Recorder Aux2 DVD player Coaxial Optical 6 Select a connected device on the left of the menu, then press . 7 Select the connector that is used for the device, then press OK. » Repeat steps 6–7 to map other devices. 8 Press to exit the menu. Update audio mapping from connected devices If you have already mapped audio from connected devices, you can use this procedure to update your mapping. 1 2 3 4 Press , select [Settings], then press OK.
Play a disc Information on disc contents The contents of a disc are generally divided into sections or folders (groups of titles/files) as shown below. BD-video, DVD-video Caution title 1 chapter 1 chapter 2 title 2 chapter 1 chapter 2 chapter 3 track 4 track 5 • Never place any objects other than discs into the disc compartment. • Never touch the disc optical lens inside the disc compartment. Audio CD 1 2 3 Press track 1 to open the disc compartment. Insert a disc with its label facing up.
Play video Change video play Control video play 1 2 1 2 Button Play a title. Use the remote control to control the title. Button (Play) / Action Pauses play. Starts or resumes play. Stops play. • Home menu is displayed. Skips to the next title or chapter. Skips to the beginning of the current title or chapter. Press twice to jump to the previous title or chapter. Searches fast-forward (right) or fast-backward (left). Press repeatedly to change the search speed.
BD-video disc • TOP MENU stops the video play and shows the disc menu. This feature is discdependent. • POP-UP MENU accesses the BD-video disc menu without interrupting disc play. DVD-video disc • DISC MENU displays disc information and guides you through the available functions in the disc. • TOP MENU displays the contents in the disc. Quick skip to a specific time 1 During play, press OPTIONS. » The play options menu is displayed. 2 Select [Time Search] in the menu, then press OK.
View video play from different camera angles 1 During play, press OPTIONS. » The play options menu is displayed. 2 Select [Angle List] in the menu, then press OK. 3 Select an angle option, then press OK. » Play changes to the selected angle. Play BD-video Blu-ray video disc has a larger capacity and supports features such as high-definition videos, multi-channel surround sound, interactive menus and so on. 1 2 3 Note • Applicable only to discs that contain multiangle scenes.
Select the language to play, then press OK. Note English 4 • You can only play DivX videos that were Enjoy BD-LIVE (applicable only to BD Live enabled BD-Video) Additional content such as movie trailers, subtitles, etc. can be downloaded to the external storage (USB) on this Home Theatre System. Special video data may be played back while they are being downloaded. When the disc supporting BD-Live is played back, the Home Theatre System or disc’s ID can be sent to the content provider via the Internet.
Play MP3/WMA music MP3/WMA is a type of highly compressed audio file (files with .mp3, .wma extensions). Play photo Play photo as slideshow 1 Insert a disc or USB that contains the MP3/WMA music. 2 You can play JPEG photos (files with .jpeg or .jpg extensions). Press , select [Play Disc] or [USB], then press OK. » A contents menu is displayed. 1 Insert a disc or USB that contains the JPEG photos. 3 4 2 Select a folder, then press OK. Press , select [Play Disc] or [USB], then press OK.
Play musical slideshow 1 2 Play MP3/WMA music files and JPEG photo files simultaneously to create musical slideshow. The MP3/WMA and JPEG files must be stored on the same disc or USB device. Play photo slideshow. Use the remote control to control the photo. Button Action Rotates the photo anticlockwise. Rotates the photo clockwise. Flips the photo upside down. Flips the photo left-to-right (mirror image). Stops play. OPTIONS Accesses options for the current activity or selection. For example, Zoom.
1 Connect a USB device to the jack. 2 Press , select [USB], then press OK. » A contents menu is displayed. 3 Select a file to play, then press (Play). » Play starts (see ‘Play music, Play photo, Play video’ for details). • To stop play, press USB device. USB or remove the Note 1 Connect a 3.5 mm stereo audio cable (not supplied) from the MP3 LINK jack on this Home Theatre System to the ‘headphone’ jack on the portable media player. 2 Press AUDIO SOURCE repeatedly until ‘MP3 LINK’ is displayed.
Reinstall all the radio stations When you access radio mode for the first time, follow the instruction to install the radio stations. 1 2 1 Press RADIO. » ’AUTO INSTALL ... PRESS PLAY’ is displayed. 2 Press (Play). » All detected radio stations are stored. To stop auto tuning, press • Check the radio antenna connection if no stereo signal is detected or less than 5 stations are detected during radio installation. .
6 Adjust sound Option Description DOLBY VS Control the volume STEREO Dolby Virtual surround sound Stereo sound from two front speakers. 1 Press +/- to increase or decrease the volume. • To mute, press . • To restore the volume, press again or press +. Note • This product also contains the capability to decode 5.1 DTS-Digital Surround.
You can customise various kinds of settings as you prefer. Refer to the following instructions to navigate through the setup menus. [Subtitle] Selects the default subtitle language for disc play. English 7 Adjust settings [Disc Menu] Selects the language for the disc menu. Note Note • You cannot change a setting that is greyed out. • If the language you have set is not available on the disc, the disc uses its own default language.
Note • If the setting is not compatible with your TV, a blank screen appears. Wait for 15 seconds for auto recover or press HDMI repeatedly until the picture appears. [HDMI Deep Colour] This feature is available only when the display device is connected by a HDMI cable, and when it supports the deep colour feature. • [Auto] - Switches on automatically if the connected display device supports HDMI deep colour. • [On] - Enjoys vivid images in over a billion colours on Deep Colour enabled TV.
Note • Applicable only to Dolby encoded DVD-video or BD-video. [HDMI Audio] Selects the HDMI audio output when you connect this Home Theatre System and the TV/audio device with a HDMI cable. • [As Source]– The audio format is not converted. A secondary audio track on a Blu-ray disc might not be available. • [Auto] – Detects and selects the best supported audio format automatically. • [Off] - Disables audio from the TV.
[Parental Control] Restricts access to discs that are unsuitable for children. These types of discs must be recorded with ratings. To access, enter your last set password or ‘0000’ using the keyboard on the TV. [Auto Standby] Turns off or turns on standby switching mode. It is an energy saving feature. • [On] - Switches to standby after 30 minutes of inactivity (for example, in pause or stop mode). • [Off] - Disables auto standby mode.
• See the explanations of the above options in the following pages. [EasyLink] Your product supports Philips Easylink, which uses the HDMI CEC (Consumer Electronics Control) protocol. EasyLink-compliant devices that are connected through HDMI connectors can be controlled by a single remote control. • [On] - Enables EasyLink features. • [Off] - Disables EasyLink features.
Note • See the explanations of the above options in [Clear Local Storage] Deletes the content of the BD-Live storage folder on the USB drive. the following pages. Note [BD-Live Security] You can restrict Internet access when BDR/RE disc is used. • [On] - Internet access is prohibited for all BD-Live contents. • [Off]- Internet access is permitted for all BD-Live contents. • Local storage is a folder (BUDA) located on the connected USB device. [DivX® VOD Code] Displays the DivX® registration code.
To check for new updates, compare the current software version of your home theatre with the latest software version (if available) on the Philips website. 1 2 3 Press . Select [Advanced Setup] > [Version Info.], then press OK. Prepare the network connection, see chapter ‘Getting Started’ > ‘Set up network’ for detailed information. 2 At Home menu, select [Settings] > [Advanced Setup] > [Software Download] > [Network]. 3 Follow the instructions on the TV to confirm update operation.
9 Specifications Note USB • Compatibility: Hi-Speed USB (2.0) • Class support: UMS (USB Mass Storage Class) • File system: FAT16, FAT32 • Specification and design are subject to change without notice Playback media • BD-Video, BD-R, BD-RE, DVD-Video, DVD+R/+RW, DVD-R/-RW, DVD+R/-R DL, CD-R/CD-RW, Audio CD, Video CD/SVCD, Picture CD, MP3-CD, WMACD, DivX (Ultra)-CD, USB flash drive. Amplifier • Total output power: 440 W RMS (±0.
Warning • Risk of electric shock. Never remove the casing of the product. To keep the warranty valid, never try to repair the product yourself. If you have problems using this product, check the following points before you request service. If you still have a problem, register your product and get support at www.philips.com/welcome. If you contact Philips, you will be asked for the model and serial number of your product. The model number and serial number are on the back or bottom of your product.
No sound on HDMI connection. • If the connected device is not HDCPcompliant or is only DVI-compatible, you cannot transmit sound through an HDMI connection. Use an analogue or digital audio connection. • Make sure that the [HDMI Audio] setting is turned on. No sound from TV programme. • Connect an audio cable from the audio input on this home theatre to the audio output on your TV. Then press AUDIO SOURCE repeatedly to select the correct audio source. No surround sound effect from the speakers.
A AVCHD AVCHD is a new format (standard) for high definition video cameras that can be used to record and play high-resolution HD images. B BD-J Some BD-Video discs contain Java applications, and these applications are called BD-J. You can enjoy various interactive features in addition to playing normal video. Blu-ray Disc (BD) A Blu-ray Disc is a next generation optical video disc capable of storing five times more data than a conventional DVD.
H M HDCP High-bandwidth Digital Content Protection. This is a specification that provides a secure transmission of digital contents between different devices (to prevent unauthorised copyright.) MP3 A file format with a sound data compression system. MP3 is the abbreviation of Motion Picture Experts Group 1 (or MPEG-1) Audio Layer 3. With the MP3 format, one CD-R or CD-RW can contain about 10 times more data than a regular CD.