Register your product and get support at www.philips.com/welcome HTS3011 EN ZH_CN ZH_TW MS_MY DVD Home Theater System DVD 家庭影院系统 DVD 家庭劇院系統 Sistem Teater Rumah DVD 1_hts3011_98_eng 3_final808.
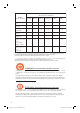
᳝↦᳝ᆇ⠽䋼ܗ㋴ +D]DUGRXV 7R[LF 6XEVWDQFH 䚼ӊৡ⿄ 䪙 1DPH RI WKH 3DUWV 3E /HDG ∲ +J 0HUFXU\ 䬝 &G &DGPLXP ݁Ӌ䫀 &KURPLXP ⒈㘨㣃 3%% ⒈Ѡ㣃䝮 3%'(˅ +RXVLQJ O O O O O O '9' ORDGHU '9' Ⲧܝ 6XEZRRIHU 䍙䞡Ԣ䷇ㆅ X O O O O O X O O O O O /RXGVSHDNHUV ুऩܗ O O O O O O 3:%V ⬉䏃ᵓ㒘ӊ X O O O O O $FFHVVRULHV 5HPRWH FRQWURO FDEOHV 䰘ӊ˄䘹఼ˈ ⬉⑤㒓ˈ䖲㒓˅ X O O O O O %DWWHULHV LQ 5HPRWH &RQWURO =Q& 䘹఼⬉∴ X O O O O O ƻ˖㸼⼎䆹᳝↦᳝ᆇ⠽䋼䆹䚼ӊ᠔᳝ഛ䋼ᴤ᭭Ёⱘ䞣ഛ6- 7 ᷛޚ㾘ᅮⱘ䰤䞣㽕∖ҹϟDŽ O:
LASER Type Wave length Output Power Beam divergence Semiconductor laser GaAIAs 645 - 660 nm (DVD) 770 - 800 nm (CD) 6 mW (DVD) 7 mW (VCD/CD) 60 degrees Manufactured under license from Dolby Laboratories. Dolby, Pro Logic and the double-D symbol are trademarks of Dolby Laboratories. DivX, DivX Ultra Certified, and associated logos are trademarks of DivX, Inc. and are used under license. Official DivX® Ultra Certified product.
Language Code Abkhazian 6566 Afar 6565 Afrikaans 6570 Amharic 6577 Arabic 6582 Armenian 7289 Assamese 6583 Avestan 6569 Aymara 6589 Azerhaijani 6590 Bahasa Melayu 7783 Bashkir 6665 Belarusian 6669 Bengali 6678 Bihari 6672 Bislama 6673 Bokmål, Norwegian 7866 Bosanski 6683 Brezhoneg 6682 Bulgarian 6671 Burmese 7789 Castellano, Español 6983 Catalán 6765 Chamorro 6772 Chechen 6769 Chewa; Chichewa; Nyanja 7889 9072 中文 Chuang; Zhuang 9065 Church Slavic; Slavonic 6785 Chuvash 6786 Corsican 6779 Česky 6783 Dansk 68
English ------------------------------------ 6 English Index ----------------------------- 52 Bahasa Melayu ----------------------- 144 Bahasa Melayu ----------------------------- 98 Ensure that the power outlet is always within reach. If abnormal situations occur, fully disconnect power: unplug the power cord from the power outlet. This product incorporates copyright protection technology that is protected by method claims of certain U.S.
Table of contents English General General Information ........................................................................................................ 8 Setup precautions.................................................................................................................................................8 Accessories supplied ...........................................................................................................................................8 Cleaning discs .........
Playing a MP3/ WMA disc ............................................................................................................................... 30 Playing a JPEG image file (slide show) ...........................................................................................................31 Preview function ..........................................................................................................................................31 Zooming...........................................
General Information English WARNING! This unit does not contain any userserviceable parts. Please leave all maintenance work to qualified personnel. Setup precautions Finding a suitable location – Place this unit on a flat, hard and stable surface. Never place the unit on a carpet. – Never place this unit on top of other equipment that might heat it up (e.g., receiver or amplifier). – Never put anything under this unit (e.g., CDs, magazines).
6 English Main Unit 7 Front Panel View MIC MIC LEVEL 1 2 3 4 5 8 9 10 11 a STANDBY-ON h SOURCE – Turns on this unit or turns off to standby mode. – Selects the relevant active source mode: DISC, FM, AUX 1 or AUX 2. b Disc Tray i MIC LEVEL – Activates microphone level mode and use the volume control to set the microphone volume level. c OPEN/CLOSE ç – Opens/closes the disc tray. d Display panel – Shows information about the current status of the unit.
Remote Control English e INFO 1 2 – Displays the current status or disc information. 3 f OK 4 – Confirms an entry or selection. 5 g vVbB – DISC: selects movement direction in the menu. – DISC: press left or right for fast forward and backward search. – RADIO: press up or down to tune the radio frequency. – RADIO: press left or right to start auto search. 6 67 68 69 10 6 h OPTIONS – Enters or exits the system setup menu. i u (Play/Pause) 11 12 – DISC: starts/pauses playback.
Remote Control (continued) – AUX: switches to AUX 1 or AUX 2 external source mode. – RADIO: switches to FM band. – DISC: switches to DISC mode. English o Source buttons 15 p MENU (BACK) – DVD: go back to title menu. – VCD/SVCD: During playback (PBC ON mode only) return to PBC menu. q í/ë (Previous / Next) 16 – DISC: skips to the previous or next title/ chapter/track. – RADIO: selects a preset radio station. 17 r (Mute) – Mutes or restores the volume.
Remote Control (continued) English Using the remote control CAUTION! – Remove batteries if they are exhausted or if the remote control is not to be used for a long time. – Never mix batteries (old and new or carbon and alkaline, etc). – Batteries contain chemical substances, they should be disposed of properly. A Push to open the battery compartment. B Insert two batteries type R03 or AAA, following the indications (+-) inside the compartment. C Close the cover.
English Basic Connections REAR LEFT FRON T LEFT REAR RIGHT Step 1: Placing the speakers The Philips Home Theatre System is simple to install. However, proper system placement is critical to ensure an optimum sound experience. A Place the front left and right speakers at equal distances from the TV and at an angle of approximately 45 degrees from the listening position. B Place the centre speaker above the TV or the main unit such that the centre channel’s sound is localised.
Basic Connections (continued) English Option 1 Main Unit (rear) Step 2: Connecting to TV This connection enables you to view the video playback from this unit. You only need to choose one of the options below to make the video connection. – For a standard TV, follow option 1. – For a progressive scan TV, follow option 2.
English Basic Connections (continued) Option 2 Option 2: Connecting to a Progressive Scan TV or component video input The progressive scan video quality is only available when using Y Pb Pr connection and a progressive scan TV is required. It provides superior picture quality when watching DVD movies.
Basic Connections (continued) English FRONT CENTRE FRONT LEFT REAR LEFT REAR RIGHT FRONT RIGHT SUBWOOFER Step 3: Connecting speakers and subwoofer Connect all the speakers and subwoofer to the matching sockets at the rear of the main unit, Make sure that the colours of the cables and sockets are matched. Helpful Hint: – To prevent unwanted noise, never place the speakers too close to the main unit, subwoofer, AC power adapter, TV or any other radiation sources. 16 1_hts3011_98_eng 3_final808.
English Basic Connections (continued) Main Unit (rear) Main Unit (rear) FM antenna Step 4: Connecting the FM antenna A Connect the FM antenna (supplied) to the FM 75 Ω socket. (For some models, it has been connected in the factory.) B Extend the FM antenna and fix its ends to the wall. For better FM stereo reception, connect an external FM antenna (not supplied). Helpful Hints: – Adjust the position of the antenna for optimal reception.
Optional Connections English DVD Recorder/VCR Cable/Satellite Box Connecting audio from other devices This unit provides analog audio connection. You can connect the audio output from an audio/video device (e.g. DVD Recorder, VCR, Cable/Satellite Box, game console or TV) to the main unit in order to enjoy the multi-channel surround sound capabilities. Use an audio cable (not supplied) to connect the AUDIO IN-AUX1 or AUDIO IN-AUX2 sockets on the main unit to the AUDIO OUT sockets on the connected device.
Finding the correct viewing channel A Press STANDBY-ON to turn on the English Getting Started Switching to different play source On the main unit unit. B Press DISC on the remote control. C Turn on the TV and switch it to the correct video-in channel. You may go to the lowest channel on your TV, then press the Channel Down button on your TVs remote control until you see the Video In channel. You may press ° button repeatedly on your TV’s remote control.
Getting Started (continued) English Setting language preferences Audio, Subtitle and Menu language for DVD playback The language options are different depending on your country or region. It may not correspond to the illustrations shown on the user manual. You can select your preferred language settings for DVD playback. If the selected language is recorded on the DVD disc, this unit automatically plays the disc in that language. Otherwise, the disc’s default language will be used instead.
Getting Started (continued) English If the language you want is not available in the list, select { Others }. Use the numeric keypad (0-9) on the remote control to enter the 4-digit language code ‘XXXX’ (see Language Code page) and press OK to confirm. E Repeat steps C ~ D for other settings. Helpful Hints: – During DVD playback, you can press the AUDIO SYNC and SUBTITLE on the remote control to change the audio and subtitle languages respectively.
Getting Started (continued) English Setting up Progressive Scan feature (for Progressive Scan TV only) The progressive scan displays twice the number of frames per second than interlaced scanning (ordinary normal TV system). With nearly double the number of lines, progressive scan offers higher picture resolution and quality. Before you start... Ensure that you have connected this unit to a progressive scan TV (see ‘Option 2: Connecting to a Progressive Scan TV or component video input’.
Getting Started (continued) E Use English keys to highlight { Speakers Delay } and press . Setting the speakers’ channels Audio Setup You can adjust the delay times (centre and surround only) and volume level for individual speakers. These adjustments let you optimise the sound according to your surroundings and setup. Before you start... Stop the disc playback by pressing x button twice or remove the disc from the disc tray. Otherwise, the settings are not accessible.
Disc Operations English Playable discs Your DVD home theatre system plays: – Digital Versatile Discs (DVDs) – Video CDs (VCDs) – Super Video CDs (SVCDs) – Finalised DVD Recordable (DVD±R), DVD Rewritable (DVD±RW) – Audio Compact Discs (CDs) – MP3/ Windows Media™ Audio discs, picture (Kodak, JPEG) files on CD-R(W) – ISO 9660/UDF format – JPEG resolution support up to 3072 x 2048 – Supported sampling frequencies: 32 kHz, 44.
Basic playback controls Pausing playback During playback, press u. While in pause mode, you can press to step forward one frame at each press. To resume playback, press u again. Selecting another track/chapter Press í / ë or use the numeric keypad 0-9 to key in a track/chapter number. If the repeat track mode is active, press again to replay the same track/chapter. Searching backward/forward Press m / M on the remote control. While searching, press m / M repeatedly to increase the search speed.
Disc Operations (continued) English Repeating a specific section (A-B) Other playback features for video discs (DVD/VCD/ SVCD) A While playing a disc, press REPEAT A-B at the start point. B Press REPEAT A-B again to end the section. The section will now repeat continuously. C Press REPEAT A-B again to resume normal playback. DISC BACK MENU INFO OPTIONS Helpful Hints: – The marked section for repeat playback is only possible within the same track/chapter.
Viewing playback information This unit can display the disc playback information (for example, title or chapter number, audio/subtitle language) and a number of operations can be done without interrupting disc playback. A During playback, press INFO. A list of available disc information appears on the TV. DVD Zooming This option allows you to zoom and pan through the picture on the TV. English Disc Operations (continued) A During playback, press ZOOM repeatedly to select a different zoom factor.
Disc Operations (continued) English Changing sound track language This operation works only on DVDs with multiple sound track languages, or VCDs/ SVCDs with multiple audio channels. For DVD Press AUDIO SYNC repeatedly to select the available audio languages. For VCD and SVCD Press AUDIO SYNC repeatedly to select the available audio channels provided by the disc (STEREO, MONO LEFT, MONO RIGHT or MIX MONO).
Disc Operations (continued) 01 02 03 04 05 06 Exit English { Track Interval } View the content of a single track in six thumbnail pictures. It divides a single track into six portions at regular intervals and displays them on one screen. This option is only available during playback mode. Menu To go to the previous or next page, press í / ë. To return to the main menu, select { Menu } on the screen and press OK. Press OK on the selected thumbnail picture to start playback from there.
Disc Operations (continued) English Playing a MP3/ WMA disc This unit can playback most of the MP3 and Windows Media™ Audio files recorded on a recordable disc or commercial CD. Before you start ... Turn on your TV to the correct Video In channel. See ‘Finding the correct viewing channel’ for details. A Load a MP3/WMA disc. The disc reading time may exceed 30 seconds due to the complexity of the directory/file configuration. The disc menu appears on the TV.
Playing a JPEG image file (slide show) Before you start ... Turn on your TV to the correct Video In channel. See ‘Finding the correct viewing channel’ for details. Preview function A During playback, press INFO. 12 thumbnail pictures will be displayed on the TV. English Disc Operations (continued) A Load a JPEG photo CD (or Kodak Picture CD). For a Kodak disc, the slide show begins automatically. For a JPEG disc, the picture menu appears on the TV. Press u to start the slide-show playback.
Disc Operations (continued) English Playing music and photo files simultaneously You can create a musical slide show playback if the disc contains both the MP3/WMA music and JPEG picture files. A Load a disc that contains both MP3/WMA and JPEG files. B Use keys to select a MP3/WMA file from the disc menu and press OK to start playback.
Microphone setting Playing a Karaoke disc A Press KARAOKE to access ‘Microphone A Connect a microphone (not supplied) to the MIC socket at the right side of the front panel. Setup’ page. English Playback - Karaoke Microphone Setup Mic Mic Volume Echo Level Key On Off Score MIC B In ‘Microphone Setup’ page, use keys to select the option for microphone settings and press OK to confirm. { Mic } - On - Off To turn on or off the karaoke microphone.
Setup Menu Options English Accessing the setup menu You can change the settings in this unit to suit your particular requirements. General Setup Disc Lock Display Dim OSD Language Screen Saver Sleep DivX(R) VOD Code Press OPTIONS to exit menu OK See ‘General Setup’ on this Chapter. OPTIONS Audio Setup Speakers Volume A In disc mode, press OPTIONS on the remote control. The setup menu appears. Speakers Delay CD Upsampling Audio Sync B Use keys to select one of the setup menu options, then press .
General Setup (underlined options are the factory default settings) Disc Lock Not all discs are rated or coded by the disc maker. You can prevent play of specific discs with the disc lock function. Up to 40 discs can be locked. { Lock } – To block the playback of the current disc. Subsequent access to a locked disc requires a six-digit password. The default password is ‘136900’ (see { Preferences > Password } for details). { Unlock } – All discs can be played.
Setup Menu Options (continued) English Audio Setup (underlined options are the factory default settings) Speakers Volume Access the speaker’s level setup menu. Use keys to adjust the volume level for each connected speaker between -6dB to +6dB. See ‘Getting Started - Setting the speakers’ channels’. Speakers Delay Access the speaker’s distance setup menu. Use keys to set the delay times for the centre and rear speakers based on the listening position and distance.
English Setup Menu Options (continued) Video Setup (underlined options are the factory default settings) TV Type Select the colour system that matches the connected TV. It enables playback of a different type of disc (PAL or NTSC disc) on this unit. { PAL } – For PAL-system TV. { NTSC } – For NTSC-system TV. { Multi } – For TV that is compatible with both PAL and NTSC. TV Display The picture shape can be adjusted to fit your TV. { 4:3 Pan Scan } – For a full-height picture with the sides trimmed.
Setup Menu Options (continued) English Video Setup (underlined options are the factory default settings) Closed Caption This feature is only available if the disc contains of special video signal data. It shows sound effects on the screen if your TV supports this feature, such as ‘phone ringing’ and ‘footsteps.’ { On } { Off } – Turn on closed caption feature. – Turn off closed caption feature. 38 1_hts3011_98_eng 3_final808.
English Setup Menu Options (continued) Preferences (underlined options are the factory default settings) Audio Select the preferred audio language for DVDs with multiple sound tracks. Subtitle Select the preferred subtitle language for DVD playback. Disc Menu Select the preferred disc menu language for DVD playback. Note: If the selected audio/subtitle/disc menu language is not available on the DVD, the disc’s default language will be used instead.
Setup Menu Options (continued) English Preferences (underlined options are the factory default settings) MP3/JPEG Nav MP3/JPEG Navigator can only be set if the disc is recorded with a menu. It allows you to select different display menus for easy navigation. { Without Menu } – Display all the files contained in the MP3/ Picture disc. { With Menu } – Display the folder menu of the MP3/ Picture disc. Note: This unit can only display 648 files in the directory.
English Setup Menu Options (continued) Preferences (underlined options are the factory default settings) Default This feature enables you to reset all the setup menu options and your personal settings to the factory defaults, except your password for the Disc Lock and Parental. Press OK to confirm the default reset. Version Info This shows you informations about the current version of the software installed in this unit. You may require this information for future online firmware upgrade.
Radio Operations English Before you start ..... Ensure that FM antenna is connected to the main unit. (For some models, it has been connected in the factory.) Extend the FM antenna and fix its ends to the wall. Tuning to radio stations A Press SOURCE repeatedly until ‘FM’ appears on the display panel (or press RADIO on the remote control). B Press FM antenna / on the remote control to start tuning. The frequency indication starts to change until a radio station with sufficient signal strength is found.
Presetting radio stations You can store up to 40 FM preset radio stations in the memory. There are three different ways to program the radio stations: – Using auto install (for first time setup only) – Using automatic preset – Using manual preset Using auto install When you access the ‘RADIO’ mode for the very first time, you will be prompted to install the radio stations. With this feature, you can install all the available radio station automatically with one touch of button.
Radio Operations (continued) English Using automatic preset Use automatic presetting to store or reinstall all the preset radio stations. Selecting a preset radio station A Press RADIO to switch to ‘FM’ band. RADIO B Press í / ë or use the numeric keypad 0-9 to select a preset radio stations. The preset number and radio frequency appear on the display panel. Deleting a preset radio station PROGRAM REPEAT A In radio mode, press í / ë to select a preset radio station.
Selecting digital sound effects Select a preset digital sound effect that matches your disc’s content or that optimises the sound of the musical style you are playing. (Mute) VOL+SURROUND SOUND MODES English Sound and Volume Controls Press SOUND MODES +/- to select the available sound effect. +- Volume control Press VOL +/- to increase or decrease the volume level. To turn off the volume temporarily Press . Playback continues without sound and ‘MUTE’ appears.
Other Features English Turning on the sleep timer Installing the latest software The sleep timer enables the unit to switch to standby mode automatically after the selected preset time. Philips provides software upgrades to make sure that this unit is compatible with the newest formats. To check the updates, compare the current software version of this unit with the latest software version available at the Philips website.
WARNING Under no circumstances should you try to repair the system yourself, as this will invalidate the warranty. Never open the system as there is a risk of electric shock. If a fault occurs, first check the points listed below before taking the system for repair. If you are unable to solve a problem by following these instructions, consult your dealer or Philips for help. Problem (General) English Troubleshooting Solution No picture. – Refer to your TVs manual for correct Video In channel selection.
Troubleshooting (continued) English Problem (Playback) The unit does not start playback. Solution – Load a readable disc with the playback side facing down. The DVD+R/CD-R must be finalised. – Make sure the disc is not scratched or warped. – Press OPTIONS to turn off the system setup menu screen. – You may need to enter the password in order to unlock the disc for playback. – Moisture may have condensed inside this unit. Remove the disc and leave this unit turned on for about an hour.
AMPLIFIER MAIN UNIT Total output power : - Home Theatre mode: 200 W Frequency Response: 180 Hz – 18 kHz / ±3 dB Signal-to-Noise Ratio: > 60 dB (A-weighted) Input Sensitivity - AUX 1: 400 mV - AUX 2: 400 mV Power Supply Rating: 110-240 V; 50-60 Hz Power Consumption: 40 W Dimensions: 360 x 55 x 332 (mm) (w x h x d) Weight: 2.58 kg RADIO Tuning Range: FM 87.
Glossary English Analogue audio: Sound that has not been turned into numbers. Analogue sound is available if you use the AUDIO LEFT/RIGHT. These red and white sockets send audio through two channels, the left and right. Aspect ratio: Aspect ratio refers to the length to height ratio of TV screens. The ratio of a standard TV is 4:3, while the ratio of a high-definition or wide TV is 16:9. The letter box allows you to enjoy a picture with a wider perspective on a standard 4:3 screen.
Glossary (continued) English MP3: A file format with a sound data compression system. ‘MP3’ is the abbreviation of Motion Picture Experts Group 1 (or MPEG-1) Audio Layer3. By using the MP3 format, one CD-R or CD-RW can contain about 10 times more data than a regular CD. MPEG: Motion Picture Experts Group. A collection of compression systems for digital audio and video. PBC: Playback Control. A system of navigating a Video CD/Super VCD through on-screen menus recorded onto the disc.