User Manual 6 Manuel D’utilisation 58 Manual del usuario 110 English HTS6500 DVD Home Theater System
Return your Product Registration Card or register online at www.philips.com/usasupport today to get the very most from your purchase. Registering your model with PHILIPS makes you eligible for all of the valuable benefits listed below, so don't miss out. Complete and return your Product Registration Card at once, or register online at www.philips.
1. Read these instructions. 2. Keep these instructions. 12. 3. Heed all warnings. 4. Follow all instructions. 5. Do not use this apparatus near water. 13. Unplug this apparatus during lightning 6. Clean only with dry cloth. storms or when unused for long periods of time. 7. Do not block any ventilation openings. Install in accordance with the manufacturer´s instructions. 14. Refer all servicing to qualified service personnel.
CAUTION LASER Type Wave length Output Power Beam divergence Semiconductor laser GaAIAs 650 - 660 nm (DVD) 784 - 796 nm (CD) 7 mW (DVD) 10 mW (VCD/CD) 60 degrees Canada English: This digital apparatus does not exceed the Class B limits for radio noise emissions from digital apparatus as set out in the Radio Interference Regulations of the Canadian Department of Communications.
Manufactured under license from Digital Theater Systems, Inc. U.S. Pat. Noís. 5,451,942; 5,956,674; 5,974,380; 5,978,762; 6,226,616; 6,487,535 and other U.S. and world-wide patents issued and pending. “DTS” and “DTS Digital Surround” are registered trademarks of Digital Theater Systems, Inc. Copyright 1996, 2003 Digital Inc. All Rights Reserved. DivX Ultra Certified products: “DivX, DivX Ultra Certified, and associated logos are trademarks of DivX, Inc. and are used under license.
Table of contents English General General Information ........................................................................................................ 8 Setup precautions.................................................................................................................................................8 Accessories supplied ...........................................................................................................................................8 Cleaning discs .........
Other playback features for video discs (DVD/VCD/SVCD) ............................................................. 28 Using the Disc Menu ................................................................................................................................. 28 Viewing playback information ..................................................................................................................29 Resuming playback from the last stopped point ...............................................
General Information English CAUTION! The machine does not contain any user-serviceable parts. Please leave all maintenance work to qualified personnel. Setup precautions Finding a suitable location – Place the set on a flat, hard and stable surface. Do not place the set on a carpet. – Do not position the set on top of other equipment that might heat it up (e.g., receiver or amplifier.) – Do not put anything under the set (e.g., CDs, magazines.
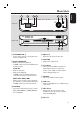
1 2 3 4 5 6 English Main Unit 7 Top view Front view 10 9 8 a STANDBY ON 2 d EJECT ç – Turns on the system or turns off to Eco Power standby mode. – Ejects the disc from the disc slot. b PLAY PAUSE u – DISC: starts/pauses playback. – TUNER: starts auto tuner installation for first time setup. STOP Ç – Exits an operation. – DISC: stops playback. – TUNER: press and hold this button to erase the current preset radio station. PREV .
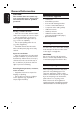
Remote Control English c ZOOM – Enlarges a picture on the TV. d AUDIO 1 2 3 4 5 – Selects an audio language (DVD) or an audio channel (CD.) e SETUP – Enters or exits the system setup menu. f DISPLAY – Displays the current status or disc information. 6 g PLAY É – DISC: starts playback. 7 h STOP Ç 8 – Exits an operation. – DISC: stops playback. – DISC: press and hold this button to eject the disc. – TUNER: press and hold this button to erase the current preset radio station.
Remote Control (continued) English m MP3-DIRECT – Switches to MP3 mode for the source connected through the MP3 Direct socket at the front panel. n SUBTITLE – Selects a DVD subtitle language. o DISC MENU – For DVD, enter or exit disc contents menu. – For VCD/SVCD, enter digest menu. pWXST 13 14 15 16 17 18 – DISC: selects movement direction in the menu. – TUNER: press up or down to tune the radio frequency up/down. – TUNER: press left or right to start auto search.
Remote Control (continued) English Using the remote control A Open the battery compartment. B Insert two batteries type R03 or AAA, following the indications (+-) inside the compartment. C Close the cover. D Point the remote control directly at the remote sensor (iR) on the front panel. E Select the source you wish to control by pressing the DISC, TUNER, TV, AUX/DI or MP3 DIRECT button on the remote control. F Then select the desired function (for example ., >.
English Basic Connections Step 1: Placing the speakers The Philips Home Theater System is simple to install. However, proper system placement is critical to ensure an optimum sound experience. Before you start ... If you wish to mount the SonoWave speakers on the wall, see section ‘Optional Connections - Mounting the SonoWave speakers on the wall.’ A Place the SonoWave speakers at the normal listening ear level, equal distance from the TV and face straight ahead towards the listening area.
Basic Connections (continued) English SUBWOOFER FRONT RIGHT FRONT LEFT FM/AM ANTENNA ~ MAINS SUBWOOFER FRONT RIGHT FRONT LEFT AM L FM 75 R HDMI OUT Ensure this portion is fully inserted into the jack. Step 2: Connecting the SonoWave speakers and subwoofer Connect the SonoWave speakers to the matching speaker jacks at the rear of the DVD system.
English Basic Connections (continued) Option 1 Option 2 FM/AM ANTENNA ~ MAINS SUBWOOFER FRONT RIGHT FRONT LEFT AM L FM 75 R HDMI OUT Step 3: Connecting to TV This connection enables you to view the playback from this DVD system. You only need to choose one of the options below to make the video connection. – For a standard TV, follow option 1 or 2. – For a progressive scan TV, follow option 3. – For a HDMI TV, follow option 4. – For TV with only a single antenna input jack, follow option 5.
Basic Connections (continued) English Option 3 Option 4 FM/AM ANTENNA ~ MAINS NT T AM SUBWOOFER L FRONT RIGHT FRONT LEFT L FM 75 R R HDMI OUT Option 3: Connecting to a Progressive Scan TV or component video input The progressive scan video quality is only available when using Y Pb Pr connection and a progressive scan TV is required. It provides superior picture quality when watching DVD movies. A Follow option 1 to make the basic video connection.
English Basic Connections (continued) fix the claw into the slot Rear of an RF modulator (example only) Option 5 FM antenna AM antenna Antenna 2 1 FM/AM ANTENNA ~ FM/AM ANTENNA ~ MAINS AM MAINS AM L T FM 75 R L FM 75 R Option 5: Using an accessory RF modulator If your TV has only a single Antenna Input jack (labeled as 75 ohm or RF In,) you will need an RF modulator in order to view the DVD playback on the TV.
Basic Connections (continued) English FM/AM ANTENNA ~ MAINS SUBWOOFER FRONT RIGHT FRONT LEFT AM L FM 75 R HDMI OUT Step 5: Connecting the power cord After everything is connected properly, plug the AC power cord into the power outlet. The Eco Power LED on the DVD system will light up. Never make or change any connections with the power turned on. Helpful Hints: – Refer to the type plate at the rear or bottom of the product for identification and supply ratings.
OR English Optional Connections DIGITAL OUT FM/AM ANTENNA ~ MAINS SUBWOOFER FRONT RIGHT FRONT LEFT AM L FM 75 R HDMI OUT Connecting audio from TV When connecting the audio output from your TV to this Home Theater Audio System, you will have the sound of the TV output on all the speakers. It will enable you to enjoy the multi-channel surround sound capabilities. Use an audio cable (red/white - not supplied) to connect the TV IN jacks on this DVD system to the AUDIO OUT jacks on the TV.
Optional Connections (continued) English Mounting the speakers on the wall You can choose to wall mount the speakers on the wall. CAUTION! You should get a qualified person to drill and insert the mounting screws (not supplied) on the wall. DO NOT do it yourself in order to avoid any unexpected damage to the equipment or injury to personnel.
English Getting Started Step 1: Turning on the DVD system Step 2: Finding the correct viewing channel Press the SOURCE button on the front panel repeatedly to select : DISC ¤ MP3 DIRECT ¤ FM ¤ AM ¤ TV ¤ AUX ¤ DI ¤ DISC .... Before you start ... Make sure you have completed all the necessary connections before proceeding. A Press SOURCE button until “DISC” appears on the display panel. B Turn on the TV and set it to the correct Or Press DISC/USB, TUNER, TV, AUX/DI or MP3 DIRECT on the remote control.
Getting Started (continued) English Step 3: Setting language preferences The language options are different depending on your country or region. It may not correspond to the illustrations shown on the user manual. On-screen display (OSD) language The OSD (On-Screen Display) language for this DVD system will remain as you have set it, regardless of the changes made to the DVD disc language. A In ‘DISC’ mode, press SETUP on the remote control. { General Setup Page } appears.
If the language you want is not available in the list, select { Others. } Use the numeric keypad (0-9) on the remote control to enter the 4-digit language code ‘XXXX’ (see last page) and press OK to confirm. E Repeat steps C ~ D for other settings. Helpful Hints: – During DVD playback, you can switch the audio and subtitle languages by pressing the AUDIO and SUBTITLE buttons on the remote control. However, this does not change the default settings you have made here.
Getting Started (continued) English Step 5: Setting up Progressive Scan feature (for Progressive Scan TV only) The progressive scan displays twice the number of frames per second than interlaced scanning (ordinary normal TV system.) With nearly double the number of lines, progressive scan offers higher picture resolution and quality. Before you start...
F Use W X keys to select { LISTENING Step 6: Setting the SonoWave speakers POSITION } and press OK. There are three parameters to adjust the SonoWave speakers: Room Acoustics, Speaker Distance and Listening Position. You can adjust the SonoWave speaker settings according to your room environment and setup for optimum performance. FRONT L TV FRONT R A Press and hold SOUND on the remote control to enter SonoWave speaker settings mode. B Use W X keys to select { ROOM ACOUSTICS } and press OK.
Disc Operations English Playable discs IMPORTANT! – If the inhibit icon (ø or X) appears on the TV screen when a button is pressed, it means the function is not available on the current disc or at the current time. – Do not put any objects other than discs on the disc tray. Doing so may cause the disc player to malfunction.
Basic playback controls Pausing playback During playback, press u (or Å on the remote control.) While in pause mode, you can press Å repeatedly to view the next still picture (for video playback only.) To resume playback, press u (or PLAY X on the remote control.) Selecting another track/chapter Press ./ > or use the numeric keypad (0-9) to key in a track/chapter number. If the repeat track mode is active, press . again to replay the same track/ chapter. Searching backward/forward Press and hold ./ >.
Disc Operations (continued) English Programming disc tracks (not for Picture CD/MP3) You can play the contents of the disc in the order you want by programming the playing order of the tracks. Other playback features for video discs (DVD/VCD/ SVCD) A Press PROGRAM on the remote control. The programming menu appears. 6 7 2 8 9 10 Exit Start Next B Use the numeric keypad (0-9) to enter a valid track/chapter number. C Use WXST keys to move the cursor to the next position.
Viewing playback information This DVD system can display the disc playback information (for example, title or chapter number, elapsed playing time, audio/subtitle language) and a number of operations can be done without interrupting disc playback. A During playback, press DISPLAY. A list of available disc information appears on the TV.
Disc Operations (continued) English Changing sound track language This operation works only on DVDs with multiple soundtrack languages, you can change the language you want while playing a DVD. Press AUDIO repeatedly to select the available audio languages. For VCD – changing the audio channel Press AUDIO repeatedly to select the available audio channels provided by the disc (STEREO, MONO LEFT, MONO RIGHT or MIX MONO.
Disc Operations (continued) This DVD system can playback most of the MP3, JPEG and Windows Media™ Audio files recorded on a CD-R/RW disc or commercial CD. Before you start ... Turn on your TV to the correct Video In channel. See the section on “Finding the correct viewing channel.” During playback, you can; English Playing an MP3/ JPEG/ Windows Media™ Audio disc Press ./ > to playback another track/file in the current folder. Press and hold ./ > to fast reverse/forward search for a music track.
Disc Operations (continued) English Playing a JPEG image file (slide show) Before you start ... Turn on your TV to the correct Video In channel. See the section on “Finding the correct viewing channel.” Insert a Picture disc (Kodak Picture CD, JPEG.) For a Kodak disc, the slide show will begin automatically. For a JPEG disc, the picture menu will appear on the TV. Press PLAY X (or u) to start the slide-show playback. Preview function A During playback, press Ç.
Playing MP3 music and JPEG pictures simultaneously You can create a musical slide show if the disc contains both the MP3 music and JPEG picture files. A Insert an MP3 disc that contains music and pictures. B Select an MP3 track in the menu and press PLAY X (or u) to start playback. C During MP3 music playback, use WXST keys to select a picture folder from the disc menu and press PLAY X (or u.) The picture files will be played back through to the end of the folder.
USB Operations English Playing from USB flash drive or USB memory card reader This DVD system is able to access and view the data files (JPEG, MP3 or Windows Media™ Audio) in the USB flash drive or USB memory card reader. Editing and copying the data are not possible. A Insert a USB flash drive or USB memory card reader into the USB port on the front panel. B A message will appear on the TV for 5 (five) seconds when the device is detected.
English MP3 Direct Operations Playing from a portable audio or HDD player This DVD system is able to playback audio tracks from your portable audio or HDD player. A Use the supplied MP3 direct cable to connect between the ‘headphone’ output jack on your portable audio or HDD player and the MP3 DIRECT jack on the front panel of this DVD system. The white cable is for the portable audio player. OR B Press MP3 DIRECT on the remote control. C Start playback on your portable audio or HDD player.
DVD Setup Menu Options English Accessing the DVD setup menu This DVD system setup is carried out via the TV, enabling you to customise the DVD system to suit your particular requirements. OK SETUP General Setup Page Disc Lock Display Dim Program OSD Language Screen Saver DivX(R) VOD Code see page 37 Audio Setup Page HDMI Audio Night Mode Lip Sync see page 38 A In ‘DISC’ mode, press SETUP on the remote control. The setup menu appears.
General Setup Page (underlined options are the factory default settings) Disc Lock Not all discs are rated or coded by the disc maker. You can prevent a specific disc from playing by locking the disc. Up to 40 discs can be locked. { Lock } – Selects this to block the playback of the current disc. Subsequent access to a locked disc requires a six-digit password. The default password is ‘136900’ (see ‘Preference Setup Page - { Password }.) { Unlock } – All discs can be played.
DVD Setup Menu Options (continued) English Audio Setup Page (underlined options are the factory default settings) HDMI Audio This setting is only required if you are using the DVD system’s HDMI OUT jack to connect your TV or other display device (see ‘Option4: Connecting to a HDMI-compatible TV’.) Note: It may take a while for the DVD system and the input device to communicate and initialize. { Off } – Select this if the playback audio format is not supported by HDMI connection (e.g. projector, SACD.
English DVD Setup Menu Options (continued) Video Setup Page (underlined options are the factory default settings) TV Type The color system for this DVD system is { NTSC }. It can support NTSC-system TV. This DVD system will automatically convert the PAL disc video output to NTSC format. TV Display The picture shape can be adjusted to fit your TV. { 4:3 Letter Box } – For a ‘wide-screen’ display with black bars on the top and bottom. { 4:3 Pan Scan }– For a full-height picture with the sides trimmed.
DVD Setup Menu Options (continued) English Video Setup Page (underlined options are the factory default settings) HDMI Setup It provides the picture settings to enhance the appearance and picture quality for disc playback. This feature is only applicable if you have connected this DVD system to a HDMI-compatible TV/ device. { HDMI Video }– Selects a suitable video resolution depending on the capability of the connected TV/device to further enhance the HDMI video output.
English DVD Setup Menu Options (continued) Preference Setup Page (underlined options are the factory default settings) Audio Selects the preferred audio language for DVD playback. Subtitle Selects the preferred subtitle language for DVD playback. Disc Menu Selects the preferred disc menu language for DVD playback. Note: If the selected audio/subtitle/disc menu language is not available on the DVD, the disc’s default language will be used instead.
DVD Setup Menu Options (continued) English Preference Setup Page (underlined options are the factory default settings) DivX Subtitle Selects the font type that supports the recorded DivX subtitle. { Standard } – Displays a standard list of Roman subtitle fonts provided by this DVD system. { Central Europe } – Displays Central Europe fonts. { Cyrillic } – Displays Cyrillic fonts. { Greek } – Displays Greek subtitle fonts. { Chinese (Simp) } – Displays Simplified Chinese fonts.
IMPORTANT! Make sure the FM and AM antennas are connected. Tuning to radio stations A Press SOURCE repeatedly until “FM” appears on the display panel (or press TUNER on the remote control.) B Press W / X briefly on the remote control to start tuning. “SEARCH > or <” will appear on the display panel until a radio station with sufficient signal strength is found. C Repeat step B if necessary until you find the desired radio station.
Tuner Operations (continued) English B Press PLAY X until “START ...” appears on the display panel. The system will start searching from the FM band followed by the AM band. All the available radio stations with strong signal will be stored automatically. Once complete, the last tuned radio station will be played back. Using manual preset Use manual presetting to store your favorite radio stations. A Tune to your desired radio station (see “Tuning to radio stations”.) B Press PROGRAM. C Use .
Selecting digital sound effects Select a preset digital sound effect that matches your disc’s content or that optimizes the sound of the musical style you are playing. Press SOUND to select the available sound effect. MUTE SURR. SOUND When playing movie discs or in TV mode, you can select : CONCERT, DRAMA, ACTION or SCI-FI. When playing music discs or while in TUNER or AUX/DI mode, you can select : CLASSIC, JAZZ, ROCK or DIGITAL. Selecting surround sound Press SURR.
Other Features English Software upgrades Periodically Philips will issue software upgrades to enhance your user experience. Before you start ... Check the current software version of this DVD system: 1) Press EJECT ç. 2) Press DISPLAY on the remote control. A Visit the Philips website ‘www.philips. com/support’ to check the availability of the latest software upgrade. Download the software to a CD-R. B Insert the CD-R to the disc slot. The software will start to install on the recorder automatically.
AMPLIFIER MAIN UNIT Output power: 500 W / 200 W FTC* Frequency Response: 20 Hz – 20 kHz / –3 dB Signal-to-Noise Ratio: > 65 dB (CCIR) Input Sensitivity - AUX In : 1000 mV - TV In: 500 mV - Digital In: 500 mV Power Supply Rating: 120 V; 60 Hz Power Consumption: 100 W Eco Standby power: < 1 W Dimensions: 340 x 70 x 330 (mm) (w x h x d) Weight: 3.5 kg English Specifications SonoWave SPEAKERS * (1% THD 1kHz) System: TUNER Tuning Range: FM 87.
Troubleshooting English WARNING Under no circumstances should you try to repair the system yourself, as this will invalidate the warranty. Do not open the system as there is a risk of electric shock. If a fault occurs, first check the points listed below before taking the system for repair. If you are unable to solve a problem by following these instructions, consult your dealer or Philips for help. Problem (General) Solution No power. – Check if the AC power cord is properly connected.
Troubleshooting (continued) The DVD system does not start playback. Solution English Problem (Playback) – Insert a readable disc with the playback side facing down. The DVD+R/CD-R must be finalized. – Check for any scratches or smudges on the disc. – Press SETUP to turn off the system setup menu screen. – You may need to enter the password in order to change the parental control rating level or to unlock the disc for playback. – Moisture may have condensed inside the system.
Troubleshooting (continued) English Problem (USB/HDMI/MP3 Direct) Solution The contents of the USB flash – The USB flash drive format is not compatible with the drive cannot be read. system. – Drive is formatted with a different file system which is not supported by this DVD system (e.g. NTFS.) Slow operation of the USB flash drive. – Large file size or high memory USB flash drive takes longer time to read and display on the TV. No HDMI audio output.
Why does it take so long to display the contents on my USB device? – This could be due to the large numbers of files (>500 files/folders) or size of the files (>1MB.) – There could be other non-supported files in the device that the system is trying to read/display. What if un-supported devices (e.g. USB mouse, keyboards) are plugged into the system? – The device may cause the system to be unstable. Remove the unsupported device and unplug the mains cord.
Glossary English Analog: Sound that has not been turned into numbers. Analog sound varies, while digital sound has specific numerical values. These jacks send audio through two channels, the left and right. Aspect ratio: The ratio of vertical and horizontal sizes of a displayed image. The horizontal vs. vertical ratio of conventional TVs is 4:3, and that of wide-screens is 16:9. AUDIO OUT jacks: Red and white jacks on the back of the unit that send audio to another system (TV, Stereo, etc.).
MP3: A file format with a sound data compression system. “MP3” is the abbreviation of Motion Picture Experts Group 1 (or MPEG-1) Audio Layer3. By using the MP3 format, one CD-R or CD-RW can contain about 10 times more data than a regular CD. Title: The longest section of a movie or music feature on DVD. Each title is assigned a title number, enabling you to locate the title you want. VIDEO OUT jack: Yellow jack on the back of the DVD system that sends the DVD picture video to a TV.
PHILIPS LIMITED WARRANTY ONE (1) YEAR WARRANTY COVERAGE: PHILIPS warranty obligation is limited to the terms set forth below. WHO IS COVERED: Philips warrants the product to the original purchaser or the person receiving the product as a gift against defects in materials and workmanship as based on the date of original purchase (“Warranty Period”) from an Authorized Dealer. The original sales receipt showing the product name and the purchase date from an authorized retailer is considered such proof.
English