Philips Sonicare 2 Series
1
Sonicare 2 Series ENGLISH 4
ENGLISH Introduction Congratulations on your purchase and welcome to Philips! To fully benefit from the support that Philips offers, register your product at www.philips.com/ welcome. IMPORTANT SAFEGUARDS READ ALL INSTRUCTIONS BEFORE USE DANGERS To reduce the risk of electrocution: 1 Always place and store the charger at a safe distance from water. 2 Do not reach for a charger that has fallen into water. Unplug immediately. 3 Never use a charger with a damaged cord or plug.
ENGLISH 5 5 The mains cord cannot be replaced. If the mains cord is damaged, discard the charger. 6 Keep the cord away from heated surfaces. 7 Do not use the charger outdoors. 8 This product contains no user-serviceable parts. Refer to ‘Warranty and support’ if the product no longer works properly or needs repair. 9 Use this product only for its intended use as described in this document or as recommended by your dental professional.
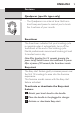
ENGLISH Electromagnetic fields (EMF) This Philips product complies with all applicable standards and regulations regarding exposure to electromagnetic fields. SAVE THESE INSTRUCTIONS Your Sonicare (Fig. 1) 1 Hygienic travel cap 2 Brush head with unique identifier 3 Handle 4 Power on/off button 5 Battery level indicator 6 Charger Note:The contents of the box may vary based on model purchased. Getting started Attaching the brush head 1 Align the brush head so the bristles face the front of the handle.
ENGLISH 7 Charging your Sonicare 1 Plug the charger into a live electrical outlet. 2 Place the handle on the charger. ,, The battery level indicator flashes to indicate that the toothbrush is charging. When the light stops flashing and turns solid green the toothbrush is fully charged. Note: It can take up to 48 hours to fully charge the battery, but the Sonicare may be used before it is fully charged. Using your Sonicare Brushing instructions 1 Wet the bristles and apply a small amount of toothpaste.
ENGLISH Note:To make sure you brush evenly throughout the mouth, divide the mouth into 4 sections using the Quadpacer feature (see chapter ‘Features’), (specific types only). 6 Begin brushing in section 1 (outside top teeth) and brush for 30 seconds before moving to section 2 (inside top teeth). Continue brushing in section 3 (outside bottom teeth) and brush for 30 seconds before moving to section 4 (inside bottom teeth).
ENGLISH Features Quadpacer (specific types only) -- The Quadpacer is an interval timer that has a short beep and pause to remind you to brush the 4 sections of your mouth. Smartimer The Smartimer indicates that your brushing cycle is complete when it automatically turns off the toothbrush at the end of the brushing cycle. Dental professionals recommend brushing at least 2 minutes twice a day. Note: After brushing for 2.5 seconds, pressing the power on/off button causes the toothbrush to pause.
ENGLISH ,, To activate Easy-start: Press and hold the power on/off button for 2 seconds.You hear 2 beeps and the battery level indicator flashes green to indicate that the Easy-start feature has been activated. ,, To deactivate Easy-start: Press and hold the power on/off button for 2 seconds.You hear 1 beep and the battery level indicator flashes yellow to indicate that the Easy-start feature has been deactivated.
ENGLISH 11 Brush head 1 Rinse the brush head and bristles after each use. 2 Remove the brush head from the handle and rinse the brush head connection at least once a week with warm water. Charger 1 Unplug the charger. 2 Use a damp cloth to wipe the surface of the charger. Storage If you are not going to use the product for an extended period of time, unplug it from the electrical outlet, clean it and store it in a cool and dry place away from direct sunlight.
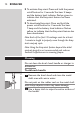
ENGLISH Disposal -- This appliance contains a rechargeable battery which must be disposed of properly. -- Contact your local town or city officials for battery disposal information. You can also call 1-800-8-BATTERY or visit www.rbrc.com for battery drop-off locations. -- For assistance, visit our website www.philips.com/ support or call 1-800-243-3050 toll free. Removing the rechargeable battery Only remove the rechargeable battery when you discard the appliance.
ENGLISH 13 4 Remove the internal frame from the handle. 5 Remove the rubbers that are on top and below the battery. 6 Insert the screwdriver between the battery and the frame. Tilt the screwdriver to pop the battery out of the frame. 7 Place some tape over the ends of the battery to avoid any short-circuiting due to residual energy in the battery. The rechargeable battery can now be recycled or disposed of and the rest of the product discarded appropriately.
ENGLISH Warranty and support Philips warrants its products for two years after the date of purchase. Defects due to faulty materials and workmanship will be repaired or replaced at Philips’ expense provided that convincing proof of purchase in the qualifying period is provided. Philips recommends use of genuine Sonicare brush heads for optimal performance. Use of other brush heads may damage your Sonicare toothbrush and limit your warranty protection.
ENGLISH 15 LIMITATION OF REMEDIES IN NO EVENT SHALL PHILIPS OR ANY OF ITS AFFILIATED OR SUBSIDIARY COMPANIES BE LIABLE FOR ANY SPECIAL, INCIDENTAL OR CONSEQUENTIAL DAMAGES BASED UPON BREACH OF WARRANTY, BREACH OF CONTRACT, NEGLIGENCE, TORT, OR ANY OTHER LEGAL THEORY. SUCH DAMAGES INCLUDE, WITHOUT LIMITATION, LOSS OF SAVINGS OR REVENUE; LOSS OF PROFIT; LOSS OF USE; THE CLAIMS OF THIRD PARTIES INCLUDING, WITHOUT LIMITATION, DENTISTS AND DENTAL HYGIENISTS; AND COST OF ANY SUBSTITUTE EQUIPMENT OR SERVICES.
www.philips.com/Sonicare ©2016 Koninklijke Philips N.V. (KPNV). All rights reserved. Philips and the Philips shield are trademarks of KPNV. Sonicare and the Sonicare logo are trademarks of Philips Oral Healthcare, LLC and/or KPNV. >75% recycled paper 4235.020.8624.