Philips multimedia projector bSure 1 / bSure 2 English User guide
Index 1. Introduction 2. Functional overview 3. Set up 4.
Index 5. Operation 6. Maintenance 7.
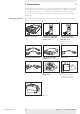
1. Introduction > Congratulations on your purchase of one of the most sophisticated and reliable products on the market today. We are sure that, used properly, it will bring you years of enjoyment.You will want to keep this manual handy, as it is a convenient source of information about your projector. For your own protection and prolonged operation of your projector, please read the enclosed Safety Sheet. Packaging contents Please confirm that the following items are packed in the projector box.
1.
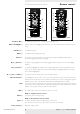
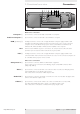
2. Functional overview 1 2 AV Mute Controls > 34 5 Source Menu OK Lamp Stand by Temp 6 7 8 9 0 ! A(udio)/V(ideo) Mute 1 Source 2 –/+3 Menu 4 OK 5 Standby/ Standby indicator 6 To mute the sound of the projector and to mute the picture. To select the current projection source (Computer, Component, RGBS, S-Video,Video). The button toggles between the five signals. To adjust the volume. To activate and deactivate the menu. To confirm actions in the menu when the menu is on screen.
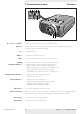
2. Functional overview # % Height/Level adjuster # Controls < $ ^ & To adjust the vertical angle of the projector. Dust filter $ Mains inlet socket % Lock slit ^ To connect the projector to the mains. To insert an optional locking device (Kensington lock).
2.
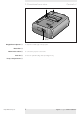
2. Functional overview Connections < 5 67 8 1 S-Video Computer 1 Audio in Computer 2 USB (upstream) 3 Note PS/2 4 Component in 5 Video 6 Audio L/R 7 S-Video 8 Philips Multimedia Projector Computer Pr R Video Y G Audio L Pb B Audio R 23 4 Audio in Computer USB PS/2 Data source connections Input socket to connect to the Data out terminal of a computer. Input socket to connect to the Audio out terminal of a computer.
3. Set up Positioning the projector and screen > SCREEN SCREEN Front projection Ceiling front projection SCREEN SCREEN Rear projection • • • • • • Switching on the projector AV Mute Source Menu OK Lamp Stand by Temp Ceiling rear projection Place the projector on a stable, level surface, out of direct sunlight and away from sources of excessive dust, dirt, heat, water, moisture, vibration and strong magnetic fields.
3. Set up Adjusting the focus and size of the image • • > Use the Zoom ring to adjust the size of the image. Use the Focus ring to adjust the focus of the image. Zoom ring Focus ring Adjusting the vertical angle of the projector Data S-Video Pr R Video Y G Audio L Pb B Audio R Audio in Data USB PS/2 A To • – To • • raise: Keep knob A pressed and lift to raise the projector. The Height/Level Adjuster B will come out. Lower: Keep knob A pressed and gently lower the projector.
4. Installation General information General information < Computer input The computer input is suitable for both Apple Macintosh computers (Power Book and Power Mac) as well as for IBM compatible PCs.
4.
4. Installation AV Mute Source Menu OK Lamp Stand by Temp Connecting to a computer < Connecting to an external monitor 1 Connect the VGA Y connector marked ‘Projector’ (4a), of an optional VGA Y-cable, to the Computer (in) socket of your projector. 2 Connect the VGA cable supplied (1a) between the computer and the VGA Y connector marked ‘Computer’ (4b). 3 Connect the VGA Y connector marked ‘Monitor’ (4c) to the VGA cable (5) of the monitor. 4 Switch on your Computer. 5 Switch on the projector.
4. Installation Connecting to video equipment > CVBS only CVBS only S-Video 1b 1a S-Video Computer Pr R Video Pr R Video Y G Audio Y L G Audio L Pb B AudioPb R B Audio R 2 Audio in Computer USB PS/2 S-VHS only VCR Video out L Audio R out S-Video out CVBS CVBS only only CVBS 1 2 S-VHS 1 2 Scart connection Connect the Video (out) socket of a VCR, Laser Disc player, video camera or TV to the Video (in) socket of the projector.
4. Installation Connecting to video equipment > S-Video 1 Computer Pr R Video Y G Audio L Pb B Audio R Audio in Computer USB PS/2 2 Component/HDTV equipment DVD player, Settop Box, HDTV receiver, etc. Cr Pr R Component/HDTV Philips Multimedia Projector Y Y G Cb Pb B Audio out R L Pr,Y, Pb/Cr,Y, Cb 1 Connect the Component in sockets of the projector to the appropriate output sockets of your Component- or HDTV-video equipment (Pr,Y, Pb / Cr,Y, Cb).
4. Installation Connecting to video equipment < S-Video Computer Pr R Video Y G Audio L Pb B Audio R Audio in Computer USB PS/2 3 2 1 Component/HDTV equipment 4 Audio out R Scart connection RGBS L DVD player, Settop Box, etc. RGBS 1 Connect an optional Scart/RCA Component Video adapter (1) to the Scart connector of your Component- or HDTV-video equipment 2 Connect the Component in sockets of the projector to the R, G and B outputs of the adapter.
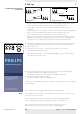
5. Operation General AV Mute Source Menu Preparation < 1 Press the Standby button to switch on the projector. – – The Standby indicator lights up orange. When the projection lamp is on, the Standby indicator lights up green and the start-up screen (when enabled) appears for several seconds. OK Lamp Stand by Temp p j PHILIPS Multimedia Projectors 2 Note Messages Fan error The projector will switch off automatically.
5. Operation Menu tree AV Mute Source Menu OK Lamp Stand by Temp On Screen Display Menu > All video and data adjustments and settings (except A/V Mute) are done via On Screen Displays and with help of Menu, OK and Cursor Control on the projector or the remote control. The projector is set to standard settings at the factory. However, you can adjust these settings to suit your own preferences. The projector menu screens allow you to adjust the various projector settings (for both Computer and Video).
5. Operation Menu tree GENERAL ADJUSTMENTS/SETTINGS Main menu Display Picture Audio On Screen Display Menu > Sub menu Audio Volume Bass Treble Mute Settings Language Settings Volume Bass Treble Setting Min Min Min Off Max Max Max On Mute Eng. Esp. Deu. Fra. Por. Ita. Chi.
5. Operation General explanation AV Mute Source Menu On Screen Display Menu > 1 Press Menu. – The menu bar appears on the screen. The first item is highlighted and its sub menu is shown. OK Lamp Stand by Temp Display Picture Audio Settings Digital Freeze Digital Zoom > Magnification Auto Image > Horizontal size > Phase > Shift . . .
5. Operation Computer adjustments AV Mute Source Menu OK Lamp Stand by Temp Tip for Windows users To adjust size and phase correctly 1 Select ‘Start’ and then ‘Shut down’ from the Windows Taskbar. 2 Adjust the projectors size control, so that no vertical bars are visible. 3 Now adjust the projectors phase control for maximum brightness of the projected image. 4 Press ‘No’ in the Windows shutdown screen to cancel the shutdown action.
5. Operation Computer adjustments AV Mute Source Menu OK Lamp Stand by Temp Display Picture Audio Settings Digital Freeze Digital Zoom > Magnification On Screen Display Menu > Shift The Shift function adjusts the computer image in horizontal and vertical direction to centre it on the screen.This function is only active when ‘Auto image’ is set to ‘Off ’. 1 Press Menu. – – 2 3 The menu bar appears on the screen. ‘Display’ is highlighted and its sub menu is shown.
5. Operation Video/S-Video adjustments AV Mute Source Menu OK Lamp Stand by Temp Picture Display Audio Settings Digital Freeze Digital Zoom > Magnification Auto Image > Horizontal size > Phase > On Screen Display Menu > For Video/S-Video signal input, the following ‘Display’ and ‘Picture’ adjustments can be made: Display adjustments • Press Menu and select ‘Display’ in the menu bar.
5. Operation General adjustments AV Mute Source Menu OK Lamp Stand by Temp Display Picture Audio Settings Volume Bass Treble Mute On Screen Display Menu > Audio adjustments • Press Menu and select Audio in the menu bar.
5. Operation On Screen Display Menu > Loading your own personal start-up screen (for bSure2 Brilliance projectors only) All settings described under ‘Other settings’ can be made according to the instructions under ‘On Screen Display Menu - General explanation’. Loading your own personal start-up screen however follows a slightly deviant procedure which we will describe hereafter. You can load any image as long as the size of the image does not exceed 128 Kb.
5. Operation AV Mute Source Menu OK Lamp Stand by Temp Note Philips Multimedia Projector On Screen Display Menu < Resetting the projector 1 Press the Standby button twice in succession to switch the projector into the Power/Standby mode. 2 Wait until the cooling fan has stopped (about 3 minutes after the projector has been switched to Power/Standby).Then disconnect the mains lead to switch off the mains supply.
6. Maintenance Cleaning Caution AV Mute Source Menu OK Lamp Stand by Temp > Switch off and disconnect the projector before cleaning. 1 Press the Standby button twice to switch off the projector. – The Standby indicator starts blinking orange. 2 Wait until the cooling fan has stopped (about 3 minutes after the projector has been put in Standby) and disconnect the mains lead and all other cables. Cleaning the cabinet • When the cabinet is dusty, clean it by gently wiping with a soft cloth.
6. Maintenance Lamp Warning: > When operation time reaches the last 100 hours of the average lamplife, the message ‘Warning: lamplife has almost expired’ will be displayed on the screen, each time the projector is switched on.The lamp indicator lights up orange. Lamplife has almost expired It is suggested to have a spare lamp available. The lamp type is indicated in the user guide.
6. Maintenance Lamp replacement 5 6 • • < • • 8 9 Unscrew screw B. Grasp the lamp holder handle and carefully pull the lamp holder out of the projector. Do not tilt. If the inner tube is broken glass particles may fall out. Keep lamp holder opening to your right. Do not touch lamp or point lamp holder opening at anyone. Carefully remove the new lamp housing from its package. Always use the same type of lamp: See ‘Optional accessories’ for the correct type of lamp for your projector.
7.Troubleshooting > If a fault occurs, first check the points listed below before taking the projector for repair. If you are unable to remedy a problem by following these hints, consult your dealer or service organisation. Warning Under no circumstances should you try to repair the projector yourself as this could invalidate the guarantee. Read as follows Problem Image is not or incorrectly displayed – • Possible cause Solution General – Mains lead is not correctly connected.
7.Troubleshooting > In Data mode – Input resolution is too high (and keystoning is applied). • If you wish to keep the keystone correction, decrease the input resolution until the image is correctly displayed. For this, refer to the User Guide or support information of the computer. • If you wish to keep the input resolution as it is, decrease keystoning until the image is correctly displayed. For this, use ‘Keystone correction’ option in the ‘Settings’ menu.
7.Troubleshooting Indicators > Lamp indicator – green: normal lamp condition. – orange: lamp life has almost expired (less than 100 hours to go). • See warning messages on the start up screen for details. – red: lamp life has expired. • Replace lamp. See ‘Maintenance’. – red (fast blinking): lamp start has failed. • Disconnect projector from the mains. Reconnect and restart. If this does not resolve the problem, replace the lamp. See ‘Maintenance’. Temperature indicator – red: temperature error.
7.Troubleshooting The mouse cursor does not react when using the cursor control on the remote control < General: • Check that the batteries are installed properly in the remote control and/or replace the batteries. • Check that the projector receives the signals from the remote control. • Check that the USB cable or PS/2 cable has been properly connected. • Check that both projector and computer are switched on. • Unplug the USB cable or PS/2 cable and then reconnect.