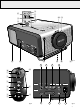
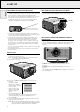
Philips Multimedia projector Hopper 10 series On/Of f Video Menu Data AVMu te OK Video S-Vide o in Video in L Aud io R Data Audio Power Mouse Data in out Audio in English Standb y Mute Lamp Volum e RC
IMPORTANT NOTE FOR USERS IN THE U.S.A.
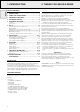
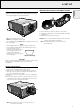
Standby 6 Lamp RC Mute Volume 9 5 8 7 3 Data AV Mute Video 4 2 1 Menu OK 0 ! On/O ff Video Data Standb y Mute AVMut e Menu Lamp RC Volum e OK Video S-Vid eo in Video in L Au dio R Data Audio Powe r Mouse Data in out Audio in # @ % $ d e Video S-Video in Video in Data Mouse Data in out Audio in a b c f &fig. 1 ^ g ( * 1 3 Menu 2 Volume 6 Standby 8 On/off On/Off 4 5 AV-Mute y Data Mute Video V D L Audio R Audio Power 7 4 c fig. 2 h fig.
1. INTRODUCTION 2. THINGS YOU SHOULD KNOW English TABLE OF CONTENTS 1. INTRODUCTION .................................................................4 2. THINGS YOU SHOULD KNOW ........................................4 3. IMPORTANT SAFEGUARDS .............................................5 4. PROJECTOR FEATURES....................................................6 5. FUNCTIONAL OVERVIEW .................................................7 Controls .............................................................
S English 3. IMPORTANT SAFEGUARDS CAUTION: Please read all of these instructions before you operate your projector. Save these instructions for future reference. Electrical energy can perform many useful functions. This projector has been engineered and manufactured to meet applicable safety standards. IMPROPER USE CAN RESULT IN POTENTIAL ELECTRICAL SHOCK OR FIRE HAZARDS.
4. PROJECTOR FEATURES English 1. Fully compatible with PC and MAC The Philips Limesco solution enables perfect interfacing with all sorts of PC and MAC standards. Optimum picture quality is guaranteed in all modes. The projector will adapt automatically to the proper data source. Signals from PC and MAC compatible computers will be accepted without additional hardware. 2.
5. FUNCTIONAL OVERVIEW See illustrations on page 3 % Dust filter 1 Cursor Control For manipulating the mouse cursor on the connected computer as long as the menu is not active. When the menu is active the Cursor Control controls the menu cursor. The cursor control, by means of the local keyboard, works with up/down and left/right button operation.
6. SET UP English POSITIONING THE PROJECTOR AND SCREEN ADJUSTING THE FOCUS AND SIZE OF THE IMAGE • Place the projector on a stable, level surface, out of direct sunlight and away from sources of excessive dust, dirt, heat, water, moisture, vibration and strong magnetic fields. Face the projector at right angles towards the screen for the best picture results. To determine the distance for the desired size, please refer to the Projection Assistant, a calculation programme included on the CD-ROM.
6. SET UP On/O ff Video Data AVMute Standby Mute Lamp English INSERTING THE BATTERIES IN THE REMOTE CONTROL Horizontal angle (horizon) • Adjust or correct a possible oblique displayed picture by turning the horizontal adjusters to the desired position. Push RC Volume Menu OK Video S-Vide o in Video in L Au dio Data R Audio Powe r Mouse Data in out Audio in 1. Push and slide the lid in the direction of the arrow. 2.
7. INSTALLATION Video/computer cables and adaptor English VIDEO/COMPUTER CABLES AND ADAPTOR These accessories are supplied for connecting the projector to computer/AV equipment. The numbers in the left-hand column correspond with the numbers in the connection diagrams on the following pages. No. CONNECTIONS CABLE/ADAPTOR Projector side 1 2 VGA Cable Video/Audio Stereo RCA Cable Computer/AV products side D-Sub M 15P (male) D-Sub M 15P (male) 2.0 m RCA pin (male) x 3 RCA pin (male) x 3 2.
7. INSTALLATION Connecting to a computer English CONNECTING TO A COMPUTER General – Caution: Always switch off the projector before making any connections! – The data input is suitable for both Apple Macintosh computers (Power Book and Power Mac) as well as for IBM compatible PCs. – The data output of IBM compatible PCs can be connected directly to the projector using standard data cables. – Apple Macintosh computers may need a conversion plug (optional) added to the standard data cable.
7. INSTALLATION Connecting to video equipment English CONNECTING TO VIDEO EQUIPMENT General – The figures in brackets (1) correspond to the figures in the diagram on page 10. – The characters in brackets (a) correspond to characters in fig. 2 on page 3. – Caution: Always switch off the projector before making any connections.
7. INSTALLATION Connecting to audio equipment English CONNECTING TO AUDIO EQUIPMENT General – The figures in brackets (1) correspond to the figures in the diagram on page 10. The characters in brackets (a) correspond to characters in fig. 2 on page 3. – Caution: Always switch off the projector before making any connections. • Connect the AUDIO IN L/R sockets of an amplifier or stereo system to the AUDIO OUT socket (g) of the projector. For this, use an (optional) audio connection cable.
8. OPERATION Preparation/Picture control English PICTURE CONTROL On Screen Display menu - General explanation All video and data adjustments and settings (except A/V Mute) are done via On Screen Displays and with help of the following controls: MENU, OK (–/– –) and Cursor Control on the projector or the remote control. 1. Press MENU. – The menu bar appears on the screen. The first item is highlighted and its sub menu is shown. Audio Display Shift Hor.
8. OPERATION Notes: – When you have selected the menu mode, you cannot use the source selection buttons on the projector or on the remote control to select another input. You can only change to another input via the SOURCE menu. – A(audio)/V(video)-mute can A/V mute only be selected with the A/V MUTE button on the projector or on the remote control. A/V mute then appears on the screen. Data mode selection When set to AUTO, the projector can automatically identify the signal type of the connected computer.
8. OPERATION Picture control/Audio control/Personal Preferences English PERSONAL PREFERENCES 6. Use Cursor Control to select the required video system in the action window: AUTO, PAL, SECAM or NTSC. 7. Press OK (–/– –) to confirm and store the selected video system. 8. If required, select another item you wish to adjust or press MENU to exit. AUDIO CONTROL The projector’s sound is set to standard specifications at the factory.
8. OPERATION OTHER SETTINGS Changing Personal Preferences 1. Select the required input (Video, S-Video, Data). 2. Make the new adjustments, as described under ‘Picture Control’ and ‘Audio Control’. 3. Press MENU. – The menu bar appears on the screen. 4. Use Cursor Control to select P(ersonal) PREf(erences) in the menu bar. 5. Use Cursor Control to select STORE from the submenu. Audio Source P.Pref. Recall Store Reset Audio Source P.Pref.
8. OPERATION English 4. 5. 6. 7. Other settings Press OK (–/– –) to activate the HOR. MIRROR item. Use Cursor Control to select REAR in the action window. Press OK (–/– –) to confirm and store the selection. If required, select another item you wish to adjust or press MENU to exit. 1. – 2. 3. Press MENU. The menu bar appears on the screen. Use Cursor Control to select MISC(ellaneous) in the menu bar. Use Cursor Control to select VER.(vertical) MIRROR from the sub menu.
9. ADDITIONAL INFORMATION Notes: – We advise you to clean the filter every 100 hours. – Operating the projector with a torn or damaged filter may cause damage to the projector. – When the filter is damaged replace it with a filter of the same type (12 nc: 4822 480 10229). – The projector power cannot be switched on again unless the filter holder is installed correctly. MAINTENANCE OF YOUR REMOTE CONTROL er pp Ho er pp Ho 10 SV 10 SV 6. Remove the filter from its compartment.
9. ADDITIONAL INFORMATION Maintenance in Audio out Data in Mouse er pp Ho Video 10 SV Powe r er pp Ho Audio Data in L Au dio R er pp Ho S-Vide o in Video 10 SV 10 SV 6. Read the caution and warning labels on the lamp cover. 7. Unscrew the lamp holder. in Audio out Data in Powe r Mouse er pp Ho Audio Data 10 SV Video in L Au dio R S-Vide o in Video 11. Tighten the screws. 12. Replace the cover and tighten both the screws and the horizontal adjusters. 13.
10. TROUBLESHOOTING English If a fault occurs, first check the points listed below before taking the projector for repair. If you are unable to remedy a problem by following these hints, consult your dealer or service organisation. WARNING Under no circumstances should you try to repair the projector yourself as this could invalidate the warranty.