
Owner's Manual

4.
Press OK (–/––) to activate the HOR. MIRROR item.
5.
Use Cursor Control to select REAR in the action window.
6.
Press OK (–/––) to confirm and store the selection.
7.
If required, select another item you wish to adjust or press
MENU to exit.
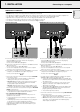
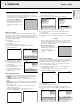
Upside-down (ceiling) projection
The projector is equipped with an upside-down scan function
(vertical mirror), which allows the image to be flipped when the
projector is mounted upside down to the ceiling.
Table-top projection
Ceiling projection
1.
Press MENU.
– The menu bar appears on the screen.
2.
Use Cursor Control to select MISC(ellaneous) in the menu bar.
3.
Use Cursor Control to select VER.(vertical) MIRROR from the
sub menu.
4.
Press OK (–/––) to activate the VER. MIRROR item.
5.
Use Cursor Control to select CEILING in the action window.
6.
Press OK (–/––) to confirm and store the selection.
7.
If required, select another item you wish to adjust or press
MENU to exit.
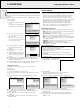
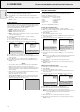
Misc.
Lamp life
Language
Hor. mirror
Ver. mirror
Source P.Pref.
Use cursor control to select
Press OK or — to invoke item
Table-top Ceiling
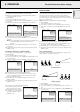
Misc.
Lamp life
Language
Hor. mirror
Ver. mirror
Source P.Pref.
Use cursor control to select
Press OK or — to invoke item
Press MENU to exit menu
SCREEN
SCREEN
18
8. OPERATION Other settings
English
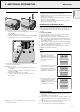
9. ADDITIONAL INFORMATION
Remote control software/Maintenance
INSTALLING THE REMOTE CONTROL SOFTWARE
This chapter describes how to install and use your pointing device
software. Installation is only necessary if the mouse cursor cannot
be manipulated by the remote control Cursor Control, after making
all necessary connections.
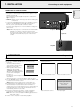
For Macintosh users:
1.
Turn off your computer and connect the supplied remote mouse
cable (ADB) between the projector and the ADB port
2.
Switch-on your computer; you can immediately operate your
mouse via the Remote Control
For PC users:
1.
Turn off your PC and connect the supplied remote mouse cable
(RS232) between the computer and the projector
2.
Switch-on your PC; you can now operate your mouse via the
remote control;
if not, please continue:
For Windows users:
1.
Double click on the remote control software file
(ex. m83setup.exe)
2.
Follow installation instructions.
3.
Re-boot your computer.
– A dialog box appears, asking to install a new hardware driver for
a Logitech serial mouse.
4.
Select the Windows default driver (click OK).
– You should now be able to control your PC mouse via the
remote control.
CLEANING
CAUTION: Switch off and disconnect the projector before
cleaning.
1.
When the cabinet is dusty, clean it by gently wiping with a soft
cloth.
2.
A chamois leather slightly moistened with water is sufficient for
cleaning the housing.
3.
Do not use cleaning agents as they may harm the housing.
Always keep the lens clean
1.
When the lens is dirty or dusty, first blow the dust off and then
gently wipe with a soft brush or lens cleaning paper.
Never touch the lens with your fingers.
2.
The lens is likely to become mouldy if left dirty.
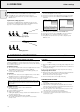
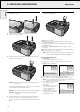
CLEANING THE DUST FILTER
1.
Press the STANDBY ON/OFF button to switch off the
projector.
– The standby indicator lights up red.
2.
Wait until the cooling fan has stopped (about 3 minutes
after the projector has been switched off) and disconnect
the mains lead and all other cables.
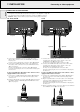
3.
Turn the projector over.
Never place the projector on the
side where the connections are located!
4.
Unscrew and remove both horizontal adjusters.
5.
Unscrew the screws at the bottom of the cover and
remove the cover.
Please continue with the following instructions, if this is the
first time that you use the Remote control mouse function
with your PC.