Register your product and get support at www.philips.
Table of contents 1 Welcome Product highlights 3 3 2 Important Safety Hearing safety Disposal of your old product 4 4 4 4 Your Voice Tracer digital recorder Whatʹs in the box? Overview 5 5 6 3 4 5 Get started Insert the battery Charge the battery Power on/off Keypad lock (HOLD function) Using the Voice Tracer with a computer Record Record with the built-in microphone Record with an external microphone Add index marks 7 7 7 8 8 8 6 Playback Playback of a recording or music file Playback functi
1 Welcome Congratulations on your purchase and welcome to Philips! To fully benefit from the support that Philips offers, visit our Website for support information such as user manuals, software downloads, warranty information and more: www.philips.
2 Important Safety • To avoid a short circuit, do not expose the product to rain or water. • Do not expose the device to excessive heat caused by heating equipment or direct sunlight. • Protect the cables from being pinched, particularly at plugs. • Back up your files. Philips is not responsible for any loss of data.
3 Your Voice Tracer digital recorder Whatʹs in the box? 0612 LFH 0617 LFH 0632 LFH 0633 LFH 0642 LFH 0646 LFH 0652 LFH k Quic Regis ter yo star get e t guid suppo 1 × AAA battery rt at and e duct elcom ur pro om/w s.c philip www.
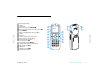
Overview 4 5 6 7 8 9 10 11 12 13 14 15 16 17 18 Table of contents 1 15 17 2 16 18 3 4 5 10 g 3 Record / play indicator Display Hold switch Index, Folder, Repeat (INDEX / a) Fast rewind, File selection, Set menu option (h) Menu (MENU) Power on/off, Play/Pause, Play speed (f) Speaker Strap hole Volume up, Menu item selection (+) Record, Pause, Power On (g) Fast forward, File selection, Set menu option (b) Stop, Display, Delete (j / DEL) Volume down, Menu item selection (–) Microphone jack (MIC
4 Get started Insert the battery Charge the battery 1 Slide open the battery cover. 2 Insert the battery as indicated. Make sure the polarity is correct. The rechargeable battery Philips LFH9154 can be charged in the Voice Tracer. When the Voice Tracer is connected to a computer, the rechargeable battery is automatically charged. A complete recharge cycle takes about 2.5 hours. AA A D Notes • Fully charge the battery before first use. • The computer must be ON when charging the batteries.
Power on/off Using the Voice Tracer with a computer 1 To power on, press the f button until the display shows a short animation [ ]. 2 To power off, press the f button while the recorder is stopped until the display shows BYE. As a USB mass storage device, the Voice Tracer offers a convenient way to save, back up and move files. The Voice Tracer connects to a computer using a USB connection and does not require special software to be installed.
5 Record Please note the instructions in this section when you make the first recording with your Voice Tracer! Record with the built-in microphone 1 Press the INDEX / a button while the recorder is stopped to select the desired folder. 2 Press the g button to start recording. • The record / play indicator lights red. • Point the built-in microphone toward the sound source. 3 To pause recording, press the g button. • The record / play indicator will blink, and PAUSE will flash on the display.
Record with an external microphone To record with an external microphone, connect the microphone to the microphone jack and follow the same procedure as for the built-in microphone. The built-in microphone is switched off when an external microphone is connected. D Notes • The index icon index marks.
6 Playback Playback of a recording Playback functions 1 Press the INDEX / a button while the recorder is stopped to select the desired folder. 2 Press the h or b button to select the file to play back. 3 Press the f button. • The playback time will be shown on the display, and the record / play indicator will light green. 4 Adjust the volume using the + and – buttons. 5 To stop playback, press the j / DEL button. • The total playback time of the current file will be shown on the display.
Search Repeated playback 1 Press and hold the h or b button during playback to scan backward or forward in the current file at a fast speed. 2 Release the button to resume playback at the selected speed. You can set the Voice Tracer to play files repeatedly. Rewinding and forwarding / searching for an index mark 1 To repeat or loop a sequence in a file, press the INDEX / a button at the chosen start point. 1 on the display flashes and the loop • The symbol 2 appears.
Repeat a file or folder 1 Press and hold the INDEX / a button for one second or longer during playback to switch between play modes (repeat file or repeat folder). 2 Select the desired playback mode. Icon Description Repeat a file. Repeat all files in a folder.
7 Delete Deleting files and index marks 1 Press the INDEX / a button while the recorder is stopped to select the desired folder. 2 Press and hold the j / DEL button for one second or longer. • DELETE appears on the display. 3 Press the h or b button to select a delete option: Icon Description Delete a single file. Delete all files in a folder. Delete all index marks in a file. 4 Press the f button.
8 Customize settings You can customize the settings of your Voice Tracer to suit the recording conditions and your personal preferences. 1 Press the MENU button while the recorder is stopped. • The display shows MODE and the current setting for recording mode is flashing. 2 Press the + or – button to navigate the setting icons bar up or down. 3 Press the h or b button to change the displayed setting.
Icon / Display Option Description 5 15 The Voice Tracer automatically turns off after 5 or 15 minutes of inactivity AUTOOFF Icon / Display DIVIDE No Yes FORMAT Delete all files on the recorder. Transfer important files to a PC before formatting the memory. Press f to confirm the selection. Display the firmware version and the release date. Example: 100 06/01/2010 INFO On Off The display remains illuminated for a few seconds when a button is pressed.
9 Update the firmware Your Voice Tracer is controlled by an internal program called firmware. As a part of ongoing product maintenance, the firmware is revised and errors are corrected. It is possible that a newer version (an "update") of the firmware has been issued since you purchased the Voice Tracer. In this case you can easily update your recorder to the latest version. 1 Connect the Voice Tracer to your computer using the supplied USB cable.
10 Frequently asked questions The answers to frequently asked questions listed here are intended to solve simple problems with the Voice Tracer. If you have no success please contact your dealer or visit our website: www.philips.com/support My Voice Tracer cannot play recordings. My Voice Tracer cannot power on. • The Voice Tracer is in HOLD mode. Slide the HOLD switch to the "Off" position. • The battery is flat or has been inserted incorrectly.
11 Technical data Connectivity Headphones jack Microphone jack USB Recording 3.5 mm Impedance: 16 Ω or above 3.5 mm Impedance: 2.2 kΩ High-speed USB 2.0, mini USB port Format Microphone Recording modes Bit rate Display Type Screen size Backlight LCD / segment 34.5 mm / 1.4 " white Recording time (approx.
Speaker Type Diameter Output power Sound enhancement built-in dynamic speaker 23 mm / 0.
%JHJUBM SFDPSEFS ] &OSFHJTUSFVS OVNÌSJRVF ] %JHJUBMFS 3FDPSEFS ] ɢɴʀɼɺɮɺɵ ɼɱɶɺɼɰɱɼ 1SPEVDFE CZ 1IJMJQT "VTUSJB (NC) 4QFFDI 1SPDFTTJOH (VUIFJM 4DIPEFS (BTTF ȸ ȸȸ 7JFOOB "VTUSJB *NQPSUFE CZ *NQPSUÌ QBS 1IJMJQT 4QFFDI 1SPDFTTJOH /PSUI "NFSJDB 1FSJNFUFS $FOUFS &BTU "UMBOUB (" PS PV ȸ )JMMNPVOU 3PBE .BSLIBN 0/ - $ 4 Εισαγωγέας: Φίλιπς Ελλάς ˌ ː ˍ ː ˰˹ .
Specifications subject to change without notice. Trade marks are the property of Royal Philips Electronics or their respective owners. © 2011 Royal Philips Electronics. All rights reserved. Document version 3.0, 2011-02-01.