Micro Hi-Fi System user manual manuel d'utilisation manual del usario benutzerhandbuch gebruikershandleiding manuale per l'utente MC160 användar-handbok brugermanual käyttöoppaita manual do usuário ÂÁ¯ÂÈÚ›‰ÈÔ ¯Ú‹Û˘ 1 3141 075 20021
Important notes for users in the U.K. Italia DICHIARAZIONE DI CONFORMITA’ Mains plug This apparatus is fitted with an approved 13 Amp plug. To change a fuse in this type of plug proceed as follows: Si dichiara che l’apparecchio MC160 Philips risponde alle prescrizioni dell’art. 2 comma 1 del D.M. 28 Agosto 1995 n. 548. 1 2 Remove fuse cover and fuse. Fatto a Eindhoven 3 Refit the fuse cover. Fix new fuse which should be a BS1362 5 Amp, A.S.T.A. or BSI approved type.
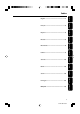
% 3 4 ^ 9 CD REPEAT TUNER TAPE SHUFFLE AUX SLEEP ( ! VOL 5 @ & DSC DBB MUTE IS NEWS/TA * $ 1 2 3 4 7 8 9 0 5 ! 6 @ # 3 3 3141 075 20021
DK SF Advarsel: Usynlig laserstråling ved åbning når sikkerhedsafbrydere er ude af funktion. Undgå utsættelse for stråling. Luokan 1 laserlaite Varoitus! Laitteen käyttäminen muulla kuin tässä käyttöohjeessa mainitulla tavalla saattaa altistaa käyttäjän turvallisuusluokan 1 ylittävälle näkymättömälle lasersäteilylle. Oikeus muutoksiin varataan. Laite ei saa olla alttiina tippu-ja roiskevedelle. Bemærk: Netafbryderen er sekundært indkoblet og ofbryder ikke strømmen fra nettet.
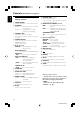
English Index Français English ------------------------------------------------ 6 Español Français -------------------------------------------- 23 Deutsch Español --------------------------------------------- 40 Nederlands Deutsch --------------------------------------------- 57 Italiano Nederlands ---------------------------------------- 74 Svenska Italiano ---------------------------------------------- 91 Dansk Svenska ------------------------------------------- 108 Suomi Dansk ----------
Contents English General Information Tape Operation / Recording Environmental information ................................ 7 Supplied accessories ............................................ 7 Safety information ................................................ 7 Tape playback ...................................................... 17 General information on recording ................. 17 Synchro start CD recording ..................... 17–18 Recording from the radio .................................
This product complies with the radio interference requirements of the European Community. Environmental Information All unnecessary packaging has been omitted. We have tried to make the packaging easy to separate into three materials: cardboard (box), polystyrene foam (buffer) and polyethylene (bags, protective foam sheet). Your system consists of materials which can be recycled and reused if disassembled by a specialized company.
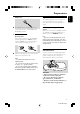
Preparations English AM loop antenna FM wire antenna speakers (right) AM aerial B C speakers (left) A AC power cord Rear connections The type plate is located at the rear of the system. For users in the U.K.: please follow the instructions on page 2. B Antennas Connection Connect the supplied AM loop antenna and FM antenna to the respective terminals. Adjust the position of the antenna for optimal reception.
FM Antenna English Preparations Optional connection The optional equipment and connecting cords are not supplied. Refer to the operating instructions of the connected equipment for details. ● For better FM stereo reception, connect an outdoor FM antenna to the FM AERIAL (FM ANTENNA) terminal. C Speakers Connection Front Speakers Connect the speaker wires to the SPEAKERS terminals, right speaker to "RIGHT" and left speaker to "LEFT", coloured (marked) wire to "+" and black (unmarked) wire to "-".
Controls (illustrations on page 3) English Controls on the system and remote control ! VOLUME (VOL -/+ ) – – 1 TIMER ON•OFF – activates/deactivates or sets the timer function. @ 2 PROGRAM 3 – – 4 – – 5 6 – 7 8 9 – 0 – for CD ................. programmes tracks and reviews the programme. for Tuner ............. programmes tuner stations manually or automatically. STANDBY ON y switches the system to standby/on. on the remote control only - switches the system to standby.
Adjusting volume and sound IMPORTANT: Before you operate the system, complete the preparation procedures. 1 Turn the VOLUME control anti-clockwise to decrease or clockwise to increase volume on the system (or press VOL -/+ on the remote control). ➜ Display shows the volume level VOL and a number from 0-32. 2 Press DSC repeatedly to select the desired sound effect: CLASSIC (no indication)/ ROCK ( ) / JAZZ ( ) / POP ( ). 3 Press DBB to switch bass enhancement on or off. if the DBB is activated.
CD Operation English 5 To interrupt playback press PLAY•PAUSE 2; (on the remote control 2;). Press PLAY•PAUSE 2; (on the remote control 2;) again to resume play. ➜ The display freezes and the elapsed playing time flashes when playback is interrupted. 6 To stop disc playback, press STOP 9. Note: CD play will also stop when; – the CD door is opened. – the disc has reached the end. – you select another source: TAPE,TUNER or AUX. – you select to standby. – you press the tape deck PLAY 2 key.
Programming track numbers Different play modes: SHUFFLE and REPEAT You can select and change the various play modes before or during playback. The play modes can also be combined with PROGRAMME. 1 Press PROGRAM to enter the programming mode. ➜ A track number is shown and PROGRAM flashes. 2 Use the PREV ¡1 or NEXT 2™ (on the remote control ¡ or ™) to select your desired track number.
Radio Reception English Programming radio stations You can store up to a total of 40 radio stations in the memory. Automatic programming Automatic programming will start with a chosen preset number. From this preset number upwards, former programmed radio stations will be overridden. The system will only programme stations which are not in the memory already. 1 Press PRESET 3 or 4 (on the remote control ¡ or ™ ) to select the preset number where programming should start.
Tuning to preset radio stations Searching programme type (PTY) ● Press PRESET 3 or 4 (on the remote control ¡ or ™ ) until the desired preset station is displayed. PTY helps you find a desired programme type. To enable PTY, first programme RDS stations into the tuner memory (see Programming radio stations) RDS Radio Data System is a service that allows FM stations to show additional information. If you are receiving a RDS station, and the station name are displayed.
Radio Reception English RDS News and Traffic Announcement (TA) You may set up the tuner in such a way that listening to CD or tape is interrupted by the NEWS of a RDS station. This only works if the RDS station broadcasts a NEWS signal while sending the news. 1 2 Tune to the desired RDS station. Press NEWS/TA once or more on the remote control to select the NEWS option. ➜ NEWS ON, TA ON or OFF is displayed briefly. ➜ NEWS is displayed if you have activated the NEWS or TA option.
English Tape Operation / Recording General information on recording Tape playback 1 Select TAPE source. ➜ Display: shows TAPE throughout tape operation. 2 Press STOP•OPEN to open the tape door. 3 Insert a recorded tape and close the tape door. ● Load the tape with the open side downward and the full spool to the left. ● Recording is permissible insofar as copyright or other rights of third parties are not infringed.
Tape Operation / Recording English To select and record a particular passage within a CD track: ● Press à or á. Release the control when you recognize the passage you want. ● To pause CD playback, press 2;. ● Recording starts from this exact point in the track when you press RECORD. 6 To pause, press PAUSE. Press again to resume. 7 To stop recording, press STOP•OPEN. Recording from the radio 1 Tune to the desired radio station (see Tuning to radio stations). 2 Press STOP•OPEN to open the tape door.
Setting the timer ● The system can be used as an alarm clock, whereby the CD or TUNER is switched on at a set time. The clock time needs to be set first before the timer can be used. ● During setting, if no button is pressed within 90 seconds, the system will exit timer setting mode automatically. 1 In any mode, press TIMER ON•OFF for more than 2 seconds. 2 Turn VOLUME clockwise (or press SELECT SOURCE) to select sound source. 3 Press TIMER ON•OFF to confirm your desired mode.
Clock/Timer English Activating and deactivating SLEEP The sleep timer enables the system to switch off by itself after a set period of time. The clock time needs to be set first before the sleep timer can be used. ● To deactivate, press SLEEP on the remote control once or more until SLEEP OFF is shown, or press STANDBY ON on the system or remote control. ➜ SLEEP OFF scrolls across the display. ● Press SLEEP on the remote control once or more.
WARNING Under no circumstances should you try to repair the system yourself, as this will invalidate the warranty. Do not open the system as there is a risk of electric shock. If a fault occurs, first check the points listed below before taking the system for repair. If you are unable to remedy a problem by following these hints, consult your dealer or service centre. Problem CD OPERATION “NO DISC” is displayed. RADIO RECEPTION Radio reception is poor.
Troubleshooting English The remote control does not function properly. The timer is not working. The Clock/Timer setting is erased. – Select the source (CD or TUNER, for example) before pressing the function button (É,í,ë). – Reduce the distance between the remote control and the system. – Insert the batteries with their polarities (+/– signs) aligned as indicated. – Replace the batteries. – Point the remote control directly toward IR sensor on the front of the system. – Set the clock correctly.