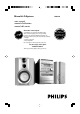
Micro Hi-Fi System MC260 Return your Warranty Registration Card within 10 days EE E S Congratulations on purchasing this Philips product. We’ve included everything you need to get started. If you have any problems, Philips Representatives can help you get the most from your new product by explaining: • Hookups, • First Time Setup, and • Feature Operation. Do not attempt to return this product to the store.
Canada English: This digital apparatus does not exceed the Class B limits for radio noise emissions from digital apparatus as set out in the Radio Interference Regulations of the Canadian Department of Communications. Français: Cet appareil numérique n'emet pas de bruits radioélectriques dépassant les limites applicables aux appareils numériques de Class B prescrites dans le Règlement sur le Brouillage Radioélectrique édicté par le Ministère des Communications du Canada.
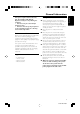
% 1 0 ^ & CD REPEAT TUNER TAPE SHUFFLE AUX SLEEP ) 5 VOL 9 6 * DSC DBB MUTE IS NEWS/TA ( $ 3 1 2 3 7 8 9 4 0 5 ! 6 @ # 3 3140 115 xxxxx
Return your Warranty Registration card today to ensure you receive all the benefits you’re entitled to. • Once your Philips purchase is registered, you’re eligible to receive all the privileges of owning a Philips product. • So complete and return the Warranty Registration Card enclosed with your purchase at once, and take advantage of these important benefits.
TR ATION N IS Visit our World Wide Web Site at http://www.philips.com IT AY DED W S REG EE y! r r Hu HIN 10 D Congratulations on your purchase, and welcome to the “family!” Dear Philips product owner: Thank you for your confidence in Philips.You’ve selected one of the best-built, best-backed products available today.And we’ll do everything in our power to keep you happy with your purchase for many years to come.
IMPORTANT SAFETY INSTRUCTIONS 1. Read these instructions. 12. 2. Keep these instructions. 3. Heed all warnings. 4. Follow all instructions. 5. Do not use this apparatus near water. 13. Unplug this apparatus during lightning 6. Clean only with dry cloth. storms or when unused for long periods of time. 7. Do not block any ventilation openings. Install in accordance with the manufacturer's instructions. 14. Refer all servicing to qualified service personnel.
English Index Français English ------------------------------------------------ 8 E s p añ o l Français -------------------------------------------- 24 Español --------------------------------------------- 43 7 3140 115 xxxxx
Contents English General Information Tape Operation / Recording Environmental information ................................ 9 Supplied accessories ............................................ 9 Safety information ................................................ 9 Rear connections ........................................ 10–11 Optional connection ......................................... 11 Inserting batteries into the remote control . 11 Tape playback ....................................................
This system complies with the FCC rules, Part 15 and with 21 CFR 1040. 10. Operation is subject to the following two conditions: – This device may not cause harmful interference, and – this device must accept any interference received, including interference that may cause undesired operation. Environmental Information All unnecessary packaging has been omitted.
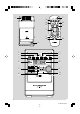
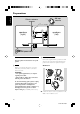
Preparations English AM loop antenna FM wire antenna speakers (right) AM aerial B C RIGHT LEFT speakers (left) AUX in L R A AC power cord Rear connections The type plate is located at the rear of the system. A Power B Antennas Connection Connect the supplied AM loop antenna and FM antenna to the respective terminals. Adjust the position of the antenna for optimal reception. AM Antenna Before connecting the AC power cord to the wall outlet, ensure that all other connections have been made.
Preparations FM Antenna 1 English Optional connection The optional equipment and connecting cords are not supplied. Refer to the operating instructions of the connected equipment for details. 2 ● For better FM stereo reception, connect an outdoor FM antenna to the FM AERIAL (FM ANTENNA) terminal. C Speakers Connection Front Speakers Connect the speaker wires to the SPEAKERS terminals, right speaker to "RIGHT" and left speaker to "LEFT", coloured (marked) wire to "+" and black (unmarked) wire to "-".
Controls (illustrations on page 3) English Controls on the system and remote control 9 SHUFFLE/ SIDE A/B 1 TIMER ON•OFF 0 – – 2 3 – – 4 – – 5 6 – 7 8 activates/deactivates or sets the timer function. PROGRAM for CD ................. programmes tracks and reviews the programme. for TUNER ........ programmes tuner stations manually or automatically. STANDBY ON y switches the system to standby/on. on the remote control only - switches the system to standby.
Adjusting volume and sound IMPORTANT! Before you operate the system, complete the preparation procedures. 1 Turn the VOLUME control anti-clockwise to decrease or clockwise to increase volume on the system (or press VOL -/+ on the remote control). ➜ Display shows the volume level VOL and a number from 0-32. 2 Press DSC repeatedly to select the desired sound effect: CLASSIC (no indication)/ ) / JAZZ ( ) / POP ( ). ROCK ( 3 Press DBB to switch bass enhancement on or off.
CD Operation English 5 To interrupt playback press PLAY•PAUSE 2; (on the remote control 2;). Press PLAY•PAUSE 2; (on the remote control 2;) again to resume play. ➜ The display freezes and the elapsed playing time flashes when playback is interrupted. 6 To stop disc playback, press STOP 9. Note: CD play will also stop when; – the CD door is opened. – the disc has reached the end. – you select another source: TAPE,TUNER, AUX or standby. IMPORTANT! The lens of the CD player should never be touched.
Programming track numbers Different play modes: SHUFFLE and REPEAT You can select and change the various play modes before or during playback. The play modes can also be combined with PROGRAMME. 1 Press PROGRAM to enter the programming mode. ➜ A track number is shown and PROGRAM flashes. 2 Use the PREV ¡1 or NEXT 2™ (on the remote control ¡ or ™) to select your desired track number.
Radio Reception English Programming radio stations You can store up to a total of 40 radio stations in the memory. Automatic programming Automatic programming will start with a chosen preset number. From this preset number upwards, former programmed radio stations will be overridden. The system will only program stations which are not in the memory already. 1 Press PRESET 3 or 4 ( ¡ or ™ on the remote control) to select the preset number where programming should start.
Tape Operation / Recording English Switching tape sides The tape side can be switched manually or automatically before or during tape playback. ● Press SIDE A/B (during playback only 2; on the remote control). ➜ The display shows SIDE A or SIDE B and the tape counter resets to 000. Reverse mode options ● Press REV MODE repeatedly to select your option; å : playback stops at the end of the tape. : both sides are played once. : both sides are played repeatedly, up to 5 times each side.
Tape Operation / Recording English Synchro start CD recording 1 Select CD source. 2 Insert a disc and if desired, programme track numbers. 3 Press OPEN•CLOSE 3 to open the tape door. 4 3 Press RECORD to start recording. ➜ RECORD is displayed briefly and RECORD is shown during recording. ● If you wish, press CLOCK once to monitor the counter display. 4 To stop recording, press STOP 9. Recording timer Insert a suitable tape into the deck and close the tape door.
Setting the clock 1 2 In standby, press CLOCK SET. ➜ The clock digits for the hours flash. Turn VOLUME to set the hours: clockwise for hours up; anti-clockwise for hours down. 3 Press TIMER ON•OFF to confirm your desired mode. ➜ The selected source or TUNER is shown. Display sequence scrolls SET ON TIME and TIMER flashes. The clock digits for the hours flash. 4 Turn VOLUME to set the hours: clockwise for hours up; anti-clockwise for hours down. 5 Press TIMER ON•OFF again.
Specifications / Maintenance English AMPLIFIER Output power ................................. 20W total power .................................................................... 2 x 10 W RMS(1) ......................................................................... 2 x 8W FTC(1) Signal-to-noise ratio .......................... ≥ 65 dBA (IEC) Frequency response ......... 40 – 20000 Hz, ± 3 dB Input sensitivity AUX ....................... 0.5 V (max. 2 V) Impedance loudspeakers ...........................
WARNING Under no circumstances should you try to repair the system yourself, as this will invalidate the warranty. Do not open the system as there is a risk of electric shock. If a fault occurs, first check the points listed below before taking the system for repair. If you are unable to remedy a problem by following these hints, consult your dealer or service centre. Problem CD OPERATION “NO DISC” is displayed. RADIO RECEPTION Radio reception is poor.
Troubleshooting English The remote control does not function properly. The timer is not working. The Clock/Timer setting is erased. – Select the source (CD or TUNER, for example) before pressing the function button (É,í,ë). – Reduce the distance between the remote control and the system. – Insert the batteries with their polarities (+/– signs) aligned as indicated. – Replace the batteries. – Point the remote control directly toward IR sensor on the front of the system. – Set the clock correctly.
LIMITED WARRANTY AUDIO SYSTEM One Year Free Labor One Year Free Service on Parts This product must be carried in for repair. WHO IS COVERED? BEFORE REQUESTING SERVICE... You must have proof of purchase to receive warranty service. A sales receipt or other document showing that you purchased the product is considered proof of purchase. Please check your owner's manual for assistance. If you have additional questions, call us at 1-800-531-0039. TO GET WARRANTY SERVICE IN U.S.A., PUERTO RICO, OR U.S.