MCD759 DVD Micro Theatre pg 001-039_MCD759_93_Eng 1 2006.11.
Manufactured under license from Dolby Laboratories. "Dolby", "Pro-logic" and the double-D symbol are trademarks of Dolby Laboratories. MANUFACTURED UNDER LICENSE FROM DIGITAL THEATER SYSTEMS, INC. US PAT. NO 5,451,942,5,956,674, 5,974,380, 5,978,762 AND OTHER WORLDWIDE PATENTS ISSUED AND PENDING. "DTS" AND "DTS DIGITAL SURROUND" ARE RESISTERED TRADEMARKS OF DIGITAL THEATER SYSTEMS, INC. COPYRIGHT 1996, 2000 DIGITAL THEATER SYSTEMS, INC. ALL RIGHTS RESERVED.
English Index English ------------------------------------------------ 4 -------------------------------------------------------- 40 3 pg 001-039_MCD759_93_Eng 3 2006.11.
Contents English General Information Disc Operations Features .................................................................. Supplied accessories ............................................ Environment information ................................... Installation .............................................................. Maintenance .......................................................... 6 6 6 7 7 Connections Step 1: Placing the speakers and subwoofer ..
English Contents System Menu Options Basic Operations ................................................ 27 General Setup Page ..................................... 27~28 TV Display OSD Lang Screen Saver DIVX(R) VOD registration code Audio Setup Page ........................................ 28~30 Speaker Setup SPDIF Setup Dolby Digital Setup 3D Processing HDCD Night mode Video Setup Page ......................................... 30~31 Component TV Mode Quality Preference Page .............................
General Information English Features Supplied accessories Your DVD Micro Theatre with 5.1-channel full digital amplifier creates the same dynamic sound qualities that you find in full-fledged cinemas and incorporates some of the best features in home theater technology. – – – – Other features include: Built-in DTS and Dolby Digital decoder, supporting Incredible Surround and DSC sound setting.
English General Information Installation ● Place the player on a flat, hard, and stable surface. ● In a cabinet, allow about 10cm (4 inches) of free space all around the player for adequate ventilation. ● Do not expose your player to extreme temperatures or humidity. ● The apparatus shall not be exposed to dripping or splashing. ● No objects filled with liquids, such as vases, shall be placed on the apparatus. ● No naked flame sources, such as lighted candles, shall be placed on the apparatus.
Connections English IMPORTANT! – The type plate is located at the bottom of the system. – Before connecting the AC power cord to the wall outlet, ensure that all other connections have been made. – Never make or change any connections with the power switched on. – A separate power switch is provided on the back of the subwoofer. Please switch it on after completing all connections in order to enjoy 5.1-channel sound output.
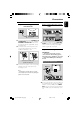
Step 3: Connecting speakers and subwoofer 1 2 Connect the terminal marked CONNECT TO SUBWOOFER on the rear of the amplifier to CONNECT TO MAIN SET on the rear of the subwoofer with the supplied DIN cable by matching the pins. Connect the center and front speakers to the corresponding terminals on the rear of the amplifier by matching the colors.
Connections English 2 To hear the TV channels through this DVD system, use the audio connectors (white/ red) of the supplied audio and composite video cables (2-in1) to connect AUX IN jacks to the corresponding AUDIO OUT jacks on the TV. Using S-Video jack IMPORTANT! – If S-Video is used for DVD playback connection, the system’s VIDEO OUT setting will need to be changed accordingly.
Step 6: Connecting FM/MW antennas Using an accessory RF modulator IMPORTANT! – If your TV only has a single Antenna In jack (labeled as 75 ohm or RF In), you will need an RF modulator in order to view DVD playback on the TV. See your electronics retailer or contact Philips for details on RF modulator availability and operations.
Connections English Step 7: Connecting the power cord VIDEO IN C AUDIO IN R VCR L 1 B AUDIO OUT L ~ AC MAINS R A Power Outlet Television After everything is connected properly, plug in the AC power cords of the main set, subwoofer and TV set to the power outlet. Make sure to turn on the power switch on the rear of the subwoofer in order to enjoy 5.1-channel output. Never make or change any connection with the power switched on.
1 2 English Functional Overview 6 43 6 758 9 0 DVD player and power amplifier ! 7 OPEN•CLOSE ç – opens or closes the disc tray. 1 STANDBY-ON B 8 SURROUND – – switches the system on or to standby mode. 2 Display – shows the current status of the DVD player. – 9 SOURCE – 3 ÉÅ starts or interrupts disc playback. – 4 PRESET + 0 – – in tuner mode, selects a preset radio station forward. 5 PRESET-/9 – – stops disc playback or erases a program.
Functional Overview English 4 PROG Remote control – – 1B – switches the system on/ off. – 20 – opens or closes the disc compartment – DVD/VCD/CD: enters the program menu. MP3/WMA-CD: adds/deletes a programmed track to/from the program list. Picture CD: during playback, to select a slide show mode. Tuner: programs preset radio stations. 3 Numeric Keypad (0-9) 5 GOTO/ST – – – inputs a track/title/chapter number of the disc. inputs the number of a preset radio station.
$ CH +/- (¡ / ™) – – Disc: skips to the previous/next chapter/title/ track Tuner: selects a preset radio station. % ÉÅ – starts or interrupts disc playback. – stops disc playback or erases a program. – – – – selects the respective sound source for DVD/ AUX/FM/MW. For tuner (TUNER): press to switch between MW and FM. exits P-SCAN (progressive scan). (Only for DISC) – – Standby mode sets time for switching on the system automatically. Power-on mode sets the sleep timer function (auto off).
Getting Started English Step 1: ➜ Or, you may go to channel 1 on your TV, then press the Channel down button repeatedly until you see the Video In channel. ➜ Or, the TV Remote Control may have a button or switch that chooses different video modes. ➜ Or, set the TV to channel 3 or 4 if you are using an RF modulator. Inserting batteries into the Remote Control 3 1 2 1 2 3 2 Close the cover. Aim the Remote Control directly at the remote sensor (IR) on the front panel.
Setting up Progressive Scan feature (for Progressive Scan TV only) The progressive scan display twice the number of frames per seconds than interlaced scanning (ordinary normal TV system). With nearly double the number of lines, progressive scan offers higher picture resolution and quality. IMPORTANT! Before enabling the progressive scan feature, you must ensure: 1) Your TV can accept progressive signals, a progressive scan TV is required.
Getting Started English Step 3: Setting the speakers Step 4: Setting language preference You can adjust the delay effect (center, subwoofer and rear speakers only) and volume level for individual speakers. These adjustments let you optimize the sound according to your surroundings and setup. You can select your own preferred language settings. This DVD system will automatically switch to the selected language whenever you load a disc.
English Getting Started Setting the Audio, Subtitle and Disc Menu language 1 2 3 4 5 6 Press SYSTEM in stop mode. Press 1 2 to select “Preference Page”. Press 3 4 to highlight the following in the Preference Page. – “Audio” (disc’s soundtrack) – “Subtitle” (disc’s subtitles) – “Disc Menu” (disc’s menu) Enter its submenu by pressing 2. Select a language and press OK. Repeat steps 3~5 for other language settings. To exit from the menu ● Press SYSTEM again.
Basic Operations English Switching the system on/off ● Press STANDBY-ONB (B on the remote). ➜ “HELLO” is displayed briefly. The system will switch to the last selected source. ● Press DISC, TUNER or AUX on the remote. ➜ The system will switch to the selected source. To switch the system to standby mode ● Press STANDBY-ONB (B on the remote). ➜ “BYE BYE” is displayed briefly. The interactive sound settings, last selected source and tuner presets will be retained in the player’s memory.
IMPORTANT! – Depending on the DVD or VIDEO CD, some operations may be different or restricted. – Do not push on the disc tray or put any objects other than disc on the disc tray. Doing so may cause the disc player malfunction. – If the inhibit icon (ø) appears on the TV screen when a button is pressed, it means the function is not available on the current disc or at the current time. Region Codes DVDs must be labeled as shown below in order to play on this DVD system.
Disc Operations English Using the Disc Menu Depending on the disc, a menu may appear on the TV screen once you load the disc. Resuming playback from the last stopped point (DVD/VCD/CD) ● In stop mode and when a disc has not been removed, press ÉÅ. To select a playback feature or item ● Use 1 2 3 4 and OK or Numeric Keypad (0-9) on the remote. ➜ Playback will start automatically. To cancel resume mode ● In stop mode, press PRESET-/9 (9 on the remote) again.
1 2 3 Repeat A-B (DVD/VCD/CD/MP3/DivX/ WMA) 1 Press A-B at your chosen starting point. 2 Press A-B again at your chosen end point. ➜ The section A and B can be set only within the same chapter/track. ➜ The section will now repeat continuously. To exit the sequence, press A-B again. 3 4 Slow Motion (DVD/VCD/DiVX) 1 2 Press SLOW during playback to select the required speed: 1/2, 1/4, 1/8 or 1/16 (forward). ➜ Sound will be muted. To return to normal speed, press ÉÅ.
Disc Operations English For Super VCD/VCD/DivX/CD ➜ Single/Total Elapsed: displays the elapsed time of the current single/total track. ➜ Single/Total Remain: displays the remaining time of the current single/total track. ➜ Display Off: switches time display off. Playing MP3/WMA disc IMPORTANT! For DRM protected WMA files, use Windows Media Player 10 (or later) for CD burning/conversion. Visit www.microsoft.com for details about Windows Media Player and WM DRM (Windows Media Digital Rights Management).
Playing JPEG Picture CD General operation 1 To enter the remote key function menu ● Use 1 2 3 4 to highlight “Menu” and press OK. Load a JPEG Picture CD. ➜ The data disc menu appears on the TV screen. 2 Use 3 4 to select a folder and press OK to open the folder. 3 Press 3 4 or use the Numeric Keypad (09) to highlight a picture file. 4 Press OK to confirm. ➜ The playback will start from the selected picture to the end of the folder.
Disc Operations English Playing a DivX disc This DVD player supports the DivX movie playback that you download from your computer onto a CD-R/RW (see “System Menu Options-DIVX(R) VOD registration code” for more information). 1 Load a DivX disc. ➜ Playback will start automatically. If not press ÉÅ. 2 If the DivX movie contains external subtitles, the subtitle menu will appear on the TV screen for your selection. ● In this case, pressing SUBTITLE on the remote control will turn on or off the subtitle.
1 2 3 4 5 6 Basic operations TV Display Press SYSTEM to enter the Setup Menu. Set the aspect ratio of the DVD Player according to the TV you have connected. ➜ Normal/PS (panscan): If you have a normal TV and want both sides of the picture to be trimmed or formatted to fit your TV screen. Press 1 2 to select a page to be set. Press 3 4 to highlight an option. Enter its submenu by pressing 2 or OK. Move the cursor by pressing 3 4 to highlight the selected item.
System Menu Options English DIVX(R) VOD registration code ® 1 Philips provides you the DivX VOD (Video On Demand) registration code that allows you to rent and purchase videos using the DivX® VOD service. For more information, visit us at www.divx.com/ vod. In ‘General Setup Page’, press 3 4 to highlight DIVX CODE, then press 2 or OK to ener its submenu and press OK again to confirm. ➜ The registration code will appear.
Note: – This option is available only when you select "5.1CH" under "Downmix" and the disc tray is open. 3D Processing The options included in 3D Processing are: “Pro Logic II” and “Reverb Mode”. Dialog Adjusts the dialog level up or down so that you can hear the dialog more clearly during playback. Off Concert Livingroom Hall Bathroom Cave Arena Church SPDIF Output The options included in SPDIF (Sony/Phillips Digital Interface Format) Setup Page are: “SPDIF Off ”, “SPDIF/Raw” and “SPDIF/PCM”.
System Menu Options English ➜ Auto: Allows automatic selection of the Pro Logic II mode depending on the discs being played back. Panorama Extends the front stereo image to include the surround speakers for a wraparound effect. ➜ On: Enables this function. ➜ Off: Disables this function. Dimension Incrementally adjusts the sound field either towards the front or towards the rear speakers. The adjustable range is from -3 (towards the rear) to +3 (towards the front).
Parental Some DVDs may have a parental level assigned to the complete disc or to certain scenes on the disc. This feature lets you set a playback limitation level. The rating levels are from 1 to 8 and are country dependent. You can prohibit the playing of certain discs that are not suitable for your children or have certain discs played with alternative scenes. Sharpness Adjusts the sharpness level. ➜ High, Medium and Low. Brightness Adjusts the brightness level. Range: -20-+20.
System Menu Options English 4 PG 13 – Material is unsuitable for children under age 13. 5-6 PGR, R – Parental Guidance - Restricted; recommended that parents restrict children under 17 from viewing or allow to view only when supervised by a parent or adult guardian. 7 NC-17 – No children under age 17; not recommended viewing for children under age 17. Password Enter your four digit password when a hint is displayed on the screen. The default password is 1234. 1 2 3 Press 3 4 to highlight “Password”.
Radio Reception 3 Press PRESET+ or PRESET-/9 (or CH +/(¡ / ™) on the remote) to select the desired preset number. ➜ If “PROG” icon goes off before you select the desired preset number, press PROG on the remote. Press PROG on the remote again to store the radio station. Tuning to radio stations 1 Press STANDBY-ONy (or y on the remote) to switch on the last selected source. 2 Press SOURCE (TUNER on the remote) to select TUNER mode.
Other Functions English To deactivate the sleep timer Setting the clock 1 In Standby mode, press and hold CLOCK on the remote until the time flashes on the display. ➜ ”CLOCK SET” is displayed briefly. Then, the hour digits flash on the display screen. 2 Turn VOLUME -/+ clockwise or anticlockwise or press VOLUME +/- on the remote to set the hours. 3 Press CLOCK to confirm. ➜ The minute digits flash on the display screen.
SYSTEM Power supply .......................................... 220V / 50 Hz Total output power ............................................. 1000W Front .................................................................... 2x100W Rear ...................................................................... 2x100W Center ...................................................................... 300W Subwoofer .............................................................. 300W AUX input sensitivity .................
Troubleshooting English WARNING Under no circumstances should you try to repair the system yourself, as this will invalidate the warranty. Do not open the system as there is a risk of electric shock. If a fault occurs, first check the points listed below before taking the system for repair. If you are unable to remedy a problem by following these hints, consult your dealer or Philips for help. Problem Solution ✔ Check if the AC power cord is properly No power. connected.
The aspect ratio of the screen cannot be changed even though you have set the TV shape. ✔ ✔ No sound or distorted sound. ✔ ✔ There is no sound from the center and surround speakers. ✔ The micro DVD player does not start playback. ✔ The aspect ratio is fixed on the DVD disc. Depending on the TV, it may not be possible to change the aspect ratio. Adjust the volume. Check that the speakers are connected correctly. ✔ Replace the speaker cables. ✔ Disconnect the headphones.
Troubleshooting English Considerable noise in radio broadcasts. ✔ ✔ ✔ ✔ ✔ ✔ ✔ The remote control does not function. ✔ Tune in to the correct frequency. Connect the antennas. Fully extend the FM wire antenna. Position for best reception and secure to a wall. Connect an outdoor FM or MW antenna. Adjust the direction and position for best reception. Place the antenna farther away from any equipment that may be causing the noise. Increase the distance between the system and your TV or other equipment.
Analog: Sound that has not been turned into numbers. Analog sound varies, while digital sound has specific numerical values. These jacks send audio through two channels, the left and right. Aspect ratio: The ratio of vertical and horizontal sizes of a displayed image. The horizontal vs. vertical ratio of conventional TVs. is 4:3, and that of wide-screens is 16:9. AUDIO OUT Jacks: Jacks on the back of the DVD System that send audio to another system (TV set, Stereo, etc.).
Meet Philips at the Internet http://www.philips.com English MCD759 CLASS 1 LASER PRODUCT Printed in China PageBack_MCD759_93 76 PDCC-JS-JW-0644 2006.11.