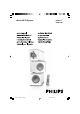
Micro Hi-Fi System pg001-017_MCM118_12_Eng 1 MCM118 MCM118B 2006.7.
Important notes for users in the U.K. Italia DICHIARAZIONE DI CONFORMITA’ Mains plug This apparatus is fitted with an approved 13 Amp plug. To change a fuse in this type of plug proceed as follows: Si dichiara che l’apparecchio MCM118 Philips risponde alle prescrizioni dell’art. 2 comma 1 del D.M. 28 Agosto 1995 n. 548. 1 2 Remove fuse cover and fuse. Fatto a Eindhoven 3 Refit the fuse cover. Fix new fuse which should be a BS1362 3 Amp, A.S.T.A. or BSI approved type.
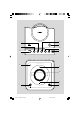
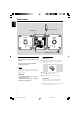
4 1 5 2 OP E N / C LO S E 6 7 3 STANDBY-ON SOURCE BAND PROG/CLOCK - VOLUME + TUNING M I C R O S Y S T E M M C M1 1 8 8 iR 0 ! @ # 9 AUX-IN 3 pg001-017_MCM118_12_Eng 3 2006.7.
DK SF Advarsel: Usynlig laserstråling ved åbning når sikkerhedsafbrydere er ude af funktion. Undgå utsættelse for stråling. Luokan 1 laserlaite Varoitus! Laitteen käyttäminen muulla kuin tässä käyttöohjeessa mainitulla tavalla saattaa altistaa käyttäjän turvallisuusluokan 1 ylittävälle näkymättömälle lasersäteilylle. Oikeus muutoksiin varataan. Laite ei saa olla alttiina tippu-ja roiskevedelle. Bemærk: Netafbryderen er sekundært indkoblet og ofbryder ikke strømmen fra nettet.
English Français -------------------------------------------- 18 Svenska --------------------------------------------- 78 Dansk ----------------------------------------------- 90 Suomi --------------------------------------------- 102 Português ---------------------------------------- 114 Eλληνικά ----------------------------------------- 126 5 pg001-017_MCM118_12_Eng 5 2006.7.
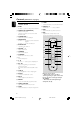
Contents English General Information Maintenance .............................................. 14 Environmental information ................................ 7 Supplied accessories ............................................ 7 Safety information ................................................ 7 Clock/Timer Preparation Rear connections ............................................. 8–9 Before using the remote control ...................... 9 Replacing battery (lithium CR2032) into the remote control ..
This product complies with the radio interference requirements of the European Community. Supplied accessories – 2 speaker boxes – remote control with battery – MW loop antenna Environmental Information All unnecessary packaging has been omitted. We have tried to make the packaging easy to separate into three materials: cardboard (box), polystyrene foam (buffer) and polyethylene (bags, protective foam sheet).
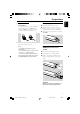
Preparations English MW loop antenna FM antenna Speaker (left) Speaker (right) AC power cord Rear connections B Antenna Connection The type plate is located at the rear of the system. 1 For users in the U.K.: please follow the instructions on page 2. A Power – Before connecting the AC power cord to the wall outlet, ensure that all other connections have been made. WARNING! – For optimal performance, use only the original power cable.
C Before using the remote control Speakers Connection Front Speakers Connect the speaker wires to the SPEAKERS terminals, right speaker to "RIGHT" and left speaker to "LEFT", the wire (marked red) to "+" and the wire (marked black) to "-". 1 2 3 Pull out the plastic protective sheet. Select the source you wish to control by pressing one of the source select keys on the remote control (for example CD, TUNER). Then select the desired function (for example É, í, ë).
Controls (illustrations on page 3) English Controls on the system and remote control activates/deactivates or sets the timer function. ( ALBUM 4 3 for MP3 disc......................selects an album. 1 BAND – * TIMER – for Tuner........ (on the set only) selects waveband. ) DBB 2 SOURCE (CD/ TUNER/ AUX) – – – ¡ DSC switches on the system. selects the respective sound source for CD/ FM/ MW/ AUX. 3 STANDBY-ON / y – for CD ................. programs tracks and reviews the program. for clock .....
Adjusting volume and sound OP STANDBY-ON SOURCE BAND PROG/CLOCK - VOLUME 1 Press VOLUME – / + to increase or decrease volume. ➜ Display shows the volume level and a number from 0-32. 2 Press DSC repeatedly to select the desired sound effect: JAZZ / POP / CLASSIC / ROCK. E N / C LO S E + TUNING IMPORTANT: Before you operate the system, complete the preparation procedures. Switching the system on ● Press STANDBY-ON (y on the remote control).
CD/MP3 Operation English Basic playback controls To play a disc M I C R O S Y S T E M MCM108 ● Press 2; to start playback. ➜ The current track number and elapsed playing time of the track are displayed during disc playback. iR POP TRK PROG DBB MP3 To select a different track REP ALL ● Press ¡1 2™ once or repeatedly until the desired track number appears in the display. CD To find a passage within a track AUX-IN 1 IMPORTANT: The lens of the CD player should never be touched.
3 Press ¡1 2™ to select a desired track. ➜ The album number will change accordingly as you reach the first track of an album by pressing ¡1 or the last track of an album by pressing 2™ . 4 Press 2; to start playback. Notes: – The SHUFFLE and REPEAT functions cannot be used simultaneously. – SHUFFLE play is not available in the programe mode. Programming track numbers ● During playback, press once ALBUM 4 3 to show the current album number. Supported MP3 disc formats: – ISO9660, Joliet, UDF 1.
Radio Reception Other Connection English Helpful hints: To improve radio reception: – For FM, extend coil antenna at the back of the unit fully for optimum reception. Listening to an external source You can listen to the sound of the connected external device through your system’s speakers. OP STANDBY-ON SOURCE BAND PROG/CLOCK - VOLUME 1 2 E N / C LO S E + TUNING Select AUX source. Use a line-in cable (not supplied) to connect MCM 118’s AUX-IN jack (3.
4 5 Press ¡1 / 2™ to set the hours. 6 7 Press ¡1 / 2™ to set the minutes. M I C R O S Y S T E M M C M10 8 iR AUX-IN English Clock/Timer Press TIMER again. ➜ The clock digits for the minutes flash. Press TIMER to confirm the time. ➜ The timer is now set and actiated. Notes: - If source CD is selected and no disc is in the CD tray or the disc has an error, TUNER will be selected automatically. - At the set time of wake up, the set will turn on at volume level 12.
Specifications English AMPLIFIER Output power .................................................... 2 x 15W .................................................................. 30W total power Signal-to-noise ratio .......................... ≥ 62 dBA (IEC) Frequency response ......... 60 – 16000 Hz, ± 3 dB Impedance loudspeakers ......................................... 4 Ω Impedance headphones ................. 32 Ω – 1000 Ω CD PLAYER Frequency range ..................................
English Troubleshooting WARNING Under no circumstances should you try to repair the system yourself, as this will invalidate the warranty. Do not open the system as there is a risk of electric shock. If a fault occurs, first check the points listed below before taking the system for repair. If you are unable to remedy a problem by following these hints, consult your dealer or service centre. Problem Solution ✔ Insert a disc. ✔ Check if the disc is inserted upside down.