MCM239D Micro Hi-Fi System Register your product and get support at www.philips.
CAUTION Use of controls or adjustments or performance of procedures other than herein may result in hazardous radiation exposure or other unsafe operation.
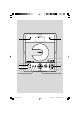
7 1 2 3 8 9 4 0 ! @ # 5 6 3 MCM239D_79_Eng 3 23/8/07, 9:53 3140 115 xxxxx
Contents English General Information Tuner Supplied accessories ............................................ 5 Environmental information ................................ 5 Safety information ................................................ 6 Tuning to radio stations .................................... 18 Programming radio stations ............................. 18 Controls Controls on the set ............................................. 7 Remote control ................................................
Congratulations on your purchase and welcome to Philips! To fully benefit from the support that Philips offers, register your product at www.philips.com/welcome. Supplied accessories – 1 X certified power adapter (Input: 100-240V ~50/60Hz 0.7A, Output: 15V 1.
General Information English Hearing Safety Listen at a moderate volume. ● Using headphones at a high volume can impair your hearing. This product can produce sounds in decibel ranges that may cause hearing loss for a normal person, even for exposure less than a minute. The higher decibel ranges are offered for those that may have already experienced some hearing loss. ● Sound can be deceiving. Over time your hearing "comfort level" adapts to higher volumes of sound.
Controls on the set (illustrations on page 3) – press to open the CD door.
Controls English Remote control – – 1 AUX 2 8 3 4 9 – selects the audio input from an additional connected appliance – In standby mode: switches the set on and selects the audio input from an additional connected appliance 0 5 ! @ # iPod selects iPod source.
Installation 9 DSC (Digital Sound Control) – Placing MCM239D selects predefined sound settings: ROCK, JAZZ, POP, CLASSIC, OPTIMAL MCM239D is supplied with a stand, you may attach or detach the stand to/from the main set.
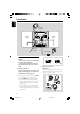
Installation English MW loop antenna Speaker (left) Speaker (right) FM wire antenna Power adaptor Rear connections Warning: – Never make or change connections with the mains supply switched on. – Install your set near the AC outlet and where the AC power plug can be reached easily. A Speaker connections Use the supplied speakers only. Using other speakers can damage the set or the sound quality will be negatively affected.
● Position the antenna as far as possible from a TV, VCR or other radiation source. Connecting an additional appliance Connecting a USB device or memory card FM antenna The wire antenna supplied can only be used to receive nearby stations. For better reception we recommend using a cable antenna system or an outdoor antenna.
Installation English Using AC power Connecting a non-USB device It is possible to use an additional appliance, e.g. TV, VCR or CD recorder with the set. On MCM239D, you can playback music from an external source. 1 2 3 Insert one plug of the audio cable (not supplied) to the socket AUX IN at the rear panel of the main set.
Using the remote control Setting the clock IMPORTANT! After connecting MCM239D to the power supply, set the clock first. – Remove the protective plastic tab before using the remote control. 1 Press and hold STANDBY-ON to switch the – Always point the remote control directly towards IR area on the Center or Station you wish to operate. Notes for remote control: – First select the source you wish to control by pressing one of the source select keys on the remote control (for example CD,TUNER).
Basic Functions English Switching on/off the set and selecting functions 1 2 3 To switch on, press STANDBY-ON or SOURCE on the set (or y on the remote control) ➜ The set switches to the last source selected OR On the remote control, press the source button (e.g. USB, CD, TUNER, iPod, AUX). When the set is on, press STANDBY-ON to switch off (or y on the remote control). To select your function, press SOURCE once or more on the set (or USB, CD, TUNER, iPod, AUX on the remote control).
IMPORTANT! – Make sure that the file names of MP3 files end with .mp3. – For DRM protected WMA files, use Windows Media Player 10 (or later) for CD burning/ conversion. Visit www. microsoft.com for details about Windows Media Player and WM DRM (Windows Media Digital Rights Management).
CD English Selecting and searching Programming tracks Selecting a different track You may store up to 20 tracks in the desired sequence. If you like, store any track more than once. ● Press 4 / ¢ once or repeatedly until the desired track number appears in the display. MP3/WMA: ➜ Track information scrolls briefly. MP3/WMA: ● Press ALBUM/ PRESET once or more to select the next or previous album. ➜ Album information scrolls briefly.
Different play modes: REPEAT, SHUFFLE REP TRACK– plays the current track continuously. REP ALL– plays the entire disc/program continuously. SHUF – plays all the tracks in random order. 1 During playback, press once or more REPEAT or SHUFFLE to select play modes. 2 To return to normal playback, press REPEAT or SHUFFLE repeatedly until the various modes are no longer displayed. Helpful hints: – In the shuffle mode, press ¢ to select tracks.
Tuner English Tuning to radio stations 1 2 3 4 Press SOURCE once or more to select TUNER (or TUNER on the remote control). Press TUNER on the remote control. repeatedly to select your desired waveband, FM or MW. ➜ Display shows: , radio station frequency, waveband and if programmed, a preset number. Press and hold 4 / ¢ until SEARCH appears. ➜ The radio automatically tunes to a station with sufficient reception. Display shows SEARCH during automatic tuning.
Using a USB mass storage device By connecting a USB mass storage device to the Hi-Fi system, you can enjoy the music stored on the external device through the powerful speakers of Hi-Fi system. Playing a USB mass storage device Compatible USB mass storage devices With the Hi-Fi system, you can use – USB flash memory (USB 2.0 or USB1.1) – USB flash players (USB 2.0 or USB1.
USB English 1 2 Check the USB device has been properly connected. (See Installation: Connecting an additional appliance) Press SOURCE once or more to select USB (or USB on the remote control) ➜ The icon 3 AUX appears – NO AUDIO appears if no audio file is found in the USB device Play the USB’s audio files as you do with the albums/tracks on a CD (See CD) Note: – For compatibility reasons, the album/track information may differ from what it is displayed through flash players’ music management software.
English iPod Speaker (left) Speaker (right) Portable player Dock Playing iPod using the dock By connecting the supplied dock to your Hi-Fi system, you can listen to the sound of the docked player through the powerful speakers of the Hi-Fi system. 1 Installing the dock adaptor Align two latches of the adaptor and two holes of the dock, then gently push in the adaptor until it clicks.
iPod English Playing iPod 1 2 3 4 Select the dock adaptor of the correct type and size, and snap it into the dock (See “ Dock adaptor ” ). Correctly place your iPod in the dock. Connect the cables of the dock to DOCK IN jacks on the main set correspondingly. Charging iPod battery using the dock Docking your iPod and connecting the dock to MCM239D, you can charge the iPod in the standby mode and power-on mode of MCM239D. Press SOURCE repeatedly or iPod to select iPod source.
SLEEP Setting the timer The set can be used as an alarm clock, whereby the selected source (CD, TUNER or USB) star ts playback at a preset time. Make sure the clock is set before using the timer. 1 2 In standby mode, press and hold TIMER on the remote control until SET TIMER appears. ➜ flashes. SELECT SOURCE scrolls. ➜ Display shows current source CD, TUNER or USB. Press SOURCE on the set repeatedly to select the source (or press CD,TUNER or USB on the remote control). 3 Press TIMER to confirm.
Specifications English AMPLIFIER Output power .......................................... 2 x 5 W RMS Signal-to-noise ratio ....................................... ≥ 65 dBA Frequency response ............. 100 – 18kHz, ± 3 dB Input sensitivity AUX ....................... 0.5 V (max. 1 V) Impedance loudspeakers ..................................... ≥ 4 Ω Impedance headphones .................... 32 Ω -1000 Ω .....................................................................................
WARNING Under no circumstances should you try to repair the system yourself, as this will invalidate the warranty. Do not open the system as there is a risk of electric shock. If a fault occurs, first check the points listed below before taking the system for repair. If you are unable to remedy a problem by following these hints, consult your dealer or Philips for help. Problem Solution “NO DISC” is displayed. ✔ Insert a disc. ✔ Wait until the moisture condensation at the lens has cleared.
Troubleshooting English The remote control does not function properly. ✔ Select the source (CD or TUNER, for example) ✔ ✔ ✔ ✔ before pressing the function button (ÉÅ,í, ë). Reduce the distance between the remote control and the system. Insert the battery with its polarities (+/– signs) aligned as indicated. Replace the battery. Point the remote control directly toward IR sensor on the front of the system. The timer is not working. ✔ Check the set is switched off ✔ Set the clock correctly.
AUSTRALIA - Philips Manufacturers Warranty for Australia only These warranty conditions are valid for the following consumer electronics products: Colour Televisions, Projection TV, Plasma & LCD TV, Video Cassette Recorders, CD Recorders & Players, DVD Players, DVD Recorders, DVD Recorders with HDD, Audio Systems, Home Theatre systems, Digital Set Top Box & Portable Audio products.
NEW ZEALAND - Guarantee and Service for New Zealand Thank-you for purchasing this quality Philips product. Philips New Zealand Ltd guarantees this product against defective components and faulty workmanship for a period of 12 months. Any defect in materials or workmanship occurring within 12 months from the date of purchase subject to the following conditions will be rectified free of charge by the retailer from whom this product was purchased. Conditions 1.