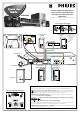
Printed in China Use this simple and quick way to watch your favorite DVD movie and enjoy your Home Cinema experience! MX3660D (Not all the cables supplied are required to complete the basic hook-up.) Connecting Speaker Cable .
continue... SUPER VIDEO AV IN DVD VIDEO DIGITAL SURROUND SYSTEM STANDBY-ON PLAY•PAUSE STOP PROGRAM BASS PREV NEXT SURROUND TREBLE OPEN•CLOSE SOURCE VOLUME Make sure your DVD system and TV are connected and turned on! Playing a disc 1 Press DISC on the remote control. You can also adjust the SOURCE button on the front panel until “DISC” appears on the display panel. 2 Turn on the TV and select the correct Video In mode.
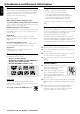
DVD VIDEO DIGITAL SURROUND SYSTEM CALL US BEFORE YOU CONSIDER RETURNING THE PRODUCT! E Return your Warranty Registration Card within 10 days S Philips representatives are ready to help you with any questions about your new product.We can guide you through Connections, First-time Setup, or any of the Features. We want you to start enjoying your new product right away! RTAN PO T! Need help? Call us! 3660D IM MX EE WH Y INS ID 1-800-531-0039 or Visit us on the web at www.philips.
Return your Warranty Registration card today to ensure you receive all the benefits you’re entitled to. • Once your Philips purchase is registered, you’re eligible to receive all the privileges of owning a Philips product. • So complete and return the Warranty Registration Card enclosed with your purchase at once, and take advantage of these important benefits.
English Index Canada English -------------------------------------------------------- 5 Français English: This digital apparatus does not exceed the Class B limits for radio noise emissions from digital apparatus as set out in the Radio Interference Regulations of the Canadian Department of Communications.
IMPORTANT SAFETY INSTRUCTIONS 1. Read these instructions. 2. Keep these instructions. 11. Only use attachments/accessories specified by the manufacturer. 12. 3. 4. 5. 6. Heed all warnings. Follow all instructions. Do not use this apparatus near water. Clean only with dry cloth. 13. Unplug this apparatus during lightning storms or when unused for long periods of time. 7. Do not block any ventilation openings. Install in accordance with the manufacturer´s instructions. 14.
Introduction and General Information Features ............................................................................... 6 Discs for playback ............................................................. 6 Player zone Supplied accessories ......................................................... 6 Environmental information.............................................. 6 Installation ........................................................................... 6 Maintenance ..............................
Introduction and General Information English Features Supplied accessories Your complete 7-piece DVD Digital Home Cinema System creates the same dynamic sound qualities that you find in full-fledged cinemas and incorporates some of the best features in home theater technology. – – – – – – Other features include: Built-in DTS and DolbyR Digital decoder, supporting DolbyR ProLogic and virtual surround Lets you use the Home Cinema Audio System for a movietheater surround sound experience.
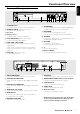
English Functional Overview Front and Rear panels DVD VIDEO DIGITAL SURROUND SYSTEM STANDBY-ON PLAY•PAUSE STOP PROGRAM BASS PREV NEXT SURROUND TREBLE OPEN•CLOSE SOURCE 1 2 3 1 STANDBY ON y – 5 67 8 9 0 4 to switch between power on and standby modes. to open or close the disc tray. # – to select multichannel surround (Dolby Digital, DTS or Dolby ProLogic) or stereo sound effect. – – in Disc mode, to program disc tracks. in Tuner mode, to program preset radio stations.
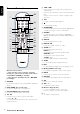
English 5 S / T Remote Control – – ¡ ( – 1 in disc mode, press to skip to the previous/next chapter/track. in disc mode, hold down to fast reverse/forward the disc. in Tuner mode, to tune to a lower or higher radio frequency. 6 ÉÅ ) ( – 7 Ç – 2 3 4 5 6 7 8 9 0 ! ( * 4 ( 5 & ( ^ ( % ( $ ( # @ to star t or interrupt disc playback. to stop playing the disc. 8 SURROUND – to select multichannel surround (Dolby Digital, DTS or Dolby ProLogic) or stereo sound effect.
Rear of TV (example only) English Connections Front Speaker (Left) Front Speaker (Right) Center Speaker 75 V S-VIDEO IN Pr/Cr AUDIO OUT Pb/Cb L VIDEO IN R Y 3 2 FM Antenna FR AM/FM ANTENNA 1 FR WOOFER LINE OUT FL FL C C SR 3 SL + + L Pr/Cr Pb/Cb Y R OPTICAL COAXIAL DIGITAL OUT AUX TV AUDIO IN SPEAKERS (4 ) AUDIO OUT AM Antenna Rear of System Rear Speaker (Surround Right) Rear Speaker (Surround Left) 2 2 Subwoofer AUDIO INPUT IMPORTANT! – Before connecting the AC p
English OR Step 2: Connecting the speakers Option 2 Use the component video cables (red/blue/green) (not supplied) to connect the system’s Pr/Cr Pb/Cb Y jacks to the corresponding Pr/Cr Pb/Cb Y input jacks on the TV. Connect the supplied speaker systems using the supplied speaker cables by matching the colors of the jacks and speaker cables. IMPORTANT! If S-VIDEO or Component video Pr/Cr Pb/Cb Y is used for DVD playback connection, the system’s VIDEO OUT setting will need to be set accordingly.
Inserting batteries into the remote control 1 Open the battery compartment. 2 Place the batteries in the compartment with the correct polarity as indicated by “+“ and “-“ symbols. 3 Close the cover. CAUTION! – Remove batteries if they are exhausted or will not be used for a long time. – Do not use old and new or different types of batteries in combination. – Batteries contain chemical substances, so they should be disposed of properly.
English Changing the volume level You can change the speakers’ sound distribution to suit your surround sound needs. System Setup (DVD) ● Press CENTER +/- to adjust the level of the center speaker. ➜ “CNT +XX DB” is displayed. The system setup is carried out via the TV, it enabling you to customize the DVD system to suit your particular requirement. If the preferred options selected are not available on a disc, then the disc’s own preference will be used.
English Setting the sound 16:9 (Wide screen) 4:3 LB (Letter Box) – Digital Output 4:3 PS (Pan Scan) Digital output selection enables you to specify the type of digital output suitable for your DVD system. ¶ Select ALL, if you have connected the digital output Note: – If your DVD is not encoded to allow you to change the aspect ratio,TV shape cannot be changed. – TV System Allows you to select the color system matching the connected TV set. AUTO – If the connected TV is multi system, select this mode.
English Setting the language 2 Use 34 keys to select a rating level. 3 Press OK to confirm. – Audio – Subtitle – Disc Menu ● This is to select the audio language, subtitle language and the language used on TV screen menus or DVD menus that will always be used for every disc to be played back. The default setting is English. ● If the language selected is not available on the disc, the original language designated by each disc will be selected.
Basic Functions IMPORTANT! – For proper surround sound, make sure you have followed the “Connections” and “Preparations” procedures fully. – The center and surround speakers only operate when the system is set to surround sound mode and the source material being played is recorded or broadcast in Dolby Digital, DTS or Dolby Pro Logic surround sound. – Stereo broadcasts or recordings will produce some surround channel effects when played in a surround mode.
English Volume control Adjust VOLUME button (or press VOL +/-) to increase or decrease the volume level. ➜ “VOL XX” is displayed. “XX”denotes the volume level. For Philips TVs only ● Press TV VOL +/- on the remote control to adjust the TV’s volume level. To listen through the headphones ● Connect the headphones plug to the n socket at the front of the player. ➜ The speakers will be muted. To switch off the volume temporarily ● Press MUTE. ➜ Playback will continue without sound and "MUTE" is displayed.
Discs information DVD-VIDEO DISC TITLE 1 CHAPTER 1 TITLE 2 CHAPTER 2 CHAPTER 1 CHAPTER 2 CHAPTER 3 ● DVD video discs may have one or more Titles, and each Title may have one or more Chapters. ● Playback stops at the end of each Title. Notes: – Your player will not play discs that have a region code different from the region code of your player. – If the inhibit icon appears on the TV screen when a button is pressed, it means the function is not available on the disc you are playing.
English Repeat play You can only select the repeat play mode during playback. For DVD - Repeat chapter/title/disc ● Press REPEAT repeatedly to select the following : ➜ “R-1” – repeat chapter. ➜ “R-A” – repeat title/disc. For VCD/CD/MP3-CD - Repeat track/disc ● Press REPEAT repeatedly to select the following : ➜ “R-1” – repeat the current track. ➜ “R-A” – repeat the entire disc. Notes: – Repeat play might not work correctly with some DVDs. – For VCD, repeat play is not possible during PBC playback.
● Select from the menu bar and press 4 key to select 3 To resume normal play, pressÉÅ. English Changing sound track language This operation works only on DVDs with multiple soundtrack language. Note: – The sound will be muted during fast reverse or forward search. the desired language.
English Zooming in This function allows you to enlarge the picture on the TV screen and to pan through the enlarged image. Checking the contents of DVD 1 Press DISC MENU on the remote control. ➜ If the current title has a menu, the menu will appear on the screen. Otherwise, the disc menu will be displayed. 2 Use 1 2 34 keys to select the desired title or chapter, followed byÉÅ or OK. ➜ The selected title or chapter starts playing.
English Special MP3-CD features – – – – – – JPEG format Max. 12 characters Max. nested directory is 7 levels The max. album number is 32 Supported VBR bit-rate Supported sampling frequencies for MP3 disc are : 32 kHz, 44.1 kHz, 48 kHz – Supported Bit-rates of MP3 disc are: 32, 64, 96, 128, 192, 256 (kbps) – The disc reading time may exceed 30 seconds due to the large number of songs compiled onto one disc. MP3-CD menu 1 Press DISC MENU to switch on the MP3-CD menu.
Other Functions English Tuning to radio stations 1 Press STANDBY ON to switch on the last selected source. 2 Adjust SOURCE (or press TUNER) to select TUNER mode. 3 Press TUNER again to select the desired band : FM or AM. 4 Press and hold S or T until the frequency indication starts to change, then release. ➜ The system automatically tunes to the next strong radio station. Listening to preset radio stations ● In tuner mode, press 1 or 2 or use the numeric keypad (0-9) to select the desired preset number.
AMPLIFIER SECTION Output power - Stereo mode (DIN) .................................................................................... 2 x 50 W - Surround mode (1 kHz) ..................................................... 50 W RMS/channel Total Harmonic Distortion ............................... 10% at rated power (1 kHz) Frequency Response .................................................. 180 Hz – 14 kHz / ±1 dB Signal-to-Noise Ratio ......................................................................
Troubleshooting English WARNING! Under no circumstances should you try to repair the system yourself, as this will invalidate the warranty. Do not open the system as there is a risk of electric shock. If a fault occurs, first check the points listed below before taking the system for repair. If you are unable to solve a problem by following these hints, consult your dealer or service center. Problem Solution No power. No picture. – – – – – Distorted or poor picture.
LIMITED WARRANTY AUDIO SYSTEM One Year Free Labor One Year Free Service on Parts This product must be carried in for repair. WHO IS COVERED? BEFORE REQUESTING SERVICE... You must have proof of purchase to receive warranty service. A sales receipt or other document showing that you purchased the product is considered proof of purchase. Please check your owner's manual for assistance. If you have additional questions, call us at 1-800-531-0039. TO GET WARRANTY SERVICE IN U.S.A., PUERTO RICO, OR U.S.