Digital surround sound receiver Toll Free Help Line Ligne d’assistance en service libre Linea de ayuada telefónica sin cargo 800-531-0039 FR960 MX975D
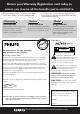
Return your Warranty Registration card today to ensure you receive all the benefits you’re entitled to. • Once your Philips purchase is registered, you’re eligible to receive all the privileges of owning a Philips product. • So complete and return the Warranty Registration Card enclosed with your purchase at once. And take advantage of these important benefits.
English Français English ....................................................2 Español Français.................................................27 Español .................................................51 Canada English: This digital apparatus does not exceed the Class B limits for radio noise emissions from digital apparatus as set out in the Radio Interference Regulations of the Canadian Department of Communications.
IMPORTANT SAFETY INSTRUCTIONS – Read before operating equipment English This product was designed and manufactured to meet strict quality and safety standards. There are, however, some installation and operation precautions which you should be particularly aware of. 1. Read these instructions – All the safety and operating instructions should be read before the appliance is operated. 2. Keep these instructions – The safety and operating instructions should be retained for future reference. 9.
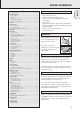
Safety instructions Safety instructions ......................................................................2 & 4 General information Scope of supply..................................................................................5 Maintenance ......................................................................................5 Setup ..................................................................................................5 Environmental information..............................................
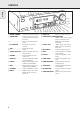
CONTROLS English 1 2 3 4 5 6 7 VOLUME SOURCE R SELECTO DVD PHONO L CIN EM DIG ITA CINEMA POWER / STANDB LINK D A SO UN TUNER CE NT ER CD HALL 3D SUR 8 ROUND CDR / TAPE Y AV TV VCR TUNER PRESET MENU TOR NAVIGA SAT PREV. / TUNER PHONES FRONT ND ON/OFF SURR. MODE NAME/FR BAND ROU 3D SUR ND EQUENC TER / OK CO ! ME AV / GA ≤ £ ™ ¡)( * & ^ % $ 1 POWER / STANDBY.......Switches the receiver on and off. 2 CINEMA LINK ................
REMOTE CONTROL Open the battery compartment of the remote control and insert 2 alkaline batteries, type AA (R06, UM-3). Remove batteries if they are dead or if the remote control will not be used for a long time. English Remote control use MUTE PHONO TUNER CD CDR/TAPE TV VCR SAT DVD Batteries contain chemical substances, so they should be disposed of properly. The buttons on the remote control work the same way as the corresponding ones on the receiver.
REMOTE CONTROL English Remote control buttons H MUTE .....................Mutes the sound of the receiver. 2 ................................Switches the receiver to standby. PHONO, TUNER, CD, CDR/TAPE, TV, VCR, SAT, DVD..............Switches the remote control to the commands of the different products. Selects the sources if pressed longer than 2 seconds. SAT only works with digital satellite receivers. 1–0................................Keys in numbers for tracks, stations or frequencies.
REMOTE CONTROL You can identify the universal remote control by the inscription Multibrand/Universal. The universal remote control must be programmed to use the codes for your appliances of different brands. This is done by keying in a 4-digit code or by scanning the codes until the correct one is found. We recommend to using the 4-digit code. This method is faster and more reliable. The code scanning method should be used only if you cannot find the code for one of your appliances.
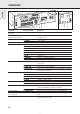
CONNECTORS English ) ¡ ™ £ ≤ ∞ §≥• ANTENNA ( FM 300 C A U TI P AM LOO FER SUBWOO T PRE-OU UT VIDEO IN/O VCR IN OPTICAL R CENTER SAT IN OUT IN COAX 1 IN OUT REC IN PLAY UT AUDIO IN/O SAT E CDR/TAP CENTER T PRE-OU CD VCR PHONO TV L COAX OUT R IN IN PLAY OUT REC IN IN IN PLAY SURROUND SPEAKERS AUDIO IN/OUT DIGITAL AUDIO IN/OUT VIDEO IN/OUT Antenna connectors Preamplified outputs System control bus Power outlets (not on all versions) Power cord 10 STANDBY ED .
Audio connections There are analog and digital connectors available on some appliances. If possible use the digital connection; usually this will result in better sound quality. See “Reassigning a source selection” on how to use the digital connectors of the receiver. Because of a different kind of output signal, the use of Dolby Digital Laserdisc requires an optional AC-3 RF demodulator. POWERED SUBWOOFER MONITOR / TV AUDIO OUT ANTENNA PHONO GND.
CONNECTIONS English System control bus, CINEMA LINK If the receiver and your Philips TV (or even better in addition a Philips VCR or DVD player) are connected with the CINEMA LINK system bus control, some extra system benefits are offered: – Upon starting a source the system will automatically switch to that input. – You may control the system via the TV screen. Depending on the language of the TV, this can be done in your preferred language.
Power Antenna connections The type plate is located on the rear of the receiver. AM (MW) antenna The loop antenna supplied is for indoor use only. Position the antenna as far away as possible from the receiver, a TV, the cables, a DVD player, a VCR and other radiation sources. 1 Check whether the power voltage as shown on the type plate corresponds to your local power voltage. If it does not, consult your dealer or service organization. 1 Fit the plug of the frame antenna to AM LOOP as shown below.
SYSTEM SETUP English NT CENTER FR ON T SU BW OO FE R FRO LEFT SURROUND (REAR) LEFT RIGHT RIGHT SURROUND (REAR) Positioning the speakers General hints for positioning Avoid positioning the speakers in a corner or on the floor as this will boost the bass tones too much. Placing the speakers behind curtains, furniture, etc. will reduce the treble response. The listener should always be able to ”see” the speakers.
1 2 0 L L + IN - + 9 SPEAKE R R CY SU L OUT 8 7 AC MAINS ~ BW OO F ER LE V E L C ON T R O L CUT R FREQ Hz 3 60 Hz 4 R SOURC SELEC E TOR OFF 150 STANDBY - ON - + SPEAK ER SUBW IN / WIRELESS OOFER IN MAX MIN SUBW OOFER 1 Use the cinch cable supplied to connect SUBWOOFER IN to SUBWOOFER PRE-OUT at the receiver.
DISPLAY Status lights English Display The display of the receiver is divided into 4 sections, which are to be used for the following: Speaker diagram Signs showing you various settings and information about the status of the receiver. PRESET ......................Tuner is tuned to a preset radio station. is switched to high sensitivity. SENS LO ..................Tuner is switched to low sensitivity. C I N E M A L I N K O N ......CINEMA LINK is active STEREO ......................
Receiver menu The receiver is equipped with a menu system. The menu is used for the setup of the receiver. The different menu options are related to each other in a logical way. Let’s assume you have no center speaker connected, and so you switched CENTER SPEAKR to NO. If you try to use VOL CENTER, a message will be scrolled that this is not possible (INSTALL CENTER SPEAKER). The menu always works the same way. Arrows in the display show you the possible moving directions. 1 Press SETUP MENU.
MENUS English TV menu If the receiver is connected to a Philips CINEMA LINK TV via the CINEMA LINK system control bus jacks (see “CONNECTIONS”), you may use the TV to set up the system. An option called RECEIVER will be added to the TV menu. If CINEMA LINK is on, adjustments on the receiver will be shown on the TV screen for a few seconds. Consult the instruction booklet of your TV on how to use the TV menu. The options offered may vary by TV model.
SOURCE SELECTOR When selecting a source by turning SOURCE SELECTOR, the audio and video inputs with the corresponding name are activated. The incoming signal is reproduced by all audio and – if the source includes a video signal – video outputs of the receiver. It is possible to reassign a source selection to other than these standard inputs. Source selected........Connectors used DVD...............................COAX 1 digital audio input and DVD IN video input PHONO..........................
PLAYBACK, RECORDING English Playing a source Recording from a source 1 Press POWER / STANDBY to switch on the receiver. If you wish to record from a source you must select it with SOURCE SELECTOR. The incoming signal is reproduced by all audio and – if the source includes a video signal – video outputs of the receiver. The sound settings do not affect the recording. 2 Turn SOURCE SELECTOR to select a source. y The name of the source is displayed.
About surround sound Surround sound settings Surround sound gives you a completely new listening sensation. You will have the feeling of being in the middle of the action, because sound is coming from everywhere around you. Look out for TV broadcasts, audio and video tapes and discs with the 3 or 1 or marks which are encoded for multichannel surround sound. You should prefer Dolby Digital to get the most out of your receiver. HALL The sound reproduction is enhanced and a slight echo is added.
TUNER English Tuning to radio stations Storing radio stations You can search for radio stations by scanning the frequency band. You can also key in the frequency of a known radio station. If an FM station is being broadcast and received in stereo, STEREO is shown. You may store up to 30 radio stations in the memory. The receiver can select and program radio stations by itself or you can choose them yourself. Searching for radio stations 1 Turn SOURCE SELECTOR to select the tuner. y TUNER is displayed.
Tuning to stored radio stations Naming radio stations 1 Turn SOURCE SELECTOR to TUNER to select the tuner. y TUNER is displayed. It is possible to assign a name to any of the preset radio stations. 2 Turn TUNER PRESET X to select a preset radio station. y PRESET, the preset number and station are displayed. 1 Choose * TUNER from the menu and press NEXT 2. Resorting stored radio stations After programming radio stations, you might want to change their sequence.
TECHNICAL DATA English Receiver Subject to modification without notice. General Power consumption (FR 960)........................................≈ 175 W Power consumption (FR 970)........................................≈ 195 W Standby power consumption ............................................< 2 W Dimensions, w × h × d ............................435 × 135 × 350 mm Weight (FR 960) ................................................................8.6 kg Weight (FR 970) ...................................
WARNING Under no circumstances should you try to repair the set yourself as this will invalidate the warranty. Do not open the set as there is a risk of electric shock. If a fault occurs, first check the points listed, before taking the set for repair. If you are unable to solve a problem by following these hints, consult your dealer or service centre. PROBLEM POSSIBLE CAUSE SOLUTION No sound VOLUME is not adjusted correctly. Adjust the VOLUME. Headphones are connected. Disconnect headphones.
LIMITED WARRANTY AUDIO SYSTEM One Year Free Labor One Year Free Service on Parts This product must be carried in for repair. WHO IS COVERED? BEFORE REQUESTING SERVICE... You must have proof of purchase to receive warranty service. A sales receipt or other document showing that you purchased the product is considered proof of purchase. Please check your owner’s manual before requesting service. Adjustments of the controls discussed there may save you a service call.