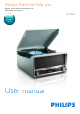
Always there to help you Register your product and get support at www.philips.
Contents 1 Safety Safety 2 Your classic micro sound system Introduction What's in the box Overview of the product 3 Get started Connect power Prepare remote control Turn on Set the clock 2 2 4 4 4 5 8 8 8 8 9 4 Play 9 9 11 11 12 12 5 Listen to FM radio stations 13 13 13 14 14 6 Listen to an external device 14 7 Other features 15 15 15 15 Play a disc Play vinyl record Play from USB Play from a Bluetooth device USB record Search for a radio station automatically Program radio stations automatica
1 Safety • • Read and understand all instructions before you use this product. If damage is caused by failure to follow the instructions, the warranty does not apply. Safety Warning •• Never remove the casing of this apparatus. •• Never lubricate any part of this apparatus. •• Never look into the laser beam inside this apparatus. •• Never place this apparatus on other electrical equipment. •• Keep this apparatus away from direct sunlight, naked flames or heat.
• Make sure that curtains or other objects never cover the ventilation slots on the product. Risk of swallowing coin battery! • The device may contain a coin/button type battery, which can potentially be swallowed. Keep the battery out of reach of children at all times! If swallowed, the battery can cause serious injury or death. Severe internal burns can occur within two hours of ingestion.
2 Your classic micro sound system Congratulations on your purchase, and welcome to Philips! To fully benefit from the support that Philips offers, register your product at www.philips.com/welcome. Introduction With this product, you can: • listen to vinyl records, • listen to FM radio stations, • listen to audio CDs, • listen to audio from an external device through the AUDIO-IN socket, • listen to audio from an external device via Bluetooth connection. • listen to audio from a USB storage device.
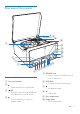
Overview of the product u t s a q v p o o n b c d e f g Overview of the device a Vinyl record platter b c d r • Open/close the disc compartment. REC • Record the track from disc/FM/Phono/ AUX/Bluetooth to a USB device. • Turn on the device, or switch to Standby mode. l m kl j hi e SOURCE knob • Select a source: CD, USB, FM, Phono/ Aux, or Bluetooth. f AUDIO IN • Connect an external audio device. g h • Headphone socket. • USB socket.
k IR sensor • Detect signals from the remote control (always point the remote control towards the IR sensor). l m • / Skip to the previous/next track. Tune to a radio station. Press and hold the key to search within a track in disc/USB source. Adjust time. • Start or pause playback. • • • n VOLUME • Rotate the knob to adjust volume. Overview of remote control a b c o n d m e f g h i l k j o +/• Skip to the previous/next album. • Select a preset radio station. p • • Stop play.
g • REC Record the track from disc/FM/Photo/ AUX/Bluetooth to a USB device. h FIND/FILE CUT • Search tracks by title or by folder name in disc/USB source. • Press to cut the audio file when recording audio files from Phono/ AUX/Bluetooth source to a USB storage device. i VOL +/• Increase or decrease volume. j • Mute or restore volume. k INFO/DELETE • In disc/USB source, press to display the playback information of .mp3 files. • Delete files from the USB storage device.
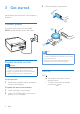
3 Get started 3 Close the battery compartment. Always follow the instructions in this chapter in sequence. Connect power Connect the AC power cord to the AC MAIN~ socket and then to the wall outlet. Note •• Before pressing any function button on the remote Prepare remote control control, first select the source with the remote control and not the main unit. •• If the the remote control will not be used for an extended period of time, remove the battery.
Set the clock 1 2 4 Play In standby mode, press CLOCK/PROG. Press / to select a time format, and then press CLOCK/PROG to confirm. »» Hour digits blink. 3 Press / to set the hour, and then press CLOCK/PROG to confirm. »» Minute digits blink. 4 Press / to the minute and then press CLOCK/PROG to confirm. Play a disc 1 Press SOURCE repeatedly to select CD source. 2 3 Press 4 Play starts automatically. If not, press to open the disc compartment.
Program tracks Note •• For MP3 files, the bit rates from 32 kbps to 320 kbps Note are supported. •• You can program tracks only when the play stops. •• You can program a maximum of 20 tracks. 1 In playback stop mode, press CLOCK/ PROG to activate the program mode. »» [MEMORY] (memory is displayed on the screen. 2 For MP3 tracks, press album. 3 Press / to select a track, then press CLOCK/PROG to confirm. 4 Repeat steps 2 to 3 to program more tracks. 5 Press to play the programmed tracks.
Play vinyl record Caution Note •• The micro system automatically switches to AUX source when there is an external device is connected through the AUDIO IN socket. •• Remove the stylus protector before use. •• Place one vinyl record on the platter at a time. •• Keep 15 cm at least between the device and other objects. 1 Press SOURCE repeatedly to select PHONO/AUX source. 2 Select the correct speed with the speed selector. • You can select speed 33 or speed 45 according to different vinyl type.
Play from a Bluetooth device You can listen to a Bluetooth device through the micro system. Note •• Before you connect a Bluetooth device to the unit, familiarize yourself with the Bluetooth capabilities of the device. •• Keep the unit away from other electronic devices that may cause interference. •• The effective operation range between the unit and the paired device is approximately 10 meters (30 feet). •• Any obstacle between the unit and the device can reduce the operational range.
Cut a file When you record audio files from Bluetooth/ AUX/PHONO/FM to a USB storage device, you can cut a file by pressing FIND/FILE CUT during recording. A new audio file is generated and recording continues. Delete file from USB 1 In playback stop mode, press SOURCE repeatedly to select USB source. 2 Press INFO/ DELETE. »» DEL -- 001 is displayed in the screen. 3 Press / deleted. 4 Press DELETE to confirm. • To exit file deletion mode, press .
Program radio stations manually 1 2 Press 3 Press / to allocate a number to this radio station. 4 Press CLOCK/PROG to confirm. »» The radio station is stored with the selected sequence number. 5 Repeat steps 1-4 to program more radio stations. / to tune to a radio station. Press CLOCK/PROG to activate the programming. Note •• If a radio station is stored over the sequence number of a previously saved station, the earlier station will be overwritten.
7 Other features Set the sleep timer This micro sound system can automatically switch to standby after a set period of time. • When the micro system is turned on, press SLEEP/TIMER repeatedly to select a set period of time (in minutes). • [SLEEP -- 90] • [SLEEP -- 75] • [SLEEP -- 60] • [SLEEP -- 45] • [SLEEP -- 30] • [SLEEP -- 15] • [OFF] »» When sleep timer is activated, [SLEEP] is displayed. To deactivate sleep timer • Press SLEEP/TIMER repeatedly until [SLEEP OFF] (sleep off) is displayed.
8 Product information Amplifier Rated Output Power Frequency Response Signal to Noise Ratio Aux Input Note 1.5 W x 2 RMS 60 Hz - 16 kHz, ±3 dB > 65 dB 0.5 V RMS 20 kohm •• Product information is subject to change without prior notice.
Supported formats: • USB or memory file format FAT12, FAT16, FAT32 (sector size: 512 bytes) • MP3 bit rate (data rate): 32-320 Kbps and variable bit rate • Directory nesting up to a maximum of 8 levels • Number of albums/ folders: maximum 99 • Number of tracks/titles: maximum 999 • ID3 tag v2.0 to v2.
9 Troubleshooting • • Power has been interrupted, or the AC power adaptor has been disconnected. Set the clock/alarm again. Warning •• Never remove the casing of this product. To keep the warranty valid, never try to repair the product yourself. If you encounter problems when using this product, check the following points before requesting service. If the problem remains unsolved, go to the Philips Web page (www. philips.com/support).
10 Notice Care of the environment Disposal of your old product and battery Any changes or modifications made to this device that are not expressly approved by WOOX Innovations may void the user’s authority to operate the equipment. Compliance This product complies with the radio interference requirements of the European Community. Hereby, WOOX Innovations declares that this product is in compliance with the essential requirements and other relevant provisions of Directive 1999/5/EC.
Important notes for users in the U.K. Trademark notice Mains fuse This information applies only to products with a UK mains plug. This product is fitted with an approved molded plug. If you replace the fuse, use one with: • the ratings shown on the plug, • a BS 1362 approval, and • the ASTA approval mark. The Bluetooth® word mark and logos are registered trademarks owned by Bluetooth SIG, Inc. and any use of such marks by WOOX Innovations is under license.
EN 21
Specifications are subject to change without notice 2014 © WOOX Innovations Limited. All rights reserved. Philips and the Philips’ Shield Emblem are registered trademarks of Koninklijke Philips N.V. and are used by WOOX Innovations Limited under license from Koninklijke Philips N.V. OTT2000_05_UM_V1.