P001-031_PET740_05_Eng 2008.4.29 Portable DVD player Page 1 PET740 Register your product and get support at www.philips.
P001-031_PET740_05_Eng 2 2008.4.
P001-031_PET740_05_Eng 2008.4.29 14:20 Page 3 Important notes for users in the U.K. Mains plug This apparatus is fitted with an approved 13 Amp plug.To change a fuse in this type of plug proceed as follows: 1. Remove fuse cover and fuse. 2. Fix new fuse which should be a BS1362 3 Amp, A.S.T.A. or BSI approved type. 3. Refit the fuse cover. If the fitted plug is not suitable for your socket outlets, it should be cut off and an appropriate plug fitted in its place.
P001-031_PET740_05_Eng 2008.4.
P001-031_PET740_05_Eng 2008.4.
P001-031_PET740_05_Eng 2008.4.29 14:20 English English Content 1 Control elements and functional components . . 8 1.1 Main unit controls . . . . . . . . . . . . . . . . . . . . . . . . . . 8 1.2 Remote Control . . . . . . . . . . . . . . . . . . . . . . . . . . . 9 2 Introduction . . . . . . . . . . . . . . . . . . . . . . . . . . . . 10 2.1 Your portable DVD player . . . . . . . . . . . . . . . . . . . 10 2.2 Unpacking . . . . . . . . . . . . . . . . . . . . . . . . . . . . . . . . 10 2.
2008.4.29 14:20 Page 7 5.5 Playback Music CD . . . . . . . . . . . . . . . . . . . . . . . . 23 5.6 Playback Music MP3-CD . . . . . . . . . . . . . . . . . . . . 24 5.7 Playback Picture-CD . . . . . . . . . . . . . . . . . . . . . . . 25 6 Addition Functions . . . . . . . . . . . . . . . . . . . . . . . . . . 27 6.1 DISPLAY Menu . . . . . . . . . . . . . . . . . . . . . . . . . . . . 27 6.2 Connection . . . . . . . . . . . . . . . . . . . . . . . . . . . . . . 28 6.2.1 Headphone . . . . . . . . . . . .
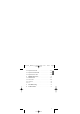
P001-031_PET740_05_Eng 2008.4.29 14:20 English Congratulations on your purchase and welcome to Philips! To fully benefit from the support that Philips offers, register your product at www.philips.com/welcome. 1 Control elements and functional components (illustrations on page 4-5) 1.1 Main unit controls (see figure 1) 1 POWER 2 9 Switch the player on / off Press once to stop playback and store the stop position. Press twice to stop playback completely.
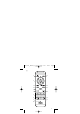
P001-031_PET740_05_Eng 2008.4.29 14:20 Page 9 1 MENU 2 3, 4, 1, 2 OK VOL+ / 3 DISPLAY 4 J( 5 2; 6 9 7 0-9 8 SUBTITLE 9 RETURN 10 A - B 11 SETUP 12 OPTION 13 )K 14 s 15 AUDIO 16 ZOOM English 1.
P001-031_PET740_05_Eng 2008.4.29 14:20 English 2 Introduction 2.1 Your portable DVD player Your portable DVD player plays digital video discs conforming to the universal DVD Video standard.With it, you will be able to enjoy full-length movies with true cinema picture quality, and stereo or multichannel sound (depending on the disc and on your playback set-up).
2008.4.29 14:20 Page 11 • The lens may cloud over when the player is suddenly moved from cold to warm surroundings. It is then not possible to play a CD/DVD. Leave the player in a warm environment until the moisture evaporates. 2.4 Playable disc formats In addition to DVD-Video disc, you will also be able to play all Video CDs, CDs, CDR, CDRW,DVD±R and DVR±RW. 2.4.1 DVD-Video Depending on the material on the disc (a movie, video clips, a drama series, etc.
P001-031_PET740_05_Eng 2008.4.29 14:20 English 2.4.5 DivX video discs DivX is a popular media technology created by DivX, Inc. DivX media files contain highly compressed video with high visual quality that maintains a relatively small file size. DivX files can also include advanced media features like menus, subtitles, and alternate audio tracks. Many DivX media files are available for download online, and you can create your own using your personal content and easy-to-use tools from DivX.com.
2008.4.29 14:20 Page 13 3 General information Power Sources This unit operates on a supplied AC adaptor, car adapter, or a rechargeable battery pack. • Make sure that the input voltage of the AC adaptor is in line with the local voltage. Otherwise, the AC adaptor and unit may be damaged. • Do not touch the AC adaptor with wet hands to prevent electric shock. • When connecting with car power (cigarette lighter) adaptor, be sure the input voltage of the adaptor is identical with car voltage.
P001-031_PET740_05_Eng 2008.4.29 14:20 English • Do not use any cleaning agents containing alcohol, ammonia, benzene, or abrasives as these may harm the player. • Apparatus shall not be exposed to dripping or splashing. Do not place any sources of danger on the appartus (e.g. liquid filled objects,lighted candles) • Do not touch the lens! Hearing Safety Listen at a moderate volume. • Using headphones at a high volume can impair your hearing.
2008.4.29 14:20 Page 15 Be sure to observe the following guidelines when using your headphones. • Listen at reasonable volumes for reasonable periods of time. • Be careful not to adjust the volume as your hearing adapts. • Do not turn up the volume so high that you can’t hear what’s around you. • You should use caution or temporarily discontinue use in potentially hazardous situations. • Do not use headphones while operating a motorized vehicle, cycling, skateboarding, etc.
P001-031_PET740_05_Eng 2008.4.29 14:20 English Handling discs • Do not attach paper or tape to the disc. • Keep the disc away from direct sunlight or heat sources. • Store the disc in a disc case after playback. • To clean, wipe the disc outwards from the center with a soft, lint-free clean cloth. On handling the LCD screen The LCD is manufactured using high precision technology.You may, however, see tiny black points that continuously appear on the LCD.
P001-031_PET740_05_Eng 2008.4.29 14:20 Page 17 English 4 Charging the units 4.1 Charge the DVD player Plug in the AC/DC adaptor • The RED LED indicates that charging is in progress. • When the set is not in use, it will take about 4 hours to fully charge it. The RED LED will turn off when the set is fully charged. Tips: * You can operate the DVD player while charging. However, it takes longer time to fully charge the battery. * When the low battery icon appears on the screen, please charge the player.
P001-031_PET740_05_Eng 2008.4.29 14:20 English CAUTION • Batteries contain chemical substances, so they should be disposed of properly. • Batteries shall not be exposed to excessive heat such as sunshine, fire or the like. • Danger of explosion if battery is incorrectly replaced. Replace only with the same or equivalent type. • Incorrect use of batteries can cause electrolyte leakage and will corrode the compartment or cause the batteries to burst.
P001-031_PET740_05_Eng 2008.4.29 14:20 Page 19 English 5 Start up 5.1 Setup 1 Press SETUP. A list of features is shown. 2 Use 3 / 4 to highlight your selection. 3 Use 2 to enter a sub-menu 4 Use 3, 4, 1, 2 to highlight your desired setting and press OK to confirm. The SETUP menu includes: General Language Set On Screen Display (OSD) languages PBC settings Set Playback Control function ON/OFF. This feature is available for Super VCD.
P001-031_PET740_05_Eng 2008.4.29 14:20 English Mpeg 4 subtitle Select subtitle language for Mpeg 4 video, e.g. DivX video Audio Dolby Set Dolby output Digital (SPDIF) Set digital output format 5.2 Playback DVD 1 Briefly press POWER on the main control of the player to switch on the set. 2 Open the disc door and insert the disc. • The player will start to play the disc automatically.
Subtitle Language Angle Zoom A-B Repeat 2008.4.29 14:20 Page 21 Change subtitle display.The function is available by pressing either the SUBTITLE or OPTIONS key Change language.The function is available by pressing either the AUDIO or OPTIONS key Change the viewing angle provided in the DVD disc.The function is available by pressing the OPTIONS key. Zoom in the screen, and then use the navigation keys to pan the screen.
P001-031_PET740_05_Eng 2008.4.29 14:20 English Fast backward / Fast forward Keep pressing J( or )K to initiate backward/forward when 2x is shown on screen, press J( or )K briefly to change speed to 4x, 8x, 16x, 32x or resume normal playback.You may also press 2; to resume normal playback. Volume Control Press + or - briefly or repeatedly to increase or decrease the sound volume Stop Briefly press 9 to stop playback Language Some VCDs only contain 2 languages for selection.
2008.4.29 14:20 Page 23 2 Open the disc door and insert the disc. If PBC is on, the disc index menu will appear on the screen. 3 Use numeric keypad 0-9 to input your selection or select a play option. 4 Press RETURN on the remote control to return to the previous menu. 5 To turn Playback Control mode on/off, please go to SETUP and select PBC settings. 5.5 Playback Music CD 1 Briefly press POWER on the main control of the player to switch on the set. 2 Open the disc door and insert the disc.
P001-031_PET740_05_Eng English Repeat Shuffle Stop A-B Repeat 2008.4.29 14:20 Press OPTIONS key to select Repeat 1 track or Repeat all tracks Press OPTIONS key to turn shuffle playback on or off Briefly press 9 to stop playback Set repeat loop playback. Press A-B to set the starting point and press A-B again to set the ending point.Then, the player will repeat the loop playback. Press A-B to cancel the loop layback 5.
2008.4.29 14:20 Page 25 The following functions are available during playback: Pause Press 2; to pause playback.You can resume playback by pressing 2; again Previous/Next Briefly press J( or )K once or several times to select your desired track Fast backward / Fast forward Keep pressing J( or )K to initiate backward/forward when 2x is shown on screen, press J( or )K briefly to change speed to 4x, 8x, 16x, 32x or resume normal playback.You may also press 2; to resume normal playback.
P001-031_PET740_05_Eng 2008.4.29 14:20 English Press 2; to pause playback.You can resume playback by pressing 2; again Previous/Next Briefly press J( or )K once or several times to select your desired track Rotate Press OPTIONS key to select rotate mode.Then, use 1 to rotate the picture clockwise. Use 2 to rotate the picture anti-clockwise. Press OPTIONS key to exit rotate mode. Slide show Press OPTIONS key to select Slide Show, then press OK to confirm.
2008.4.29 14:20 Page 27 6 Addition Functions 6.1 DISPLAY Menu When you press DISPLAY during playback, the following menu will appear and you can access the corresponding function and information: Brightness It allows you to adjust the brightness of the screen Contrast It allows you to adjust the contrast of the screen Color It allows you to adjust the color of the screen from cool, warm and normal.
P001-031_PET740_05_Eng 2008.4.29 14:20 English 6.2 Connection 6.2.1 Headphone Connect the headphone to either one of the headphone jacks on the side of the player. 6.2.2 TV You can connect the player to a TV and enjoy your DVD.
2008.4.29 14:20 Page 29 7 Troubleshooting If it appears that the DVD-Video player is faulty, first consult this checklist. It may be that something has been overlooked. WARNING Under no circumstances should you try to repair the set yourself as this will invalidate the guarantee. If a fault occurs, first check the points listed, before taking the set for repair. If you are unable to solve a problem by following these hints, consult your dealer or service centre.
P001-031_PET740_05_Eng 2008.4.29 14:20 English Symptom Remedy Completely distorted picture / no colour in the TV screen No sound The NTSC/PAL setting may be in the wrong status. Match your TV’s setting with the player’s setting. Check audio connections. If using a HiFi amplifier, try another sound source. Disc can’t be played • Ensure the disc label is upwards. • Clean the disc. • Check if the disc is defective by trying another disc.
P001-031_PET740_05_Eng 2008.4.29 14:20 Page 31 English 8 Technical data Dimensions 20.5 x 16.8 x 4.5 cm 8.1 x 6.6 x 1.8 inches Weight 1.07 kg / 2.36 lb Power supply DC 12V, 1A Power Consumption ≤20W Operating temperature range 0 - 50°C (32 - 122°F) Laser wavelength 650nm Video system NTSC / PAL / AUTO PHILIPS reserves the right to make design and specification changes for product improvement without prior notice.
P001-031_PET740_05_Eng 2008.4.29 14:20 English Meet Philips at the Internet http://www.philips.