Register your product and get support at www.philips.
Philips Consumer Lifestyle Glaslaan2 5616LW Eindhoven The Netherlands DECLARATION OF CONFORMITY We, Philips Consumer Lifestyle Glaslaan2 5616LW Eindhoven The Netherlands Declare that product models CD 560 & CD 565 (telecommunications terminal equipments) manufactured in China are in compliance with ANNEX IV of the R&TTE-Directive 1999/5/EC and then with the following essential requirements: Article 3.
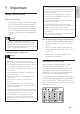
1 Important Safety instructions 6 Text and numbers 5 5 2 Your CD560/CD565 8 8 9 10 11 3 Get started 12 12 13 13 14 14 14 14 15 15 15 15 What is in the box Overview of the phone Overview of the base station Display icons Connect the base station Connect the charger Wallmount the base station Install the handset Check the battery level Set the country Set the date and time Set the date and time format What is standby mode? Check the signal strength Switch your handset On/Off 4 Calls Make a call End
12 Extra features 30 30 30 31 31 13 Advanced settings 32 32 32 32 14 Telephone answering machine 33 33 33 34 34 34 35 15 Default settings 38 38 16 Technical data 39 17 Frequently asked questions 40 Alarm clock Auto clock Keypad lock Locate the handset Register the handsets Unregister the handsets Restore default settings Turn on the answering machine Turn off the answering machine Set the answering machine language Set the answer mode Outgoing messages (OGM) Incoming messages (ICM) Answering
•• Do not expose the phone to excessive heat caused by heating equipment or direct sunlight. •• Do not drop your phone or allow objects to Safety instructions Power requirements • This product requires an electrical supply of 100-240 volts AC. In case of power failure, the communication can be lost. • The voltage on the network is classified as TNV-3 (Telecommunication Network Voltages), as defined in the standard EN 60950. Warning •• The Electrical network is classified as hazardous.
Use GAP standard compliance The GAP standard guarantees that all DECT™ GAP handsets and base stations comply with a minimum operating standard irrespective of their make. The handset and base station are GAP compliant, which means they guarantee the minimum functions: register a handset, take the line, make a call and receive a call. The advanced features may not be available if you use them with other makes.
Environmental information English All unnecessary packaging has been omitted. We have tried to make the packaging easy to separate into three materials: cardboard (box), polystyrene foam (buffer) and polyethylene (bags, protective foam sheet.) Your system consists of materials which can be recycled and reused if disassembled by a specialized company. Please observe the local regulations regarding the disposal of packaging materials, exhausted batteries and old equipment.
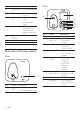
2 Your CD560/ CD565 Congratulations on your purchase and welcome to Philips! To fully benefit from the support that Philips offers, register your product at www.philips. com/welcome. Power supply What is in the box 5 Base station with bracket (CD560) Line cord Guarantee 5 5 User Manual Base station with bracket (CD565) Quick start guide Note •• In some countries, you have to connect the R line adaptor to the line cord, then plug the line cord to the line socket.
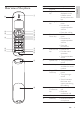
o m Name 1 2 Earpiece Right soft key 3 Call Log/Up key 4 Phonebook/ Down key 5 End /On/Off key 6 Speaker key 7 Redial key 8 Ringer Off/ Pause key 9 Intercom/ Conference key 10 11 Microphone Mute key • Mute/unmute the microphone a p n Key R b c d e f g l h k i j q r Descriptions English Overview of the phone • Select the function displayed on the handset screen directly above the key.
CD565 Key Name 12 Star/Keylock • Lock/unlock keypad key Menu key • Access the main menu Talk/Recall • Make and receive key calls • Send the flash signal Left soft key • Select the function displayed on the handset screen directly above the key.
English Display icons In standby mode, the icons shown on the main screen tell you what features are available on your handset. Icon Descriptions The battery is fully charged, the talk time can go up to 14 hours. The battery is empty. It indicates if your phone is linked to a base. The call is in progress. The alarm is activated. The speaker is on. The ringer is off. Call log Answering machine. There is unheard voice message. Scroll up for more options. ECO Scroll down for more options.
3 Get started CD560 Caution •• Ensure you have read the safety instructions in the “Important” section before you connect and install your handset. CD 560 Connect the base station Warning •• Risk of product damage! Ensure that the power supply voltage corresponds to the voltage printed on the back or the underside of the phone. •• Use only the supplied power socket to charge the battery. CD565 Note •• The type plate is located on the bottom of the base station.
2 Turn the bracket around. English Connect the charger Note •• The instructions for charger connection below is only available for multi-pack models. 1 Connect the output plug of the power socket to the bottom of the charger. 3 4 2 Re-insert the bracket into the back of the base station. Insert screws (not included) into the wall. Connect the power socket to a standard wall outlet. Wallmount the base station Warning •• You must follow the instructions below to wallmount the base station.
Install the handset Note •• If the handset becomes warm when the batteries are being charged, it is normal. Caution •• Risk of explosion! Keep batteries away from heat, sunshine or fire. Never discard batteries in fire. •• Use only the supplied batteries. •• Risk of decreased battery life! Never mix different brands or types of batteries. Check the battery level The battery icon displays the current battery level. The battery is full, the talk time can go up to 14 hours. Note The battery is empty.
5 Press the numeric buttons to enter the time. • If the time is in 12-hour format, press to select [AM] or [PM]. 4 • Press [OK] to confirm. Press and hold to switch off the handset. The handset’s screen turns off. Note Set the date and time format 1 Press menu. 2 Select [CLOCK & ALARM] > [SET 3 Switch your handset On/Off English 4 FORMAT], then press [SELECT] to confirm. •• When the handset is switched off, no call can be received. • Press and hold to switch on the handset.
4 Calls Note •• When the power fails, the phone cannot access emergency services. Redial the most recent number 1 2 3 Press . Press redial. Press [SELECT]. »» The most recent number is then dialed out. Call from the redial list Tip •• Check the signal strength before you make a call or when you are in a call. For more information, see “Check the signal strength” in the Get started section. You can make a call from the redial list.
End a call You can end a call in these ways: • Press ; or • Place the handset to the base station or charging cradle if the auto hang up is activated. 1 2 Answer a call When the phone rings. Press answer the call. or to Warning •• When the handset rings or when the handsfree is activated, keep the handset away from your ear to avoid ear damage. registered to the caller ID service with your service provider. Tip •• When there is a missed call, the handset 2 Press and hold in standby mode.
Toggle between two calls You can toggle your calls in these ways: 1 2 Press and ; or Press [OK] and select [SWITCH CALLS], then press [OK] again to confirm. »» The current call is put on hold, and you are now connected to the other call. Make a conference call Note •• This service is network dependent. Check with the service provider for additional charges. When you are connected to two calls, press [OK], select [CONFERENCE] and then press [SELECT] again to confirm.
An intercom call is a call to another handset that shares the same base station. A conference call involves a conversation among you, another handset user and the outside callers. Make a call to another handset Toggle between calls Press int to switch between the outside call and the intercom call. English 5 Intercom and conference calls Transfer a call 1 2 3 Note Press int during a call. Select or enter the handset number, then press [SELECT] to confirm. Press when the other side answers your call.
Note •• Press to join an ongoing conference with another handset if [ADVANCED SET] > [CONFERENCE] is set to [ON]. During the conference call 1 2 3 Press int to put the external call on hold and go back to the internal call. »» The external call is put on hold. Press int to toggle between the external and internal call. Press and hold int to establish the conference call again. Note •• If a handset hangs up during the conference call, the other handset remains connected to the external call.
You can enter text and numbers for handset name, phonebook records, and other menu items. Enter text and numbers 1 2 Press once or several times on the alphanumeric key to enter the selected character. Press [CLEAR] to delete the character. Press / to move the cursor left and right. Key Characters (Upper case) 0 .0,/:;“‘!¡?¿*+-%\^ ~| [Sp] 1 @ _ # = < > ( ) & € £ $ ¥ [ ] { } ¤ § ...
7 Phonebook This phone has a phonebook that stores up to 200 records. You can access the phonebook from the handset. Each record can have a name up to 14 characters long and a number up to 24 digits long. View the phonebook Note •• You can view the phonebook on one handset only each time. 1 2 Press . Select a contact and view the available information. Access the phonebook during a call 1 2 3 Scroll the contact list Access the phonebook menu, then press and to scroll through the phonebook entries.
5 •• The phonebook only saves new number. Tip •• Press and hold to insert a pause. »» Your new record is saved. Set the melody You can personalize the melody played when someone in the phonebook calls you. Note •• Ensure you have subscribed the caller line identification service before you have this feature. 1 2 3 4 5 Delete a record 1 2 3 Press menu. Select [PHONEBOOK] > [DELETE], then press [SELECT] to confirm. Select a contact, then press [OK] to confirm »» The record is deleted.
8 Call log Save a call record to the phonebook The call log stores the call history of all outgoing, missed or received calls. The incoming call history includes the name and number of the caller, call time and date. This feature is available if you have registered to the caller ID service with your service provider. 1 2 3 Your phone can store up to 50 call records. The call log icon on the handset flashes to remind you of any unanswered calls.
The redial list stores the call history of dialed calls. It includes the names and/or numbers you have called. This phone can store up to 10 redial records. View the redial records 1 2 Press redial to enter the list of dialed calls. Select a record, press [SELECT]. Delete a redial record 1 2 3 English 9 Redial list Press redial to enter the list of dialed calls. Select a record, then Press [SELECT] then [OPTION]. Select [DELETE], then press [SELECT]. »» The record is deleted.
10 Self-defined settings Personalize the sounds Set the handset’s ringtone You can select from 15 ringtones. Customize the settings to make it your own phone. 1 2 Personalize the phone display 3 Name the handset The name of the handset can be up to 14 characters. It is displayed on the handset screen in standby mode. 1 2 3 4 Press menu. Select [PERSONAL SET] > [HANDSET NAME], then press [SELECT] to confirm. Enter or edit the name. To erase a character, press [CLEAR]. Press [OK] to confirm.
English Enhance the audio quality XHD (Extreme High Definition) sound mode is an exclusive feature which transmits high fidelity signals to the handset. It makes the phone conversations sound like real-life conversations. When you are in standby mode, 1 2 3 Press menu. Select [ADVANCED SET] > [XHD SOUND], then press [SELECT] to confirm. Select the new setting, then press [SELECT] to confirm. »» The setting is saved. When you are in a call, 1 2 3 Press [OPTION] to enter the options menu.
11 Call features The phone supports a number of call-related features that help you handle and manage the calls. Auto hang up To end a call, simply place the headset on the base station or charge cradle. Activate/Deactivate auto hang up 1 2 3 Press menu. Select [PERSONAL SET] > [RECALL TIME], then press [SELECT] to confirm. Dial mode Note •• This feature only applies to models that support both tone and pulse dial. Dial mode is the telephone signal used in your country.
First ring This feature checks and formats your outgoing call number before it is dialed out. The prefix number can replace the detect number you set in the menu. For example, you set 604 as the detect number and 1250 as the prefix. When you have dialed out a number such as 6043338888, your phone changes the number to 12503338888 when it dials out. If you have subscribed for caller ID service with your service provider, your phone can suppress the first ring before the caller ID displays on the screen.
12 Extra features Your phone offers you extra features which keep you organized and informed while on the move. Set the alarm melody 1 2 3 Alarm clock Set the alarm 3 4 5 Press menu. Select [CLOCK & ALARM] > [ALARM], then press [SELECT] to confirm. Select [ON ONCE] or [ON DAILY], then press [SELECT] to confirm. Press [OK] to confirm. »» The alarm is set and the screen.
English Keypad lock You can lock the keypad to prevent accidental button presses. Lock the keypad 1 Press and hold in standby mode. »» The keypad is locked. Note •• When the keypad is locked, no call can be made. You can still answer the incoming calls. The keypad is unlocked during the call but is locked automatically after you finish the call. Unlock the keypad 1 Press and hold . »» The keypad is unlocked. Locate the handset 1 2 3 Press on the base station.
13 Advanced settings Register the handsets You can register additional handsets to the base station. The base station can register up to 5 handsets. Auto registration 1 Place the handset on the base station. »» The handset detects the base station and start to register automatically. »» Registration is completed in less than 2 minutes.The base station automatically assigns a handset number to the handset.
Through the handset 1 2 3 Note •• Available only for CD565. Your phone includes a telephone answering machine that records unanswered calls when it is on. By default, the answering machine is set to the [ANSWER & REC.] mode. You can also access the answering machine remotely and change the settings through the answering machine menu on the handset. . The LED message counter (two digits 7-segment display) on the base station shows the number of the messages when the answering machine is on. .
Set the answering machine language Note •• This feature only applies to models with multiple-language support. The answering machine language is the language for the outgoing messages. 1 2 3 Press menu. Select [ANSWER MACHINE] > [SETTINGS] > [VOICE LANGUAGE], then press [SELECT] to confirm. Select a language, then press [SELECT] to confirm. »» The setting is saved. Outgoing messages (OGM) The outgoing message is the message your caller hears when the answering machine picks up the call.
4 Select [ANSWER & REC.] or [ANSWER ONLY]. Press [SELECT] to confirm. Select [PLAY], then press [SELECT] to confirm. »» The handset plays the current outgoing message. Delete an outgoing message 1 2 3 4 5 Press menu. Listen to the incoming messages Incoming messages are played back in the sequence they are recorded. From the base • • • Select [ANSWER MACHINE] >[RECORD OGM], then press [SELECT] to confirm. Select [ANSWER & REC.] or [ANSWER ONLY], then press [SELECT] to confirm.
From the handset 1 2 Press during message playback to enter the options menu. Select [DELETE], then press [SELECT] to confirm. »» The current message is deleted. Delete all old incoming messages Set the ring delay You can set the number of times the phone rings before the answering machine picks up the call. 1 2 3 From the base 1 Press and hold in standby mode. »» All old messages are permanently deleted. Press menu.
Select [ANSWER MACHINE] > [SETTINGS] > [REMOTE ACCESS] , then press [SELECT] to confirm. 3 Select a new setting, then press [SELECT] to confirm. »» The setting is saved. Access the answering machine remotely 1 Make a call to your home number with a touch tone phone. 2 Set the sound quality of the message English 2 You can adjust the sound quality of the messages received from the answering machine. 1 2 3 Press menu.
15 Default settings Language Handset name Date Date format Time Time format Auto clock Alarm Phonebook list Auto hang up Recall time Area code Carrier code Network type Country dependent PHILIPS 01/01/09 DD/MM 00:00 24-hour On Off Unchanged On Country dependent [Empty] [Empty] PSTN (DECT phone for connection to the public switched telephone network) First ring Country dependent Conference Off Handset ring melody Melody 1 Alarm tone Melody 1 Receiver volume Volume 3 Handset speaker Level 3 volume Handset ri
16 Technical data • • Operation: Up to 95% at 40°C Storage: Up to 95% at 40°C Display • Progressive LCD backlight General telephone features • • • • Dual mode caller name & number identification 10 polyphonic ringer melodies and 5 standard ringer melodies Conference call and voicemails Intercom Phonebook list, Redial list and Call log • • • Phonebook list with 200 entries Redial list with 10 entries Call log with 50 entries Battery • 2 x AAA Ni-MH 1.
17 Frequently asked questions The signal icon flashes. •• The handset is out of range. Move it closer to the base station. If the handset displays [UNREGISTERED], register the handset. Tip •• For more information, see “Register the handsets” on the Advanced settings section. IF I fail to register the additional handsets to the base station, what do I do? Your base memory is full. Unregister the unused handsets and try again. No dialing tone •• Check your phone connections. •• The handset is out of range.
ANNEX 1 English Hereby, Philips Consumer Lifestyle, BU P&A, declares that this [type of equipment] is in compliance with the essential requirements and other relevant provisions of Directive 1999/5/EC. Finnish Philips Consumer Lifestyle, BU P&A vakuuttaa täten että [type of equipment) tyyppinen laite on direktiivin 1999/5/EY oleellisten vaatimusten ja sitä koskevien direktiivin muiden ehtojen mukainen.
0168 © 2009 Koninklijke Philips Electronics N.V. All rights reserved. Printed in China CD560-565_EN_UM_V1.