220S4L www.philips.
Table of Contents 1. Important ...............................................1 1.1 Safety precautions and maintenance .1 1.2 Notational Descriptions ............................2 1.3 Disposal of product and packing material ...............................................................3 2. Setting up the monitor .......................4 2.1 Installation .........................................................4 2.2 Operating the monitor ..............................7 2.
1. Important Please use approved power cord provided by Philips all the time. If your power cord is missing, please contact with your local service center. (Please refer to Customer Care Consumer Information Center) 1. Important This electronic user’s guide is intended for anyone who uses the Philips monitor. Take time to read this user manual before you use your monitor. It contains important information and notes regarding operating your monitor.
1. Important Temperature: 0-40°C 32-95°F 1.2 Notational Descriptions Humidity: 20-80% RH The following subsections describe notational conventions used in this document. Important information for Burn-in/Ghost image Notes, Cautions and Warnings IMPORTANT: Always activate a moving screen saver program when you leave your monitor unattended. Always activate a periodic screen refresh application if your monitor will display unchanging static content.
1. Important Taking back/Recycling Information for Customers 1.3 Disposal of product and packing material Philips establishes technically and economically viable objectives to optimize the environmental performance of the organization's product, service and activities. Waste Electrical and Electronic EquipmentWEEE From the planning, design and production stages, Philips emphasizes the important of making products that can easily be recycled.
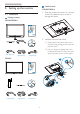
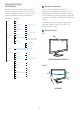
2. Setting up the monitor Install the base 2. Setting up the monitor 220S4LS/220S4LA 1. Place the monitor face down on a smooth surface. Pay attention not to scratch or damage the screen. 2.1 Installation Package contents 220S4LS/220S4LA 220S4L 2. Hold the base with both hands. (1) Gently attach the base to the column until the three guiding pins rest into the position holes.
2. Setting up the monitor 220S4LC 3. Hold the base with both hands. (1) Gently attach the base to the column until the three guiding pins rest into the position holes. 1. Place the monitor face down on a smooth surface. Pay attention not to scratch or damage the screen. located at the bottom of the base, and secure the base to the column tightly. 2 2. Snap in the base in the VESA mount area.
2. Setting up the monitor Connect to PC Connecting to your PC 1. Connect the power cord to the back of ! 220S4LS 2. Turn off your computer and unplug its power cable. 1 2 3. Connect the monitor signal cable to the video connector on the back of your computer. 3 24L0S 4 4. Plug the power cord of your computer and your monitor into a nearby outlet. 3 2 1 5. Turn on your computer and monitor. If the monitor displays an image, installation is complete.
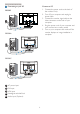
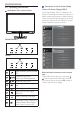
2. Setting up the monitor Description of the On Screen Display 2.2 Operating the monitor What is On-Screen Display (OSD)? Description of the control buttons On-Screen Display (OSD) is a feature in all Philips LCD monitors. It allows an end user to adjust screen performance or select functions of the monitors directly through an on-screen instruction window.
2. Setting up the monitor The OSD Menu Below is an overall view of the structure of the On-Screen Display. You can use this as a reference when you want to work your way around the different adjustments later on. Main menu Input This monitor is designed for optimal performance at its native resolution, 1680 × 1050 @ 60 Hz. When the monitor is powered on at a different resolution, an alert is displayed on screen: Use 1680 × 1050 @ 60 Hz for best results.
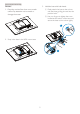
2. Setting up the monitor Height adjustment 2.3 Remove the Base Assembly for VESA Mounting Before you start disassembling the monitor base, please follow the instructions below to avoid any possible damage or injury. 220S4LS/220S4LA 1. Place the monitor face down on a smooth surface. Pay attention not to scratch or damage the screen. 110mm (220S4LC) Pivot 90° 0° 2. = mylars from the hinge cover. (220S4LC) 3. Remove the screws from hinge cover.
2. Setting up the monitor 4. Remove the base assembly. 3. Remove the screws from hinge cover. 1 2 220S4LC 1. Place the monitor face down on a smooth surface. Pay attention not to scratch or damage the screen. 4. Remove the base assembly. 2. = mylars from the hinge cover. Note This monitor accepts a 100mm x 100mm VESA-Compliant mounting interface.
3. Image Optimization 3. Image Optimization 2. Keep pressing to toggle among # Photo, Movie, Game, Economy and Off. 3.1 SmartImage 3. The SmartImage on screen display will remain on screen for 5 seconds, or you can >#?> J ! What is it? 4. When SmartImage is enabled, the sRGB scheme is disabled automatically. To use sRGB, you need to disable SmartImage with the button at the front bezel of your monitor.
3. Image Optimization washout in brighter areas maintaining a dynamic natural values for the ultimate video display. 3.3 Philips SmartControl Premium The new SmartControl Premium software by Phillips allows you to control your monitor via an easy to use on-screen graphic interface. Complicated adjustments are a thing of the past as this user friendly software guides you through ] " Clock/Phase adjustments, RGB White point adjustment, etc.
3. Image Optimization You can adjust more options without wizard by Standard pane. Start with Standard pane Adjust menu Adjust Menu allows you to adjust Brightness, Contrast, and Resolution. You can follow the instruction and do the adjustment. Cancel prompts user if you want to cancel installation. Color menu Color Menu allows you to adjust RGB, Black Level, White Point, Display Gamma, Calibration, SmartImage, and SmartKolor. You can follow the instruction and do the adjustment.
3. Image Optimization 1. "Show Me" starts color calibration tutorial. 2. Start - starts the 6-step color calibration sequence. 3. Quick View loads the before/after images. 4. To return to Color home pane, click the Cancel button. 5. Enable color calibration - by default is on. If unchecked, does not allow for color calibration to happen, dimes out start and quick view buttons. 6. Must have patent info in calibration screen.
3. Image Optimization First Color Calibration Screen Eco Power menu Previous button is disabled until the second color screen. Next goes to the succeeding target (6-targets). Final next goes File > Presets pane. Options menu Cancel closes the UI and returns to the plug in page. Options>Preferences - Will only be active when selecting Preferences from the dropdown Options menu. On a non-supported display capable of DDC/CI, only the Help and Options tabs are available.
3. Image Optimization menu displays SmartControl Premium selections for Select Preset and Tune Display in the desktop right-click context menu. Disabled removes SmartControl Premium from the right click context menu. Option>Auto Pivot. Enable Task Tray icon is checked (On) by default. Enable context menu shows the task tray menu for SmartControl Premium. A right click on the task tray icon displays the menu options for Help, Technical Support. Check for Update, About, and Exit.
3. Image Optimization To enable Theft Deterrence, click on On button to bring up the following screen: Help>Version - Will only be active when selecting Version from the drop- down Help menu. On a non-supported display capable of DDC/CI, only the Help and Options tabs are available. User can enter PIN between 4 and 9 digits numbers only. After entering PIN, Accept button takes user to the pop-up dialog box on the following page. Minimum minutes set to 5. Slider set to 5 by default.
3. Image Optimization Technical Support - Displays the tech support page. Check for Update - Takes the user to PDI Landing and checks the user’s version against the most current available. About - Displays detailed reference information: product version, release information, and product name. Exit - Close SmartControl Premium. To run SmartControl Premium again, either select SmartControl Premium from Program menu, double-click the desktop PC icon, or restart the system.
3. Image Optimization dragged into the region and it will automatically align. When the window and mouse cursor are within the region, the region will become highlighted. 3.4 SmartDesktop Guide SmartDesktop SmartDesktop is in SmartControl Premium. Install SmartControl Premium and select SmartDesktop from Options. Note If the outline of the region is not visible when dragging the window, “Show windows contents while dragging” is disabled. To enable: 1. In Control Panel, click System. 2.
3. Image Optimization Title Bar Options Note If more than one display is attached, the user can select the targeted display to change the partition. The highlighted icon represents the current active partition. Desktop partition can be accessed from the title bar of the active window. This provides a quick and easy way to manage the desktop as well as sending any window to any partition without having to drag and drop. Move the cursor into the active window’s title bar to access the drop down menu.
3. Image Optimization Find Windows – In some cases, the user may have sent multiple windows to the same partition. Find Windows will show all open windows and move the selected window to the forefront. Desktop Partition – Desktop Partition shows the current selected partition and allows the user to quickly change to any of the partitions shown in the drop down. Identify Partition – Displays the outline grid on the desktop for the current partition.
4. Technical Specifications Picture/Display Monitor Panel Type Backlight Panel Size Aspect Ratio Pixel Pitch Brightness SmartContrast Contrast Ratio (typ.) Response time Optimum Resolution Viewing Angle Display Colors Vertical Refresh Rate Horizontal Frequency sRGB Connectivity Signal Input Input Signal Audio In/Out (220S4LA) Convenience Built-in speakers (220S4LA) LCD LED 22" W (55.9cm) 16:10 0.282 x 0.
Heat Dissipation* Normal Operation Sleep (Standby) Off Power LED indicator Power Supply AC Input Voltage AC Input Voltage AC Input Voltage at 100VAC , 50Hz at 115VAC , 60Hz at 230VAC , 50Hz 53.58 BTU/hr 53.58 BTU/hr 53.58 BTU/hr 0.341 BTU/hr 0.341 BTU/hr 0.341 BTU/hr 0.341 BTU/hr 0.341 BTU/hr 0.
4.1 Resolution & Preset Modes Maximum Resolution 1680 x 1050 @ 60 Hz (analog input) 1680 x 1050 @ 60 Hz (digital input) Recommended Resolution 1680 x 1050 @ 60 Hz (digital input) H. freq (kHz) Resolution V. freq (Hz) 31.47 720x400 70.09 31.47 640x480 59.94 35.00 640x480 66.67 37.86 640x480 72.81 37.50 640x480 75.00 37.88 800x600 60.32 46.88 800x600 75.00 48.36 1024x768 60.00 60.02 1024x768 75.03 44.77 1280x720 59.86 63.89 1280x1024 60.02 79.
5. Power Management 5. Power Management If you have VESA DPM compliance display card or software installed in your PC, the monitor can automatically reduce its power consumption when not in use. If an input from a keyboard, mouse or other input device is detected, the monitor will 'wake up' automatically.
6. Regulatory Infomation Congratulations! Restrictions on chlorinated and brominated flame retardants, plasticizers, plastics and heavy metals such as cadmium, mercury and lead (RoHS compliance). This display is designed for both you and the planet. Both product and product packaging is prepared for recycling.
6. Regulatory Infomation Lead-free Product CE Declaration of Conformity Lead free display promotes environmentally sound recovery and disposal of waste from electrical and electronic equipment. Toxic substances like Lead has been eliminated and compliance with European community’s stringent RoHs directive mandating restrictions on hazardous substances in electrical and electronic equipment have been adhered to in order to make Philips monitors safe to use throughout its life cycle.
6. Regulatory Infomation Energy Star Declaration " [ approved by the party responsible for compliance could void the user's authority to operate the equipment. (www.energystar.gov) As an ENERGY STAR® Partner, we have determined that this product meets the ENERGY STAR® ! Use only RF shielded cable that was supplied with the monitor when connecting this monitor to a computer device.
6. Regulatory Infomation Cependant, rien ne peut garantir l'absence d'interférences dans le cadre d'une installation particulière.
6. Regulatory Infomation North Europe (Nordic Countries) Information Ergonomie Hinweis (nur Deutschland) Placering/Ventilation VARNING: FÖRSÄKRA DIG OM ATT HUVUDBRYTARE OCH UTTAG ÄR LÄTÅTKOMLIGA, NÄR DU STÄLLER DIN UTRUSTNING PÅPLATS. Der von uns gelieferte Farbmonitor entspricht den in der "Verordnung über den Schutz vor Schäden durch Röntgenstrahlen" festgelegten Vorschriften.
6. Regulatory Infomation China RoHS EU Energ Lable The People's Republic of China released a regulation called "Management Methods for Controlling Pollution by Electronic Information Products" or commonly referred to as China RoHS. All products produced and sold for China market have to meet China RoHS request.
7. Customer care and warranty black pixel. Other combinations of lit and dark sub pixels appear as single pixels of other colors. 7. Customer care and warranty Types of Pixel Defects Pixel and sub pixel defects appear on the screen in different ways. There are two categories of pixel defects and several types of sub pixel defects within each category. 7.1 Philips’ Flat Panel Monitors Pixel Defect Policy Philips strives to deliver the highest quality products.
7. Customer care and warranty Proximity of Pixel Defects Note A red or blue bright dot must be more than 50 percent brighter than neighboring dots while a green bright dot is 30 percent brighter than neighboring dots. Because pixel and sub pixels defects of the same type that are near to one another may be for the proximity of pixel defects. Black Dot Defects Black dot defects appear as pixels or sub pixels that are always dark or 'off'.
7. Customer care and warranty Customer Care & Warranty For warranty coverage information and additional support requirement valid for your region, please visit www.philips.com/support website for details. You may also contact your local Philips Customer Care Center number listed below. Contact Information for WESTERN EUROPE region: Country ASC Consumer care number Price Germany Siemens I&S +49 01803 386 853 € 0.
7. Customer care and warranty Contact Information for CENTRAL AND EASTERN EUROPE region: Country Call center ASC Consumer care number Belarus NA IBA +375 17 217 3386 Bulgaria NA LAN Service +359 2 960 2360 Croatia NA Renoprom +385 1 333 0974 Estonia NA FUJITSU +372 6519900 Latvia NA “ServiceNet LV” Ltd. +371 7460399 Lithuania NA UAB "Servicenet" +370 7400088 Romania NA Blue Ridge Intl. +40 21 2101969 Serbia & Montenegro NA Kim Tec d.o.o.
7. Customer care and warranty Contact Information for APMEA region: Country Australia Call center NA ASC Consumer care number AGOS NETWORK PTY LTD 1300 360 386 New Zealand NA Visual Group Ltd. 0800 657447 Hong Kong / Macau NA Smart Pixels Technology Ltd. Hong Kong:Tel: +852 2619 9639 Macau:Tel: (853)-0800-987 India NA REDINGTON INDIA LTD Tel: 1 800 425 6396 SMS: PHILIPS to 56677 Indonesia NA PT.
8. Troubleshooting & FAQs satisfactory, you can do manual adjustments via the OSD menu. 8. Troubleshooting & FAQs Note The Auto Function is not applicable in DVIDigital mode as it is not necessary. 8.1 Troubleshooting This page deals with problems that can be corrected by a user. If the problem still persists after you have tried these solutions, contact Philips customer service representative.
8. Troubleshooting & FAQs Eliminate the vertical bars using the Phase/ Clock of Setup in OSD Main Controls. It is valid only in VGA mode. The "power on" light is too strong and is disturbing You can adjust “power on” light using the power LED Setup in OSD main Controls. For further assistance, refer to the Consumer Information Centers list and contact Philips customer service representative. Image appears blurred, indistinct or too dark Adjust the contrast and brightness on On-Screen Display.
8. Troubleshooting & FAQs Q3. After installing SmartControl Premium, when clicking on SmartControl Premium tab, nothing shows up after a while or a failure message shows, what happened? 8.3 General FAQs Q1: When I install my monitor what should I do if the screen shows 'Cannot display this video mode'? It might be your graphic adaptor is not compatible with the SmartControl Premium.
8. Troubleshooting & FAQs package. Monitor drivers (.inf and .icm ! Q4: How do I adjust the resolution? Ans.: Your video card/graphic driver and monitor together determine the available resolutions. You can select the desired resolution under Windows® Control Panel with the "Display properties". 1. Color Temperature: The six settings are 5000K, 6500K, 7500K, 8200K, 9300K and 11500K.
8. Troubleshooting & FAQs may cause "burn in", also known as "after-imaging" or "ghost imaging", on your screen. "Burn-in", "after-imaging", or "ghost imaging" is a well-known phenomenon in LCD panel technology. In most cases, the "burned in" or "atter-imaging" or "ghost imaging" will disappear gradually over a period of time after the power has been switched off. Always activate a moving screen saver program when you leave your monitor unattended.
2012 © Koninklijke Philips Electronics N.V. All rights reserved. Philips and the Philips Shield Emblem are registered trademarks of Koninklijke Philips Electronics N.V. and are used under license from Koninklijke Philips Electronics N.V.