Register your product and get support at www.philips.
Contents 1 Important Safety Notice 2 Your camcorder Introduction What’s in the box Functional overview 3 Get started Load the Micro SD card Turn on First-time setup Charge the built-in battery 4 Use your camcorder Record video Take pictures Play Options during video play Adjust settings 5 Use more of your camcorder 4 4 4 6 6 6 7 9 9 9 9 10 11 11 11 11 11 12 View video or pictures on TV Install and use the camcorder software 13 13 13 6 Technical specifications 15 7 Frequently asked questions
1 Important Notice Safety a Read these instructions. b Keep these instructions. This product complies with the radio interference requirements of the European Community. c Heed all warnings. d Follow all instructions. e Do not use this apparatus near water. f Clean only with dry cloth. Your product is designed and manufactured with high quality materials and components, which can be recycled and reused. g Do not block any ventilation openings.
EN 5
2 Your camcorder Introduction With this portable camcorder, you can: • take full HD (1080P) or VGA movies • take pictures • play recorded movies or pictures either directly or on the large screen of a connected TV • upload the recorded movies or pictures to the Internet directly via your PC/Mac What’s in the box Make sure that the following items are packed in the box: • Camcorder • Quick start guide • Pouch • Hand strap 6 EN
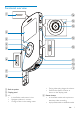
Functional overview a p o n b m c d l e f k j i g h a Built-in speaker b Display panel c +/• In viewfinder mode, zoom in/out. • Navigate up/down in a menu. • Change a value in the settings menu. • • During video play, change the volume. Perform the specific function as shown on the display panel. d Shutter button • In viewfinder mode, take a picture or start/stop video recording. • In play mode, switch to viewfinder mode.
e • In viewfinder mode, switch to play mode. In play mode, play a selected video clip. Confirm settings. • • f MICRO SD • Connect a Micro SD card. g • • • / • Navigate left/right in a menu. Select a menu option. In play mode, turn to the previous/ next picture/video clip. In viewfinder mode, switch to the settings menu. h USB connector i • Eject the USB connector. j Tripod socket k Hand strap hole l HDMI • Connect to a TV through an HDMI cable with a mini HDMI connector.
3 Get started Tip •• To save energy, the camcorder turns off automatically after being idle for 3 minutes. Load the Micro SD card First-time setup When you turn on the camcorder for the first time, a menu for OSD language selection is displayed. 1 2 1 2 3 3 Flap open the protective cover on the Micro SD card socket. Insert a Micro SD card (not supplied) into the socket. • Ensure that the the Micro SD card is not write-protected. • Ensure that the metal contact of the card faces down.
Select a special effect 1 2 3 In viewfinder mode, press to enter the window for scene selection. Press +/- to select a scene. Press to confirm and go back to viewfinder mode. • Or press to cancel and go back to viewfinder mode. Charge the built-in battery 1 2 3 Press at the bottom of the camcorder to eject the USB connector. Connect the USB connector to a USB socket on a PC. »» The status indicator on the shutter button starts flashing in orange.
4 Use your camcorder Record video 1 2 3 4 Switch the mode switch button to . »» The selected resolution and remaining recording time are displayed on the display panel. Hold the camcorder steadily and aim the lens as needed. Press the shutter button to start recording. »» A red time indicator is displayed on the display panel. »» The status indicator on the shutter button starts flashing in red. Press the shutter button again to end recording. »» [Recording saved!] is displayed briefly.
Adjust settings 1 2 3 4 In viewfinder mode, press . »» A settings menu is displayed. Press +/- to highlight an option. Press / to select a setting. Press to confirm the setting and return to viewfinder mode. Description Select an automatic exposure mode that matches your shot for easy shooting. [Effects] Add a special effect to your shooting. [Resolution] Select a video resolution. [Volume] Change the keypad tone and operation sound. [Date] Set the date. [Time] Set the time.
5 Use more of your camcorder Note •• The software supplied only works on PCs that operate Microsoft® Windows® XP, Vista and Windows 7. •• When you connect the camcorder to a Mac, use the iMovie software to import and edit your pictures/ videos directly. View video or pictures on TV Install the camcorder software 1 2 3 Connect the camcorder to a PC (see ‘Get started’ > ‘Charge the built-in battery’). If the software does not install automatically, find and click the Setup icon at My Computer\CAM102B.
Transfer video/pictures to a PC/Mac 1 2 3 Connect the camcorder to a PC/Mac (see ‘Get started’ > ‘Charge the built-in battery’). »» It may take some time for the PC/Mac to recognize the camcorder. Find your video/pictures at My Computer\CAM102B\DCIM\100MEDIA or My Computer\CAM102B SD\ DCIM\100MEDIA. Copy any video/pictures you want to your designated folder in the PC/Mac. Tip •• You can also import the video/picture files with the camcorder software (for PC) or iMovie (for Mac).
6 Technical specifications Product information is subject to change without prior notice. Image sensor 1/3.2” 5MP CMOS sensor Operation modes Movie record, picture record Lens (focusing) Fixed Focus mode Fixed Focus range 0.7m to Infinity Aperture F2.8 Digital zoom 2X Exposure control Auto Exposure -2.0~2.0EV compensation White balance Auto Auto power off 3 minutes Memory 128MB + Micro-SD card Slot Shutter type Electronic Shutter speed 1/2~1/4000 second Picture file format JPEG Video *.MP4 (H.
7 Frequently asked questions (FAQ) Why is there no response when I use the camcorder? •• The camcorder is in power-off mode. Turn on the camcorder (see ‘Get started’ > ‘Turn on’). •• The built-in battery may be drained. Charge the battery (see ‘Get started’ > ‘Charge the built-in battery’). Why is [Memory full!] displayed when I try to record? •• Ensure that the Micro SD card has been inserted correctly (see ‘Get started’ > ‘Load the Micro SD card’). •• The memory is used up.
Why does the camcorder sometimes not record the right color? •• To record both indoors and outdoors, and not having to change any settings, the camcorder has an automatic whitebalance correction. This enables you to record both indoors and outdoors where the amount of light in the environment changes. If you move fast from outdoors to indoors, the camcorder might need some time to correct that, and in extreme cases the colors might seem a bit unnatural.
• • 18 EN Don’t move too fast when panning (i.e. moving the camera horizontally) as it will be hard to follow what is captured when you review the video Try shooting from different angles – for example, from the side, from the front, or even from below.
© 2012 Koninklijke Philips Electronics N.V. All rights reserved. CAM102B_12_UM_V2.