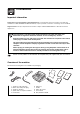
Dear Customer, Below you will find some of the most important functions of your fax machine. PLAIN PAPER FAX MACHINE You have bought a fax machine which is capable of printing on standard A4 sheets and offers special support for use with additional corded and cordless telephones. It also offers special features to simplify installation and convenient use. PRINTING Your fax machine is able to print a total number of 300 pages with a single ink film.
SAFETY INSTRUCTIONS Important information for safe installation: · · · · · · · · Never connect your fax machine to the power supply or telephone socket during a thunderstorm. Never connect the telephone or power connector in damp rooms unless these wall sockets are specially designed for humid conditions. Never touch uninsulated telephone or power cables unless the telephone cable is disconnected from the telephone line and/or the power cable is disconnected from the power line.
INTRODUCTION INSTALLATION 1 INTRODUCTION 2 3 4 5 6 7 8 9 0 # ∗ FAX 3 BASIC FUNCTIONS 4 THE FAX SWITCH (operating modes, additional phones and answering device) 6 THE FAX THE FAX FAX THE TELEPHONE 5 THE TELEPHONE THE FAX SWITCH 1 BASIC FUNCTIONS 2 INSTALLATION 8 APPENDIX APPENDIX A BC TROUBLESHOOTING 7 TROUBLESHOOTING –1–
Table of contents 1 Introduction .......................................... 3 6 The fax ................................................. 29 Important information ............................................... 3 Overview of the machine ......................................... 3 Location of controls ................................................. 4 General view of functions ........................................ 5 Description of the machine ...................................... 6 Sending faxes ....
1 Introduction Important information Connection of your fax machine to the telephone line: your fax machine has been tested in conformity with standards UL 1950, EN 60950 and IEC 950 and may only be operated on networks conforming to these standards. Suppression:We hereby certify that the fax machine complies with EN 55022 VDE Part 1 Class B interference suppression. This equipment is not designed for making telephone calls when the power fails.
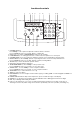
Location of controls 1 2 3 5 4 6 7 1 FINE TEL PHOTO FAX FAX INSTALL OK START COPY HELP FUNCTION TEL/FAX FINE/PHOTO 11 2 3 ABC DEF 4 5 6 GHI JKL MNO 7 8 9 PQRS TUV WXYZ 1-9 A-Z R 0 DIAL CHECK DISPLAY STOP 10 8 9 12 13 14 15 16 1 CURSOR LEFT key: Press briefly: to select options/to adjust the volume/to delete a character Press and hold (at least for 2 seconds): delete a complete line 2 Display (also see chapter 1 Introduction/Description of the machine) 3 FUNCTIO
General view of functions To keep the use of functions as simple as possible, they are grouped logically. You can print out a list of all functions: OK FUNCTION Press the FUNCTION key three times. Below please find an example of a function list: FUNCTION LIST 15-MAY-99 12:30 1 INSTALLATION 11 12 13 14 15 16 2 FAX SET LANGUAGE SET TIME/DATE your teL. NO. YOUR NAME DIAL MODE STORE NUMBERS 21 22 23 24 25 3 FAXSWITCH SLOW (4800BPS) POLLED REC. POLLING SEND SEND LATER SIZE COMPR. 31 ring count 32 ext.
Description of the machine 1 1 2 3 4 5 6 7 8 9 10 11 Mains cable with power plug Paper refill flap Paper feed mechanism Paper tray Spiral cable for the telephone handset Telephone handset Operation panel Document outlet Document feed slot Document width adapter Paper outlet 5 15 12 13 14 12 13 14 15 16 6 2 7 8 3 4 9 10 11 Front ink film compartment Rear ink film compartment Grey printer roller Blue release levers for opening the ink film cover Ink film cover 16 Whenever you are closing t
2 Installation INSTALLATION This chapter explains the correct installation of your fax machine. The correct location 30 cm Your fax should be positioned near the telephone socket and near a mains socket. The fax machine must stand securely and stably on a smooth, flat, horizontal surface (no underlays such as carpets etc.). Avoid exposure to direct sunlight (the ink film is heat-sensitive) and close proximity with heaters, radio and TV sets, air conditioning systems, dust, water and chemicals.
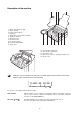
Connecting the fax machine Connecting to the telephone socket Turn the machine upside down. Connect the telephone cable to the fax machine by inserting it in the socket on the bottom of the machine identified with LINE. Insert the cable in the groove provided. Then insert the telephone plug into the line socket. In the UK: For all other countries: Connecting the spiral cable to the handset Connecting the handset to the fax machine Plug one end of the spiral cable into the handset.
Connecting to the power supply Plug the power connector into the back of the fax machine. Plug the mains cable into the wall socket. The machine will carry out an internal test. TIME: 1ˆ:00 TIME: 12:3¡ Press the OK key. YEAR: ¢8 Enter the correct year (00 - 99, for the year 2000 select 00). YEAR: 9¢ Press the OK key. MONTH: ¡1 Enter the correct month (1 - 12). MONTH: 0¤ Press the OK key. DAY: ¡1 Enter the correct day (1 - 31). DAY: 1¤ Confirm with OK.
Tone or pulse dialling Your phone can dial in two different ways. Older telephone systems usually work with pulse dialling whilst modern, digital systems use tone dialling. You can change the dialling mode of your fax machine. If you do not know which method your line uses, contact your telephone company. OK FUNCTION 1 2 3 4 5 6 7 8 9 0 # ∗ OK FUNCTION Select function 15 by pressing the FUNCTION key and then enter number 15. 15 dial mode Press the OK key.
Removing the old ink film 2 4 3 INSTALLATION 1 1 1. Open the ink film cover by pressing the blue release levers back with both hands. 2. Then carefully fold the ink film cover back. 3. Press the empty roll of ink film on the left-hand side against the spring. 4. Lift the roll upwards on the left side in order to lift it out of its seat. 5. Remove both ink film rolls. They cannot be reused. Dispose of the ink film rolls with normal waste.
Loading and removing paper Loading paper Before you can receive or copy documents, paper must be loaded in your fax machine. Please only use the following paper format: standard A4—210 x 297 mm. The fax machine works with normal paper used for writing and copying and has been optimised for smooth 80 g/m2 paper. The smoother the paper surface the better the print quality of your fax machine.
Removing the paper 2 1. Fold the paper feed flap forwards. 2. Pull the paper out. INSTALLATION 1 3. Close the paper feed flap. Paper jam Open the operation panel and the ink film cover. Leave the paper refill flap closed, so that the paper is easier to remove. Pull the paper carefully outwards from the inside. Before closing the ink film cover, the ink film roll must be tensioned by turning the gearwheel of the front ink film roll forwards.
Connecting additional devices In addition to your fax machine, you can also connect other devices, such as additional telephones, call-fee indicators, answering machines or modems to a single telephone line (for UK: So long as the Ringer Equivalent Number (REN value) on the line doesn’t exceed 4. The REN value of this fax is 1). If you want to receive fax messages by modem, make sure that your fax machine is set to the TEL mode.
Connecting to a private branch exchange P A B X PTT OK FUNCTION 1 2 3 4 5 6 7 8 9 0 # ∗ OK FUNCTION OK Connect the fax machine to an extension line of the private branch exchange (PABX). In order to operate your fax machine on an extension, you need to enter the appropriate settings in function 15. Select function 15 by pressing the FUNCTION key and then choosing number 15. 15 dial mode Press the OK key. DIAL MODE: PULSE Press the OK key.
1 2 3 4 5 6 7 8 9 0 # ∗ 3 Basic functions If you press a wrong key by mistake, press the STOP key as often as necessary to return to the original position. If you want to keep a note of the factory settings on your machine for later, we recommend printing out a function list before you change any of the settings (press 3 x the OK/FUNCTION key). If you want to delete your individual settings, you can do so in function 45 “Service code” (see chapter 7 Troubleshooting/Service code).
Entering your number “Your name” and “your telephone number” are transmitted at the top of each page (the first 4 mm) together with the date, time and page number. Use the key ∗ or the key # to enter the “+”, that is often used in international fax numbers in front of the country code, ) to enter a space. The maximum number of digits you can use for your number is 20. and the CURSOR RIGHT key ( OK FUNCTION NR.: __ Press the FUNCTION key. 1 2 3 4 5 6 7 8 9 0 # ∗ OK Enter function 13.
OK Press the FUNCTION key. FUNCTION NR.: __ Enter function 14. 14 your name Press the OK key. your name FUNCTION 1 2 3 4 5 6 7 8 9 0 # ∗ OK FUNCTION Example for entering your name: 1 2 3 4 5 6 7 8 9 0 # 1 2 3 4 5 6 7 8 9 0 # ∗ ∗ Press the key position. 2 Press the key marked on it. 2 , for example. The cursor will remain in the same again. The key now enters the second letter Now press the CURSOR RIGHT key. The cursor moves one place to the right.
Type of ring signal You can choose between five different ring signals. OK FUNCTION 1 2 3 4 5 6 7 8 9 0 # ∗ OK Enter function 44. 44 RINGER TYPES Press the OK key. RINGER TYPE: 1 Select using the keys selected. OK FUNCTION 1 to 5 . You will hear the signal you have RINGER TYPE: 3 15-MAY-99 12:30 Confirm your entry by pressing OK. Volume of the ring signal You can adjust the volume of the ring signal if the fax machine is in standby mode or if it is just ringing.
4 The fax switch FAX Operating modes Your fax machine has three different operating modes. It is set to TEL/FAX mode by default which allows both automatic fax reception as well as the operation of an external answering device and external telephones.
Ring count Use this function to choose the number of rings before your fax machine will automatically activate fax reception. OK FUNCTION 1 2 3 4 5 6 7 8 9 0 # ∗ OK Choose function 31. 31 ring count Press the OK button. RING COUNT: Use CURSOR LEFT and CURSOR RIGHT to choose how often the device will ring in TEL/FAX and TEL/SILENT FAX RECEPTION mode, before fax reception will be started. RING COUNT: 03 Confirm with OK.
OK FUNCTION 1 2 3 4 5 6 7 8 9 0 # ∗ Press OK key. Enter two-digit code. First position should be a ∗ or # character. ** rel. line: *2 15-MAY-99 12:30 Press OK key. OK rel. line: FUNCTION Please note that the two codes must be different. When you enter the same code several times, CODE NOT OK will be displayed. To use this function you must set your external phone to tone dialling. If your telephone connection requires pulse dialling, you must reset your device briefly.
5 The telephone The R key allows you to use various services offered by the telephone service provider (call waiting, CLI, etc.). Contact your telephone service provider for more information. Making a call 1 2 3 4 5 6 7 8 9 0 # ∗ Dial the desired number. If you enter a wrong digit, delete it using the CURSOR LEFT key. Lift the handset. The fax machine will dial. During the call, the call duration appears on the display after about 10 seconds.
Using the short dial keys You can use the short dial keys for telephone calls and for sending faxes. Press the SHORT DIAL key. On the display appears: 1-9 1 2 3 4 5 6 7 8 9 0 # ∗ DIAL choose 0-9 Select using the keys 0 to 9. The corresponding name will appear on the display. If you have not entered a name the telephone number will appear on the display. 1: 12345 Lift the handset or press the DIAL key. The fax machine will start to dial and the number is displayed.
Storing numbers and names with the TELEPHONE BOOK key A-Z 1 2 3 4 5 6 7 8 9 0 # ∗ OK FUNCTION 1 2 3 4 5 6 7 8 9 0 # ∗ OK Press the TELEPHONE BOOK key for at least 2 seconds until you hear a confirmation tone. ENTER NAME Enter a name. BERGER Press the OK key. ENTER NUMBER Enter the telephone number by using the dial pad. Using the REDIAL key you can enter a dialling pause. 12345_ Press the OK key. A confirmation will appear briefly on the display.
choose 0-9 The display shows either 1 2 3 4 5 6 7 8 9 0 # ∗ 1-9 or the first name in the book. BERGER You can now search through the list using the dial pad. CHOMSKY Then press the SHORT DIAL or TELEPHONE BOOK key for at least 2 seconds. Chomsky_ Press the CURSOR LEFT key until the entry is deleted and you hear a confirmation tone. _ A-Z Correcting an entry 1 2 3 4 5 6 7 8 9 0 # ∗ OK Enter the correct name and number using the dialpad and confirm each entry with OK.
FAX 6 The fax This chapter explains all fax functions provided. Sending faxes Which documents to use In order to avoid transmission errors you must use good quality, legible originals. Therefore, keep to the following guidelines: single letters: several letters: Width: 148 - 217 mm Length: 100 - 600 mm Thickness: 0.05 - 0.2 mm Width: 148 - 217 mm Length: 148 - 297 mm Thickness: 0.08 - 0.12 mm Write clearly and legibly. Only use pens with dark ink (black/dark-blue, not yellow/orange/light green).
Take your documents (max. 10 pages) and insert them loosley with the printed side up in the document feed slot until you notice a tangible resistance. Then leave them. Push the document width adapter against the pages of your document(s), so that it guides them precisely without jamming them. The top page will then be taken automatically by the feeding mechanism and drawn in slightly. Do not push this page further in, because otherwise several pages will be drawn in together when sending or copying.
The document will now be fed into the machine. It will appear at the front of the machine again. The last page of the copy will appear completely infront of the document outlet. Pull it out gently. If your local copies or received faxes are blank, the document was inserted the wrong way. You can interrupt the process of copying by pressing the STOP key. Improving the picture quality Your fax machine normally operates with standard resolution.
1 2 3 4 5 6 7 8 9 0 # ∗ 12345_ Enter the telephone number. START COPY DIALLING... Press the START key. CONNECTING... Polling codes work in accordance with the international ITU standard. However, there are manufacturers who use other processes and whose machines are therefore not compatible. If the polled reception does not work with a specific number, try to poll manually. Lift the handset, dial the required number and then press START.
Delayed send If you wish to make use of cheaper telephone rates, or if your fax correspondent is only available at particular times, you can program automatic transmission of a fax at a later time (within 24 hours). OK FUNCTION 1 2 3 4 5 6 7 8 9 0 # ∗ OK Select function 24. 24 SEND LATER Press the OK key. The current time is displayed. TIME: ƒ6:00 Enter the time when you wish the document to be sent. TIME: 23:3¡ Press the OK key. INSERT DOCUMENT Insert the document.
Fax journal The fax journal is a list of the last 10 received and transmitted faxes. You can choose whether to print out the journal immediately or automatically after 10 successful transmissions. OK FUNCTION 1 2 3 4 5 6 7 8 9 0 # ∗ OK Select function 41. 41 fax journal Press the OK key. journal: no Select with the CURSOR RIGHT or CURSOR LEFT key. journal: yes Press the OK key. print: now Select with the CURSOR RIGHT or CURSOR LEFT key. Press the OK key.
7 Troubleshooting The following table contains an overview of the most frequent operating errors or problems and their possible causes and remedies. Before calling our service desk, please consult this table which has been compiled by our service engineers. In most cases you will be able to solve the problem on your own. If you cannot rectify a fault using the instructions provided, please disconnect from the mains. Wait at least ten seconds and reconnect.
Problems when establishing a connection Error Possible cause Remedy You cannot phone or send faxes. Wrong dialling mode selected. Change the dialling mode with function 15. You are operating your fax machine on a private branch exchange and have not set it accordingly. In function 15, select PABX: Yes. The telephone connection is of poor quality. Try again or send the fax at reduced speed (function 21). The recipient has a paper jam or has run out of paper. Call your fax partner.
Other Errors Possible cause Remedy On lifting the handset of your fax machine you hear a tone or silence. The caller is trying to send a fax. Press the START key. Then replace the handset. On lifting the handset of an additional telephone you hear a tone or silence. The caller is trying to send a fax. You can start your fax machine by pressing keys ∗ and 5 . On lifting the handset of an additional telephone you hear that your fax machine has already gone off-hook.
Service code Function 45 Service code is used to delete some or all of your changes to the factory settings. This function enables you to partially or fully reconfigure your machine. It is especially helpful if you have modified settings but find that your fax machine does not respond as expected. Only use this function when absolutely necessary. If you are satisfied with your changes to the factory settings you should not use this function.
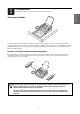
Poor output quality when copying or sending fax messages Clean the scanner glass, scanner roller, document feed roller and facing rubber lips A B C D Open the operation panel by raising it at the recess in the middle. If you hear a slight click, the panel is latched into place. FINE/PHOTO Lightly wipe the scanner glass (B) and rubber lip (D) with a cloth. Carefully turn the document feed roller (A) by hand and wipe it gently with the cloth.
A BC 8 Appendix Technical specification Compatibility Type of connection Flashtimes Size of document Printing paper Largest scanning width Resolution Photo mode Contrast control Copying Data compression Modulation Transmission speeds Sound power level Printing method Fax paper Document feed Fax switch Dimensions Weight Power consumption Power supply Allowed operating environment Recommended operating environment ITU Group 3 outside line (PSTN) / extension (PABX) outside line: 100 ms extension (PABX):
Glossary You can operate your fax machine together with additional devices such as (cordless) telephones, an answering machine etc. on a single telephone line. You may have to enter some specific settings to do this. Calling Line Identification (CLI) A network-provided service feature that notifies your fax machine of the phone number from which the call has originated. document The written note you want to send by fax to another party. DTMF Short for: Dual Tone Multiple Frequency.
Index A Additional devices connection 13 technical term 39 Answering machine external 22 how to connect an additional answering machine 13 in TEL mode 22 in TEL/FAX mode 22 in TEL/SILENT FAX RECEPTION mode 22 operating mode 22 ring count 22 settings 22 Appendix 38 Arrows on the display 6 B Base station of cordless telephones proper location 7 Basic functions 16 C Call duration on the display 23 Change names 18 numbers 18 transmission speed 32 type of ring signal 19 volume of loudspeaker 19 volume of ring
Q Quality of telephone line 32 R Rear ink film compartment 6 Redialling of the last 5 numbers 23 Release levers for opening the ink film cover 6 Removing the old ink film 11 the paper 13 Replacing paper 12 the ink film 10 Reports Language of reports 16 Resolution (FINE/PHOTO) 29 Ring count 21 Ring signal choose type 19 regulate volume 19 TEL/SILENT FAX RECEPTION mode 20 Telephone book 24 correction of names and numbers 18 print stored numbers 26 storing names or numbers with the TELEPHONE BOOK 25 storing
Your international guarantee Dear customer, Thank you for purchasing this PHILIPS product which has been designed and manufactured to the highest quality standards. If, unfortunately, something should go wrong with this product PHILIPS guarantees free of charge labour and replacement parts during a period of 12 months from date of purchase.