PPF 685 PPF 695 EN User Manual
EN Dear Customer, About this User Manual With the purchase of this device, you have chosen a quality PHILIPS product brand. Their device fulfils the most varied requirements for private use or in your office and business everyday. Your device is delivered with an already inserted free ink film for a few test pages. For this film, you do not require any Plug’n’Print card (= chip card with information regarding ink film capacity).
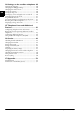
Table of Contents Dear Customer, ......................................................... 2 About this User Manual ............................................ 2 1 General Safety Information .............. 5 2 Overview............................................. 6 Overview of the Menu Functions .............................. Device Overview ........................................................ Cordless Telephone Panel .......................................... Panel ...................................
14 Settings on the cordless telephone 40 EN Selecting the language .............................................. Changing the Wallpaper Image ............................... Changing the menu colours ..................................... Setting the contrast .................................................. Setting the ring tone ................................................ Turning key-tones and signal-tones on and off ........ Switching silent mode on/off ...................................
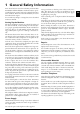
1 General Safety Information Your device has been tested in conformity with standards EN 60950-1 and IEC 60950-1 and should only be operated with telephone systems and power equipment that meet these standards. The device was built exclusively for use in the indicated sales region. Do not make any changes or settings that are not described in this user manual. Setting Up the Machine The device should rest securely on a stabile, flat surface. The device should rest securely on a stabile, flat surface.
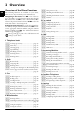
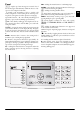
2 Overview Overview of the Menu Functions 45 Using Service Codes 45 Using service codes................................ page 50 46 Checking the ink film reserve ................ page 46 47 Checking the firmware version .............. page 50 48 Sudoku.................................................. page 36 46 Checking the Ink Film Reserve EN The following functions are available on your device.
Device Overview Primo · Voice overview ‚ Handset ƒ Paper tray „ Document feeder (writing facing up) … Panel with display † )-Socket—Connection socket for the telephone handset ‡ EXT-Socket—Connection socket for additional devices ˆ LINE-Socket—Connection socket for telephone cable PPF 63x, PPF 67x ‚ Scanner glass ƒ Rollers of the automatic document feeder „ Rests of the intake rollers … Document guide / scanner film † Cover for scanner and automatic document feeder ‡ Toothed wheel for tightening the ink f
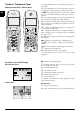
Cordless Telephone Panel Monochrome Dect · Colour Dect Paneel Dect Kombi Programmable button left õ—Programmable button (the saved function appears on the display) ô—Programmable button (the saved function appears on the display) / calling options / confirming selection “/@—Press briefly: Place calls / receives calls / hands free / press and hold: Redialling / switching on cordless telephones ’—Press briefly: Ending calls / aborting menu functions / press and hold: switching off cordless telephone m—Press
Panel Message ä—Lights up, if new messages are received / list of the new messages with submenus / blinks in the case of device error (for example no ink film) {—During a call: Forwarding a call to a specific or all cordless telephones / in the starting mode: Locating cordless phones (all registered cordless phones start ringing) Speed dial buttons ë—Press briefly: Recalling speed dial entry / press and hold: Editing speed dial entry ma—Press briefly: Calling up the telephone book entries.
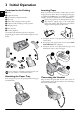
3 Initial Operation EN Contained in the Packing Inserting Paper Package Contents Primo · Voice Paper Format ‚ Device ƒ Telephone handset „ Spiral cable for telephone handset … Paper tray † Mains cable with plug (country-specific) ‡ Telephone cable with plug (country-specific) ˆ Charging station ‰ Three batteries Š Cordless telephone User manual with installation guide (not depicted) Depending upon model several cordless telephones are included.
Connecting the Telephone Cord Initial Installation Connecting the Telephone Cable Starting Initial Installation Your device is an analogue fax device (Group 3). It is not an ISDN device (Group 4), and therefore it cannot be operated directly on an ISDN connection. In order to do this, you need either an analogue adapter or a connection for analogue terminals. Connecting the Telephone Cable Connect the telephone cable to the device by inserting it in the socket designated with LINE (RJ-11-Connector).
Inserting batteries in cordless telephone EN 1 Insert the new batteries in the battery compartment with the positive and negative poles as shown in the picture in the battery compartment. Never use non-rechargeable batteries in the cordless telephone. Follow the specifications in the technical data. 2 Place the cover on the battery compartment and slide it upward until it snaps into place. 3 Place the cordless telephone into the charging station.
4 Telephone functions For information on how to connect additional cordless telephones and another device and which functions are available to you, please refer the chapter on Telephone Connections and additional devices, Page 43. In the fax only reception mode (F on the display) the device rings twice. Then the fax reception switches on.
EN Redial list: Press and hold @ (at least two seconds). Use [ to select an entry from the list of the dialled numbers. Caller List: 1 Press [, and using [CALLS select PERSONALIS.. 2 Confirm with OK. 3 Using [, select from which list you would like to dial a number. 4 Confirm with OK. 5 Select the desired number using [. You can adjust the volume level of the speaker on the cordless telephone using [ even during a call. Switching notification tone for call waiting on/ off 1 Press OK, 42 and OK.
Mute mode To other cordless telephones Mute mode Forwarding Existence of aseveral call todevices Dect is the prerequisite You can put the handset on mute, if you want to speak to someone without letting the caller hear the conversation. On the device 1 During a call, press C. Your caller cannot hear anymore. 2 Press C again to continue with the call. 1 2 3 4 On the Cordless Telephone Switching Dect to Mute 1 2 3 4 Mute mode During a call, press ô Menu. Using [ select SECRET. Confirm with OK.
Calling Line Identification (CLIP) (Function is not supported in all countries and networks) The number of an incoming call appears on the display. For this function to work, the Calling Line Identification Presentation (CLIP) must be activated for your telephone connection. Enquire with your telephone company. Caller Line Identification may be associated with a fee.
5 Telephone book of the device Press i and 3 to print an overview of the telephone book functions. Help 3 · Telephone Functions Telephone Book In the telephone book of your device, you can save entries with multiple numbers and collect multiple entries into groups. You can assign various ring tones to the entries. Follow the specifications in the technical data. You can move the cursor using [. Use C to delete individual characters. Press STOP to close the menu and return to the starting mode.
EN Deleting a Group 1 Press OK, 13 and OK. 2 Using [ select the group you would like to delete. 3 Confirm with OK. 4 Using [ select DELETE MEMBER?. 5 Confirm with OK. 6 Using [ select DELETE: ALL. 7 Confirm with OK. All entries in the group are deleted. Speed dialling Speed Dialling You can assign the speed dial buttons to frequently dialled telephone numbers. You can load these telephone numbers quickly with the speed dial buttons.
6 Telephone book of the cordless telephone Restricted telephone book functions All functions for the telephone book of the device are not available to you on the cordless telephone. Deleting and closing Use C to delete individual characters. Press ’ to close the menu and return to the starting mode. Saving entry Do not add to device entries You can add entries to the telephone book of the cordless telephone only. 1 Hold m pressed (for at least two seconds). 2 Using [ select . 3 Enter the name.
7 Cordless telephone Looking for cordless telephone Emergency call number It is recommended not to save any actual emergency call number (e.g. police or fire brigade) with this function, so that you do not accidentally call this emergency call number. Using the search function EN This function helps you in locating cordless telephones, which you have misplaced. For this purpose the cordless telephones must be registered with the device and must be within its range. Press { on the device.
Modifying the emergency call number 1 Press [, and using [ select SECURITY. 2 Confirm using OK. 3 Dial using [ EMERGENCY. 4 Confirm using OK. 5 Press õ EDIT ENTRY. 6 Using [ select CHANGE NO. 7 Confirm using OK. 8 Enter the telephone number. 9 Confirm using OK. Additional functions Telephone call at alarm time If you place a call at a preset alarm time, the cordless telephone rings after the call is terminated. Back and Close Press C to return to the previous menu level.
9 Enter the birth day, e.g. 08 06 for 8th June. 10 Confirm using OK. 11 Enter the time, e.g. 14 00 for 2 pm. 12 Confirm using OK. EN Displaying birthday 1 Press [, and using [ to select ACCESSORIES. 2 Confirm with OK. 3 Dial using [ BIRTHDAY. 4 Confirm using OK. 5 Using [ select the entry which you would like to be displayed. 6 Confirm using OK. Name, date and time of the birthday reminder are displayed. 7 End the function using ’. Modifying a birthday 1 Press [, and using [ to select ACCESSORIES.
8 Answering Machine Press i and 3 to print an overview of the answering machine functions. Help 3 · Answering Machine Only Fax Reception In the fax only reception mode (F on the display) the answering machine of the device is switched off. You cannot switch on the answering machine in this mode (also see chapter Setting the Fax Switch, page 38) (this function is not supported in all countries and networks).
On the cordless telephone Back and Close EN Press C to return to the previous menu level. Press ’ to close the menu and return to the starting mode. Recording the outgoing message: 1 Press [, and using [ to select VOICE MAIL. 2 Confirm with OK. 3 Use [ to select OUTGOING MSG.. 4 Confirm using OK. 5 Using [ select EDIT ENTRY. 6 Confirm using OK. 7 Press ô Begin to start the recording. Wait for the confirmation tone before you say your text. Using õ Exit you can cancel the recording.
Deleting messages On the device You can also call the function by pressing OK, 79 and OK. Deleting an Individual Message During playback, press C and OK in order to delete the currently playing outgoing message. 4 Enter a four-digit code. The access code may not be identical to the VIP code. 5 Confirm with OK. Deleting Heard Messages Forwarding Messages Deleting New Messages Messages not yet heard must be heard first before deleting them. 1 Press b. 2 Using [ select MESSAGES. 3 Confirm with OK.
EN If you select the 5/2 option for the number of rings of the answering machine, the answering machine switches on after two rings, when you have received new messages. If there are no new messages, the device rings five times. If the device does not pick up after two rings, you have no new messages. You can terminate the remote access without incurring any telephone costs. 5 The functions below are available via the number buttons. 6 Hang up to end the remote control session.
Modifying the settings Available only on the device These functions are available only on the device. Entering the VIP Code VIP Code EN If callers enter the VIP code, the machine continues to ring, even if the answering machine has taken over the call. With this function, certain persons can reach you even if you have set the number of rings to zero. The VIP code may not be identical to the access code for remote control. 1 Press b. 2 Using [ select VIP CODE. 3 Confirm with OK.
9 Fax Help 4 · Fax EN Loading Documents Press i and 4 to print the instructions for sending faxes and for fax switch settings. Do not insert any documents into the machine that... ... are wet, have been edited with correction fluid, are soiled or have a coated surface. ... are written on with a soft pencil, with paint, chalk or charcoal. ... originate from newspapers or magazines (printing ink). ... are held together with office or notebook staples or with tape or glue. ... are pasted with note papers. .
Broadcasting Paper Error Broadcasting You can send one fax to multiple recipients in succession. Entering Recipients Individually 1 Insert the document. 2 Press OK, 34 and OK. The document is now read. 3 Enter the desired number using the numeric keypad or select a saved entry. 4 Confirm with OK. 5 Enter the next telephone numbers. 6 Confirm with OK. You can enter up to 25 recipients. 7 Press START. The device transmits the fax message successively to all recipients.
Sending Faxes via Polling Secure Fax Polling Protect your document against unauthorised access with a code. Secure Fax Polling EN A caller who knows the code can poll the fax from your device. You can continue to make telephone calls and receive faxes. 1 Insert the document. 2 Press OK, 32 and OK. 3 Enter a code (max. 20 characters). 4 Confirm with OK. Press STOP to eject the document. This interrupts the standby mode.
10 Copier Help 5 · Copier Press i and 5 to print help for copying. EN 10 Documents · A5/A4 Use documents with sizes A5 or A4 with 60 to 100 g/m2 weight. You can insert up to 10 documents at a time. Inserting Documents 1 Insert the documents face up into the document feeder. The top most document will be fed in first. 2 Set the desired resolution. You can choose between RESOL.: STANDARD (for documents without special features), RESOL.: FINE (for texts with small print or drawings) and RESOL.
11 SMS (Function is not supported in all countries and networks) Press i and 8 to print the instructions for SMS functions. Function is not supported in all countries and networks Help 8 · SMS EN SMS Requirements CLIP for SMS Your device is preset for using the SMS (Short Messaging Service) services. Caller Line Identification (CLIP) must be activated for the SMS to work.
SMS to E-Mail (Function is not supported in all countries and networks) You can send an SMS to an E-Mail address. 1 Press _. You can also call the function by pressing [ and selecting using [ SMS. Confirm with OK. Function is not supported in all countries and networks 2 3 4 5 6 Using [ select EDIT EMAIL. Confirm using OK. Enter the text as described under Sending SMS. Confirm using OK. Enter the e-mail address. Press and hold 0 until the @ character appears. E-Mail addresses must not contain a space.
EN 6 Select the desired SMS using [. 7 Press ô Select. 8 Using [ select READ. 9 Confirm with OK. Press ô Select to call additional SMS functions. Modifying the Read Mode Modifying the Read Mode You can display an SMS in different ways. 1 Select the SMS to Read. 2 Press ô Select. 3 Using [ select SMS MODE. 4 Using [, select the desired mode: AUTO SCROLL—The text scrolls automatically. MANUAL SCROLL—Using [ you can navigate within the text. 2 LINES—Two rows of the text are displayed. 5 Confirm with OK.
Enter the number for sending SMSs. Confirm using OK. Enter the number for receiving SMSs. Confirm using OK. Use [ to select the SMS service provider through which you would like to send SMSs. 9 Confirm using OK. You can receive SMS messages via both providers. 4 5 6 7 8 EN Switching Off Automatic Printing Automatic Printing You can deactivate the automatic printing of SMS messages. 1 Press OK, 66 then OK repeatedly until PRINT SMS: YES appears on the display.
12 Fun and Games Help 7 Games and Fun Press i and 7 to print the instructions for the Games and Fun functions of your device. EN Sudoku Sudoku Sudoku is a Japanese number puzzle. The game has 3 × 3 squares divided into 3 × 3 fields. Depending on the difficulty level, lesser or more digits are already given at the beginning of the game. The aim of the game is to fill digits from 1 to 9 in the game field is such a way that each digit appears only once in a row, a column and each of the nine blocks.
13 Settings on the device Cursor navigation 1 You can move the cursor using [. Use C to delete individual characters. Press STOP to close the menu and return to the starting mode. Entering the Date and Time 1 Press OK, 91 and OK. 2 Enter the time, for example 14 00 for 2 o'clock p.m. 3 Enter the date (two digits for each field), for example 08 06 07 for June 8th, 2007. 4 Confirm with OK. You must check the time and date after a short power failure. Confirm with OK.
Setting line interruption Setting the Fax Switch (Function is not supported in all countries and networks) The necessary length of the short line interruption (Hook Flash) depends on the country and telephone network. The Hook Flash period is set in the device by the factory, if you have selected the correct country, in which you operate your device. If you cannot call special functions or dial outside from an extension, you must probably change the Hook Flash time (country and network-dependent).
Setting the Fax Only Reception Mode Printing Fax Journal (Function is not supported in all countries and networks) You should select this mode if you primarily receive faxes at your device. In the fax only reception mode the device rings twice. Then the fax reception switches on. You can only accept an incoming telephone call whilst it is ringing. The answering machine of the device is switched off. You cannot switch on the answering machine in this mode.
14 Settings on the cordless telephone Back and Close EN Press C to return to the previous menu level. Press ’ to close the menu and return to the starting mode. Selecting the language Selecting the language Your cordless telephone automatically adopts the language setting of the device during registration. You can set a different language for the display of the cordless telephone. All languages are not available on the cordless telephone.
7 Using [, select whether you would like to turn the button-tones, the notification tone for low battery charge or the confirmation tone when replacing the cordless telephone in the charging station on or off. 8 Confirm with OK. 9 Press õ EDIT ENTRY to switch the function on/off. 10 Confirm with OK. Switching silent mode on/off Silent mode In the silent mode, all ring tones, alarm tones and button tones of the cordless telephone are turned off. However, you can still place a call.
EN 7 Use [ to select an option: You can have the call details displayed, call the number, save it to the telephone book or delete it from the log, send an SMS to the number or delete all numbers from the list. 8 Confirm with OK. Calling events 1 Press [, and using [CALLS select PERSONALIS.. 2 Confirm with OK. 3 Dial using [ EVENTS. 4 Confirm using OK. 5 Dial using [ VIEW. 6 Confirm using OK. 7 Select the desired number or message using [. 8 Confirm using OK.
15 Telephone Lines and Additional Devices Configuring Telephone Lines and Services PABX Systems PABX Systems Private branch exchanges (PABX) are typical in many offices and some households. You must dial an outside line access code in order to get a connection to the public telephone network (PSTN) from a PABX. An additional telephone connected to the machine on a telephone socket is not considered an extension. External Device Not Extension 1 Press OK, 96 and OK.
De-registering Cordless Telephone EN On the Device 1 Press OK, 83 and OK. 2 Using [ to select which cordless telephone you are would like to de-register. 3 Confirm with OK. The device disconnects from the cordless telephone. On the Cordless Telephone 1 On the cordless telephone, press [, and using [ select SETTINGS. 2 Confirm with OK. 3 Select with [ADVANCED SET.. 4 Confirm with OK. 5 Using [ select SET BASE. 6 Confirm with OK. 7 Using [ select DELETE HANDSET. 8 Confirm with OK.
Using Additional Telephones (Easylink) Easylink With the Easylink function you can control your device with additional telephones. To use this function, additional telephones must be set to the tone dialling mode (DTMF/MFV tones) (for this purpose see the operating manual of your additional telephone).
16 Service Disruptions Should disruptions occur, follow the instructions on the display and on the error report. EN 3 Grip the rear ink film roll at both the sides and place it next to the front ink film roll. Checking the Ink Film Reserve 1 Press OK, 46 and OK. 2 The number of pages that can still be printed with the ink film is shown on the display. 3 Press STOP to return to the starting mode. If the ink film used up or if there is no ink film in the machine, a message appears on the display.
7 Place the larger roll with the ink film in the rear ink film tray. The blue gear wheel must be on the right hand side. 11 Close the device. Insert the paper tray in the opening provided for it behind the paper feeder. Insert paper again. Fixing a Paper Jam 1 Remove the paper from the paper feeder and take the paper tray out of the device. 2 Open the device by lifting the panel using grip in the centre and folding it up. 8 Place the smaller roll without ink film in the front tray.
Fixing a Document Jam EN 1 Remove the paper from the paper feeder and take the paper tray out of the device. 2 Open the device by lifting the panel using grip in the centre and folding it up. Lock the cover of the device completely into place when opening the device. You could be injured if the cover falls while you are working on the device. 3 Open the scanner cover and the cover of the automatic document cover by first pushing the support (A) and then the support (B) inside. The cover (C) folds below.
3 Open the scanner cover and the cover of the automatic document cover by first pushing the support (A) and then the support (B) inside. The cover (C) folds below. 7 Turn the blue gear wheel forward to tension the ink film. The ink film must not have any creases. EN 4 Lightly wipe the upper side of the scanner glass (A) and the lower side of the document feeder/scanner film (= white plastic plate) (B) with a cloth. 8 Close the device.
Never use non-rechargeable batteries in the cordless telephone. Follow the specifications in the technical data. EN Using Service Codes The service codes delete all the changed settings and your device is reset to factory settings. It may be possible that the device with the changed settings reacts differently than expected. Only use the service codes if this is absolutely necessary. Some service codes also delete saved messages and telephone book entries. 1 Press OK, 45 and OK.
Problems when faxing or printing Copy is blank. Insert the documents face up into the document feeder. Printing is interrupted. Paper or document jam, no paper or ink film. Follow the instructions on the display and in the error report. There could be a small pause after printing several pages. The device continues printing automatically. No printing Check if you have inserted clamped paper correctly. The lever on the right hand side next to the paper feeder must be folded backwards.
17 Appendix Technical Data Dimensions (L¦×¦H¦×¦W) ...................313¦×¦129¦×¦197¦mm Weight ...................................................................1,9¦kg Power Supply ......................... 220¦–¦240¦V¦~ / 50¦–¦60¦Hz Power Consumption Stand-by mode ...............................................<¦2,5¦W Transmission ...................................................<¦20¦W Recommended Ambient Temperature .............18¦–¦28¦ºC Relative humidity ................
This user manual was printed on recycled paper bleached without chlorine. This satisfies the highest standards for low environmental impact. The cardboard packaging used and the packaging inserts of paper and cardboard can be disposed of as waste paper. The plastic foil may be submitted for recycling or disposed of with waste not intended for recycling, depending on the requirements in your country. Trademarks: The references mentioned in this manual are trademarks of the respective companies.
EN 54 Philips PPF 685 · 695
EN Appendix 55
E-Mail E-Mail: dti.faxinfoline@sagem.com Internet: www.sagem-communications.com Internet PHILIPS and the PHILIPS’ Shield Emblem are registered trademarks of Koninklijke Philips Electronics N.V. and are used by SAGEM COMMUNICATIONS under license from Koninklijke Philips Electronics N.V. SAGEM COMMUNICATIONS Printing Terminals Headquarters : Le Ponant de Paris 27, rue Leblanc · 75015 Paris · FRANCE Tél. : +33 1 58 11 77 00 · Fax : +33 1 58 11 77 77 www.sagem-communications.