Register your product and get support at www.philips.
Table of Contents Overview ................................................... 3 Dear Customer ................................................................... 3 About this User Manual ..................................................... 3 1 General Safety Information ................ 4 Setting Up the Device ........................................................ 4 Repairs ................................................................................... 4 Power Supply ...............................
Overview Dear Customer Thank you for purchasing our Pocket Projector. We hope you enjoy your device and its many functions! About this User Manual With the installation guide on the following pages, you can start using your device quickly and easily. Detailed descriptions can be found in the following sections of this user manual. Read the entire user manual carefully. Follow all safety instructions in order to ensure proper operation of your device.
1 General Safety Information Do not make any changes or settings that are not described in this user manual. Physical injury or damage to the device or loss of data can result from improper handling. Take note of all warning and safety notes indicated. Setting Up the Device The device is exclusively for indoor use. The device should be placed securely on a stable, flat surface.
DANGER! Risk of explosion with incorrect type of batteries Only replace the batteries with the same or comparable batteries. There is a risk of explosion if the incorrect battery type is used. Switch the device on or off using the power switch before removing the power supply from the socket. Turn off the device and remove it from the power supply before cleaning the surface. Use a soft, lint-free cloth. Never use liquid, gaseous or easily flammable cleansers (sprays, abrasives, polishes, alcohol).
2 Overview Top of the Device Side view 1—USB cable USB connection for a computer / port for power supply USB connection for a USB storage medium 2—Focus wheel for image sharpness.
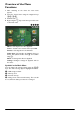
Overview of the Menu Functions 1 After switching on the device the main menu appears. 2 Select the desired menu using the navigation keys ¡/¢, À/Á. 3 Confirm with à. 4 By pressing the ¿ key several times you will return to the main menu. Videos—Selecting files for video playback Source – Switch to the external video input AV . Pictures—Selecting files for the slideshow Folder View—Selecting files for Playback. Copy or Delete Files (Mark the files with Á and confirm using à).
3 Initial Operation Setting up the Device Initial Installation A tripod accessory is available if you want to elevate the device. 1 Switch the device on using the on/off switch on the side. 2 Turn the device towards a suitable projection surface or wall. Note that the distance to the projection surface must be a minimum of 0.3 meters and a maximum of 2.1 meters. Make sure the projector is in a secure position. 3 Use the focus wheel on the top to adjust the image sharpness.
4 Memory card / USB storage medium Inserting a Memory Card 1 Remove the cover ot the memory card socket MICRO SD. 2 Insert a memory card with the contacts facing upwards into the MICRO SD slot at the side of the device. Your device supports the following memory cards: micro SD/SDHC. 3 Insert the memory card into the slot until it snaps into position.
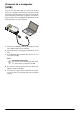
Connect to a computer (USB) You can use the USB cable to connect the Pocket Project to a computer. In this way, you are able to copy files back and forth between the internal memory, an inserted memory card and the computer. You can also delete the files. You can playback the files saved on the Pocket Projector on your computer. 1 Connect the USB plug of the Pocket Projector with a free USB socket of your computer. 2 Switch the device on using the on/off switch on the side.
5 Connect to the Playback Device Only use the supplied cable or cables that are available as accessories to connect the projector. Supplied Cables Video-(CVBS) cable (PPX2330) Connecting to a computer (PPX2330) Installing the Software 1 Close all open programs and applications before beginning the installation process. 2 Connect the device with a USB socket of your computer. 3 Select PicoPix2330 as drive in the Windows Explorer and start the program PicoPix Fun Viewer with a double-click.
Connecting the Headphones (PPX2330) 1 Before connecting the headphones, turn down the volume on the device. 2 Connect the headphones to the projector's headphone slot. The device speakers deactivate automatically when the headphones are connected. 3 After connecting the headphones, increase the volume to a comfortable level. DANGER! Danger of Hearing Damage Do not use the device over a longer time at high volume—especially when using headphones. This could lead to the risks of hearing damage.
6 Media Playback Video Playback Video Playback (USB/SD card/ internal memory) 9 Press ¿ to end playback and return to the overview. 10 When you press ¿ again, you will return to the main menu. Note 1 Switch the device on using the on/off switch on the side. 2 After the initial screen the main menu appears. Navigation during playback Review / cue: Press À/Á long. Press à to stop or continue playback. File Format 3 Use the navigation keys to select Videos. 4 Confirm with à.
Modify settings during playback 1 Press the ¡ or ¢ key. 2 Use the ¡/¢ keys to choose from the following settings: Brightness: Adjust brightness Contrast: Adjust contrast Saturation: Adjust colour saturation Smart Settings: Select predefined settings for brightness / contrast / colour saturation Volume: Adjust volume level 3 Modify the setting using À/Á. The device saves the modified settings automatically. Modify other settings 1 Press the à button.
Zoom in / Zoom out 1 Press à to stop the slide show and open the menu. 2 Select with À/Á Ò and confirm with à to enlarge the current image. 3 Use the À/Á/¡/¢ keys to move around the magnified image. 4 Press ¿ to continue the slide show. Music Playback Note Switch off the image playback You can turn off image playback while playing music in order to save power (see also chapter Music settings, page 18). As soon as you press the ¿ key, the image reappears and the fan starts again.
8 Mark the file using Á. Pressing ¿ deselects the chose file(s). Press Á long to select all files in current folder. Note Mark the entire folder You can also mark an entire folder to copy all files from the folder. Note that the copy process of large folders can takes some time. Delete Files You can delete files from the internal memory, the connected USB storage medium or the memory card. 1 Switch the device on using the on/off switch on the side. 2 After the initial screen the main menu appears.
13 Use ¡/¢ if you want to delete the files or cancel the deletion process. 14 Confirm with à. Note Error If errors occur during the deletion process, make sure that the storage medium is not write-protected. Note Deleting photos on the memory card When deleting photos via the computer, note that the photos may not be correctly displayed when the memory card is inserted into the digital camera again.
7 Settings 1 Switch the device on using the on/off switch on the side. 2 After the initial screen the main menu appears. Brightness—Adjust brightness Contrast—Adjust contrast Saturation—Adjust colour saturation Sound Settings: Volume—Adjust the volume Key beep—Turn key tones on and off 3 Use the navigation keys to select Settings. 4 Confirm with à. 5 Use ¡/¢ to select from the following settings. 6 Confirm with à. 7 Modify the settings using à, ¡/¢, 8 Confirm with à.
Language Select the desired language for the menu. Maintenance Reset settings—Reset settings to factory defaults. Firmware Update—Update Firmware Note Connect for the duration of the firmware update the power adapter.
8 Service Care Instructions for the Battery The capacity of the battery diminishes with time. You can prolong the life of the battery if you observe the following points: • Without a power supply, the device operates from the built-in battery. When the battery does not have sufficient capacity, the device switches to stand-by mode. Connect the device to the power supply. • When the battery does not have sufficient capacity, the battery symbol in the display turns red.
Cleaning Device overheated DANGER! Switching off the device! Switch the device on or off using the power switch before removing the power supply from the socket. A overheat symbol appears if the device is overheated. • At maximum level of brightness the symbol appears in the status bar and the device turns automatically to minimum level of brightness. • At minimal level of brightness the symbol shows for three seconds in the middle of the screen. Then the device turns off automatically.
Troubleshooting 1 Switch the device off using the on/off switch on the side. 2 Wait at least ten seconds. 3 Switch the device on using the on/off switch on the side. 4 If the problem repeats, please contact our technical customer service or your retailer. Power Cycling If a problem occurs that cannot be corrected with the instructions in this user manual (see also the help below), follow the steps given here.
9 Appendix Technical Data Dimensions (L¦×¦H¦×¦W)........................... 94¦×¦22¦×¦53¦mm Weight ..........................................................................0,14¦kg Recommended Ambient........................................5¦–¦35¦ºC Relative Humidity ..................15¦–¦85¦% (non-condensing) File format................................ *.avi, *.mov, *.mp4, *.mkv, *.divx, *.dat, *.mpg, *.mpeg, *.vob, *.ts, *.rm, *.rmvb Photo formats .....................................................
The CE marking certifies that the product meets the main requirements of the European Parliament and Council directives 2006/95/CE, 2004/108/CE and 2009/ 125/CE on telecommunications terminal equipment, regarding safety and health of users and regarding electromagnetic interference. The declaration of compliance can be consulted on the site www.picopix.philips.com. Preservation of the environment as part of a sustainable development plan is an essential concern of Sagemcom Documents SAS.
PHILIPS and the PHILIPS’ Shield Emblem are registered trademarks of Koninklijke Philips Electronics N.V. and are used by Sagemcom Documents SAS under license from Koninklijke Philips Electronics N.V. È 2012 Sagemcom Documents SAS All rights reserved Sagemcom Documents SAS Documents Business Unit Headquarters : 250, route de l’Empereur 92500 Rueil-Malmaison Cedex · FRANCE Tel: +33 (0)1 57 61 10 00 · Fax: +33 (0)1 57 61 10 01 www.sagemcom.com Simplified Joint Stock Company · Capital 8.479.