Register your product and get support at www.philips.
Table of Contents Overview ................................................... 3 Dear Customer ................................................................... 3 About this User Manual ..................................................... 3 1 General Safety Information ................ 4 Setting Up the Device ........................................................ 4 Repairs ................................................................................... 4 Power Supply ...............................
Overview Dear Customer Thank you for purchasing our Pocket Projector. We hope you enjoy your device and its many functions! About this User Manual With the installation guide on the following pages, you can start using your device quickly and easily. Detailed descriptions can be found in the following sections of this user manual. Read the entire user manual carefully. Follow all safety instructions in order to ensure proper operation of your device.
1 General Safety Information Do not make any changes or settings that are not described in this user manual. Physical injury or damage to the device or loss of data can result from improper handling. Take note of all warning and safety notes indicated. Setting Up the Device The device is exclusively for indoor use. The device should be placed securely on a stable, flat surface.
DANGER! Risk of explosion with incorrect type of batteries Only replace the batteries with the same or comparable batteries. There is a risk of explosion if the incorrect battery type is used. Switch the device on or off using the power switch before removing the power supply from the socket. Turn off the device and remove it from the power supply before cleaning the surface. Use a soft, lint-free cloth. Never use liquid, gaseous or easily flammable cleansers (sprays, abrasives, polishes, alcohol).
2 Overview Top of the Device (1)—Focus wheel for image sharpness. Note Note that the distance to the projection surface must be a minimum of 0.5 meters and a maximum of 5 meters. If the Pocket Projector is located outside of this range, it will not be possible to focus the image. Turn the focus wheel carefully so as to avoid damaging the lens.
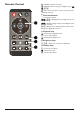
Remote Control —Standby / Activate the device —Magnify still.
Overview of the Menu Functions 1 After switching on the device the main menu appears. 2 Select the desired menu using the navigation keys , À/Á. 3 Confirm with à. 4 By pressing the key several times you will return to the main menu. Videos—Selecting files for video playback Source—Switch to the external video input HDMI, , or VGA Pictures—Selecting files for the slideshow Folder View—Selecting files for Playback. Copy or Delete Files (Mark the files with Á and confirm using à).
3 Initial Operation Setting up the Device Initial Installation You can position the device so that it lies flat on a table in front of the projection surface; it is not necessary to tilt it towards the projection surface. The device compensates for the distortion from the slanted projection (pincushion distortion). A tripod accessory is available if you want to elevate the device (Pico Tripod / 253521272). 1 Switch the device on using the on/off switch on the side.
Installing or Changing the Batteries of the Remote Control 3 Push the battery compartment back into the remote control until the locking mechanism engages. DANGER! Risk of explosion with incorrect type of batteries Only use the CR 2025 type battery. There is a risk of explosion if the incorrect battery type is used. 1 To access the battery, disengage the locking mechanism ( ) and slide out the battery compartment ( ). Note Normally the batteries will last for around one year.
Using the Remote Control Point the remote control at the remote sensor on the back of the device. The remote can be used within an angle of 60 degrees and up to 5 meters from the device. When using the remote control, no obstacle should be placed between the remote control and remote sensor. CAUTION! r The improper use of batteries can lead to overheating, explosion, risk of fire and injury. Leaking batteries can possibly damage the remote control. r Never expose the remote control to direct sunlight.
4 Connect to the playback device Supplied Cables Connecting to a Computer (VGA) Mini-USB to USB Cable HDMI to mini-HDMI Cable (PPX341 included) Note Only use the supplied cable or cables that are available as accessories to connect the projector. Many laptops do not activate the external video output automatically when you connect a second display such as a projector. Check your laptop's manual to find out how to activate the external video output.
Connecting using Audio/ Video (CVBS) Adaptor Cable Connecting using Component-Video (YPbPr/ YUV) Cable Use the projector's audio/video adaptor cable (A/V cable) to connect camcorders, DVD players or digital cameras. The jacks for these devices are yellow (video), red (audio right) and white (audio left). Please use this type of connection to obtain the highest possible image quality. This cable is available as an accessory.
Connecting to mobile multimedia devices Some video devices (e.g.: pocket multimedia players, ...) require specific connection cables. There are either supplied with the device or acquired from the manufacturer of the multimedia device. Please note that only the original cables from the device manufacturer may function. Connecting the headphones 1 Before connecting the headphones, turn down the volume on the device. 2 Connect the headphones to the projector's headphone slot.
5 Memory card / USB storage medium Inserting a Memory Card Connecting USB Storage Medium 1 Connect the USB storage medium directly to the USB socket on the left side of the device. 1 Insert a memory card with the contacts facing upwards into the slot at the back of the device. Your device supports the following memory cards: SD/SDHC/SDXC/MMC. 2 Insert the memory card into the slot until it snaps into position.
6 Media Playback Note Navigation keys All the keys shown are buttons on the remote control. 9 Press to end playback and return to the overview. 10 When you press again, you will return to the main menu. Note Navigation during playback Review / cue: Press / on the remote control or À/Á on the device. Press T to stop or continue playback. Video Playback Video Playback (USB/SD card/ internal memory) 1 Switch the device on using the on/off switch on the side. 2 After the initial screen the main menu appears.
Video Playback (Mini-HDMI socket) 1 Connect the audio/video output of the external device to the Pocket Projector's mini-HDMI socket. Use the corresponding cable and cable adapter for this purpose (see also chapter Connect to the playback device, page 12). 2 To find out how to deactivate the video output for the external device, please see the relevant instruction manual. Most often, this option is labeled "TV out" or "TV Output" in the corresponding menu. 3 Start the video playback on the external device.
Music Playback Managing files Note Copy Files Switch off the image playback You can turn off image playback while playing music in order to save power (see also chapter Music Settings, page 21). As soon as you press the key, the image reappears and the fan starts again. You can copy files back and forth from the internal memory to the connected USB storage medium or memory card. 1 Switch the device on using the on/off switch on the side. 2 After the initial screen the main menu appears.
11 Select with Copy. 3 Use the navigation keys to select Folder View. 4 Confirm with à. 5 With an inserted memory card or USB storage device: Select the internal memory, the USB storage medium or the memory card using the keys . 6 Confirm with à. to select the file that you want to delete. 7 Use Note 12 Confirm with à. to select the destination memory: SD 13 Use card, internal memory or USB storage medium. 14 Confirm with à.
Microsoft® Office & Adobe® PDF Files Playback 1 Switch the device on using the on using the on/off switch on the side. 2 After the initial screen the main menu appears. 3 Use the navigation keys to select Folder View. 4 Confirm with à. 5 With an inserted memory card or USB storage device: Select the internal memory, the USB storage medium or the memory card using the keys . 6 Confirm with à. 7 Use to select the Microsoft® Office file or Adobe® PDF file that you wish to view. 8 Press à to start view.
7 Settings 1 Switch the device on using the on/off switch on the side. 2 After the initial screen the main menu appears. Brightness—Adjust brightness Contrast—Adjust contrast Saturation—Adjust colour saturation Sound Settings: Volume—Adjust the volume Bass—Set the playback of the low frequencies Treble—Set the playback of the high frequencies Key tones—Turn key tones on and off 3 Use the navigation keys to select Settings. 4 Confirm with à. 5 Use to select from the following settings. 6 Confirm with à.
Language Select the desired language for the menu. Auto demo mode Play automatically demonstration videos when product is powered on. Maintenance Reset settings—Reset settings to factory defaults. Firmware Update—Update Firmware Note Connect for the duration of the firmware update the power adapter.
8 Service Care Instructions for the Battery The capacity of the battery diminishes with time. You can prolong the life of the battery if you observe the following points: r Without a power supply, the device operates from the built-in battery. When the battery does not have sufficient capacity, the device switches to stand-by mode. Connect the device to the power supply.
Cleaning Device overheated DANGER! Switching off the device! Switch the device on or off using the power switch before removing the power supply from the socket. A overheat symbol appears if the device is overheated. r At maximum level of brightness the symbol appears in the status bar and the device turns automatically to minimum level of brightness. r At minimal level of brightness the symbol shows for three seconds in the middle of the screen. Then the device turns off automatically.
Troubleshooting 1 Switch the device off using the on/off switch on the side. 2 Wait at least ten seconds. 3 Switch the device on using the on/off switch on the side. 4 If the problem repeats, please contact our technical customer service or your retailer. Power Cycling If a problem occurs that cannot be corrected with the instructions in this user manual (see also the help below), follow the steps given here.
9 Appendix Technical Data Dimensions (L¦×¦H¦×¦W).......................105¦×¦31¦×¦105¦mm Weight ..........................................................................0,27¦kg Recommended Ambient........................................5¦–¦35¦ºC Relative Humidity ..................20¦–¦80¦% (non-condensing) File format................................ *.mp4, *.avi, *.mov, *.mkv, ..................................... *.dat, *.mpg, *.mpeg, *.vob, *.ts ............................................. *.m2ts, *.
The CE marking certifies that the product meets the main requirements of the European Parliament and Council directives 1999/5/CE, 2006/95/CE, 2004/108/C E and 2009/125/CE on information technology equipment, regarding safety and health of users and regarding electromagnetic interference. The declaration of compliance can be consulted on the site www.picopix.philips.com. Preservation of the environment as part of a sustainable development plan is an essential concern of Sagemcom Documents SAS.
PHILIPS and the PHILIPS’ Shield Emblem are registered trademarks of Koninklijke Philips N.V. and are used by Sagemcom Documents SAS under license from Koninklijke Philips N.V. È 201 Sagemcom Documents SAS All rights reserved Sagemcom Documents SAS Documents Business Unit Headquarters: CS 50001 92848 Rueil Cedex - FRANCE Tel: +33 (0)1 57 61 10 00 · Fax: +33 (0)1 57 61 10 01 www.sagemcom.