INDOOR UNIT/OUTDOOR UNIT MODEL RAS-X18CX/RAC-X18CX INDOOR UNIT OUTDOOR UNIT RAS-X18CX RAC-X18CX Instruction manual Page 1~22 To obtain the best performance and ensure years of trouble free use, please read this instruction manual completely. Arahan pengendalian Muka surat 23~44 Untuk mendapatkan prestasi yang tinggi dan mengelakkan masalah untuk jangka masa yang lama, sila baca arahan ini sepenuhnya.
SAFETY PRECAUTION ● ● ● Please read the “Safety Precaution” carefully before operating the unit to ensure correct usage of the unit. Pay special attention to signs of “ ! Warning” and “ ! Caution”. The “Warning” section contains matters which, if not observed strictly, may cause death or serious injury. The “Caution” section contains matters which may result in serious consequences if not observed properly. Please observe all instructions strictly to ensure safety.
● The product shall be operated under the manufacturer specification and not for any other intended use. ● ● When operating the unit with burning equipments, regularly ventilate the room to avoid oxygen insufficiency. ● ● ! C A U T I O N Please switch off the unit and turn off the circuit breaker during cleaning, the high-speed fan inside the unit may cause danger. Turn off the circuit breaker if the unit is not to be operated for a long period.
NAMES AND FUNCTIONS OF EACH PART INDOOR UNIT Air filter To prevent dust from coming into the indoor unit. (Refer page 17) Front panel Indoor unit indicators Light indicator showing the operating condition. (Refer page 5) Horizontal deflector (Air Outlet) (Refer page 12) ● Vertical deflector Remote controller Send out operation signal to the indoor unit. So as to operate the whole unit. (Refer page 6) OUTDOOR UNIT Drain pipe Condensed water drain to outside.
ENGLISH INDOOR UNIT INDICATORS OPERATION LAMP This lamp lights during operation. HITACHI TIMER LAMP This lamp lights when the timer is working. FILTER LAMP When the device is operated for a total of about 200 hours, the FILTER lamp lights to indicate that it is time to clean the filter. The lamp goes out when the “ (AUTO SWING)” button is pressed while the device is on “STANDBY MODE”. OPERATION INDICATOR ● This figure shows the opening condition of front panel.
NAMES AND FUNCTIONS OF REMOTE CONTROL UNIT REMOTE CONTROLLER This controls the operation of the indoor unit. The range of control is about 7 meters. If indoor lighting is controlled electronically, the range of control may be shorter. This unit can be fixed on a wall using the fixture provided. Before fixing it, make sure the indoor unit can be controlled from the remote controller. Transmission sign The transmission sign blinks when a signal is sent.
Use the device for cooling when the outdoor temperature is 21-43°C. If indoor humidity is very high (over 80%), some dew may form on the air outlet grille of the indoor unit. Press the button so that the display indicates (COOL). Cooling operation starts with a beep. The cooling function does not start if the temperature setting is higher than the current room temperature (even though the (OPERATION) lamp lights).
DEHUMIDIFYING OPERATION Use the device for dehumidifying when the room temperature is over 16°C. When it is under 15°C, the dehumidifying function will not work. Press the button so that the display indicates (DEHUMIDIFY). Dehumidifying operation starts with a beep. The FAN SPEED is set at LOW automatically. The FAN SPEED button does not work. 1 Set the desired room temperature with the TEMPERATURE button (the display indicates the setting).
1 Press the button so that the display indicates (CIRCULATION). Circulating operation starts with a beep. 2 3 Press the FAN SPEED button and select the desired FAN SPEED (the display indicates your choice). Press the temperature control button to set to the desired temperature. STOP Press the (STOP) button to stop operation. ■ As the settings are stored in memory in the remote controller, you only have to press the (CIRCULATION) button next time.
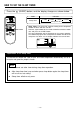
HOW TO SET THE SLEEP TIMER Press the (SLEEP) button, and the display changes as shown below. Mode Sleep timer SLEEP Indication 41 hour 42 hours 4 3 hours Sleep timer off 1 47 hours Sleep Timer: The device will continue working for the designated number of hours and then turn off. Point the signal window of the remote controller toward the indoor unit, and press the SLEEP button. The timer information will be displayed on the remote controller. The TIMER lamp lights with a beep from the indoor unit.
■ ON Timer and OFF Timer are available. ■ Operation stop at setting time OFF Timer Reservation OFF TIME setting ● ● Select the OFF TIME by pressing the (OFF) Button. Setting time will change according to the below sequence when you press the button. 1 hour interval 1 2 3 9 10 11 12 (CANCEL OFF TIMER) ■ Operation will start for setting temperature at setting time (The starting time may different depend on the room temperature and set temperature).
ADJUSTING THE AIR DEFLECTORS 1 2 Adjustment of the conditioned air in the upward and downward directions. According to “Dehumidifying” or “Cooling” operation, the horizontal air deflector is automatically set to the proper angle suitable for each operation. The deflector can be swing up and down and also set to the desired angle using the “ (AUTO SWING)” button.
When using the remote control, if there is no response from the air conditioner unit or the remote control has fading and dim displays, the batteries in the remote control device need to be removed and replaced with new ones 1 Remove the cover as shown in the figure and take out the old batteries. = 2 Install the new batteries. The direction of the batteries should match the marks in the case. ! CAUTION 1. Do not use new and old batteries, or different kinds of batteries together. 2.
THE IDEAL WAYS OF OPERATION Suitable Room Temperature Install curtain or blinds ! Warning It is possible to reduce heat entering the room through windows. Freezing temperature is bad for health and a waste of electric power. Ventilation Effective Usage Of Timer At night, please use the “OFF or ON timer operation mode”, together with your wake up time in the morning. This will enable you to enjoy a comfortable room temperature. Please use the timer effectively.
ENGLISH FOR USER’S INFORMATION The Air Conditioner And The Heat Source In The Room ! Caution If the amount of heat in the room is above the cooling capability of the air conditioner (for example: more people entering the room, using heating equipments and etc.), the preset room temperature cannot be achieved. Not Operating For A Long Time When the indoor unit is not to be used for a long period of time, please switch off the power from the mains.
ATTACHING THE AIR CLEANSING FILTERS ! CAUTION Cleaning and maintenance must be carried out only by qualified service personal. Before cleaning, stop operation and switch off the power supply. 1 Open the front panel. ● Pull up the front panel by holding it at both sides with both hands. 2 Remove the filter. ● Push upward to release the claws and pull out the filter. 3 Attaching the air cleansing filters to the filter.
! CAUTION Cleaning and maintenance must be carried out only by qualified service personal. Before cleaning, stop operation and switch off the power supply. 1. AIR FILTER Clean the air filter, as it removes dust inside the room. In case the air filter is full of dust, the air flow will decrease and the cooling capacity will be reduced. Further, noise may occur. Be sure to clean the filter following the procedure below.
2. Washable Front Panel ● Remove the front panel and wash with clean water. Wash it with a soft sponge. After using neutral detergent, wash thoroughly with clean water. ● When front panel is not removed, wipe it with a soft dry cloth. Wipe the remote controller thoroughly with a soft dry cloth. ● Wipe the water thoroughly. If water remains at indicators or signal receiver of indoor unit, it causes trouble. Method of removing the front panel.
● Please use earth line. Do not place the earth line near water or gas pipes, lightning-conductor, or the earth line of telephone. Improper installation of earth line may cause electric shock. ● A circuit breaker should be installed depending on the mounting site of the unit. Without a circuit breaker, the danger of electric shock exists.
AFTER SALE SERVICE AND WARRANTY WHEN ASKING FOR SERVICE, CHECK THE FOLLOWING POINTS.
Note ● Avoid to use the room air conditioner for cooling operation when the outside temperature is below 21°C (70°F). The recommended maximum and minimum operating temperatures of the hot and cold sides should be as below: Indoor Outdoor Dry Wet Dry Wet bulb bulb bulb bulb °C °C °C °C Minimum 21 15 21 15 Maximum 32 23 43 26 MEMO .............................................................................................................................................................................
MEMO ..................................................................................................................................................................................... ..................................................................................................................................................................................... ...............................................................................................................................................
PENYAMAN UDARA UNIT BERASINGAN MODEL RAS-X18CX/RAC-X18CX UNIT LUAR BILIK UNIT DALAM BILIK RAS-X18CX RAC-X18CX Instruction manual Page 1~22 To obtain the best performance and ensure years of trouble free use, please read this instruction manual completely. Arahan pengendalian Muka surat 23~44 Untuk mendapatkan prestasi yang tinggi dan mengelakkan masalah untuk jangka masa yang lama, sila baca arahan ini sepenuhnya.
PERKARA YANG PERLU DIAMBIL PERHATIAN UNTUK KESELAMATAN ● ● ● Sebelum menggunakan penyaman udara baca dengan teliti “Perkara yang perlu diambil perhatian” untuk mengetahui cara pengendalian yang betul. Ambil perhatian terhadap perkara yang bertanda “ ! Amaran” dan “ ! Perhatian”. Perkara dalam ruangan “Amaran” adalah perkara yang boleh membawa kesan maut atau kecederaan apabila berlaku kesilapan, manakala perkara dalam ruangan “Perhatian” boleh mendatangkan kesan yang serius.
PERKARA YANG PERLU DIAMBIL PERHATIAN DALAM PENGENDALIAN Jangan gunakan alat ini sebagai tempat menyimpan makanan, haiwan dan tumbuhan, peralatan canggih, barangan seni dan ubat-ubatan. ● ● Jika beroperasi bersama peralatan pembakaran, pastikan udara segar sentiasa beredar masuk untuk membekalkan oksigen yang cukup. ● ● ! P E R H A T I A N Sila padamkan suis dan cabutkan plag semasa membersihkan penyaman udara kerana kipas dalam penyaman udara yang berpusing dengan laju boleh mencederakan.
NAMA DAN FUNGSI SETIAP BAHAGIAN UNIT DALAM BILIK PENAPIS UDARA Menghalang habuk masuk ke dalam unit dalam bilik. (Lihat mukasurat 39) PANEL DEPAN LAMPU PENANDA UNIT DALAM BILIK Menunjukkan keadaan operasi. (Lihat mukasurat 27) PENGAWAL ALIRAN UDARA MENDATAR DAN MENEGAK (LUBANG UDARA KELUAR) (Lihat mukasurat 34) ALAT KAWALAN JAUH Memberi isyarat kepada unit dalam bilik untuk mengawal operasi penyaman udara. (Lihat mukasurat 28) UNIT LUAR BILIK SALUR AIR Menyalurkan air terkondensasi keluar.
BAHAGIAN PENUNJUK UNIT DALAM BILIK LAMPU OPERASI Lampu ini bernyala semasa unit beroperasi. HITACHI LAMPU PENAPIS UDARA Apabila unit ini telah beroperasi selama 200 jam, lampu penapis udara akan menyala sebagai peringatan untuk membersihkan penampis udara. Lampu ini akan terpadam apabila butang “ (peredaran automatik)’ ditekan sementara unit dalam keadaan “STANDBY MODE”. BAHAGIAN OPERASI ● Rajah ini menunjukkan keadaan di mana panel depan dibuka.
NAMA DAN FUNGSI SETIAP BAHAGIAN ALAT KAWALAN JAUH ALAT KAWALAN JAUH Alat ini mengawal operasi unit dalam bilik. Lingkungan kawalan adalah kira-kira 7 meter. Jika pencahayaan dalam bilik telah dikawal secara elektronik, lingkungan kawalan mungkin akan menjadi lebih dekat. Alat ini boleh diletakkan di dinding dengan menggunakan pemegang yang dibekalkan. Sebelum meletakkannya, pastikan unit dalam bilik (penyaman udara) boleh dikawal dari alat kawalan jauh.
Tekan butang 1 2 dan paparan akan menunjukkan (PENDINGINAN) Operasi pendinginan bermula dengan bunyi “beep”. Operasi pendinginan tidak akan bermula jika tetapan suhu lebih tinggi daripada suhu semasa yang ada di dalam bilik (walaupun lampu (OPERASI) menyala). Fungsi pendinginan akan bermula sebaik sahaja anda membuat tetapan suhu di bawah suhu semasa bilik berkenaan. Tetapkan KELAJUAN KIPAS yang dikehendaki dengan butang (KELAJUAN KIPAS) (paparan akan menunjukkan tetapan).
OPERASI PENGERINGAN Gunakan unit ini untuk pengeringan apabila suhu bilik melebihi 16°C. Apabila ia di bawah 15°C, fungsi pengeringan tidak akan berlaku. Tekan butang dan paparan akan menunjukkan (PENGERINGAN). Operasi pengeringan bermula dengan bunyi “beep”. KELAJUAN KIPAS telah ditetapkan RENDAH secara automatik. Butang KELAJUAN KIPAS tidak beroperasi. 1 Tetapkan suhu bilik yang dikehendaki dengan butang SUHU (paparan akan menunjukkan tetapan).
Tekan butang dan paparan akan menunjukkan (PEREDARAN). Operasi peredaran udara bermula dengan bunyi “beep”. 2 Tekan butang KELAJUAN KIPAS dan pilih KELAJUAN KIPAS yang diingini (paparan akan menunjukkan pilihan anda). 3 Tekan butang kawalan suhu untuk tetapan suhu yang diingini. BERHENTI Tekan butang (BERHENTI) untuk menghentikan operasi. ■ Disebabkan tetapan telah disimpan di dalam memori alat kawalan jauh, anda hanya perlu menekan butang masa yang akan datang.
BAGAIMANA MEMBUAT TETAPAN PEMASA TIDUR Tekan butang bawah. (TIDUR), dan perubahan akan dilihat terpapar seperti di Mode Pemasa Tidur SLEEP Penunjuk 4 1 jam 2 jam 4 3 jam 4 7 jam Pemasa tidur berhenti 1 4 Pemasa Tidur: Unit akan terus bertugas untuk beberapa jam yang dirancang dan kemudian berhenti. Arahkan isyarat pemuka alat kawalan jauh setentang ke unit penyaman udara dan tekan butang TIDUR. Keterangan pemasa akan dipaparkan pada alat kawalan jauh.
■ Boleh juga menggunakan pemasa-ON dan pemasa-OFF. MENGHENTIKAN Penyelarasan Pemasa Penyelarasan masa-OFF ● ● pada Pilih pemasa-OFF dengan menekan butang (OFF). Penyelarasan masa akan berubah mengikut turutan di bawah setiap kali anda menekan butang. BAHASA MALAYSIA 1 ■ Operasi akan berhenti penyelarasan masa. 1 jam selang 1 2 3 9 10 11 12 Pemasa-OFF berhenti HIDUPKAN Penyelarasan Pemasa 1 Penyelarasan masa-ON ● ● Pilih pemasa-ON dengan menekan butang (ON).
PENYELARASAN PENGAWAL ARAH ALIRAN UDARA 1 Penyelarasan arah aliran udara ke atas dan ke bawah. Pengawal arah aliran udara mendatar dilaraskan secara automatik kepada sudut yang sesuai bagi operasi pengeringan atau operasi pendinginan. Pengawal arah aliran udara mendatar dilaraskan pada sudut yang dikehendaki dengan butang “ (Peredaran AUTO)”. (Jika sudut pengawal telah diubah, ia tidak dapat kembali ke kedudukan auto-laras selepas operasi dimulakan kecuali mode operasi dipasangkan).
1 Keluarkan penutup seperti yang ditunjukkan dalam gambarajah dan keluarkan bateri lama. = 2 Pasangkan bateri baru. Arah bateri mesti sepadan dengan tanda dalam kotak. PERKARA YANG PERLU DIAMBIL PERHATIAN 1. Jangan gunakan bateri lama bersama bateri baru, atau menggunakan bateri yang berlainan jenis. 2. Keluarkan bateri jika anda tidak menggunakan alat kawalan jauh untuk 2 atau 3 bulan. 3.
CARA PENGENDALIAN YANG PALING SESUAI Penentuan suhu bilik yang sesuai Memasang tirai ! Amaran Boleh mengurangkan haba yang masuk melalui tingkap. Suhu yang terlalu rendah boleh menjejaskan kesihatan dan menyebabkan pembaziran tenaga elektrik. Peredaran masuk udara segar Penggunaan pemasa yang berkesan Sila gunakan pemasa secara berkesan Gunakan operasi TIDUR pada waktu malam dan bersesuian dengan waktu bangun untuk mendapat suhu bilik yang selesa.
PERKARA PENTING UNTUK PELANGGAN Pendinginan dan Sumber Haba dalam bilik ! Perhatian Tidak menggunakan penyaman udara untuk jangka masa panjang Jika tidak menggunakan unit dalam bilik bagi jangka masa panjang, sila padamkan suis bekalan kuasa. Jika suis bekalan kuasa dipasang, walaupun unit dalam bilik tidak beroperasi, tenaga elektrik akan dibazirkan dalam litar pengawal (kira-kira 8W).
MEMASANG PENAPIS PEMBERSIH UDARA ! PERHATIAN Kerja pembersihan dan penjagaan hendaklah dilakukan oleh wakil servis bertauliah. Sebelum kerja pembersihan, hentikan operasi dan keluarkan plag bekalan kuasa. 1 Buka panel depan. ● Tarik panel depan dengan memegang kedua sisi dengan kedua-dua belah tangan. 2 Mengeluarkan penapis udara. ● Tolak penapis udara ke atas supaya tertanggal dari penyangkut dan tarik keluar penapis udara. 3 Memasang penapis pembersih udara ke penapis.
PENJAGAAN ! PERHATIAN Kerja pembersihan dan penjagaan hendaklah dilakukan oleh wakil servis bertauliah. Sebelum kerja pembersihan, hentikan operasi dan keluarkan plag bekalan kuasa. PENAPIS UDARA Penapis udara perlu dibersihkan kerana ia menyedut habuk di dalam bilik. Apabila penapis udara diliputi oleh habuk, ia akan menghalang pengaliran udara dan kesan pendinginan juga akan berkurang. Selain itu, ia juga mungkin menyebabkan bunyi bising. Pastikan penapis udara dibersihkan mengikut prosedur di bawah.
2. Cara membersihkan panel depan ● Tanggalkan panel depan dan basuh dengan air bersih. Gunakan span lembut. Selepas membasuh dengan sabun, bilas dengan air bersih. ● Sekiranya panel depan tidak dibuka, cuci dengan menggunakan kain basah. Bersihkan alat kawalan jauh dengan menggunakan kain kering dan lembut. ● Lapkan air sekeringnya. Sekiranya air didapati pada bahagian penunjuk atau penanda penerima, ia boleh menyebabkan litar pintas. Cara untuk membuka dan memasang panel depan.
● Pastikan menyambung kewayar bumi. Jauhkan wayar bumi dari air atau paip gas, pengalir kilat atau telefon wayar bumi. Penyambungan wayar bumi yang tidak sempurna boleh menyebabkan berlaku kejutan elektrik. ● Litar pemutus mestilah dipasang berhampiran dengan unit. Tanpa litar pemutus boleh menyebabkan kemungkinan berlaku kejutan elektrik.
PERKHIDMATAN LEPAS JUALAN DAN JAMINAN SEBELUM MEMINTA SERVIS, PERIKSAKAN PERKARA BERIKUT KEADAAN PERIKSA PERKARA BERIKUT ● Apabila penyaman udara tidak beroperasi ● ● ● Apabila penyaman udara tidak beroperasi dengan baik.
Produk ini telah diuji dan disahkan mengikut akta 89/336/EEC pemeriksaan sambungan arus elektromagnet dan 73/23/EEC pemeriksaan alatan elektrik dengan had voltage yang tertentu. Nota Apabila suhu luar bilik dibawah 21°C (70°F) elakkan daripada menggunakan penyaman udara untuk operasi pendinginan.
MEMO ..................................................................................................................................................................................... ..................................................................................................................................................................................... ...............................................................................................................................................