Always there to help you Register your product and get support at www.philips.
Contents 1 Important safety instructions 3 2 Your phone 4 4 4 5 What is in the box Overview of the phone Overview of the base station 3 Get started Connect the base station Install the handset Check your phone's software version Configure your phone (country dependent) Change the remote access PIN code Charge the handset Check the battery level What is standby mode? Check the signal strength 6 6 6 7 7 8 8 8 8 9 4 Overview of the home screens 10 10 10 5 Display icons 12 Center home screen Main me
13 Settings Phone settings Call settings Setup wizard Set the date and time Phone software version Register additional handsets Unregister handsets 14 Blacklist View the blacklist Delete a blacklist record Block anonymous calls 15 Sounds Set the handset's ringtone volume Set the handset's ringtone Set your sound preferences Set the key tone Set the docking tone 33 33 34 37 37 37 37 38 39 39 39 39 40 40 40 40 40 40 16 Set your sound preferences 41 Set your sound preferences during a call 41 17 Scree
1 Important safety instructions Power requirements • This product requires an electrical supply of 100-240 volts AC. In case of power failure, the communication can be lost. • The voltage on the network is classified as TNV-3 (Telecommunication Network Voltages), as defined in the standard EN 60950. Warning •• The Electrical network is classified as hazardous. The only way to power down the charger is to unplug the power supply from the electrical outlet.
2 Your phone Congratulations on your purchase and welcome to Philips! The Philips S10/S10A brings you the convenience of MobileLink to make and receive all calls - both landline and mobile - on your home phone and easily download your mobile's contacts. It features a large touchscreen for easy access to all its features. To fully benefit from the support that Philips offers, including latest software updates, register your product at www.philips.com/welcome.
Overview of the base station a j b c d k a a Earpiece b LCD touch screen c • • • • End a call. Switch off the screen. Press to power on the handset. Press and hold to power off the handset. d Microphone e Micro USB socket (bottom of the handset) f Headset jack (bottom of the handset, compatible with mobile headset with microphone) g • • Make and receive calls. Show the dial pad. • • Press to find handsets. Press and hold for approximately 5 seconds to enter registration mode.
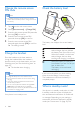
3 Get started Caution •• Make sure that you have read the safety instructions in the 'Important safety instructions' section before you connect and install your handset. Connect the base station Warning •• Risk of product damage! Make sure that the power supply voltage corresponds to the voltage printed on the back or underside of the phone. •• Use only the supplied power adapter to charge the batteries.
replacement batteries through the Philips website or Philips service. Caution •• Risk of explosion! Keep batteries away from heat, sunshine or fire. Never discard batteries in fire. •• Use only the supplied battery. Note •• Charge the battery for 6.5 hours before first use. Warning •• Check the battery polarity when inserting in the battery compartment. Incorrect polarity may damage the product. Configure your phone (country dependent) Turn your phone on/off Press until you see the Philips wordmark.
Change the remote access PIN code Check the battery level Note •• The default answering machine remote access PIN code is 0000 and it is important to change it to ensure the security. 1 2 3 4 5 Tap from the main menu screen. Select [Remote access] > [Change PIN]. Enter the old remote access PIN/passcode, then tap [OK] to confirm. Enter the new remote access PIN/ passcode, then tap [OK] to confirm. Enter the new remote access PIN/ passcode again, then tap [OK] to confirm. »» The setting is saved.
screen will dim or turn off if the handset is not on the base station or charging cradle. Check the signal strength The number of bars indicates the connection status between the handset and base station. The more bars are shown, the better the connection is. • • Make sure the handset is connected to the base station before you make or receive calls and carry out the functions and features.
4 Overview of the home screens Center home screen a b c d a The pull-down menu Pull down to quickly activate/deactivate [Alarm] and [Silent mode]. Main menu screen It is an overview of the menu options that are available in your S10/S10A. For detailed explanation of the menu options, see the corresponding sections in this user manual. b Notifications/date and time In this area, notifications of missing calls, messages etc. are displayed.
[Answer machine] - Setup, listen to, delete phone messages, etc. This icon is only available on S10A. [Call barring] - bar outgoing calls to selected numbers. [Screen saver] - Select your favorite pictures as screen savers. [Silent mode] - Disable ringtones for times during which you do not want to be disturbed. [Calendar] - Create new, view and delete reminder events. [Family note] - Leave messages on your phone. [Clock] - Set the alarm, alarm name, alarm tone etc.
5 Display icons In standby mode, the icons shown on top of the main screen inform you about the status of your phone. Icon Descriptions When the handset is off the base station/charger, the bars indicate the battery level (from full to low). When the handset is on the base station/charger, the bars keep scrolling until charging is complete. When the battery is empty, this icon flashes. If you are in a call you hear an alert tone. The battery is low and needs recharging.
6 Bluetooth The MobileLink features of S10/S10A are enabled by Bluetooth wireless technology. With MobileLink, you can connect your phone to a compatible mobile phone to make and receive mobile calls on your S10/S10A handset, or you can download the contacts from your mobile phone or computer. You can also connect a Bluetooth headset to your phone's base station. Note •• Make sure that the other Bluetooth devices with which you establish a connection support Bluetooth.
»» When S10/S10A and the mobile phone are paired, or is displayed on the handset screen. Tip •• The default Bluetooth PIN/passcode is 0000. Note •• The phone can be connected up to 2 Bluetooth devices simultaneously. •• The phone can store up to 8 devices, to which it will reconnect automatically if they are in range, and less than 2 devices are connected. If more than 8 devices have been paired, delete some devices from the list before pairing another one.
Change the Bluetooth PIN/ passcode 1 2 3 4 Tap from the main menu screen. Select [My Bluetooth info] > [My Passkey:]. Tap [Delete] to remove the current PIN/ passcode. • update the software on your phone to the latest available version.
7 Calls Tip •• You can also make a call from the contact list (see 'Make a call from the contacts' on page 22), call log (see 'Return a call' on page 28) and your favourite list (see 'Make a call from the favorite list' on page 25). •• You can make a call using a certain line (see 'Line settings' on page 36), but make sure this line is available. •• You can select from the landline or one of the mobile lines for an outgoing call.
1 End a call Press . Adjust the earpiece/speaker volume Press +/- on the left side of the handset to adjust the volume during a call. »» The earpiece/speaker volume is adjusted and the phone is back to the call screen. Mute the microphone 1 2 3 Tap to access the options menu during a call. Tap . »» The caller cannot hear you, but you can still hear his voice. Tap »» again to unmute the microphone. becomes white. »» You can now communicate with the caller.
Switch between two calls Press during a call. »» The current call is put on hold, and you are now connected to the other call. Switch between two calls on the landline and mobile line You can switch the calls between the landline and mobile line. 1 2 3 18 Make an outgoing call with the landline. When there is an incoming call from the mobile line, a screen is displayed. Select an option to answer/reject the second incoming call. »» The call from the landline is on hold.
8 Intercom and conference calls While you are on the phone You can go from one handset to another during a call: 1 2 Note Make a call to another handset Note •• If the base station only has 2 registered handsets, tap to make a call to another handset directly. 1 2 3 to access the options menu. Tap . »» The current caller is put on hold. »» For multi-handset versions, The handsets available for intercom are displayed. Then go to step 3. •• This feature is available for multi- handset versions only.
5 6 Tap . »» You are now in a 3-way conference call with an external call and a selected handset. Press to end the conference call. Note •• Press to join an ongoing conference with another handset if > [Call settings] > [Conference] is set to [Auto join on]. During the conference call • Tap to put the external call on hold and go back to the internal call. »» The external call is put on hold. • Tap to establish the conference call again.
9 Text and numbers Your phone has a virtual keypad with which you can enter text and numbers for handset name, contact records, and other menu items.
10 Contacts Update the mobile's contact This phone has a contact list that stores up to 1000 entries entered on the phone or downloaded from a computer. You can download up to 500 entries each for up to 2 mobile phones. Each record can store up to 3 numbers. You can access any entry in the contact list and use that entry to make a call using the landline or the mobile network of a connected mobile phone. You can select this option to download/update the mobile's contacts through the Bluetooth connection.
Add a record Silent mode exception 1 You can select a contact to be excluded them from silent mode. When a contact, who has been added to the silent mode exception list, calls you, the phone will ring, even while silent mode is active. 2 3 4 5 6 Tap from the main menu screen to access the contact lists. Tap the drop-down menu ( ) to select a contact list from the landline/the mobile line. »» The contact list is displayed. Tap to access the options menu. Select [Add new contact].
Block a caller from the contact list You can choose to block a contact. When this contact calls you, the phone does not ring. However, you will still see the call notification on the handset screen. 1 2 3 4 5 Delete a contact 1 2 Tap from the main menu screen to access the contact lists. 3 Tap the drop-down menu ( ) to select a contact list from the landline/mobile line. »» The contact list is displayed. 4 Select a contact, then tap options menu. to access the Select [Block caller].
»» The number is dialed. Tip •• To remove the contact from the favorite list, tap Tip again. •• You can set the phone to automatically select a line for you, or to always make a call using a certain line (see 'Line settings' on page 36). If you force the phone to use a certain line, make sure this line is available. View the favorite list 1 2 Tap from the main menu screen to access the contact lists. Tap the drop-down menu ( ) and select [Favorites]. »» The favorite list is displayed.
Tip •• If you select [Delete all], a confirmation request is displayed. Tap [Yes] to delete all records. »» The selected records are deleted.
11 Call log 3 The call log stores the call history of all incoming, outgoing, or missed calls. The incoming call history includes the name and number of the caller, call time, and date. This feature is available if you have subscribed to the caller ID service with your service provider. Your phone can store up to 50 call records. If the caller allows the display of his identity, you can view his name or number.
Return a call 1 2 3 Tap from the main menu screen to access the call log. »» The call log from the landline is displayed. Select a call record. Select an outgoing line. »» The number is dialed. Tip •• You can set the phone to automatically select a line for you, or to always make a call using a certain line (see 'Line settings' on page 36). If you force the phone to use a certain line, make sure this line is available.
12 Telephone answering machine •• The answering machine feature is available only for S10A. Your phone includes a telephone answering machine that records unanswered calls when it is on. By default, the answering machine is set to the [Answer & rec.] mode. You can also access the answering machine remotely and change the settings through the answering machine menu on the handset. Turn the answering machine on or off Tap from the main menu screen.
Restore the default announcement Listen to the incoming messages 1 2 You can listen to the incoming messages in the sequence they are recorded. 3 Tap from the main menu screen. Select [Announcement] > [Answer & rec.] or [Answer only] > [Use default]. »» A confirmation request is displayed on the handset. Tap [Yes] to confirm. »» The default announcement is restored. Set the answering machine language You can change the language used for the prerecorded default announcements.
1 2 3 Tap from the main menu screen. Select [Ring delay]. Select a new setting. »» The setting is saved. 1 2 3 •• The answering machine needs to be switched on before applying this setting. Tap the switch to turn it on or off. »» The setting is saved. •• When you access the answering machine remotely, you are recommended to set the ring delay to[Toll saver] mode. This is a cost effective way to manage your messages. When there are new messages, the answering machine picks up the call after 3 rings.
Note •• When there is no message, the phone hangs up automatically if no key is pressed for 8 seconds. Remote access commands Key 1 2 3 6 7 8 9 32 Function Repeat the current or listen to the previous message. Listen to messages. Skip to the next message. Delete the current message. Switch the answering machine on. (not available when you listen to the messages). Stop listening to the message. Switch the answering machine off. (not available when you listen to the messages).
13 Settings »» The setting is saved. Note In [Settings] menu, you can customize the phone to your preferences. Phone settings Set the display language 1 2 3 Tap from the main menu screen. Select [Phone settings] > [Language]. Select a language. »» The setting is saved. ECO mode The ECO mode reduces the transmission power and radiation of the handset and base station when you are on a call or when the phone is in standby mode.
Display settings You can change the display of the phone during standby mode. Set the brightness, wallpaper and backlight You can change the display properties during standby mode, such as display brightness, backlight behaviour and wallpaper. 1 2 3 Tap from the main menu screen. Select [Phone settings] > [Display] > [Bri ghtness]/[Wallpaper]/[Backlight]. Select an option. »» The setting is saved. Restore default settings You can reset your phone settings to the original factory settings.
4 Select an outgoing line, then press [OK] to confirm. »» The setting is saved. »» When you make an outgoing call starting with the prefix number, the pre-selected outgoing line is used. Set the time 1 2 3 Tap Set auto prefix 1 2 3 4 from the main menu screen. Select [Call settings] > [Call rules] > [Time based], then press [OK] to confirm. Select a time segment. • from [Recurrence], select an option, then press [OK] to confirm; • from [Start & end], enter the time duration, press [OK] to confirm.
Select the recall duration Make sure that the recall time is set correctly before you can answer a second call. In normal case, the phone is already preset for the recall duration. You can select among 3 options: [Short], [Medium] and [Long]. The number of available options varies with different countries. For details, consult your service provider. 1 2 3 Tap Select an option. »» The setting is saved. from the main menu screen. Select [Call settings] > [Auto clock] Select [On]/[Off].
Voice mail and info service number 3 You can set the voice mail and info service number. 1 2 3 Tap from the main menu screen. Select [Call settings] > [Voicemail]/[Info service] Enter the number, then tap [OK] to confirm. »» The setting is saved. Setup wizard This option leads you to [Eco mode], [ECO+ mode] and [Silent mode] settings. 1 2 Tap Select an option. »» The setting is saved. Note •• The date and time format setting is country dependent.
Note •• If the PIN/passcode is incorrect or no base is found within a certain period, a notification message will be displayed on your handset. Repeat the above procedure if registration fails. •• The preset PIN/passcode is 0000. No change can be made on it. Unregister handsets If two handsets share the same base station, you can unregister a handset with another handset. 1 2 3 4 Tap from the main menu screen. Select [Registration] > [Unregister]. Enter the system PIN/passcode.
14 Blacklist 3 Select [On]/[Off] to activate/deactivate the blocking of calls without identity. The blacklist contains all contacts whom you block from calling. Tip •• For information on how to add the callers to blacklist, see the chapter 'Contacts', section 'Block a caller from the contact list'. View the blacklist Tap from the main menu screen. »» The blacklist is displayed. Delete a blacklist record 1 2 3 Tap from the main menu screen. »» The blacklist is displayed.
15 Sounds Set the handset's ringtone volume You can select among 5 ringtone volume levels, ( ) (that is, the ringtone starts soft and gets louder over time if the call is not answered). 1 2 3 4 Tap Set your sound preferences You can set the sound in the earpiece or handsfree mode among 5 different profiles using the [MySound Pro] application. 1 2 3 from the main menu screen. Select [Ring volume]. Select [Home] for the landline or one of the mobile lines.
16 Set your sound preferences You can set the sound in the earpiece or handsfree mode among 5 different profiles using the [MySound Pro] application. 1 2 Tap from the main menu screen. Select a profile. »» The setting is saved. Set your sound preferences during a call Tap to access the options menu, then tap to change the sound profile during a call.
17 Screen saver You can select your favorite pictures to be displayed as a screen saver in idle mode. 1 2 3 4 5 42 Tap from the main menu screen. Select one or multiple pictures, then tap [Set] to confirm. Tap to enter the options menu. Select an option from: • [Transition time] to set the time each picture is shown before the next picture is displayed. • [Preview] to preview the screensaver. • [Screen saver] to activate/deactivate it. Tap [Set] to confirm. »» The setting is saved.
18 Silent mode You can set your phone to silent mode and enable it for a specific duration when you do not want to be disturbed. When the silent mode is turned on, your phone does not ring or send any alerts or sound. Note •• When you press to find your handset, or when you activate the alarm, your phone still sends alert even when the silent mode is activated. 1 2 3 Tap from the main menu screen. Follow the on-screen instruction, tap on the switch to activate [Status]. »» Blue is displayed.
19 Call barring You can block outgoing calls to numbers, such as overseas calls or undesirable hotlines by barring calls that start with certain digits. You can create 4 sets of numbers with 4 digits at maximum for each set of numbers. When you make a call that starts with one of these 4 sets of numbers, the outgoing call is then barred. Activate/deactivate call barring 1 2 3 Tap from main menu screen. Enter the call barring PIN/passcode. The default PIN/passcode is 0000.
20 Calendar Tip •• If you select [Delete all], a confirmation request is displayed. Tap [Yes] to delete all events. By default the monthly view is displayed in the calendar and the current date is highlighted. You can create new, view and delete reminder events. •• Birthdays and anniversaries are also displayed in the calendar but the reminder tone is disabled by default. Create new reminder events 1 2 3 4 5 6 Tap from the main menu screen. Tap +. Select the date and time.
21 Alarm clock Edit an alarm Your phone has a built-in alarm clock. Check the information below to set your alarm clock. 1 2 Create an alarm 1 2 3 Tap Tap from the main menu screen. , then +. Follow the on-screen instructions to set the alarm name, alarm time, recurrence options and alarm tones. »» The alarm is set and is displayed on the screen. Tip •• You can create a maximum of 10 alarms. Turn off an alarm Before the alarm rings 1 2 3 4 Tap Tap from the main menu screen. , then +.
22 Family notes You can leave your family a message on the phone screen. 1 2 3 4 5 Tap from the main menu screen. Tap + to create a note. Enter the text, then tap [Done] to save the message. Tap to add the photo. Tap [Post] to post the message. • To edit, select a message, then edit the text and/or change the photo. • To delete/delete all the posted messages, tap > [Delete]/[Delete all], then select messages to be removed.
23 Baby monitor Your phone can act as a baby monitor and send an alert if the sound level exceeds a pre-set limit. For this, it needs to be placed as a "baby unit" within the baby's room. Send an alert You can send an alert to other handsets within the home or an external line. External line can be a mobile phone or another fixed line outside the house.
Send alert to a contact from the contact list 1 2 3 Tap from the main menu screen. Select [Send alert] > [External line], then tap [OK] to confirm. Tap + to browse and select a contact from the contact list. Set the sensitivity level of the baby unit 1 2 3 Tap from the main menu screen. Select [Noise sensitivity]. Select a new setting. »» The setting is saved.
24 Technical data Note •• It only applies when the screen saver is turned off (see 'Screen saver' on page 42). General specification and features • 3.
25 Notice Declaration of conformity Hereby, WOOX Innovations declares that this product is in compliance with the essential requirements and other relevant provisions of Directive 1999/5/EC. You can find the Declaration of Conformity on www.p4c.philips. com. This product has been designed, tested and manufactured according the European R&TTE directive 1999/5/EC.
1 2 When this logo is attached to a product, it means a financial contribution has been paid to the associated national recovery and recycling system. Environmental information All unnecessary packaging has been omitted. We have tried to make the packaging easy to separate into three materials: cardboard (box), polystyrene foam (buffer) and polyethylene (bags, protective foam sheet.) Your system consists of materials which can be recycled and reused if disassembled by a specialized company.
26 Trademarks Bluetooth The Bluetooth word mark and logos are owned by the Bluetooth SIG, Inc. and any use of such marks by WOOX Innovations Limited is under license.
27 Frequently asked questions No signal bar is displayed on the screen. •• The handset is out of range. Move it closer to the base station. •• If the handset displays [Register your Handset], register your handset. Tip •• For further information, see 'Register additional handsets' on the 'Settings' section. My handset is in searching status, what do I do? •• Make sure that the base station has power supply. •• Register the handset to the base station. •• Move the handset closer to the base station.
I cannot change the settings of my voice mail, what do I do? The voice mail service is managed by your service provider but not the phone itself. Contact your service provider to change the settings. The handset is docked, but does not charge. •• Make sure the battery is inserted correctly. •• Make sure the handset is placed properly on the charger. The battery icon animates when charging. •• Make sure the docking tone setting is turned on.
28 Index A additional handsets adjust the volume alarm announcements answer a call answering machine answering machine language area code auto clock B baby monitor base station installation overview battery blacklist Bluetooth Bluetooth headset ECO mode ECO+ mode 37 17, 40 46 29 16 29 30 35 36 48 6 5 6, 8, 50 39 13 13 F family notes favorites find handsets first ring G GAP H home screens I incoming message Intercom 33 33 47 24 5 36 51 10 30 19 L C calendar call barring call log caller I
calling barring power adapter 44 50 R recall time 36 register/unregister 37, 38 remote access to the answering machine 31 ring delay 30, 43 ringtone 40 S safety save a call record screen saver set the date and time signal strength silent mode silent mode exception software version sounds docking keytone sound preferences speaker phone standby mode T text entry troubleshooting/FAQ two calls/call on hold 3 27 42 7 9 43 23 37 40 40 40 17 8 21 54 18 EN 57
58 EN
2014 © WOOX Innovations Limited. All rights reserved. Philips and the Philips’ Shield Emblem are registered trademarks of Koninklijke Philips N.V. and are used by WOOX Innovations Limited under license from Koninklijke Philips N.V. UM_S10/S10A_05_EN_V5.