Tripleheader shaver S1030
1 2 3 4 5 6
empty page before TOC
English 6 Español 22
English Contents IMPORTANT SAFETY INSTRUCTIONS______________________ General Description (Fig.
English 7 - Do not place or store the product where it can fall or be pulled into a tub or sink. Do not place or drop the product into water or other liquid. - This product does not work while it is connected to the power outlet. Except when charging, always unplug this product from the power outlet. - Remove power cord from power outlet and product before cleaning.
English - Do not use the power cord in or near a power outlet that contains an electric air freshener to prevent damage to the power cord. - Do not use product outdoors or operate where aerosol (spray) products are being used or where oxygen is being administered. - Always check shaving heads (caps and cutters) before using the product. Do not use the product if cutters or caps are damaged, as injury may occur. - Always attach power cord to product first, then to power outlet.
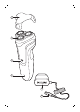
English 2 3 4 5 6 9 Shaving unit On/off button Charging light Power cord with plug Small plug Introduction Congratulations on your purchase and welcome to Philips Norelco! To fully benefit from the support that Philips Norelco offers, register your product at www.philips.com/register. Charging - Charging or using the product at temperatures below 40 °F (4.5 °C) or higher than 95 °F (35 °C) adversely affects the lifespan of the battery. - Do not charge the shaver in a pouch or travel case.
English 1 Make sure the product is turned off. 2 Put the small plug in the shaver and connect the power plug to any 100V to 240V AC outlet. Use only the power cord provided. The display of the shaver indicates that the shaver is charging. 3 After charging, remove the power plug from the wall outlet and pull the small plug out of the product. Charge indications Battery low When the battery is almost empty, the shaver starts working more slowly.
English 11 product or any accessory if it is damaged, as this may cause injury. Always replace a damaged part with one of the original type. This symbol indicates that the shaver can be used in the bath or shower. - Use this shaver for its intended household use as described in this manual. - For hygienic reasons, the shaver should only be used by one person. - Trimming is easier when the skin and hair are dry. This product can only be used without a cord.
English - Stick with it! If you alternate shaving methods during the adjustment period, it may make it more difficult to adapt to the Philips Norelco shaving system. - If you are still not convinced after 21 days, Philips Norelco will refund you the full purchase price as long as the request is received within 45 days of purchase. Turning the shaver on and off - To turn on the shaver, press the on/off button once. - To turn off the shaver, press the on/off button once.
English 13 5 Clean the shaver. Wet shaving For a more refreshing shave, you can also use this shaver on a wet face with shaving foam or gel. To shave with shaving foam or gel, follow the steps below: 1 Apply some water to your skin. 2 Apply shaving foam or shaving gel to your skin. 3 Turn on the shaver. 4 Rinse the shaving unit under the tap to ensure that the shaving unit glides smoothly over your skin.
English Note: Rinse the shaving unit regularly to ensure that it continues to glide smoothly over your skin. 6 Turn off and clean the shaver after each use. 7 Dry your face. Note: Rinse all foam or shaving gel off the shaver after each use. Cleaning and maintenance Regular cleaning guarantees better shaving results. Never clean, remove or replace the shaving unit while the shaver is switched on.
English 15 occurrence. Internal electric parts are in a waterproof compartment so the shaver will be protected against water damage. 2 1 Turn off the shaver, unplug from outlet and remove power cord from the product. 2 Turn on the shaver. 1 3 Rinse the shaving unit with warm water. 4 Press the unit release button to open the shaving unit. 5 Rinse the hair chamber with warm water. 6 Rinse the inside of the shaving unit with warm water.
English 7 Reattach the shaving unit to the shaver. 8 Carefully shake off excess water and let the shaver air-dry completely. Never dry the shaving unit with a towel or tissue, as this may damage the shaving heads. Replacement Replacing the shaving heads For maximum shaving performance, replace the shaving heads once a year. Always replace the shaving heads with original Philips Norelco shaving heads (see 'Accessories'). 1 Switch off the shaver and disconnect it from the power outlet.
English 17 4 Remove the shaving heads from the shaving unit. Discard the used shaving heads immediately to avoid mixing them with the new shaving heads. 5 Place new shaving heads in the shaving unit. Note: Make sure that the projections of the shaving heads fit exactly into the recesses. 6 Put the retaining frame back into the shaving unit (1) and turn the lock clockwise (2). 1 2 7 Reattach the shaving unit.
English Storage Put the protective cap on the shaver to prevent damage. Note: Always let the shaver dry completely before storing. - Be sure the product is turned off. Remove cord from outlet and the product before storing it in a safe, dry location where it will not be crushed, banged, or subject to damage. - Do not wrap cord around the product when storing. - Store cord and other accessories in a safe location where these will not be cut or damaged.
English 19 Online information is available 24 hours a day, 7 days a week. Disposal - This product contains a rechargeable nickel metal hydride battery which must be disposed of properly. - The built-in battery should not be disposed of with normal household waste - Contact your local town or city officials for battery disposal information. You can also call 1-800-822-8837 or visit www.call2recycle.org for battery drop-off locations. - For assistance, visit our website www.philips.
English IMPORTANT: This warranty does not cover damage resulting from accident, misuse or abuse, lack of reasonable care, the affixing of any attachment not provided with the product or loss of parts or subjecting the product to any but the specified voltage or batteries.* NO RESPONSIBILITY IS ASSUMED FOR ANY SPECIAL, INCIDENTAL OR CONSEQUENTIAL DAMAGES. In order to obtain warranty service, simply go to www.philips.com/support for assistance.
English 21 The product must be shipped prepaid by insured mail, insurance prepaid, have the original sales receipt, indicating purchase price and date of purchase, and the moneyback guarantee return authorization form enclosed. We cannot be responsible for lost mail. The product must be postmarked no later than 45 days after the date of purchase. Philips reserves the right to verify the purchase price of the product and limit refunds not to exceed suggested retail price.
Español Contenido INSTRUCCIONES IMPORTANTES DE SEGURIDAD_________ Descripción general (Fig.
Español 23 - No coloque ni guarde el producto en un lugar desde donde pueda caerse a una bañera o fregadero. No coloque el producto en un lugar desde donde pueda caerse al agua o a cualquier otro líquido ni sumerja el producto en ningún tipo de líquido. - Este producto no funciona mientras está conectado al enchufe de pared. Excepto cuando se esté cargando, siempre desenchufe este producto del enchufe de pared. - Desconecte el cable de alimentación del enchufe de pared y del producto antes de limpiarlo.
Español - Mantenga el cable de alimentación lejos de superficies calientes. - No deje caer ni introduzca ningún objeto en ninguna abertura. - No utilice el adaptador dentro o cerca de una salida de corriente que contenga un ventilador de aire eléctrico para prevenir daño al adaptador. - No use el producto a la intemperie ni lo use donde se estén usando productos de aerosol (atomizador) o donde se esté administrando oxígeno.
Español 25 CONSERVE ESTAS INSTRUCCIONES Descripción general (Fig. 1) 1 2 3 4 5 6 Tapa protectora Unidad de afeitado Botón de encendido/apagado Luz de carga Cable de alimentación con clavija Enchufe pequeño Introducción ¡Felicitaciones por su compra y bienvenido a Philips Norelco! Para obtener el máximo beneficio del soporte que ofrece Philips Norelco, registre el producto en www.philips.com/register. Carga - La carga o el uso del producto a temperaturas por debajo de los 40 °F (4.
Español Carga con el cable de alimentación Nota: No puede usar la afeitadora mientras se carga. Cuando cargue la afeitadora por primera vez o después de no haberla utilizado durante mucho tiempo, déjela cargando durante al menos 10 horas. Una afeitadora completamente cargada proporciona un tiempo de afeitado de hasta 45 minutos. 1 Asegúrese de que el producto esté apagado. 2 Coloque la clavija pequeña en la afeitadora y conecte el enchufe eléctrico en cualquier enchufe de pared de 100 V a 240 V AC.
Español 27 Cuando la afeitadora se esté cargando, la luz de carga será blanca y se quedará encendida continuamente. La luz de carga permanecerá encendida cuando la batería de la afeitadora esté completamente cargada. Nota: Después de que se haya cargado, retire el cable de corriente del enchufe de la pared y retire la clavija pequeña de la afeitadora. Uso del producto Siempre revise el producto y todos los accesorios antes de usarlo.
Español Esta afeitadora es apta para su uso en el baño o la ducha. Por lo tanto, por motivos de seguridad, no es posible usar la afeitadora mientras está conectada al enchufe de pared para cargarse. Proceso de adaptación de 21 días - Prueba de 21 días y proceso de adaptación. Es un hecho que la piel y la barba tardan algún tiempo en acostumbrarse al nuevo sistema de arreglo personal. - Utilice su nueva afeitadora únicamente 3 semanas para disfrutar completamente de un afeitado Philips Norelco al ras.
Español 29 Encendido y apagado de la afeitadora - Encienda la afeitadora, pulse el botón de encendido/apagado una vez. - Apague la afeitadora, pulse el botón de encendido/apagado una vez. Afeitado Para obtener los mejores resultados de confort sobre la piel, recorte su barba si no se ha afeitado durante 3 días o más. Afeitado seco 1 Encienda la afeitadora. 2 Mueva la afeitadora sobre la piel con movimientos circulares para atrapar todos los vellos en las diferentes direcciones de crecimiento.
Español Para afeitar con espuma o gel siga los siguientes pasos: 1 Humedezca la piel. 2 Aplique espuma o gel de afeitar sobre la piel. 3 Encienda la afeitadora. 4 Enjuague la unidad de afeitado con el agua de la llave para garantizar que se deslice suavemente sobre su piel. 5 Mueva los cabezales de afeitado sobre la piel con movimientos circulares para llegar a todos los vellos en las diferentes direcciones de crecimiento.
Español 31 7 Seque su cara. Nota: Enjuague la espuma o gel de afeitar de la afeitadora luego de cada uso. Limpieza y mantenimiento Una limpieza frecuente garantiza los mejores resultados de afeitado. Nunca limpie, retire ni reemplace la unidad de afeitado cuando la afeitadora esté encendida. No toque los cabezales de afeitado con objetos duros ya que esto podría deformar o dañar el cabezal de afeitado que cuenta con ranuras de precisión.
Español afeitadora quede protegida contra el daño del agua. 2 1 1 Apague la afeitadora, desconéctela del enchufe de pared y retire el cable del producto. 2 Encienda la afeitadora. 3 Enjuague la unidad de afeitado con agua caliente. 4 Presione el botón de liberación de la unidad para abrir la unidad de afeitado. 5 Enjuague la cámara de acumulación de vello con agua tibia. 6 Enjuague el interior de la unidad de afeitado con agua caliente.
Español 33 7 Vuelva a colocar la unidad de afeitado en la afeitadora. 8 Sacúdala con cuidado para eliminar el exceso de agua y deje que la afeitadora se seque por completo al aire. Nunca seque ni limpie la unidad de afeitado con una toalla o un papel desechable, ya que esto puede dañar los cabezales de afeitado. Sustitución Reemplazo de los cabezales de afeitado Para un rendimiento de afeitado óptimo, le aconsejamos que reemplace los cabezales de afeitado cada año.
Español 2 1 3 Gire el bloqueo a la izquierda (1) y retire el soporte de retención (2). Colóquelo a un lado en un lugar seguro. 4 Retire los cabezales de afeitado de la unidad de afeitado. Deseche los cabezales de afeitado inmediatamente para evitar mezclarlos con los nuevos. 5 Coloque los nuevos cabezales de afeitado en la unidad de afeitado. Nota: Asegúrese de que los salientes de los cabezales de afeitado encajen exactamente en las ranuras.
Español 35 requieran mantenimiento. Para solicitar asistencia, comuníquese al 1-800-243-3050. Almacenamiento Coloque la tapa protectora de la afeitadora para prevenir un daño. Nota: Siempre deje secar completamente la afeitadora antes de guardarla. - Asegúrese de que el producto esté apagado. Retire el cable del enchufe y del producto antes de guardarlo. Guarde el producto en un lugar seguro y seco donde no pueda aplastarse, golpearse o dañarse.
Español - Cabezales de afeitado de repuesto Philips Norelco SH30. Asistencia Para asistencia, visite nuestro sitio web: www.philips.com/support o llame al número gratuito 1-800-243-3050. La información en línea está disponible las 24 horas, los siete días de la semana. Desecho - Este producto contiene una batería recargable de níquel-metalhidruro que se debe desechar apropiadamente. - La batería integrada no se debe desechar en la basura normal de la casa.
Español 37 Garantía Total de Dos Años Philips North America LLC garantiza este producto nuevo (excepto los cabezales de afeitado) contra defectos en los materiales o en la mano de obra por un período de dos años desde la fecha de compra y acepta reparar o reemplazar cualquier producto defectuoso sin cargo.
Español Esta garantía le proporciona derechos legales específicos; asimismo, es posible que goce de otros derechos que pueden variar de estado a estado. En algunos estados no se permite la exclusión o la limitación de los daños fortuitos o resultantes, de modo que es posible que las limitaciones o exclusiones arriba mencionadas no apliquen a su caso. *Lea las instrucciones adjuntas atentamente.
Español 39 www.PhilipsMoneyBack.com y siga el proceso sencillo de 3 pasos. La entrega del cheque de reembolso ocurrirá de 6 a 8 semanas después de la recepción del producto devuelto.
Empty page before back cover
Manufactured for/fabricado por: Philips Personal Health a division of/una división de Philips North America LLC P.O. Box 10313, Stamford, CT 06904 USA This symbol on the product’s nameplate means it is listed by Underwriters’ Laboratories, Inc. Este símbolo en la placa del nombre del producto indica que está registrado en Underwriters' Laboratories, Inc.