
User Guide
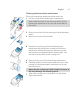
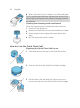


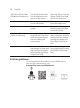
Table Of Contents
- Contents
- General description
- Introduction - Identify your shaver
- Fig. A
- Fig. B
- Important safety information
- What do the icons on the display mean? (Fig. A)
- What do the icons on the display mean? (Fig. B)
- Main menu (Fig. A)
- Main menu (Fig. B)
- How do I connect my shaver and smartphone? (Fig. A)
- How do I connect my shaver and smartphone? (Fig. B)
- What is my shaver telling me? (Fig. A)
- What is my shaver telling me? (Fig. B)
- How do I charge my appliance?
- How do I use my appliance and the attachments?
- How do I clean my appliance and the attachments?
- Storage
- How do I replace the shaving heads?
- Ordering accessories
- Troubleshooting
- Further guidance
- Recycling
- Trademarks

45
English
3
Pour any remaining fluid down a drain and recycle the
empty cartridge in accordance with local waste
regulations.
4
Place a new Quick Clean Pod Cartridge into the Quick
Clean Pod (see 'Preparing the Quick Clean Pod for
use').
Scan the QR code to the left or visit
www.philips.com/cleaning-cartridge to order
replacement Quick Clean Pod Cartridges.
Storage
Note: We advise you to let the appliance and its
attachments dry before you store them for the next use.
- Store the appliance in the pouch (if supplied).
- Put the protection cap (if supplied) on the shaver to
protect it from dirt accumulation.
- Alternatively, store the appliance on the charging
stand (if supplied) or in the Philips Quick Clean Pod (if
supplied).
How do I replace the shaving heads?
For maximum shaving performance, we advise you to
replace the shaving heads every two years.
Replace damaged shaving heads immediately. Always
replace the shaving heads with original Philips shaving
heads (see 'Ordering accessories').
Replacing the shaving heads
1
Switch off the shaver.
2
Press the release button on the shaving unit and pull
the shaving head holder off the shaving unit.