Register your product and get support at www.philips.
1 Important safety information General maintenance Recycling the product 2 Your new MUSE What’s in the box 3 3 5 7 7 3 Getting started 8 Overview of the controls and connections 8 Overview of the main menu 8 Install software 9 Connect and charge 9 Connect MUSE to a computer 9 Play while MUSE charges 9 Battery level indication 10 Battery level indication 10 Disconnect MUSE safely 10 Turn MUSE on and off 10 Automatic standb
10 Pictures 27 27 27 27 27 11 Radio 28 28 28 28 28 View pictures View slideshow Transfer pictures to MUSE Delete pictures Listen to FM radio Auto-tune preset radio station Manually tune a radio station Play a preset radio station 12 Recordings 29 Record audio/voices 29 Listen to voice/audio recordings 29 Upload your recordings to a computer 29 Delete recordings 29 13 Settings 30 14 Update MUSE 33 33 15 Trou
General maintenance Caution •• To avoid damage or malfunction: •• Do not expose the product to excessive heat caused by heating equipment or direct sunlight. •• Do not drop the product or allow objects to fall on your player. •• Do not allow the product to be submerged in water. Do not expose headphone socket or battery compartment to water, as water entering the set may cause major damage. •• Active mobile phones in the vicinity may cause interference. •• Back up your files.
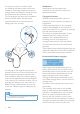
A noisy environment can severely impair our wellbeing and add to stress. Active noise cancelation technology enables the listener to strongly reduce low frequency sounds, and thus can contribute to the reduction of stress. The full benefits of the active noise cancelation feature of MUSE require that the special supplied earphones are used and that the earplugs are worn correctly: The earplugs of the supplied earphones are inserted into the ear.
Never dispose of your product with other household waste. Please inform yourself about the local rules on the separate collection of electrical and electronic products. The correct disposal of your old product helps prevent potentially negative consequences on the environment and human health. English state that no further copies shall be made. Video streams may include copy protection technology that prohibits further copying.
Notice for the USA Philips SA1MUS08 SA1MUS16 SA1MUS32 Please inform yourself about the local rules on separate collection of batteries. The correct disposal of batteries helps prevent potentially negative consequences on the environment and human health. 6 EN This equipment has been tested and found to comply with the limits for a Class B digital device, pursuant to part 15 of the FCC Rules.
MUSE allows you to • view video files • play MP3, unprotected WMA, and unprotected AAC (M4A) files • listen to FM radio • make recordings CD-ROM English 2 Your new MUSE Quick start guide Philips GoGear audio player Quick start guide What’s in the box Check that you have received the following items: Player Note •• The images serve as reference only. Philips reserves the right to change color/design without notice.
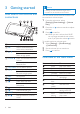
3 Getting started Overview of the controls and connections Caution •• Listening to loud sounds for longer than a moment can be harmful to the listener. You can set the volume level of MUSE to limit the maximum volume output. 1 2 3 From the main menu, select [Settings]>[Sound settings] > [Volume limit]. Press the the level. / volume controls to adjust Press to confirm. »» When you set a volume limit, MUSE can no longer exceed the set volume, even if you press the volume button.
Connect and charge MUSE comes with the following software: • Philips Device Manager (helps you get firmware updates for MUSE) • Media Converter for Philips (helps you convert and transfer video files for MUSE) • Windows Media Player (helps you convert and transver music and picture files for MUSE) Important: Remember to install the software provided in the supplied CD-ROM for music and/or video transfer.
Battery level indication Turn MUSE on and off The display indicates the approximate levels of the battery status as follows: 1 100% 75% 50% 25% 0% »» A flashing battery screen indicates that the battery is low. The player saves all settings and switches off within 60 seconds. Battery level indication Note •• Rechargeable batteries have a limited number of charge cycles. Battery life and number of charge cycles vary by use and settings.
English 4 Use MUSE to carry files MUSE allows you to carry files in Windows Explorer. 1 2 3 With MUSE connected to the USB port of the computer, open Windows Explorer. Create folders in MUSE. Use drag and drop actions to sort your files into the folders.
5 Music (noise cancelation) mark, to activate the noise canceling feature. • To deactivate the noise canceling feature, push the slider back again (away from the NC mark) Listen to music 1 2 3 From the main menu, select music mode. to enter Navigate the sub-menus to select your music. Press to play. • Press to toggle between pause and play. Reduce background noise MUSE incorporates an active noise canceling feature that lets you listen to your music and videos with less background noise.
English [Album art] • Alphanumerically listed album art [Albums] • Alphanumerically listed albums • Tracks listed in album order [Genres] • Alphanumerically listed genres • Alphanumerically listed artists • Alphanumerically listed albums • Tracks listed in album order [Playlists] • [Playlist-on-the-go] • Tracks listed in playlist order [Audiobooks] • Audiobook titles listed in alphanumerical order Note •• Alternatively, you can select from the main menu and find your files in folder view
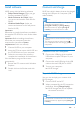
6 Windows Media Player 11 (WMP11) »» Add to Library dialog box appears. Install Windows Media Player 11 (WMP11) 1 2 Insert the supplied CD into the CD-ROM drive of your computer. Follow the on-screen instructions to complete the installation of WMP11. Transfer music and picture files to WMP11 library By default, WMP11 automatically loads all the music and picture files that are stored in your computer. The new files are also automatically added to the WMP11 library.
1 3 Click the down arrow beneath the Rip tab and select the Format. English Switch between music and pictures library in WMP and MUSE Click the arrow on the top left of WMP11,then select the category. 4 Click on the down arrow beneath the Rip tab and select the Bit Rate. Rip songs from a CD You can transfer music from a CD to MUSE. The transfer requires that you create a digital copy of the music on your computer first. This is called ripping.
By default, WMP11 starts to rip all the songs from the CD. 6 »» To modify this option, click the down arrow beneath the Rip tab and select Rip CD Automatically When Inserted > Never. 3 Choose a store and follow the on-screen instructions. Click on the check boxes to select the songs that you want to rip. »» You can find the albums or songs you purchase in the WMP11 library. 7 Click Start Rip. »» The selected tracks are converted and added to the WMP11 library.
Caution •• Do not disconnect MUSE while transfer is in progress. If you disconnect MUSE, the transfer is incomplete and Windows may not be able to recognize MUSE afterwards. 1 2 3 4 Start WMP11. Turn on MUSE. Select and prioritize what syncs automatically If WMP11 selects to sync MUSE automatically, you can choose not to sync your entire media library. You can choose what to sync from existing playlists or create new playlists.
5 In the Playlist to sync pane, select the Priority arrows to arrange them in the order that you want them to sync. 5 Drag the files and playlists that you want to sync from the Contents pane to the Sync List pane. • You can also click on the file or playlist and select Add to ‘Sync List’. »» If MUSE is full before sync is complete, the files and playlists that are lower in priority on the list are omitted from sync.
3 MUSE supports reverse sync, which lets you copy files from MUSE to your computer with WMP11. 1 2 3 4 5 6 Start WMP11. Turn on MUSE. Connect MUSE to the computer. Click on Philips MUSE in the left Navigation pane. »» The content on MUSE is listed in the Contents pane. Navigate to the file or playlist you want to copy from MUSE to the computer. Right click on the file or playlist, then select Copy from Device.
4 5 6 Click on the underlined words to refine your criteria. Click the second and third green plus signs to select and define more criteria for your auto playlist. Click OK button when done. Edit playlist You can edit your existing playlists at any time. 1 In the left Navigation pane, click on Playlists. To change the order of the items in the playlist, click and drag any item to a new position within the List pane.
1 2 3 4 5 Click the arrow on the top left of WMP11, then select Music or Pictures for deletion. Navigate to the file or playlist you want to delete. Right click on the file or playlist, then select Delete. Select Delete from library only or Delete from library and my computer, then click OK. You can use WMP11 to manage the files stored on MUSE. When you connect MUSE to the computer, the contents on MUSE is displayed in WMP11.
4 5 Select the appropriate tab, then enter or edit the information. Click OK to save your changes. Format MUSE with WMP11 Caution •• This procedure reformats the storage on MUSE and erases all data. 1 2 3 4 22 Start WMP11. Turn on MUSE. Connect MUSE to the computer. Click the down arrow beneath the Sync tab, then select Philips MUSE > Format.
Remove music tracks from a playlist Add music tracks to a playlist 1 2 1 2 3 In music play mode, press OPTIONS. Press then or to select [Add to playlist], to confirm. Press or to select the playlist, then to confirm. »» The current track is added to the selected playlist. Play music tracks from a playlist 1 2 3 From the main menu, select [Playlists]. Press or , then playlist. > 3 English 7 Playlists In music play mode, press OPTIONS. Press or Playlist].
8 Audiobooks MUSE supports books in audio format. The use of this feature requires that you download AudibleManager from audible.com. With AudibleManager you can manage the digital contents of your audiobooks. Visit audible.com/gogear and register. The onscreen instructions guide you through AudibleManager software download process. Add audiobooks to MUSE • 1 2 3 4 Important: MUSE supports audiobook format or format . On your computer, launch AudibleManager.
1 2 3 In audiobook play mode, press OPTIONS. to select [Playback Press or , then speed]. Press or , then to select [Slower], [Normal], or [Faster]. • To exit, press . Add a bookmark in an audiobook 1 2 3 In audiobook play mode, press OPTIONS. Press or , then [Bookmarks]. Delete a bookmark in an audiobook 1 2 3 4 5 English Adjust audiobook play speed In audiobook play mode, press OPTIONS. Press or , then [Bookmark [x]]. to select Press or , then bookmark].
9 Video Download, convert and transfer videos MediaConverter™ for Philips enables you to • download videos from the Internet to your PC at the click of a button. • convert video files on your PC to the correct screen size of MUSE. • transfer converted videos from your PC to MUSE. Note Play videos 1 2 3 1 1 About PC connection preferences...
10 Pictures 1 View pictures MUSE supports a range of picture formats (see section Supported formats in this user manual). 1 2 From the main menu, select picture mode. Press or , then select. to enter to navigate and 2 3 4 From the main menu, select picture mode. English Delete pictures to enter Select the picture you want to delete. Press OPTIONS to view options menu. Select the delete option to delete the picture.
11 Radio Play a preset radio station 1 Listen to FM radio 1 2 Connect earphones. From the main menu, select to enter radio mode. • The earphones cable acts as FM antenna. Auto-tune preset radio station 3 4 to enter Press OPTIONS to see the options menu. Select [Auto tune]. »» The radio automatically tunes radio stations and saves the 20 strongest frequencies to presets. »» To stop auto tuning, press »» To exit radio, press and hold seconds. .
Upload your recordings to a computer Record audio/voices 1 This is how you can record audio/voices with the built-in microphone (see section Overview for location of built-in microphone): 1 2 3 4 5 From the main menu, select recordings mode. to enter Select [Start voice recording]. • Press to toggle between pause and record. Press to stop. »» The screen prompts you to save the recording. Press / to select [Yes] / [No]. Press to save the recording. »» Recordings are saved on the player.
13 Settings This is how you customize MUSE: From the main menu, select to enter settings mode. In the menu, navigate as follows: 1 2 3 4 Press / to select an option. Press to confirm a selection and go to the next level (when available). Press to return to the previous level. Press and hold to exit the menu. In the menu, the following options are available: Settings [Sound settings] [Sleep timer] 30 EN Options menu Sub-options menu Active noise cancelation* Bar adjustment indicator.
[Brightness] [Backlight timer] [Screensaver] Font size [Date and time] • Small • Normal (default) • Large Date Date format Time Time format Show time in header [Slideshow settings] [Time per slide] [Repeat] [Shuffle] [Language] • Czech • German • [English] (default) • Spanish • French • Italian • Hungarian • Dutch • Theme 1 (default) • Theme 2 • Theme 3 • Level 1 • Level 2 • Level 3 • Level 4 • Level 5 • [[x] seconds] • [Off] (default) • [Song title] • [Album art] • [Digital
[PC connection preference] [Information] • MSC (default) • MTP • [Capacity:] • [Free space:] • [Firmware version:] • [Model:] • [Support site:] • [Yes] [Factory settings] [Restore factory • [No] settings? (Files transferred to player will not be affected.
English 14 Update MUSE MUSE is controlled by an internal program called firmware. Newer versions of the firmware may have been released after you have purchased MUSE. The software program called Philips Device Manager can use your computer to check for firmware updates that are available on the Internet. Install Philips Device Manager on your computer from MUSE or download the latest version from www.philips.com/support. Note •• Your music files are not affected by a firmware update.
15 Troubleshooting If MUSE is not working properly or the display freezes, you can reset it without losing data: How do I reset MUSE? •• Insert a pen tip or other object into the reset hole located at the bottom of MUSE. Hold until the player shuts down.
Power Power supply: 750 mAh Li-ion polymer internal rechargeable battery Play time¹ (music): 25 hours Play time¹ (video): 5 hours Connectivity Headphone 3.5 mm USB 2.0 High speed Sound Channel separation: 45 dB Frequency Response: 20 Hz - 18 kHz Output power: 2 x 1.4 mW Signal to noise ratio: > 84 dB THD 0.
Supported music file formats MUSE supports the following music formats: • .mp3 • .wma • .aac • .ape • .flac • .ogg • .wav • .ra / .rm Supported video file formats MUSE supports the following video formats: • .avi • .mp4 • .rmvb • .wmv Supported picture file formats MUSE supports the following picture formats: • .jpg / .jpeg • .bmp • .png • .gif Supported audiobook file formats MUSE supports the following audiobook formats: • .aa • .
A Active noise cancelation Active noise control (ANC) (also known as noise cancelation, active noise reduction, or antinoise) is a method for reducing unwanted sound. The active noise cancellation system cancels unwanted sound by generating an antisound (antinoise). The original, unwanted sound and the antinoise acoustically combine, resulting in the cancelation of both sounds. Album art Album art is a feature that displays the artwork (cover picture) of a music album.
MP3 A file format with a sound data compression system. MP3 is the abbreviation of Motion Picture Experts Group 1 (or MPEG-1) Audio Layer 3. With the MP3 format, one CD-R or CD-RW can contain about 10 times more data than a regular CD. MSC [Mass Storage Class] The USB mass storage device class (or USB MSC or UMS) is a set of computing communications protocols that provide an interface to storage devices. Devices that support this standard are referred to as MSC (Mass Storage Class) devices.
English technology, and Windows Media Audio encoding technology. WMV [Windows Media Video] Refers to a video compression technology developed by Microsoft Corporation. WMV content can be encoded by using Windows Media® Encoder 9 series. Files are recognised by their file extension ‘.wmv’.
© 2009 Koninklijke Philips Electronics N.V. All rights reserved. SA1MUS_37_UM_V2.