
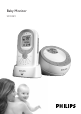
Instructions for use


Make sure the the baby unit is at least 1 metre/3 feet away from the parent unit.
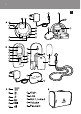
2 Press and hold the on/off 3 button on the baby unit for 2 seconds. (Fig. 11)
The nightlight lights up briey.
The display lights up and indicates the current room temperature.
O appears on the display and the connection light starts to blink red while the
baby unit tries to establish connection with the parent unit.
3 Press and hold the on/off button 3 on the parent unit for 2 seconds. (Fig. 12)
The sound level lights burn orange briey.
The display lights up and the battery symbol and the temperature indication appear on the
display.
The LINK light burns red briey and then starts to blink green while the parent unit tries to
establish connection with the baby unit.
The LINK light on the parent unit blinks green and the LINK light on the baby unit blinks red
until connection has been established. This will take up to 30 seconds. Both LINK lights then
burn green continously and the message O disappears from the baby
unit’s display. (Fig. 13)
4 Place the baby unit at least 1 metre/3 feet away from your baby. (Fig. 14)
5 Position the parent unit within the operating range of the baby unit. Make sure it is at least 1
metre/3 feet away from the baby unit. (Fig. 15)
For more information on the operating range, see section ‘Operating range’ below.
Operating range
The operating range of the baby monitor is 300 metres/900 feet in open air. Depending on the
surroundings and other disturbing factors, this range may be smaller. Indoors the operating range is
up to 50 metres/150 feet.
Dry materials Material thickness Loss of range
Wood, plaster, cardboard, glass
(without metal, wires or lead)
< 30cm/12in 0-10%
Brick, plywood < 30cm/12in 5-35%
Reinforced concrete < 30cm/12in 30-100%
Metal grilles or bars < 1cm /0.4in 90-100%
Metal or aluminium sheets < 1cm/0.4in 100%
For wet and moist materials, the range loss may be up to 100%.
Features
1 Briey press the volume + and – buttons on the baby unit until the desired loudspeaker
volume for the baby unit has been reached. (Fig. 16)
2 Briey press the volume + and – buttons on the parent unit until the desired loudspeaker
volume for the parent unit has been reached. (Fig. 17)
The displays give visual feedback on the volume settings of the units:
A : parent unit volume switched off / monitoring baby silently;
P : minimum volume (parent unit and baby unit);
}: maximum volume (parent unit and baby unit).
Note: If you press the volume + and – buttons too long, the volume will not be adjusted.
,
,
,
,
,
,
,
,
-
-
-
ENGLISH 9