Always here to help you Register your product and get support at www.philips.
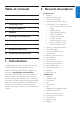
2 General description 1 Introduction 3 2 General description 3 3 Preparing for use 4 4 Using the appliance 6 5 Features 8 6 Cleaning and maintenance 12 7 Storage 12 8 Ordering accessories 12 9 Guarantee and service 12 10 Frequently asked questions 12 1 Introduction Congratulations on your purchase and welcome to Philips AVENT! To fully benefit from the support that Philips AVENT offers, register your product at www.philips.com/welcome.
3 Preparing for use IMPORTANT: Read the important safety instructions carefully before you use the video baby monitor and keep them for future reference. Hereby, Philips Electronics UK Limited, declares that this Baby Monitor is in compliance with the essential requirements and other relevant provisions of Directive 1999/5/EC. A copy of the EC Declaration of Conformity (DoC) is available on CDROM or from website: www.philips.com/ support.
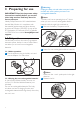
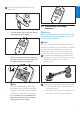
2 Insert the rechargeable battery. 3 D Note: Make sure the + and - poles point in the right direction. Reattach the lid. E N GL IS H 3.2 Parent unit 3.2.1 Operation on rechargeable battery B Warning: Unplug the parent unit and make sure your hands and the unit are dry when you insert the rechargeable battery. •• The parent unit comes with a rechargeable Li-ion polymer 1100mAh battery.
4 Using the appliance 1 •• When the battery is fully charged, the battery symbol at the top of the video display is full. •• When you charge the parent unit for the first time or after a long period of disuse, switch it off and let it charge continuously for at least 4 hours. •• Charging normally takes 2.5 hours, but it takes longer when the parent unit is switched on during charging. To keep the charging time as short as possible, switch off the parent unit during charging.
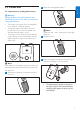
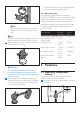
Press and hold the on/off button on the parent unit. E N GL IS H 3 4.1 Positioning the baby monitor •• The video display goes on and the linking image appears on the display. •• When a connection has been established, the baby is shown on the video display and the signal strength symbol appears. E Tip: Find out what the best position is for the parent unit by looking at the signal strength symbol. The number of stripes indicates the quality of the connection.
For more information on the operating range, see section ‘Operating range’ below. 4.1.1 Operating range E Tip: Use the provided template, to mark the exact location of the screw holes on the wall. 3 4 8 E Tip: Position the baby unit at a higher level to get a good overview of the baby’s bed or playpen. Adjust the baby unit in a way that ensures the best visibility of your baby.
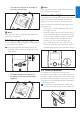
D Note: If the brightness is set to a high level, the parent unit consumes more power. E N GL IS H •• The volume bar appears on the display to show the selected volume. 5.3 Sound level lights D Note: If the volume is set to a high level, the parent unit consumes more power. 5.2 Adjusting display brightness You can adjust the display brightness of the parent unit to the level you prefer. 1 Press the brightness adjustment buttons on the parent unit to adjust the brightness of the video display.
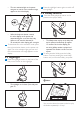
•• The voice activation light on the parent unit goes on and the voice activation image appears on the video display. 2 5.6 Lullaby function 1 2 •• When the baby unit detects a sound, the video display on the parent unit automatically goes on to show the baby. When no new sound is detected for 20 seconds, the video display goes out again. To deactivate the voice activation mode, press the voice activation button on the parent unit again.
4 Press the lullaby play/stop button on the parent unit to play the lullaby selected. •• The lullaby starts to play on the baby unit and is repeated continuously. D Note: If you have selected the repeat mode, all three lullabies are played repeatedly in a loop. To stop the lullaby, press the lullaby play/stop button again. E N GL IS H 3 •• To use the belt clip as a stand, turn it downwards until the parent unit can rest on it. 5.
6 Cleaning and maintenance B Warning: Do not immerse the parent unit and the baby unit in water and do not clean them under the tap. B Warning: Do not use a cleaning spray or liquid cleaners. 1 Switch off the baby unit and the parent unit and remove the adapters from the wall socket. 2 Clean the parent unit and the baby unit with a dry cloth. D Note: Fingerprints or dirt on the lens of the baby unit may affect the camera’s performance. Avoid touching the lens with your fingers.
Why don’t the power-on light of the baby unit and the parent unit go on when I switch on the units? •• Perhaps the rechargeable battery of the parent unit is empty and the parent unit is not connected to the mains. Insert the appliance plug into the parent unit and put the adapter in a wall socket. Then press and hold the on/off button to switch on the parent unit and to establish connection with the baby unit.
Why does the charging time of the parent unit exceed 2.5 hours? •• The parent unit may be switched on during charging. Switch off the parent unit during charging. Why do I need to keep the baby unit and its cord at least 1 metre/3.5 feet from my baby? •• To avoid strangulation with the cord and for optimal sound detection, always place the baby unit and its cord at least 1 metre (3.5 feet) away from the baby.
Why does the parent unit make a buzzing sound? •• Interference may occur when the parent unit is out of range of the baby unit. Interference may also occur if there are too many walls or ceilings between the parent unit and the baby unit or when other 2.4GHz wireless devices are switched on (e.g. microwave, Wi-Fi router). Put the parent unit in a different place, closer to the baby unit, or switch off other wireless devices. •• The rechargeable battery of the parent unit may need to be charged.
Output video display Why does the video display flicker? •• Interference may occur when the parent unit is out of range of the baby unit. Interference may also occur if there are too many walls or ceilings between the parent unit and the baby unit or when other 2.4GHz wireless devices are switched on (e.g. microwave, Wi-Fi router). Put the parent unit in a different place, closer to the baby unit, or switch off other wireless devices. •• The rechargeable battery of the parent unit may need to be charged.
www.philips.com/AVENT Philips Consumer Lifestyle BV Tussendiepen 4, 9206 AD Drachten, Netherlands Trademarks owned by the Philips Group. ©2014 Koninklijke Philips N.V. All rights reserved 4222.005.0391.