sensiflex power toothbrush
ENGLISH 6 DEUTSCH 16 FRANÇAIS 26 NEDERLANDS 35 HX2585, 2538, 1526, 1515, 1514, 1513, 1511, 1510 ESPAÑOL 45 ITALIANO 55 PORTUGUÊS 65 75
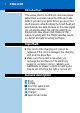
ENGLISH Introduction This unique, electric toothbrush removes plaque better than a normal, manual toothbrush. It also helps to protect your gums.When you exert too much pressure while brushing, the brush head will automatically flex back. Because of this clear signal, you will quickly adopt the right brushing force. Clinical tests have shown that, thanks to this system, brushing with the Philips Sensiflex results in a better and safer brushing technique.
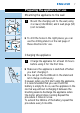
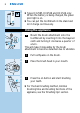
ENGLISH 7 Preparing the appliance for use Mounting the appliance to the wall C 15,6 1 Mount the charging unit to the wall, using 2 screws (3.0x30mm) and 2 wall plugs (S5) (not included). drill the holes in the right places, you can C ◗ To use the drilling stencil on the last page of 3 1 these directions for use. 2 Charging the appliance 1 Charge the appliance for at least 16 hours before using it for the first time. sure the appliance is switched off when C ◗ Make you start charging it.
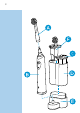
ENGLISH 8 16 hrs HX2585, HX2538 and HX1526 only: C ◗ Types When the battery is being charged, the green pilot light is on. ◗ You can put the toothbrush in the stand and let it charge continuously. Using the appliance C 1 2 1 Mount the brush attachment onto the toothbrush by inserting it into the bayonet catch and turning it clockwise a quarter of a turn. This will make it impossible for the brush attachment to become detached due to vibration. 2 Put toothpaste on the brush.
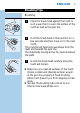
ENGLISH 9 Brushing Tips Brushing C 1 C 2 C Place the brush head against the tooth in such a way that it covers the surface of the tooth as well as the gum line. Hold the brush head in this position for a few seconds and then move on to the next tooth. The round brush head removes plaque from the teeth and beneath the gum line. The individually moving Active Tip cleans between the teeth. 3 Guide the brush head carefully along the teeth and molars.
ENGLISH Gum Protection C 1 C 2 The Gum Protection system guarantees that you will not exert too much pressure on the teeth and gums. If you exert too much pressure on the toothbrush, you will feel and hear a click when the brush head flexes backwards. As soon as you reduce the pressure, the brush head will return to its normal position.This will protect your gums. This will probably happen a few times when you first start using the brush.
ENGLISH 11 Minimum brushing time: 2 minutes In general, 2 minutes will be enough to clean your teeth properly. Naturally, you can also brush longer than 2 minutes. red pilot light will blink to indicate that C ◗ A2 minutes have passed (types HX2585, HX2538 and HX1526 only). Optimal dental hygiene For optimal dental hygiene, it is recommended to use dental floss and toothpicks in addition to the electric toothbrush.
ENGLISH C 3 Switch the toothbrush on again to rinse toothpaste residues from the drive shaft. C 4 Types HX1526, HX1515, HX1514, HX1513, HX1511, HX1510 only: store the brush attachment on the pin on the charging unit.Types HX2585 and HX2538 only: store up to 4 brush attachments in the storage container. HX2585 and HX2538 only: instead of C ◗ Types 2 brush attachments, you can also store a toothpaste tube in the storage container.
ENGLISH 13 You can obtain new brush attachments from the shop in which you purchased the toothbrush. All-round PHILIPS replacement brush attachments can be used. Environment When you discard the appliance in due course, remove the battery and dispose of it in an environmentally safe way. ◗ NB:You can also hand the appliance in at a Philips Service Centre, which will dispose of the battery for you. 1 The battery must be completely empty when you remove it.
ENGLISH C 4 Open the lid of the battery holder by hand or by means of a screwdriver. C 5 Lift the battery out of the battery holder by means of a screwdriver. After the bottom has been unscrewed, the appliance may not be watertight anymore and the guarantee will become invalid.
ENGLISH Problem Solution The toothbrush does not work at all, although it has been in the charging unit overnight. Make sure that the plug of the charging unit is properly connected to the mains. 15 Make sure the socket is live (see also the section 'Important'). Make sure the toothbrush is switched off and recharge it for at least 16 hours. The motor of the toothbrush works, but the brush head doesn't.
DEUTSCH Einleitung Diese einzigartige elektrische Zahnbürste entfernt die Plaque gründlicher als es mit einer üblichen Zahnbürste möglich ist. Mit Hilfe dieses Geräts wird Ihr Zahnfleisch besser geschützt:Wenn Sie zu stark auf die Bürste drücken, federt der Bürstenkopf augenblicklich zurück. Durch dieses deutliche Signal lernen Sie in kurzer Zeit, einen angemessenen Druck auf die Bürste auszuüben.
DEUTSCH 17 Vor dem Gebrauch Die Ladeeinheit an der Wand anbringen C 15,6 Bringen Sie die Ladeeinheit an der Wand an. Sie benötigen hierzu 2 Schrauben (3,0 x 30 mm) und zwei Dübel (S 5); sie sind im Lieferumfang nicht enthalten. der letzten Seite dieser C ◗ Auf Gebrauchsanweisung finden Sie eine 3 1 2 1 Schablone zur Platzierung der Löcher für die Dübel. Den Akku aufladen 1 Laden Sie vor dem ersten Gebrauch den Akku mindestens 16 Stunden lang auf.
DEUTSCH ohne sie nachzuladen. Laden Sie den Akku erst dann auf, wenn der Motor beinahe aufgehört hat zu arbeiten.Wiederholen Sie diesen Vorgang dreimal nacheinander. Die Nutzungsdauer des Akkus erhöht sich, wenn Sie alle 6 Monate so verfahren. 16 hrs Typen HX 1526, 2538 und 2585:) C ◗ (Nur Während des Ladevorgangs leuchtet die grüne Kontroll-Lampe. ◗ Sie können die Zahnbürste zum kontinuierlichen Nachladen im Ladegerät belassen.
DEUTSCH 19 Funktionen des Geräts finden Sie im Abschnitt "Hinweise zur Zahnpflege". Hinweise zur Zahnpflege Die Zähne bürsten C 1 C 2 C Setzen Sie den Bürstenkopf in einem Mundwinkel so an Ihre Zähne, dass er sowohl die Oberfläche der Zähne als auch einen Teil des Zahnfleisches bedeckt. Halten Sie den Bürstenkopf einige Sekunden in dieser Position, und führen Sie ihn dann zum nächsten Zahn. Der runde Bürstenkopf entfernt die Plaque vom Zahn und vom Zahnhals in der Nähe des Zahnfleisches.
DEUTSCH ◗ Hinweise zur Zahnpflege finden Sie auch über unsere Homepage: www.philips.com. Schutz des Zahnfleisches C 1 C 2 Die Druckkontrolle (das Gum Protection Sytem) verhindert, dass Sie bei der Zahnpflege mit der Bürste einen zu starken Druck auf Zähne und Zahnfleisch ausüben. Drücken Sie den Bürstenkopf zu stark an, schnellt der Bürstenaufsatz hörbar ("Klick") und spürbar zurück. So wird Ihr Zahnfleisch vor Beschädigungen geschützt.
DEUTSCH 21 Mindestens 2 Minuten die Zähne putzen Im Allgemeinen sind 2 Minuten ausreichend, um die Zähne korrekt zu putzen. Sie können die Zähne selbstverständlich auch länger putzen. Typen HX 1526, 2538 und 2585:) Wenn C ◗ (Nur die Zeit von 2 Minuten verstrichen ist, leuchtet eine rote Kontroll-Lampe.
DEUTSCH C 3 Schalten Sie die Zahnbürste erneut ein, und wischen Sie die Reste der Zahncreme vom Grundgerät ab. C 4 (Nur Typen HX 1510, 1511, 1513, 1514, 1515 und 1526:) Bewahren Sie den Bürstenaufsatz auf dem Stift der Ladeeinheit auf. (Nur Typen HX 2538 und 2585:) In dem Behälter (D) können Sie bis zu vier Bürstenaufsätze unterbringen. Typen HX 2538 und 2585:) An Stelle von C ◗ (Nur zwei Bürstenaufsätzen können Sie in dem Behälter eine Tube Zahncreme unterbringen.
DEUTSCH 23 ◗ Ersetzen Sie die Bürstenaufsätze auch schon dann, wenn sich die Borsten nach außen verbiegen. Neue Bürstenaufsätze erhalten Sie dort, wo das Gerät gekauft wurde. Sie können All-Round PHILIPS Bürstenaufsätze verwenden. Umweltschutz Wenn Sie das Gerät zu gegebener Zeit außer Betrieb nehmen, so entnehmen Sie bitte den Akku, und entsorgen Sie ihn in der vorgeschriebenen Weise.
DEUTSCH Schrauben Sie die Unterseite des Grundgeräts gegen den Uhrzeigersinn ab. C 3 Drehen Sie das Grundgerät herum, und drücken Sie es fest auf eine harte Unterlage, um den Akkuhalter entnehmen zu können. C 4 Öffnen Sie den Deckel des Batteriehalters mit der Hand oder mit Hilfe eines Schraubendrehers. C 5 Nehmen Sie den Akku mit einem Schraubendreher aus dem Akkuhalter. Wenn die Unterseite des Grundgeräts geöffnet wurde, ist es nicht mehr wasserdicht. Die Garantie ist dann erloschen.
DEUTSCH Problem Abhilfe Die Zahnbürste funktioniert nicht, obwohl Sie über Nacht aufgeladen wurde. Prüfen Sie, ob der Stecker der Ladeeinheit fest in der Steckdose steckt. 25 Prüfen Sie, ob die Steckdose Strom führt. - Vgl. den Abschnitt "Wichtig". Schalten Sie das Gerät aus, und laden Sie den Akku mindestens 16 Stunden lang auf. Der Motor läuft, aber der Bürstenkopf funktioniert nicht. Prüfen Sie, ob der Bürstenkopf korrekt auf dem Grundgerät angebracht ist.- Vgl.
FRANÇAIS Introduction Cette brosse à dents électrique unique enlève la plaque dentaire mieux qu'une brosse à dents standard Philips. Elle vous aide à protéger vos gencives. Si vous pressez la brosse trop fortement sur vos gencives, vous entendrez un déclic lorsque la brosse basculera en arrière. A cause de ce signal vous réduisez la pression et adoptez une pression correcte.
FRANÇAIS 27 Préparation à l'emploi Fixation de l'appareil au mur C 15,6 1 Fixez le chargeur au mur, à l'aide de 2 vis (3 x 30mm) et 2 fiches (S5) (non fournies). percer les trous correctement, vous C ◗ Pour pouvez utiliser le gabarit qui se trouve sur la 3 1 dernière page du mode d'emploi. 2 Charge de l'appareil 1 Lors de la première charge mettez l'appareil en charge pendant 16 heures. que l'appareil est arrêté quand C ◗ Assurez-vous vous le chargez.
FRANÇAIS 16 hrs les modèles HX2585, HX2538 et C ◗ Pour HX1526 uniquement: Lorsque l'accumulateur est en charge le témoin lumineux vert est allumé. ◗ La brosse peut être replacée sur le chargeur et laissée en charge continuellement. Utilisation de l'appareil C 1 2 1 Fixez la brossette sur le corps de l'appareil en l'insérant dans la baïonnette, puis vissez-la. Ainsi, la brossette ne pourra pas se dévisser. 2 Mettez du dentifrice sur la brossette. C 3 Placez la brossette dans votre bouche.
FRANÇAIS 29 Suggestions de brossage Le brossage C 1 C 2 C Placez la brossette contre vos dents, de telle sorte qu'elle couvre aussi bien la surface des dents que celle des gencives. Maintenez-la dans cette position quelques secondes puis passez à la dent suivante. La tête ronde de la brossette ôte la plaque dentaire située sur les dents et sous les gencives. La tête Active Tip individuelle permet de brosser les espaces interdentaires.
FRANÇAIS C 2 Si vous pressez la brosse trop fortement sur vos gencives, vous entendrez un déclic lorsque la brosse basculera en arrière. Dés que vous réduisez la pression, la brosse reprend sa position normale. Cette opération protégera vos gencives. Ceci se produira probablement souvent lorsque vous utiliserez la brosse pour la première fois. Avec le temps vous découvrirez la pression de brossage optimale.
FRANÇAIS 31 Hygiène dentaire optimale Pour une hygiène dentaire optimale, il est recommandé d'utiliser du fil dentaire et des curedents en plus de la brosse à dents électrique. Vous trouverez plus d'informations sur le Soin Dentaire Philips et d'autres produits Philips sur le site Internet: www.philips.com. Nettoyage et rangement de l'appareil C 1 Mettez la brosse en marche et rincez la tête de la brosse à l'eau tiède (max.60cC). C 2 Arrêtez la brosse. Détachez la tête et rincez l'intérieur.
FRANÇAIS C 4 Pour les modèles HX1526, HX1515, HX1514, HX1513, HX1511, HX1510 uniquement: rangez la brossette sur le chargeur. Pour les modèles HX2585 et HX2538 uniquement: vous pouvez ranger jusqu'à 4 têtes de brossage dans le compartiment de rangement. les modèles HX2585 et HX2538 C ◗ Pour uniquement: à la place de 2 têtes, vous pouvez ranger un tube dentifrice. Le compartiment de rangement et les inserts peuvent être retirés du chargeur et nettoyés dans le lave-vaisselle.
FRANÇAIS 33 Environnement En fin de vie ou si vous désirez vous débarrasser de votre appareil, retirez l'accumulateur et déposez-le dans un endroit assigné à cet effet. ◗ NB:Vous pouvez aussi apporter l'appareil à un Centre Service Agréé Philips qui s'en chargera. 1 Avant d'ôter l'accumulateur; assurez-vous qu'il est totalement déchargé. Laissez donc l'appareil en marche jusqu'à l'arrêt total. C 2 Prenez le chargeur et mettez la brosse sur le support.
FRANÇAIS En cas de problème Si vous ne pouvez pas résoudre le problème à l'aide du petit guide, adressez-vous à un Centre Service Agréé, au Service Consommateurs Philips de votre pays ou contactez-nous en ligne à www.philips.com. Problème Solution La brosse à dents ne Assurez-vous que le chargeur est correctement fonctionne pas, bien qu'elle branché. ait été chargée pendant la nuit. Assurez-vous que la prise de courant est alimentée, même lorsque la lumière est éteinte (voir le chapitre 'Important').
NEDERLANDS 35 Introductie Deze unieke elektrische tandenborstel verwijdert plak beter dan een gewone handtandenborstel en helpt tevens uw tandvlees te beschermen. Als u tijdens het poetsen te veel druk uitoefent, klikt de opzetborstel vanzelf naar achteren. Door dit duidelijke signaal zult u al snel de juiste poetsdruk gaan gebruiken. Uit klinische tests blijkt dat, dankzij dit systeem, poetsen met de Philips Sensiflex tot een betere en veiligere poetsmethode leidt.
NEDERLANDS 36 Klaarmaken voor gebruik Het apparaat aan de muur bevestigen C 15,6 Bevestig de oplader aan de muur met behulp van twee schroeven (3,0 x 30 mm) en twee muurpluggen (S5) (niet bijgeleverd). er zeker van te zijn dat u op de juiste C ◗ Om plaatsen gaatjes boort, kunt u gebruik maken 3 1 2 1 van de boormal op de laatste pagina van deze gebruiksaanwijzing. Het apparaat opladen 1 Laad het apparaat ten minste 16 uur op voordat u het voor de eerste keer gebruikt.
NEDERLANDS 16 hrs 37 types HX2585, HX2538 en HX1526: C ◗ Alleen het groene lampje brandt wanneer de accu opgeladen wordt. ◗ U kunt de tandenborstel continu in de oplader laten opladen. Gebruik van het apparaat C 1 2 1 Bevestig de opzetborstel op de tandenborstel door deze in de bajonetsluiting te plaatsen en een kwartslag rechtsom te draaien. Hierdoor kan de opzetborstel niet van de tandenborstel af trillen. 2 Doe tandpasta op de borstelkop. C 3 Plaats de borstelkop in uw mond.
NEDERLANDS Poetstips Poetsen C 1 C 2 C Plaats de borstelkop zo tegen de tand dat deze zowel het tandoppervlak als de rand van het tandvlees bedekt. Houd de borstelkop enkele seconden in deze positie en ga dan verder met de volgende tand. De ronde borstelkop verwijdert plak van de tanden en onder de rand van het tandvlees. De onafhankelijk bewegende Active Tip reinigt tussen de tanden. 3 Beweeg de borstelkop voorzichtig langs alle tanden en kiezen.
NEDERLANDS 39 Tandvleesbescherming C 1 C 2 Het poetsdrukcontrolesysteem voorkomt dat u te veel druk uitoefent op uw tanden en tandvlees. Als u te veel druk uitoefent op de tandenborstel, hoort en voelt u de opzetborstel naar achteren klikken. Zodra u de druk vermindert, keert de opzetborstel terug naar zijn normale positie. Hierdoor wordt uw tandvlees beschermd. Dit zal waarschijnlijk in het begin enkele keren gebeuren.
NEDERLANDS Minimale poetstijd: 2 minuten Over het algemeen zal 2 minuten poetsen voldoende zijn om uw tanden goed te reinigen. U kunt natuurlijk ook langer dan 2 minuten poetsen. rood lampje gaat knipperen om aan te C ◗ Een geven dat er twee minuten verstreken zijn (alleen types HX2585, HX2538 en HX1526). Optimale gebitsverzorging Voor optimale gebitsverzorging is het aan te raden om naast de elektrische tandenborstel ook tandenstokers te gebruiken en te flossen.
NEDERLANDS 41 C 3 Schakel de tandenborstel nogmaals in om restjes tandpasta van de aandrijfas af te spoelen. C 4 Types HX1526, HX1515, HX1514, HX1513, HX1511, HX1510 : bewaar de opzetborstel door hem op de pin op de oplader te plaatsen.Types HX2585 en HX2538: bewaar de opzetborstel in de opbergcontainer. Hierin is plaats voor 4 opzetborstels. types HX2585 en HX2538: in plaats C ◗ Alleen van 2 opzetborstels kunt u ook een tube tandpasta in de opbergcontainer opbergen.
NEDERLANDS ◗ Vervang de opzetborstel ook als de haren naar buiten beginnen te buigen. Nieuwe opzetborstels zijn verkrijgbaar bij de winkel waar u de tandenborstel gekocht heeft. Alle Philips opzetborstels kunnen gebruikt worden in combinatie met dit apparaat. Milieu Verwijder de accu wanneer u het apparaat afdankt. Gooi de accu niet bij het normale huisvuil, maar lever deze apart in op een door de overheid daartoe aangewezen plaats.
NEDERLANDS C 4 Open het deksel van de accuhouder met behulp van een schroevendraaier. C 5 Licht de accu uit de accuhouder met behulp van een schroevendraaier. 43 Het is apparaat is waarschijnlijk niet meer waterdicht nadat de onderzijde is losgeschroefd Uw garantie vervalt dan ook wanneer u de onderzijde heeft geopend.
NEDERLANDS Probleem Oplossing De tandenborstel werkt Zorg ervoor dat de stekker van de oplader goed in helemaal niet, ondanks het het stopcontact zit. feit dat deze de hele nacht in de oplader heeft gestaan. Controleer of er stroom op het stopcontact staat (zie ook het hoofdstukje 'Belangrijk'). Zorg ervoor dat de tandenborstel uitgeschakeld is en laad het apparaat ten minste 16 uur achter elkaar op. De motor van de tandenborstel werkt wel, maar de borstelkop werkt niet.
ESPAÑOL 45 Introducción Este nuevo cepillo eléctrico elimina la placa mejor que cualquier cepillo manual. Además protege las encías. Si se ejerce demasiada presión al cepillar, el cabezal se flexiona automáticamente hacia detrás. Gracias a esta clara señal, corregirá rápidamente la presión de cepillado. Se ha demostrado mediante pruebas clínicas que, gracias a este sistema, utilizar el cepillo Philips Sensiflex hace que la técnica de cepillado sea mejor y más segura.
ESPAÑOL 46 Cómo preparar el aparato para usarlo Cómo montar el aparato en la pared C 15,6 1 Monte la unidad de carga en la pared, utilice 2 tornillos (3x30mm) y 2 enchufes de pared (S5) (no incluídos). taladrar los agujeros en los lugares C ◗ Para correctos pueden usar la plantilla que hay en 3 1 la última página de estas instrucciones de uso. 2 Cómo cargar el aparato 1 Carguen el aparato durante por lo menos 16 horas antes de usarlo por vez primera.
ESPAÑOL 16 hrs 47 para los modelos HX2585, HX2538 y C ◗ Sólo HX1526: mientras se esté cargando la batería, el piloto verde estará encendido. ◗ Pueden poner el cepillo dental en el soporte y dejarlo cargando continuamente. Cómo usar el aparato C 1 2 1 Monten el cabezal del cepillo en el cepillo dental insertándolo en el eje con enganche de bayoneta y girándolo un cuarto de vuelta en sentido horario. Ello hará imposible que el cabezal del cepillo se suelte debido a la vibración.
ESPAÑOL Consejos de cepillado Cómo cepillar C 1 C 2 C Coloquen el cabezal del cepillo contra el diente de modo que cubra la superficie del mismo así como la línea de la encía. Mantengan el cabezal del cepillo en esa posición durante unos pocos segundos y después pasen al diente siguiente. La cabeza redonda del cepillo elimina la placa de los dientes y de debajo de la línea de las encías. La Punta Interdental, moviéndose independientemente, limpia entre los dientes.
ESPAÑOL 49 Protección de encías C 1 C 2 El sistema de Protección de Encías garantiza que no ejerzan demasiada presión sobre los dientes y las encías. Si ejercen demasiada presión sobre el cepillo dental, notarán y oirán un "click" cuando el cabezal del cepillo se flexione hacia atrás.Tan pronto como reduzcan la presión, el cabezal del cepillo volverá a su posición normal. Esto protegerá sus encías. Probablemente esto sucederá unas cuantas veces cuando empiecen a usar el aparato.
ESPAÑOL Tiempo mínimo de cepillado: 2 minutos En general, 2 minutos serán suficientes para limpiar bien sus dientes. Naturalmente, también pueden cepillarse durante más de 2 minutos. pasen los 2 minutos, el piloto rojo C ◗ Cuando comenzará a parpadear (sólo para los modelos HX2585, HX2538 y HX1526). Optima higiene dental Para una higiene dental óptima, es recomendable usar hilo dental además del cepillo dental eléctrico.
ESPAÑOL 51 C 3 Vuelvan a poner en marcha el cepillo dental para enjuagar los restos de pasta dentífrica del eje. C 4 Sólo para los modelos HX1526, HX1515, HX1514, HX1513, HX1511, HX1510 : guarde el cabezal del cepillo en la espiga de la unidad de carga. Sólo para los modelos HX2585 y HX2538: guarde hasta 4 cabezales en el contenedor. para los modelos HX2585 y HX2538: en C ◗ Sólo vez de 2 cabezales, puede guardar un tubo de pasta de dientes en el contenedor.
ESPAÑOL ◗ El cabezal del cepillo también debe ser sustituido cuando las cerdas empiecen a doblarse hacia fuera. Pueden obtener nuevos cabezales del cepillo en la tienda donde hayan comprado su cepillo dental. Pueden usar cualquier cabezal Philips de cabeza redonda. Medio ambiente. Cuando desechen el aparato, quiten la batería y desháganse de ella de un modo seguro para el medio ambiente.
ESPAÑOL 53 C 4 Abra la tapa del soporte de la batería con la mano o con un destornillador. C 5 Utilizando un destornillador, saquen la batería del soporte. Después de que el fondo haya sido desatornillado, el aparato puede que ya no sea estanco y la garantía quedará invalidada.
ESPAÑOL Problema Solución El cepillo dental no funciona a pesar de haber estado en la unidad de carga durante toda la noche. Asegúrense de que la clavija de la unidad de carga esté adecuadamente enchufada a la red. Asegúrense de que haya corriente en el enchufe (ver también la sección "Importante"). Asegúrense de que el cepillo dental esté apagado y recárguenlo durante por lo menos 16 horas. El motor del cepillo dental funciona, pero el cabezal del cepillo no.
ITALIANO 55 Introduzione Questo nuovo, rivoluzionario spazzolino elettrico rimuove la placca in modo molto più efficace rispetto ad uno spazzolino manuale e in più vi aiuta a proteggere le gengive. Quando viene esercitata una pressione eccessiva, infatti, la testina scatta automaticamente all'indietro. Grazie a questo chiaro segnale, imparerete rapidamente ad esercitare la giusta pressione.
ITALIANO 56 Messa a punto dell'apparecchio prima dell'uso Come montare l'apparecchio al muro 15,6 C 3 effettuare i fori nella giusta posizione, C ◗ Per potete usare la dima fornita nell'ultima pagina 1 1 Montate l'unità di carica alla parete, utilizzando 2 viti (3,0x30 mm) e due tasselli da muro (S5) (non inclusi). delle istruzioni. 2 Come caricare l'apparecchio 1 Caricate l'apparecchio per almeno 16 ore prima di usarlo per la prima volta.
ITALIANO 57 Per garantire una maggior durata della batteria, ripetete questa operazione ogni 6 mesi. 16 hrs mod. HX2585, HX2538 e HX1526: C ◗ Solo quando la batteria è sotto carica, si accende la spia verde. ◗ Potete riporre lo spazzolino nell'apposito supporto e lasciarlo continuamente sotto carica. Come usare l'apparecchio C 1 2 1 Inserite la testina sullo spazzolino infilandola nella presa a baionetta e ruotatela in senso orario.
ITALIANO Consigli per la pulizia Come lavare i denti C 1 C 2 C Appoggiate la testina al dente in modo tale da coprire la superficie del dente e il bordo gengivale. Tenete lo spazzolino in questa posizione per alcuni secondi prima di passare al dente successivo. La testina rotonda rimuove la placca dai denti e al di sotto del bordo gengivale. La punta attiva si muove in modo indipendente, per una migliore pulizia interdentale.
ITALIANO 59 Protezione delle gengive C 1 C 2 Il Sistema Protezione Gengive fa in modo che non venga esercitata una pressione eccessiva su denti e gengive. Quando verrà esercitata una pressione eccessiva, sentirete un "click" nel momento in cui la testina scatterà all'indietro. Non appena ridurrete la pressione, la testina ritornerà nella posizione normale.Tutto questo per proteggere le vostre gengive. Probabilmente questo si verificherà alcune volte quando inizierete ad usare lo spazzolino.
ITALIANO Durata minima della pulizia: 2 minuti In linea generale, 2 minuti sono sufficienti per pulire correttamente i denti. Naturalmente, potete anche lavarli per più di 2 minuti. rossa lampeggerà per indicare che C ◗ Lasonospiatrascorsi 2 minuti (solo mod. HX2585, HX2538 e HX1526). Igiene dentale ottimale Per un'igiene dentale ottimale, vi consigliamo di usare il filo interdentale e lo scovolino in aggiunta allo spazzolino elettrico.
ITALIANO 61 C 3 Accendete nuovamente lo spazzolino per eliminare i residui di dentifricio dall'albero motore. C 4 Solo mod. HX1526, HX1515, HX1514, HX1513, HX1511, HX1510: riponete la testina sul perno dell'unità di carica. Solo mod. HX2585 e HX2583: è possibile riporre fino a 4 testine nel contenitore. mod. HX 2585 e HX 2538: al posto di C ◗ Solo 2 testine è possibile riporre nel contenitore il dentifricio.
ITALIANO Potete acquistare le testine di ricambio nei negozi dove avete comperato l'apparecchio. È possibile utilizzare qualsiasi testina di ricambio PHILIPS. Come proteggere l'ambiente Prima di gettare l'apparecchio, ricordate di togliere la batteria e di buttarla in modo da non danneggiare l'ambiente. ◗ NB.
ITALIANO C 4 Aprite il coperchio del portabatterie a mano oppure usando un cacciavite. C 5 Estraete la batteria dal portabatteria usando un cacciavite. 63 Dopo aver svitato la parte inferiore, l'apparecchio non sarà più impermeabile e la garanzia non sarà quindi più valida.
ITALIANO Problema Soluzione Lo spazzolino non funziona Controllate che lo spinotto dell'unità di carica sia anche se è rimasto inserito correttamente nella presa di corrente. nell'unità di carica per tutta la notte. Controllate che la presa sia in tensione (vedere anche il capitolo "Importante"). Controllate che lo spazzolino sia spento e ricaricatelo per almeno 16 ore. Il motore dello spazzolino funziona, ma la testina no.
PORTUGUÊS 65 Introdução Esta escova eléctrica única remove a placa bacteriana melhor do que as escovas manuais normais.Também ajuda a proteger as gengivas. Quando se exerce demasiada pressão durante a escovagem, a cabeça da escova recua automaticamente. Devido a este sinal evidente, rapidamente adoptará a força de escovagem adequada.Testes clínicos comprovaram que, graças a este sistema, a escovagem com a Philips Sensiflex resulta numa melhor e mais segura técnica de escovagem dos dentes.
PORTUGUÊS 66 Preparação para utilização Montagem na parede C 15,6 Monte a unidade de carga na parede, usando os 2 parafusos (3.0x30 mm) e os 2 suportes (S5) (não incluído). fazer os buracos para os parafusos nos C ◗ Para sítios certos, poderá usar o esquema 3 1 2 1 fornecido na última página deste modo de emprego. Carga 1 Antes da primeira utilização, coloque o aparelho em carga durante pelo menos 16 horas. começar a carga, certifique-se que a C ◗ Quando escova está desligada.
PORTUGUÊS 16 hrs 67 nos mod. HX2585, HX2538 e C ◗ Apenas HX1526: Quando a bateria estiver em carga, a lâmpada piloto verde está acesa. ◗ A escova pode ser colocada no suporte e ficar continuamente em carga. Utilização da escova C 1 2 1 Coloque a escova na máquina, introduzindo-a na baioneta e rodando um quarto de volta para a direita. Deste modo evitará que a escova se solte devido à vibração. 2 Coloque a pasta de dentes sobre a escova. C 3 Coloque a escova na boca.
PORTUGUÊS Sugestões de escovagem Escovagem C 1 C 2 C Encoste a cabeça da escova aos dentes de modo que a superfície dos dentes e a linha das gengivas fica tapada. Mantenha a cabeça da escova nessa posição durante alguns segundos e depois passe para o dente seguinte. A cabeça redonda da escova retira a placa dos dentes e abaixo da linha das gengivas. A Ponta Activa, que se movimenta separadamente, limpa os espaços interdentários.
PORTUGUÊS 69 Protecção das gengivas C 1 C 2 O sistema de Protecção das Gengivas garante que não será exercida demasiada pressão sobre os dentes e as gengivas. Se fizer demasiada pressão sobre a escova, sentirá e ouvirá um clique quando a cabeça da escova flectir para trás. Logo que reduzir a pressão, a cabeça da escova retornará à sua posição normal. Deste modo, estará a proteger as suas gengivas. Isto irá, muito provavelmente, acontecer algumas vezes nas primeiras utilizações da escova.
PORTUGUÊS Tempo de escovagem mínimo: 2 minutos Regra geral, 2 minutos são suficientes para limpar os dentes convenientemente. É claro que poderá escová-los por mais de 2 minutos. lâmpada piloto encarnada começa a C ◗ Uma piscar para indicar que passaram 2 minutos (apenas nos mod. HX2585, HX2538 e HX1526). Uma higiene oral perfeita Para obter uma higiene oral perfeita, recomendase a utilização de fio dental e de palitos orais para além da escova eléctrica.
PORTUGUÊS 71 C 3 Volte a ligar a máquina para retirar todos os resíduos da pasta de dentes do veio motor. C 4 Apenas nos mod. HX1526, HX1515, HX1514, HX1513, HX1511, HX1510 : arrume a escova sobre o pino na unidade de carga.Apenas nos mod. HX2585 e HX2538: arrume as 4 escovas no contentor. nos mod. HX2585 e HX2538: em vez C ◗ Apenas das 2 escovas, poderá guardar o tubo da pasta de dentes dentro do contentor de arrumação.
PORTUGUÊS Poderá adquirir novas escovas na mesma loja onde comprou a sua escova de dentes eléctrica. Podem ser utilizadas todas as escovas PHILIPS redondas. Meio ambiente Quando, em devido tempo, se desfizer da sua escova de dentes eléctrica, retire-lhe a bateria e deite-a fora de modo a proteger o meio ambiente. ◗ NOTA: Se quiser, também poderá levá-la a um Centro de Assistência Philips que se encarregará de se desfazer da bateria.
PORTUGUÊS 73 C 4 Abra a tampa do suporte da bateria com a mão ou com a ajuda de uma chave de parafusos. C 5 Servindo-se da chave de parafusos, levante a bateria do respectivo suporte. Depois de desaparafusar a parte de baixo, a máquina perde a sua estanquicidade à água e a garantia torna-se nula.
PORTUGUÊS Problema Solução A escova não trabalha Certifique-se que a ficha do carregador está apesar de ter ficado toda a correctamente ligada na tomada de corrente. noite colocada no carregador. Verifique se a tomada tem corrente (consulte o capítulo 'Importante'). Verifique se a escova está desligada e deixe-a a carregar durante um mínimo de 16 horas. O motor da escova Verifique se a escova está colocada correctamente funciona, mas a escova não. na máquina (vidé o capítulo 'Utilização da escova').
75 . . , . " ' , . $ % & % ' , Philips Sensiflex % % . ◗ 2 .
76 D " E 9 F : ; % C 15,6 2 % , % (3.0x30mm) 2 5 % (S5) ( ). & C ◗ D , % 3 1 2 1 % % .
77 G , % % , % . D % , % % 5 . % . 3 % . D 5 , 6 . 16 hrs HX2585, HX2538 C ◗ F HX1526: L 5 , .
C 3 4 . C 4 ; on 5 % . ◗ D , % % , ': '. ! "# ! 4 C 1 C 2 2 .
79 2 & Active Tip 5 . C 3 $ % . ◗ 4 5 ( , & ) . 3 . ◗ U : www.philips.com.
% 5 % . F % 3 % . : : % , % 5 % % . 2 5 ( 'W '.
81 D % . 8 $ 9 Philips Y Philips : www.philips.com. $ %" & C 1 3 & % ( . 60cC). C 2 : . & .
C 4 F HX1526, HX1515, HX1514, HX1513, HX1511, HX1510: & . F HX2585 HX2538: 4 & % . HX2538: C ◗ F 2 & HX2585 , . F % & % . C 5 M .
83 F & . F % & Philips. !'"" L 3 , 3 . ◗ : : F M : Philips 3 . C 2 1 1 6 .
C 3 D . C 4 & % . C 5 4 & . % & , % % .
; 7 6 , % . 4 5 . 85 4 5 ( ': '. 4 % 16 . 2 , % .