DVD VIDEO PLAYER DVD PLAYER CALL US BEFORE YOU CONSIDER RETURNING THE PRODUCT! 1-800-531-0039 or Visit us on the web at www.philips.com Return your Warranty Registration Card within 10 days EE E S Philips representatives are ready to help you with any questions about your new product.We can guide you through Connections, First-time Setup, or any of the Features.
Return your Warranty Registration card today to ensure you receive all the benefits you’re entitled to. • Once your Philips purchase is registered, you’re eligible to receive all the privileges of owning a Philips product. • So complete and return the Warranty Registration Card enclosed with your purchase at once, and take advantage of these important benefits.
TR ATION N IS Visit our World Wide Web Site at http://www.philips.com IT AY DED W S REG EE y! r r Hu HIN 10 D Congratulations on your purchase, and welcome to the “family!” Dear Philips product owner: Thank you for your confidence in Philips.You’ve selected one of the best-built, best-backed products available today.And we’ll do everything in our power to keep you happy with your purchase for many years to come.
IMPORTANT SAFETY INSTRUCTIONS 1. Read these instructions. 2. Keep these instructions. 12. 3. Heed all warnings. 4. Follow all instructions. 5. Do not use this apparatus near water. 13. Unplug this apparatus during lightning 6. Clean only with dry cloth. storms or when unused for long periods of time. 7. Do not block any ventilation openings. Install in accordance with the manufacturer´s instructions. 14. Refer all servicing to qualified service personnel.
Canada English: This digital apparatus does not exceed the Class B limits for radio noise emissions from digital apparatus as set out in the Radio Interference Regulations of the Canadian Department of Communications. Français: Cet appareil numérique n'emet pas de bruits radioélectriques dépassant les limites applicables aux appareils numériques de Class B prescrites dans le Règlement sur le Brouillage Radioélectrique édicté par le Ministère des Communications du Canada.
General Information Environmental Information Laser safety All unnecessary packaging has been omitted. The packaging has been made easy to separate into three materials: cardboard (box), polystyrene foam (buffer) and polyethylene (bags, protective foam sheet). This unit employs a laser. Due to possible eye injury, only a qualified service person should remove the cover or attempt to service this device.
Contents General Information Supplied accessories ....................................... 8 Care and safety information .......................... 8 Connections Connecting TV ............................................ 9-11 Using Composite Video jack (CVBS) ......... 9 Using S-Video jack .......................................... 9 Using Component Video jacks (Pr Pb Y) . 10 Using an accessory RF modulator ...... 10-11 Connecting the power cord ........................
General Information ● Avoid high temperatures, moisture, water and dust – Do not expose the player, batteries or discs to humidity, rain, sand or excessive heat (caused by heating equipment or direct sunlight). ● Avoid condensation – The lens may cloud over when the player is suddenly moved from cold to warm surroundings, making it impossible to play a disc. Leave the player in the warm environment until the moisture evaporates.
Connections Connecting TV IN IN COMPONENT VIDEO IN COMPONENT VIDEO IN AUDIO IN S-VIDEO IN AUDIO IN Pr/Cr VIDEO IN IN S-VIDEO IN Y COMPONENT VIDEO IN AUDIO IN Y COMPONENT VIDEO IN AUDIO IN V (Pr/Cr) U (Pb/Cb) VIDEO IN Pb/Cb IN S-VIDEO IN S-VIDEO IN V (Pr/Cr) U (Pb/Cb) VIDEO IN Y Pr/Cr Pb/Cb VIDEO IN Y 1 2 2 VIDEO OUT U V L 1 VIDEO OUT Pb Pr L Y R Y R AUDIO OUT S-VIDEO OUT DIGITAL OPTICAL DIGITAL OUT IMPORTANT! – You only need to make one video connection from the fol
Connections ANT IN RF coaxial cable to TV 3 IN Back of RF Modulator (example only) COMPONENT VIDEO IN AUDIO IN S-VIDEO IN V (Pr/Cr) U (Pb/Cb) ANT IN VIDEO IN IN S-VIDEO IN TO TV AUDIO IN R L VIDEO IN Y COMPONENT VIDEO IN AUDIO IN V (Pr/Cr) U (Pb/Cb) VIDEO IN Y CH3 CH4 4 Antenna or Cable TV signal 1 2 1 2 VIDEO OUT Pb L Pr L R AUDIO OUT VIDEO OUT Pb Pr Y S-VIDEO OUT COAXIAL OPTICAL DIGITAL OUT AUDIO OUT IMPORTANT! – Component Video provides higher picture quality.
Connections Connecting the power cord COMPONENT VIDEO IN AUDIO OUT S-VIDEO IN V (Pr/Cr) U (Pb/Cb) VIDEO IN Y VIDEO OUT L R AUDIO OUT Using an accessory RF modulator (cont’d) 3 Use an RF coaxial cable (not supplied) to connect ANTENNA OUT or TO TV jack of the RF modulator to the ANTENNA IN jack on the TV. 4 Connect the Antenna or Cable TV service signal to the ANTENNA IN or RF IN jack on the RF modulator. (It may have been connected to your TV previously. Disconnect it from the TV).
Connections Optional: Connecting to an Audio System Optional: Connecting to a Digital Receiver STEREO OPTICAL Receiver AUDIO IN OPTICAL AUDIO OUT DIGITAL DIGITAL OR VIDEO OUT Pb Pr L L R AUDIO OUT R Y S-VIDEO OUT VIDEO OUT COAXIAL OPTICAL AUDIO OUT DIGITAL OUT Stereo has Dolby Pro Logic or Right / Left Audio In jacks 1 Select one of the video connections to your TV (CVBS VIDEO IN, S-VIDEO IN, or COMPONENT VIDEO IN) depending on the options available on your TV.
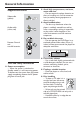
Functional Overview Front and Rear Panels 2; PLAY/PAUSE – To start or interrupt playback 9 STOP – To stop playback STANDBY-ON B – IR Sensor To switch the DVD Player to Standby mode or ON – Point the remote control towards this sensor Disc tray Display OPEN/CLOSE / – – Shows the current status of the DVD Player Open/Close the disc tray Mains (AC Power Cord) – Connect to a standard AC outlet OPTICAL (Digital audio out) Audio Out (Left/Right) – – Connect to the optical AUDIO input of a digital
Functional Overview Remote Control POWER B RETURN / TITLE – To go back to previous menu / show title menu – DISC MENU 0-9 numerical key pad – Enters the disc contents menu – Switches on or off the playback control mode (for VCD version 2.
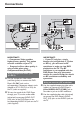
Getting Started Step 1: Inserting batteries into the Remote Control 3 1 Setting up the TV IMPORTANT! Make sure you have completed all the necessary connections. (See pages 9-10 “Connecting TV”). 1 Turn on the TV and set it to the correct 2 1 Open the battery compartment. 2 Insert two batteries type R06 or AA, following the indications (+-) inside the compartment. 3 Replace the cover.
Getting Started If the progressive function is activated but your TV does not support progressive scan or the cables are not connected accordingly, the TV screen will be blank. You can deactivate progressive scan as below. 1 Press STANDBY ON B on the front panel to switch on the DVD player. 2 Press OPEN/CLOSE / on the front panel to open the disc tray. 3 Press STOP 9 on the front panel. 4 Press PLAY/PAUSE 2; on the front panel. ➜ The blue Philips DVD background appears on the TV screen.
Getting Started Step 3: Setting language preferences Setting the Audio, Subtitle and Disc menu languages You can select your preferred language settings.This DVD Player will automatically switch to the language for you whenever you load a disc. If the language selected is not available on the disc, the disc’s default language will be used instead. The OSD (on-screen display) language for the system menu will remain as you set it, regardless of various disc languages.
Disc Operations IMPORTANT! – Depending on the DVD or VIDEO CD, some operations may be different or restricted. – Do not push on the disc tray or put any objects other than discs in the disc tray. Doing so may cause the disc player to malfunction.
Disc Operations IMPORTANT! If the inhibit icon appears on the TV screen when a button is pressed, the function is not available on the current disc or at the current time. Playing discs 1 Connect the power cords of the DVD Player and TV (and any optional stereo or receiver) to a power outlet. 2 Turn on the TV and set it to the correct Video In channel. (See page 15 “Setting up the TV”). 3 Press STANDBY-ON B on the front of the DVD Player.
Disc Operations Mute (DVD/VCD/CD/MP3/DivX/JPEG) ● Press MUTE repeatedly to disable and enable the sound. Resuming playback from the last stopped point (DVD/VCD/CD) Resume playback of the last five discs, even if the disc was remove from the Player. 1 Load one of the last five discs. ➜ “LOADING” appears. 2 Press PLAY B and the disc will play from the last point. To cancel resume mode ● While play is stopped, press STOP 9 again. Helpful Hint: – Resume may not be available on some discs.
Disc Operations Display (DVD/VCD) The Display function allows you to start playback at any chosen time on the disc. 1 During playback, press and hold DISPLAY until the time edit box appears. 2 Press DISPLAY once. Use 1 2 to highlight one of the options and use the numeric key pad (0-9) to enter the number of title (track) /chapter. 3 Press DISPLAY twice. Use 2 to highlight the time option and use the numeric key pad (0-9) to enter hours, minutes and seconds from left to right in the time edit box.
Disc Operations Special DVD Features Special VCD & SVCD Features Playing a Title Playback Control (PBC) 1 Press RETURN/TITLE. ➜ The disc title menu appears on the TV screen. 2 Use 341 2 or the numeric keypad (0-9) to select a play option. 3 Press OK to confirm. Camera Angle ● Press ANGLE repeatedly to select a different desire angle. Multiple angles or perspectives are not available on all discs.
Disc Operations Preview (VCD/SVCD/CD) For VCD/SVCD ● While play is stopped, press PREVIEW on the remote control. ➜ The preview menu will be displayed. 3. TRACK Divide a single track into nine segments by regular intervals and display them on one page to help you preview the selected track. 1. INTRO The DVD Player will play every track for a few seconds providing a summary of the disc content. 1 Press 1 on te numerical key pad. 2 Press STOP to quit previewing. 2.
Disc Operations Playing MP3/DivX/MPEG-4/ JPEG/Kodak Picture CD Special MP3/JPEG features IMPORTANT! This shows the content of the current folder or the whole disc. You have to turn on your TV and set it to the correct Video In channel. (See page 15 “Setting up the TV”). Preview (JPEG) 1 While play is stopped, press PREVIEW. ➜ Thumbnails of nine pictures appear on the TV screen. General Operation (example for nine thumbnail pictures) 1 Load an MP3/DivX/MPEG-4/JPEG disc.
DVD Menu Options Basic Operations Screen Saver 1 Press SYSTEM MENU when play is - - GENERAL SETUP PAGE - - stopped to enter the Setup Menu. OSD LANGUAGE SCREEN SAVER SMART POWER 2 Press OK to enter the next level submenu or confirm your selection. 3 Press 1 2 to enter the submenu or return to the previous menu. 4 Press 34 to highlight the desired menu. 5 Press SYSTEM MENU to quit the setup menu. ➜ The settings will be stored in the player’s memory even if after the player is switched off.
DVD Menu Options Disc Lock (DVD/VCD/CD) Program - - GENERAL SETUP PAGE - OSD LANGUAGE SCREEN SAVER SMART POWER DISC LOCK PROGRAM LOCK UNLOCK MAIN PAGE 1 Press 34 to highlight ‘Disc Lock’. 2 Enter its submenu by pressing 2. 3 Press 34 to choose a setting. ➜ Lock: Select this option and the player will lock the current playing disc. ➜ Unlock: Select this option and the player will unlock the current playing disc. ● You will need to enter the password to confirm unlock selection.
DVD Menu Options Audio Setup Menu The options in the Audio Setup menu are: ‘Downmix’, ‘Digital Output’, ‘LPCM Output’, ‘Sound Mode’, ‘Reverb Mode’ and ‘D.R.C. (Dynamic Range Control)’. 1 Press SYSTEM MENU. 2 Press 3 4 to select the ‘Audio Setup’ page. 3 Press OK to confirm. ➜ All: If you connected the DVD Player’s Digital (Coaxial or Optical) jack to a multi-channel decoder/receiver. ➜ PCM Only: Only if your receiver is not capable of decoding multi-channel audio.
DVD Menu Options Sound Mode D.R.C. (Dynamic Range Control) The digital sound effect allows you to select from various pre-set modes that control the frequency bands of optimized certain musical styles. It enhances the excitement and enjoyment of your favorite music. High volume outputs are softened, enabling you to watch your favorite action movie without disturbing others at night. - - AUDIO SETUP PAGE - DOWNMIX DIGITAL OUTPUT LPCM OUTPUT SOUND MODE REVERB MODE D.R.
DVD Menu Options Video Setup Menu The options in the Video Setup menu are: ‘TV Standard’, ‘TV Display’, ‘Closed Captions’, ‘Video Output’, ‘Progressive’ and ‘Smart Picture’. 1 Press SYSTEM MENU. 2 Press 3 4 to select ‘Video Setup’ page. 3 Press OK to confirm. TV Display Set the aspect ratio of the DVD Player according to the TV you have connected and the Discs you are playing.
DVD Menu Options Video Output Choose the type of video output that matches the connection of the DVD Player to your TV. Progressive To select this item you must set ‘Video Output’ to YPbPr (see left) and ensure your TV has progressive scan.
DVD Menu Options Smart Picture In this menu, you can choose an ideal predefined picture setting. - - VIDEO SETUP PAGE - TV STANDARD SMART PICTURE MAIN PAGE brightness level. ● Repeat steps 1 - 4 for adjusting the contrast, hue and saturation. TV DISPLAY CLOSED CAPTIONS VIDEO OUTPUT PROGRESSIVE 1 Press 1 2 to highlight ‘Brightness’. 2 Press 4 to open the level bar. 3 Press 1 2 to decrease or increase the STANDARD BRIGHT SOFT PERSONAL 4 Press OK to exit.
DVD Menu Options Parental - cont’d 1 Press 34 to highlight ‘Parental’. 2 Enter its submenu by pressing 2. 3 Use 34 to highlight a rating level for the Password This feature is used for Parental Control. Enter your four digit password to play a prohibit Disc or if prompt for a password. The default password is 1234. disc inserted. ➜ DVDs that are rated above the level you selected will not play unless you enter your four-digit password and choose a higher level rating.
DVD Menu Options Default MP3/JPEG Navigator Setting the ‘Default’ function will reset all options to the factory defaults.Your personal settings will be erased. This feature allows you to select alternate settings when you playback picture CDs (JPEG/DivX) and MP3 CDs.
Specifications TV STANDARD (PAL/50Hz) (NTSC/60Hz) AUDIO PERFORMANCE Number of lines Playback DA Converter DVD 625 Multistandard 525 (PAL/NTSC) SVCD VIDEO PERFORMANCE CVBS YPbPr 1Vpp — 75 0.7 Vpp — 75 VIDEO FORMAT Digital Compression MPEG 2 for DVD,SVCD MPEG 1 for VCD MPEG-4 DVD Horiz. resolution Vertical resolution 50Hz 720 pixels 576 lines 60Hz 720 pixels 480 lines VCD Horiz.
Troubleshooting WARNING Under no circumstances should you try to repair the system yourself, as this will invalidate the warranty. Do not open the system as there is a risk of electric shock. If a fault occurs, first check the points listed below before taking the system for repair. If you are unable to remedy a problem by following these hints, please call 1-800-531-0039 for help. Problem Solution No power – Check if the AC power cord is properly connected.
Troubleshooting Problem Solution The player does not respond to the Remote Control – Aim the Remote Control directly at the sensor on the front of the player. – Reduce the distance to the player. – Replace the batteries in the Remote Control. – Re-insert the batteries with their polarities (+/– signs) as indicated. Buttons do not work – To completely reset the player, unplug the AC cord from the AC outlet for 5-10 seconds. Player does not respond to some operating commands during playback.
Glossary Analog: Sound that has not been turned into numbers. Analog sound varies, while digital sound has specific numerical values. These jacks send audio through two channels, the left and right. Aspect ratio: The ratio of vertical and horizontal sizes of a displayed image. The horizontal vs. vertical ratio of conventional TVs. is 4:3, and that of wide-screens is 16:9. AUDIO OUT Jacks: Red and white jacks on the back of the DVD Player that send audio to another system (TV, Stereo, etc.).
Limited Warranty Digital Video Disc Player 90 days Free Product Exchange / 91 days–One Year Reduced-Cost Exchange WHO IS COVERED? You must have proof of the date of purchase to exchange your product. A sales receipt or other document showing the date that you purchased the product is considered such proof. WHAT IS COVERED? Warranty coverage begins the day you buy your product. For 90 days thereafter, you may exchange the defective product for a free new or renewed product through Philips.
Limited Warranty (cont’d) EXCHANGE INSTRUCTIONS To exchange your product with Philips (per the warranty conditions stated previously), remember: • If you exchange the product within 90 days of the original purchase, there is no cost to you.* • If you exchange the product more than 90 days after but less than one year after the day of original purchase, contact Philips at 1-800-531-0039 to determine the preset cost for exchange.
PHILIPS CONSUMER ELECTRONICS COMPANY A Division of Philips Electronics North America Corporation, Knoxville, Tennessee 37914-1810, USA DVP 640 • DVP 642 CLASS 1 LASER PRODUCT 8239 210 98531 IB8461E001 The products and services described herein are not necessarily available in all countries. Due to continuous product improvements this document is subject to change without notice.