
User Manual


Record and play a video
Note
• I f you select any resolution higher than 640 x 480 (VGA), the recording icon is disabled.
You can select a lower resolution to enable recording.
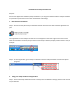
1 Aim the camera as needed.
2 In the Philips CamSuite Capture window, click to start recording.
• To pause recording, click .
3 To stop recording, click .
» A video is recorded and stored in the video gallery (also in the selected in the video folder on the
PC/notebook).
• To play a video in the video gallery, double-click it.
Tip
• Before you play a video, ensure that you have a multimedia player installed on the PC/notebook.
Image resolution
You can set different image resolutions for photos/videos taken via the webcam:
• 160 x 120 (SQVGA)
• 176 x 144 (QCIF)
• 320 x 240 (E-mail size)
• 352 x 288 (CIF)
• 640 x 480 (VGA)
• 1280 x 1024 (1.3 MP, for photo only)
• ….
Note
• For video recording, the maximum resolution is up to 640 x 480 (VGA).
The resolution settings may vary—can even be higher, depends on your webcam properties.
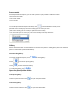
1 In the Philips CamSuite Capture window, click the drop-down arrow.
» The provided resolution options are listed.
2 Select a preferred resolution option.
• To apply another resolution setting, repeat Step 1 and Step 2.