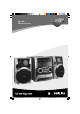
M355 MP3-CD Mini Hi-Fi System FW- 1 pg 001-030/M355/22-Eng 1 4/17/02, 10:36 AM 3139 115 21421
Important notes for users in the U.K. Italia DICHIARAZIONE DI CONFORMITA’ Mains plug This apparatus is fitted with an approved 13 Amp plug. To change a fuse in this type of plug proceed as follows: Si dichiara che l’apparecchio FW-M355 Philips risponde alle prescrizioni dell’art. 2 comma 1 del D.M. 28 Agosto 1995 n. 548. 1 2 Remove fuse cover and fuse. Fatto a Eindhoven 3 Refit the fuse cover. Fix new fuse which should be a BS1362 5 Amp, A.S.T.A. or BSI approved type.
CHANGER ™ CD / CD-R / CD-RW COMPATIBLE DIGITAL SOUND DISPLAY AL IM JA ZZ OP T STANDBY-ON ¡ DSC C H ECO POWER NO C K TE RO BAND TAPE 1 • 2 VIDEO TUNER TAPE AUX MASTER VOLUME ) MP3-CD SOUND CON TR O L AM DISC CHANGE D L ITA IG IC BASS BO OS T OPEN/ CLOSE SEARCH •TUNING CD 2 CD 3 PLAY• PAUSE SEARCH •TUNING MP3-CD TITLE+ TITLE- PREV/ PRESET RDS PLAYBACK ALBUM+ ALBUM- ▲ CD CD 1 N DY 1 2 3 4 5 6 7 8 9 0 ! @ 3CD MP3-CD MINI HIFI SYSTEM FW- NEWS STOP•CLEAR/DEMO S
DK SF Advarsel: Usynlig laserstråling ved åbning når sikkerhedsafbrydere er ude af funktion. Undgå utsættelse for stråling. Luokan 1 laserlaite Varoitus! Laitteen käyttäminen muulla kuin tässä käyttöohjeessa mainitulla tavalla saattaa altistaa käyttäjän turvallisuusluokan 1 ylittävälle näkymättömälle lasersäteilylle. Oikeus muutoksiin varataan. Laite ei saa olla alttiina tippu-ja roiskevedelle. Bemærk: Netafbryderen er sekundært indkoblet og ofbryder ikke strømmen fra nettet.
English Index Français English ------------------------------------------------ 6 Español Français -------------------------------------------- 31 Deutsch Español --------------------------------------------- 56 Nederlands Deutsch --------------------------------------------- 81 Italiano Nederlands -------------------------------------- 106 Svenska Italiano -------------------------------------------- 131 Dansk Svenska ------------------------------------------- 156 Suomi Dansk ------------
Contents English General Information Radio Reception Supplied accessories ............................................ Acknowledgement ............................................... Environmental information ................................ Safety information ................................................ 7 7 7 7 Preparations Rear connections ............................................. 8–9 Power Antennas connection Speakers connection Tuning to radio stations ....................................
This product complies with the radio interference requirements of the European Community. Supplied accessories – – – – – 2 speaker boxes remote control batteries (two AA size) for remote control AM loop antenna FM wire antenna Acknowledgement Energy Star As an ENERGY STARR Partner, Philips has determined that this product meets the ENERGY STARR guidelines for energy efficiency. Environmental information All unnecessary packaging has been omitted.
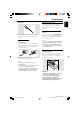
Preparations English AM loop antenna FM wire antenna AM ANTENNA speaker (right) speaker (left) B FM ANTENNA AUX/CDR R L SUBWOOFER OUT + R — — L + C SPEAKERS 6Ω AC power cord Rear connections A B Antennas Connection The type plate is located at the rear of the system. For users in the U.K.: please follow the instructions on page 2. Connect the supplied AM loop antenna and FM antenna to the respective terminals. Adjust the position of the antenna for optimal reception.
FM Antenna English Preparations Optional connection The optional equipment and connecting cords are not supplied. Refer to the operating instructions of the connected equipment for details. ● For better FM stereo reception, connect an outdoor FM antenna to the FM ANTENNA terminal. C Speakers Connection Front Speakers Connect the speaker wires to the SPEAKERS terminals, right speaker to "R" and left speaker to "L", coloured (marked) wire to "+" and black (unmarked) wire to "-".
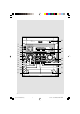
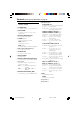
Controls (main system’s illustrations on page 3) Controls on the system and remote control ! Mode Selection PLAY•PAUSE ÉÅ for CD/MP3-CD…to start or interrupt playback. for Tape ............... to start playback. for Plug & Play…(on the system only) to initiate and start plug & play mode. 1 STANDBY ON y – to switch the system on or to standby mode. 2 ECO POWER – SEARCH•TUNING à (ALBUM -) SEARCH•TUNING á (ALBUM +) for MP3-CD ..... to select previous/next album. for CD .................
English Controls % Tape deck operation – – A. REPLAY to select continuous playback in either AUTO REPLAY or ONCE mode only. £ 5 4 RECORD to start recording on tape deck 2. ^ PROG for CD/MP3-CD…to programme disc tracks. for Tuner ............. to programme preset radio stations. for Clock ............ to select 12- or 24-hour clock mode. ^ ) & CLOCK•TIMER – ! to view the clock, set the clock or set the timer.
Basic Functions English MUTE 2 DIGITAL SOUND DISPLAY STANDBY-ON AL IM DSC C NO C K TE H ECO POWER AUX TUNER TAPE 1/2 JA ZZ OP T CD 1/2/3 RO BAND TAPE 1 • 2 VIDEO TUNER TAPE AUX MASTER VOLUME 1 2 3 4 5 6 7 8 9 PROG 0 SLEEP MP3-CD L ITA IG IC BASS BO OS T D CD 2 CD 3 PLAY• PAUSE SEARCH •TUNING ÉÅ SEARCH •TUNING MP3-CD Ç RDS á à TITLE+ TITLE- PREV/ PRESET STOP•CLEAR/DEMO STOP NEXT/ PRESET▲ NEWS A.
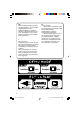
Demonstration mode The system has a demonstration mode that shows the various features offered by the system. To activate the demonstration ● In standby mode, press and holdÇon the system until "WELCOME" is displayed. ➜ The demonstration will begin. To deactivate the demonstration ● Press and holdÇon the system until "DEMO OFF" is displayed. ➜ The system will switch to standby mode. Switching the system to Eco Power standby mode (< 0.5 Watt) ● Press ECO POWER (or press and hold B on the remote control).
Basic Functions English Volume control Adjust MASTER VOLUME (or press VOLUME + or - on the remote control) to increase or decrease the volume level. To listen through the headphones ● Connect the headphones plug to the n socket at the front of the system. ➜ The speakers will be muted. To switch off the volume temporarily ● Press MUTE on the remote control. ➜ Playback will continue without sound and "MUTE" is displayed. ● To restore the volume, press MUTE again or increase the volume level.
English CD/MP3-CD Operations MUTE 3CD MP3-CD MINI HIFI SYSTEM FW- DIGITAL SOUND DISPLAY ZZ OP T JA DSC 1 2 3 4 5 6 7 8 9 PROG 0 SLEEP C NO C K TE VOLUME H ECO POWER RO ÉÅ BAND TAPE 1 • 2 VIDEO TUNER TAPE AUX MASTER VOLUME Ç SOUND CON TR O L L ITA IG IC BASS BO OS T D CD 2 CD 3 PLAY• PAUSE SEARCH •TUNING á à DIM SEARCH •TUNING DBB DSC ALBUM TITLE ALBUM+ ALBUM- MP3-CD TITLE+ TITLE- REPEAT PREV/ PRESET ▲ AM DISC CHANGE CD 1 N DY OPEN/ CLOSE ë í
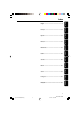
CD/MP3-CD Operations English Sound Quality Take note that MP3-CD compilations should best contain only MP3 tracks (*.mp3). To achieve a good MP3 quality, a bit rate of 128 kbps is recommended. Playing discs a disc is loaded in the disc tray the current selected disc tray is empty the current selected disc tray is loaded or playing Loading discs 1 2 Press OPEN/CLOSE to open the disc tray. Load up to two discs on the individual disc trays. To load the third disc, press DISC CHANGE.
Selecting a desired track/passage Repeat play You can select and change the various play modes before or during playback. To search for a particular passage during playback 1 Press à or á until the desired passage is located. 2 Press ÉÅ to resume normal playback. 1 Press REPEAT on the remote control repeatedly to select : ➜ "TRACK" – to repeat playback of the current track. ➜ "DISC" – to repeat playback of the current disc. ➜ "PROGRAM" – to repeat playback of the programmed tracks.
CD/MP3-CD Operations English 5 Press PROG to store the track. ● Repeat steps 3–5 to store other discs and tracks. 6 7 To end programming, press Ç once. ➜ PROG stays and the programme mode remains active. ➜ The total number of tracks programmed and the total playing time are displayed. ➜ For MP3 disc, total playing time will not be shown. Erasing the programme ● Press Ç once when playback is stopped or twice during playback. ➜ PROG disappears and "PROGRAM CLEARED" is displayed.
English Radio Reception DIGITAL SOUND DISPLAY AL IM MUTE 2 JA ZZ OP T STANDBY-ON CD 1/2/3 AUX TUNER TAPE 1/2 DSC C NO C K TE H ECO POWER RO BAND TAPE 1 • 2 TUNER TAPE VIDEO MASTER VOLUME SOUND CON TR O L L ITA IG D SEARCH •TUNING CD 3 PLAY• PAUSE 3 6 7 8 9 PROG 0 SLEEP VOLUME SEARCH •TUNING ÉÅ ALBUM+ ALBUM- MP3-CD PREV/ PRESET Ç STOP•CLEAR/DEMO STOP NEXT/ PRESET▲ á à RDS NEWS A.
Radio Reception English Erasing a preset radio station Manual Preset Programming 1 Tune to your desired radio station (refer to “Tuning to radio stations”). 1 Press í or ë to select the preset radio station to be erased. 2 Press PROG. ➜ PROG starts flashing. ➜ The next available preset number is displayed for selection. 2 Press and hold Çon the system until “PRESET DELETED” is displayed. ➜ The deleted radio frequency remains on the display.
To Check the RDS information ● Press RDS repeatedly to scroll through the following information (if available) : STATION NAME ™ PROGRAMME TYPE ™ RADIO TEXT ™ TUNED FREQUENCY ™ STATION NAME .... Notes: – If the tuned radio station does not transmit RDS signal or is a non RDS station, "NO RDS" is displayed. – If the RDS text message is not available at the RDS station, "NO RDS TEXT" is displayed.
Tape Operation / Recording English DIGITAL SOUND DISPLAY MUTE 2 AL IM JA DSC C NO 1 2 3 4 5 6 RO BAND TAPE 1 • 2 VIDEO TUNER TAPE AUX MASTER VOLUME 7 8 9 PROG 0 SLEEP L ITA IG IC BASS BO OS T D SEARCH •TUNING CD 2 CD 3 PLAY• PAUSE SEARCH •TUNING VOLUME ÉÅ ALBUM+ ALBUM- ë í MP3-CD Ç TITLE+ TITLE- PREV/ PRESET ▲ AM DISC CHANGE CD 1 N DY OPEN/ CLOSE SOUND CON TR O L MP3-CD CD TUNER TAPE 1/2 C K TE H ECO POWER AUX CD 1/2/3 ZZ OP T STANDBY-ON á à
Playing tapes To playback a selected tape deck 1 Press TAPE repeatedly to select tape deck 1 or 2. 2 PressÉÅ. To stop playback ● Press Ç. To select automatic replay or one time playback ● Press A. REPLAY repeatedly to select the different playback modes. ➜ "AUTO REPLAY" ( ) or "ONCE" ( ) is displayed. AUTO REPLAY …the tape will rewind automatically at the end of playback and replay again. It will replay up to a maximum of 20 times. ONCE ..............
Tape Operation / Recording English To select another track during recording Preparation for recording 1 2 Press TAPE to select tape deck 2. 3 Prepare the source to be recorded. CD – load the disc(s). TUNER – tune to the desired radio station. TAPE – load the prerecorded tape into tape deck 1 with the full spool to the left. AUX – connect external equipment. Load a recordable tape into tape deck 2 with full spool to the left. When recording is in progress ➜ REC starts flashing.
English Clock/Timer DIGITAL SOUND DISPLAY AL IM MUTE JA CD 1/2/3 DSC RO BAND TAPE 1 • 2 VIDEO TUNER TAPE AUX MASTER VOLUME SOUND CON TR O L L ITA IG IC BASS BO OS T D CD 2 SEARCH •TUNING PLAY• PAUSE 1 2 3 4 5 6 7 8 9 PROG 0 SLEEP CD 3 SEARCH •TUNING VOLUME ALBUM+ ALBUM- ÉÅ MP3-CD PREV/ PRESET ë í TITLE+ TITLE- ▲ AM DISC CHANGE CD 1 N DY OPEN/ CLOSE TUNER TAPE 1/2 C C NO MP3-CD CD AUX K TE H ECO POWER 2 ZZ OP T STANDBY-ON STOP•CLEAR/DEMO STOP NEXT
Clock/Timer English 2 Press CD 1/2/3, TUNER or TAPE to select the desired source. ➜ “CD1 [or 2, 3] XX:XX" indicates the CD mode is selected. ➜ “TU XX:XX” indicates the Tuner mode is selected. ➜ “TA1 [or 2] XX:XX” indicates the Tape mode is selected. ● Before setting timer, make sure the music source has been prepared. CD 1/2/3 – Load the disc(s). TUNER – tune to the desired radio station. TAPE – load the prerecorded tape into tape deck.
Notes: – All the sound control features (DSC or DBB, for example) are available for selection. – Refer to the operating instructions for the connected equipment for details. AL IM JA ZZ OP T DIGITAL SOUND DISPLAY DSC C NO C K TE H RO BAND TAPE 1 • 2 VIDEO TUNER TAPE AUX CD 1 CD 2 CD 3 D RO L MP3-CD For Recording, please refer to “Tape Operation/Recording”.
Specifications English AMPLIFIER Output power ..................................... 2 x 80 W MPO ................................................................... 2 x 40 W RMS(1) Signal-to-noise ratio .......................... ≥ 67 dBA (IEC) Frequency response .......................... 50 – 15000 Hz Input sensitivity AUX/CDR In .......................................... 500 mV / 1V Output Speakers .................................................................... ≥ 6 Ω Headphones ....................
WARNING Under no circumstances should you try to repair the system yourself, as this will invalidate the warranty. Do not open the system as there is a risk of electric shock. If a fault occurs, first check the points listed below before taking the system for repair. If you are unable to solve a problem by following these hints, consult your dealer or service centre. Problem Solution CD OPERATION “UNREADABLE DISC” is displayed. “NO DISC” is displayed. RADIO RECEPTION Radio reception is poor.
Troubleshooting English GENERAL The system does not react when buttons are pressed. Sound cannot be heard or is of poor quality. The left and right sound outputs are reversed. The remote control does not function properly. The timer is not working. Not all lighted buttons are showing light. The Clock/Timer setting is erased. The system displays features automatically. – Remove and reconnect the AC power plug and switch on the system again. – Adjust the volume. – Disconnect the headphones.