MCM149 Micro Hi-Fi System Register your product and get support at www.philips.com/welcome User manual pg001-pg022_MCM149 1 2007.8.
CAUTION Use of controls or adjustments or performance of procedures other than herein may result in hazardous radiation exposure or other unsafe operation. 2 pg001-pg022_MCM149 2 2007.8.
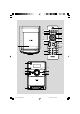
1 3 # % $ ^ & * ( ) 4 ! 5 0 ™ ALB/ PRESET PULL TO OPEN 3mm ¡ OPEN/CLOSE £ PROG. CLOCK/DISPLAY 9 1 2 3 4 5 STANDBY-ON ≤ M I C RO S Y S T E M M C M 1 4 9 iR 6 CD/CD-R/CD-RW COMPATIBLE SOURCE VOL TUNING MODE PROG ALBUM/PRESET VOL DBB 7 8 9 0 PULL TO OPEN @ 3 pg001-pg022_MCM149 3 2007.8.
pg001-pg022_MCM149 4 2007.8.
English ------------------------------------------------ 6 5 pg001-pg022_MCM149 5 2007.8.
Contents English General Information Tape Operation / Recording Supplied accessories ............................................ Environmental Information ................................ Safety Information ................................................ Hearing Safety ....................................................... 7 7 7 8 Tape playback ...................................................... 16 General information on recording ................. 16 Synchro start CD recording ..................
Congratulations on your purchase and welcome to Philips! ● Install the unit near the AC outlet and where the AC power plug can be easily reached. To fully benefit from the support that Philips offers, register your product at www.philips.com/ welcome. ● Place the system in a location with adequate ventilation to prevent internal heat build-up in your system. Allow at least 10 cm (4 inches) clearance from the rear and the top of the unit and 5 cm (2 inches) from each side.
General Information English Hearing Safety Listen at a moderate volume. ● Using headphones at a high volume can impair your hearing. This product can produce sounds in decibel ranges that may cause hearing loss for a normal person, even for exposure less than a minute. The higher decibel ranges are offered for those that may have already experienced some hearing loss. ● Sound can be deceiving. Over time your hearing "comfort level" adapts to higher volumes of sound.
English Preparations FM wire antenna speaker (left) speaker (right) B A AC power cord B Speakers Connection Rear connections The type plate is located at the rear of the system. A Power – Before connecting the AC power cord to the wall outlet, ensure that all other connections have been made. – If your system is equipped with a Voltage Selector, set the VOLTAGE SELECTOR to the local power line voltage. WARNING! – For optimal performance, use only the original power cable.
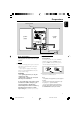
Preparations English Inserting batteries into the Remote Control 1 2 3 Open the battery compartment. Insert two R03 or AAA batteries following the indications (+/-) inside the compartment. Close the cover. 1 3 2 Using the Remote Control to operate the system 1 Aim the Remote Control directly at the remote sensor (IR) on the front panel. 2 Do not put any objects between the Remote Control and the system while operating the system.
Controls on the system and remote control 1 STANDBY ON (PWR 2) – switches the system to standby or on. – AUX jack (located on the back panel) connects an external source (3.5 mm socket) – HEADPHONE (located on the back panel) connects headphones 2 iR SENSOR – 3 – – 4 5 – 6 – 7 – 8 – 9 0 – ! – @ infrared sensor for remote control. SOURCE selects the respective sound source for CD/ TAPE/TUNER/AUX. switches on the system. ALBUM/PRESET +/for radio .............. selects a preset radio station.
Basic Functions English To exit without storing the Plug and Play STANDBY-ON ● Press 9 on the system. ➜ If you do not complete the Plug and Play installation, the function will be restarted when you next turn on the main supply again. M I C RO S Y S T E M M C M 1 4 9 iR CD/CD-R/CD-RW COMPATIBLE SOURCE Note: – During Plug and Play, if no button is pressed within 15 seconds, the system will exit Plug and Play mode.
English CD/MP3 Operation Basic playback controls STANDBY-ON To play a disc M I C RO S Y S T E M M C M 1 4 9 iR ● Press 2; to star t playback. ➜ The current track number and elapsed playing time of the track are displayed during disc playback. CD/CD-R/CD-RW COMPATIBLE SOURCE To select a different track VOL TUNING MODE ● Press TUNING 4 ¢ (on the remote control ¡ / ™) once or repeatedly until the desired track number appears in the display.
CD/MP3 Operation English 3 Press TUNING 4 ¢ (on the remote control ¡ / ™) to select a desired track. 4 Press 2; to start playback. ● During playback, press CLOCK/DISPLAY on the remote control to show the title name, album name, ID3 information and clock time. Supported MP3 disc formats: – ISO9660, Joliet, UDF 1.5 – Maximum title number: 999 (depending on filename length) – Maximum album number: 99 – Supported sampling frequencies: 32 kHz, 44.
1 STANDBY-ON M I C RO S Y S T E M M C M 1 4 9 - to select the Press ALBUM/PRESET +/preset number where programming should start. Note: – If no preset number is selected, default is preset (1) and all your presets will be overridden. iR 2 CD/CD-R/CD-RW COMPATIBLE SOURCE VOL TUNING MODE PROG ALBUM/PRESET VOL DBB Press PROG. for more than 2 seconds to activate programming. ➜ AUTO is displayed and available stations are programmed in order of waveband reception strength.
Tape Operation / Recording English PULL TO OPEN ● The best recording level is set automatically. Altering the VOLUME or DBB controls will not affect the recording in progress. ● The recording sound quality might differ depending on the quality of your recording source and the recording tape. ● At the very beginning and end of the tape, no recording will take place during the 7 seconds when the leader tape passes the recorder heads.
Other Connection Recording from the radio Listening to an external source 1 Tune to the desired radio station (see Tuning to radio stations). You can listen to the sound of the connected external device through your system’s speakers. 2 Press STOP•OPENÇ0 to open the tape door. 3 Insert a suitable tape into the deck and close the tape door. 4 Press RECORD● to start recording. 5 To interrupt playback press PAUSE;. To resume, press this key again. 6 To stop recording, press STOP•OPENÇ0.
Maintenance English Cleaning the Cabinet ● Use a soft cloth slightly moistened with a mild detergent solution. Do not use a solution containing alcohol, spirits, ammonia or abrasives. Cleaning Discs ● When a disc becomes dirty, clean it with a cleaning cloth. Wipe the disc from the centre out. ● Do not use solvents such as benzene, thinner, commercially available cleaners, or antistatic spray intended for analogue records.
STANDBY-ON 5 Press TIMER again. ➜ The clock digits for the minutes flash. 6 Press TUNING 4 ¢ (à / á on the remote control) to set the minutes. 7 Press TIMER to confirm the time. ➜ The timer is now set and activated. M I C RO S Y S T E M M C M 1 4 9 iR CD/CD-R/CD-RW COMPATIBLE SOURCE VOL TUNING MODE PROG ALBUM/PRESET VOL DBB English Clock/Timer Notes: . – If CD source is selected and no disc is in the CD tray or the disc has an error, TUNER will be selected automatically.
Specifications English AMPLIFIER Output power ........................................... 2 x 2W RMS Signal-to-noise ratio .......................... ≥ 60 dBA (IEC) Frequency response ....................... 125 – 16000 Hz Impedance loudspeakers ........................................... 8Ω CD PLAYER Frequency range ............................... 125 – 16000 Hz Signal-to-noise ratio ............................................ 65 dBA TUNER FM wave range ................................... 87.
WARNING Under no circumstances should you try to repair the system yourself, as this will invalidate the warranty. Do not open the system as there is a risk of electric shock. If a fault occurs, first check the points listed below before taking the system for repair. If you are unable to remedy a problem by following these hints, consult your dealer or Philips for help. Solution Problem ✔ Insert a disc. ✔ Check if the disc is inserted upside down.
Troubleshooting English Solution Problem The remote control does not function properly. ✔ Select the source (CD or TUNER, for example) before pressing the function button (É,í,ë). ✔ Reduce the distance between the remote control and the system. ✔ Insert the batteries with their polarities (+/– signs) aligned as indicated. ✔ Replace the batteries. ✔ Point the remote control directly towards the IR sensor. ✔ Set the clock correctly. ✔ Press TIMER to switch on the timer.
English Meet Philips at the Internet http://www.philips.com Español Português Deutsch Nederlands Italiano Svenska MCM149 Dansk Suomi CLASS 1 LASER PRODUCT Português Polski Printed in China PageBack_MCM149 76 PDCC-LL-0734 2007.8.