Register your product and get support at PhotoFrame SFP2007 SPF2107 SPF2207 EN User manual
1 Important 2 Safety 2 Safety precautions and maintenance 2 Notice 2 Declaration of Conformity 2 End of life disposal 2 Recycling Information for Customers 3 Compliance with Electro-Magnetic Field (EMF) 3 Recycling 3 North Europe Information (Nordic Countries) 4 Banned Substance Declaration 4 2 Your Digital PhotoFrame Introduction What’s in the box Overview of your PhotoFrame 3 Get started Install the stand Connect power Connect a storage device Connect PC Turn on the PhotoFrame 4 Use your Digital Phot
1 Important Safety Any operation expressly prohibited in this manual, any adjustments, or assembly procedures not recommended or authorised in this manual shall void the warranty. Safety precautions and maintenance • • • • • • • • • • Never touch, push, rub or strike the screen with hard objects as this may damage the screen permanently. When the product is not used for long periods, unplug it. Before you clean the screen, turn off and unplug the power cord.
Please find out about the local regulations on how to dispose of your old monitor from your local Philips dealer. • (For customers in Canada and U.S.A.) Dispose of in accordance to local-state and federal regulations. For additional information on recycling contact www.eia.org (Consumer Education Initiative). Recycling Information for Customers Philips establishes technically and economically viable objectives to optimize the environmental performance of the organization’s product, service and activities.
North Europe Information (Nordic Countries) VARNING: FÖRSÄKRA DIG OM ATT HUVUDBRYTARE OCH UTTAG ÄR LÄTÅTKOMLIGA, NÄR DU STÄLLER DIN UTRUSTNING PÅPLATS. Placering/Ventilation ADVARSEL: SØRG VED PLACERINGEN FOR, AT NETLEDNINGENS STIK OG STIKKONTAKT ER NEMT TILGÆNGELIGE. Paikka/Ilmankierto VAROITUS: SIJOITA LAITE SITEN, ETTÄ VERKKOJOHTO VOIDAAN TARVITTAESSA HELPOSTI IRROTTAA PISTORASIASTA.
E n g lish 2 Your Digital PhotoFrame Congratulations on your purchase, and welcome to Philips! To fully benefit from the support that Philips offers, register your product at www.philips.com/welcome. Introduction • AC-DC power adaptor • CD-ROM • Digital User Manual • PC software for Windows • USB cable With the PhotoFrame, you can play: • JPEG photo • MP3 music • M-JPEG video (*.avi format) You can place the PhotoFrame on the table or hang it on the wall.
• (For SPF2107 and SPF2207) Two extra baby frames 6 EN
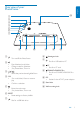
E n g lish Overview of your PhotoFrame n a b d c e f g h i j k h a • Turn on/off the PhotoFrame c Kensington lock • Play slideshow/music/video Change mode for slideshow (For photo/video) Zoom in / / / • Select the previous/next/right/left item d OK • (For music/video) Pause or resume play • Confirm a selection m i b • • • l Slot for a USB cable to PC j CF • Slot for a CF card k SD/MMC/xD/MS/MS Pro • Slot for an SD/MMC/xD/MS/MS Pro card l DC • Socket for the AC-DC power adaptor m Stand
3 Get started Connect power Note Caution • When you position the PhotoFrame, ensure that the power plug and outlet are easily accessible. • Use the controls only as stated in this user manual. Always follow the instructions in this chapter in sequence. If you contact Philips, you will be asked for the model and serial number of this apparatus. The model number and serial number are on the back of the apparatus. Write the numbers here: Model No. __________________________ Serial No.
1 Insert a storage device firmly. » You can drag and drop files from the PC to the folder on the PhotoFrame. 2 E n g lish However, we do not guarantee the operations for all types of memory card media. After all copy and save actions are complete, disconnect the USB cable from the PC and the PhotoFrame. Turn on the PhotoFrame Note • You can only turn off the PhotoFrame after all copy and save actions are complete. » Photos in the storage device are displayed in slideshow mode.
4 Use your Digital PhotoFrame Display photos Note • You can play only JPEG photos on the PhotoFrame. 1 » Photos in the album are displayed in thumbnail mode. 4 Press to start slideshow play. • In slideshow mode, press / to display the next/previous photo. • In slideshow mode, press to toggle between slideshow, browse, calendar, and Kiddy Clock (for SFP2107 and SPF2207) mode. Two options for Kiddy Clock (SPF2107): • Princess In the main menu, select [Photos] and then press OK to confirm.
Browse photos in thumbnail mode and access photo menu E n g lish Two options for Kiddy Clock (SPF2207): • Butterfly You can browse multiple photos in thumbnail mode. In thumbnail mode, you can access the photo menu to edit photos. • • • • In the main menu, select [Photos] and then press OK to confirm. • In Slideshow or Browse mode, you can press OK to browse photos in thumbnail mode. 2 Select a photo source, and then press OK to confirm. 3 Select an album, and then press OK to confirm.
5 Press to access [Photo Menu] and manage the photo. Select a photo frame 1 In [Photo Menu], select [Frames] and then press OK to confirm. 2 Select a frame, and then press OK to confirm. Tip • If the number of photos in the album is over 16, you can press / to move to the next/previous 16 photos. Rotate a photo Select a photo effect 1 In [Photo Menu], select [Photo Effects] and then press OK to confirm. 2 Select an effect, and then press OK to confirm.
Press to zoom in a photo. • Press to zoom out a photo. 3 Press / / / to crop the photo, and then press OK to confirm. 4 Select [Yes], and then press OK to confirm. 3 Select [New Album], and then press OK to confirm. » A keypad is displayed. 4 To enter the new name (up to 24 characters), select an alphabet/number and then press OK to confirm. • To switch between uppercase and lowercase, select [abc] on the displayed keypad and then press OK to confirm.
» A confirmation message is displayed. Play video Note • You can play only M-JPEG video files (in *.avi format) on the PhotoFrame. • For best compatibility, you can use bundled PC software (for Windows) to transfer video files to your PhotoFrame and play. 4 1 In the main menu, select [Video] and then press OK to confirm. 2 Select a source, and then press OK to confirm. 3 Select an album/folder, and then press OK to confirm. • To select files in a sub-folder, repeat step 3.
Select a file to play. • To select all files, press and hold OK. 5 Press to start play. During play, To stop, press and hold . To pause, press OK. To resume, press OK again. To play in full screen, press . To stop play in full screen, press . To adjust volume, press / . To select the next/previous file, press / . To mute play, press and hold until the icon is displayed. To change repeat mode, press repeatedly.
Play background music 1 In the main menu, select [Music] and then press OK to confirm. 2 Select a source, and then press OK to confirm. 7 Select [Yes], and then press OK to start play. Copy/Delete photos or files You can copy or delete a photo or a music/ video file on the PhotoFrame. Caution • Never remove a storage device before the copy or delete action completes. Before you copy or delete a file, 3 Select an album/folder, and then press OK to confirm. • To select files in a sub-folder, repeat step 3.
1 In the menu list, select [Copy to], and then press OK to confirm. 2 Select a target folder, and then press OK to start copy. E n g lish To copy, Tip • When there is not enough memory to store more images, an error message is displayed. To delete, 1 In the menu list, select [Delete] and then press OK to confirm.
5 Slideshow Select a transition effect 1 In the main menu, select [Slideshow] and then press OK to confirm. 2 Select [Transition Effect], and then press OK to confirm. 3 Select a transition effect, and then press OK to confirm. Select slideshow sequence You can display the slideshow in sequence or randomly. 1 2 In the main menu, select [Slideshow] and then press OK to confirm. Select [Slideshow sequence], and then press OK to confirm.
Display collage photos 1 In the main menu, select [Slideshow] and then press OK to confirm. 1 In the main menu, select [Slideshow] and then press OK to confirm. 2 Select [Frequency], and then press OK to confirm. 2 Select [Collage], and then press OK to confirm. 3 Select a transition time, and then press OK to confirm. 3 Select [Multi], and then press OK to confirm. 4 5 6 Select a layout. 7 Press (Right) to select [Photo 1]. Press (Right) again to access the photo source options.
8 Repeat steps 5 to 7 until all photos are selected for the format. » If you select [Auto fit], the PhotoFrame extends a photo to fill the screen with picture distortion. 9 Press to start collage display. • To stop collage display, select [Slideshow] > [Collage] > [Single] and then press OK to confirm. Tip • • If you select a collage layout, the PhotoFrame displays a static collage and the slideshow mode is deactivated.
Select on-screen language 1 2 Adjust display brightness You can set the brightness of the PhotoFrame to achieve the best view. 1 In the main menu, select [Setup] and then press OK to confirm. In the main menu, select [Setup] and then press OK to confirm. 2 Select [Brightness], and then press OK to confirm. Select [Language], and then press OK to confirm. 3 Press / to adjust brightness, and then press OK to confirm. 3 Select [Language Setting], and then press OK to confirm.
Protect/Unprotect content of memory card Set time and date 1 In the main menu, select [Setup] and then press OK to confirm. 2 Select [Time and Date], and then press OK to confirm. 3 Select [Set time] / [Set date], and then press OK to confirm. You can enable the delete function on a storage device available on the PhotoFrame. To avoid deleting photos on a storage device, you can also disable the delete function on a storage device. 1 In the main menu, select [Setup] and then press OK to confirm.
Press / / / and OK to enter the current time/date, and then press OK to confirm. 2 Select [Time and Date], and then press OK to confirm. 3 Select [Set time format] / [Set date format], and then press OK to confirm. 4 Select the time/date format, and then press OK to confirm. E n g lish 4 Set time and date format You can set the format of the time and date displayed on the PhotoFrame. 1 In the main menu, select [Setup] and then press OK to confirm.
Show clock 3 Select [Show clock], and then press OK to confirm. 4 Select an option, and then press OK to confirm. • [No clock] (No clock is displayed.) • [In slideshow] (Clock is displayed.) • [Both] (Both clock and calendar are displayed.) You can show clock or calendar in slideshow on the PhotoFrame. 1 2 In the main menu, select [Setup] and then press OK to confirm. Select [Time and Date], and then press OK to confirm.
1 In the main menu, select [Setup] and press OK to confirm. 4 To enter the new name (up to 24 characters), select an alphabet/number and then press OK to confirm. • To switch between uppercase and lowercase, select [abc] on the displayed keypad and then press OK to confirm. 5 When the name is complete, select [Enter] and then press OK to confirm. Set event time and date Note • Ensure that you set the current time and date of the 2 PhotoFrame before you set time and date for an event reminder.
2 3 Select [Event Reminder], and then press OK to confirm. Select a reminder, and then press OK to confirm. 4 Select [Set time] / [Set date], and then press OK to confirm. 5 Press / / / and OK to set the time/ date, and then press OK to confirm. Tip • When the reminder alerts, you can press any button once to stop the reminder. To stop the snooze function, press the same button twice. 26 EN Set on/off a reminder 1 In the main menu, select [Setup] and then press OK to confirm.
Select a reminder, and then press OK to confirm. 5 Select [Yes], and then press OK to confirm. E n g lish 3 Select a reminder photo You can select a photo to display for a reminder. Each event reminder activates the latest defined photo only. If there is no defined photo, the reminder takes the default Philips start up photo. 4 1 In the main menu, select [Setup] and then press OK to confirm. 2 Select [Event Reminder], and then press OK to confirm. Select [Set], and then press OK to confirmn.
3 4 Select a reminder, and then press OK to confirm. Select [Photo], and then press OK to confirm. 5 Select a photo source, and then press OK to confirm. 6 Select a photo, and then press OK to confirm. 28 EN Set snooze 1 In the main menu, select [Setup] and then press OK to confirm. 2 Select [Event Reminder], and then press OK to confirm.
Select [Snooze], and then press OK to confirm. 2 Select [Smart power], and then press OK to confirm. 4 Select an options, and then press OK to confirm. 3 Select [Set time], and then press OK to confirm. 4 Select [Weekday] / [Weekend], and then press OK to confirm. Set display auto on/off by time You can configure the time for the PhotoFrame to turn on or off the display automatically. Note • Ensure that you set the current time and date of the PhotoFrame before you set the auto on/off function.
5 6 Select [Auto on] / [Auto off], and then press OK to confirm. • To cancel [Auto on] / [Auto off], select [Set On/Off] > [Off]. Set on Demo 1 In the main menu, select [Setup] and then press OK to confirm. 2 Select [DEMO], and then press OK to confirm. 3 Select [On], and then press OK to confirm. Press / / / and OK to set the time for auto-on/auto-off function, and then press OK to confirm.
Set button sound You can display photos in the correct orientation depending the horizontal/vertical orientation of the PhotoFrame. 1 In the main menu, select [Setup] and then press OK to confirm. 2 Select [Set Beep], and then press OK to confirm. 3 Select [On] to turn on the button sound, and then press OK to confirm. • To turn off the button sound, select [Off] and then press OK to confirm. 1 2 3 In the main menu, select [Setup] and then press OK to confirm.
View status of the PhotoFrame Set to factory default 1 In the main menu, select [Setup] and then press OK to confirm. 2 Select [Settings], and then press OK to confirm. 3 Select [Default], and then press OK to confirm. You can find the free space, connected media, and the firmware version of the PhotoFrame. 1 2 In the main menu, select [Setup] and then press OK to confirm. Select [Status]. » The status of the PhotoFrame is displayed on the right of the screen.
Note • Product information is subject to change without prior notice. Picture/Display • Viewing angle: @ C/R > 10, 140° (H)/100° (V) • Lifetime, to 50% brightness: 20000 hr • Aspect ratio: 4:3 • Panel resolution: 800 x 600 • Brightness (typical): 250 cd/m² • Contrast ratio (typical): 300:1 Audio feature • Audio supported format: MP3 (MPEG Audio Layer III) • Bit rate: 16 ~ 320 Kbps • Sample rate: 8 ~ 48 KHz • Speaker output power (RMS): 0.8 W Video feature • Video supported format: *.
• • • • 34 Plug & Play Compatibility: Windows Vista, Windows 2000/XP or later Regulatory Approvals: BSMI, C-Tick, CCC, CE, GOST, PSB, Switzerland Other convenience: Kensington lock compatible On-Screen Display languages: English, Spanish, German, French, Italian, Dutch, Danish, Russian, Simplified Chinese, Traditional Chinese, Portuguese EN
Is the LCD screen touch-enabled? The LCD screen is not touch-enabled. Use the buttons on the back to control the PhotoFrame. Can I switch different slideshow photos by using different memory cards? Yes. When a memory card is connected to the PhotoFrame, you can play photos on the specific memory card in slideshow mode. Will the LCD be damaged, if I keep showing the same photo for a long time? No. The PhotoFrame can display the same photo continuously for 72 hours without any damage to the LCD screen.
9 Glossary A Aspect ratio Aspect ratio refers to the length to height ratio of TV screens. The ratio of a standard TV is 4:3, while the ratio of a high-definition or wide TV is 16:9. The letter box allows you to enjoy a picture with a wider perspective on a standard 4:3 screen. C CF Card CompactFlash card. A memory card that uses flash memory to store data on a small card.
© 2009 Koninklijke Philips Electronics N.V. All rights reserved. UM_V1.